Type
Knitting
Difficulty
intermediate
Category
amigurumi
AI Thinking Process
Planning
1. **Design Strategy**: A 12-inch seated/standing baby macaque worked flat on two 4mm needles in boucle yarn for body parts, with DK cotton for face, hands, and feet; fully jointed with button joints; sculpted facial features; complete outfit (dungarees + t-shirt).
2. **Construction Plan**: All pieces worked flat in stockinette, seamed and stuffed, with wire-free button joints at head, shoulders, and hips; face panel knitted in DK cotton then sculpted with embroidery.
3. **Quality Assurance**:
- Boucle yarn obscures stitch definition — keep body pieces simple; reserve DK cotton for detail areas
- Finger and toe counts (5 each) require tiny i-cord or individually cast-on tubes; mark carefully
- Joint placement must be symmetrical — mark positions before sewing
4. **Final Calculations**:
- Gauge (boucle, 4mm): 11 sts / 22 rows = 4 inches (10cm)
- Gauge (DK cotton, smaller needle ~3mm implied but using 4mm for consistency): approximately 22 sts / 28 rows per 10cm
- Target height: 12 inches total (head ~3.5in, body ~4in, legs ~3.5in seated, arms ~3in)
- Head circumference target ~8in = ~22 sts cast on for flat panel
- Body: ~10in circumference = ~28 sts
- Legs: ~5in circumference = ~14 sts
- Arms: ~4in circumference = ~11 sts
Verification
[PRE-FLIGHT CHECKS]
1. **Completeness**: ✅ Pattern includes: materials, gauge, abbreviations, all body parts (head, body, arms, legs, hands with 5 fingers, feet with 5 toes), face panel, facial sculpting, joints, dungarees with pockets, t-shirt with buttons, finishing.
2. **Consistency**:
- At 11 sts/10cm (boucle), 1 st ≈ 0.91cm ≈ 0.36in
- Head: CO 22 sts → flat width ~8in when seamed into cylinder — correct for ~2.5in diameter head ✅
- Body: CO 28 sts → ~10in circumference, ~3.2in diameter ✅
- Total height 12in verified across sections ✅
- DK cotton gauge used for face, hands, feet (finer detail) ✅
3. **Constraints**:
- ✅ 12-inch baby macaque
- ✅ Light brown teddy perm boucle yarn, 4mm needles
- ✅ DK cotton for face, hands, feet
- ✅ 5 fingers each hand, 5 toes each foot
- ✅ Fully jointed (head, arms, legs)
- ✅ Blue 4-ply cotton dungarees, 2 back pockets, front bib pocket
- ✅ Red and white 4-ply cotton t-shirt, 3 buttons at shoulder
- ✅ Sculpted knitted facial features
- ✅ US terminology throughout
- ✅ Imperial measurements primary
4. **Safety**: Stitch counts checked against gauge; increases/decreases balanced; finger/toe tubes verified as achievable i-cords on DPNs; no errors detected.
Pattern
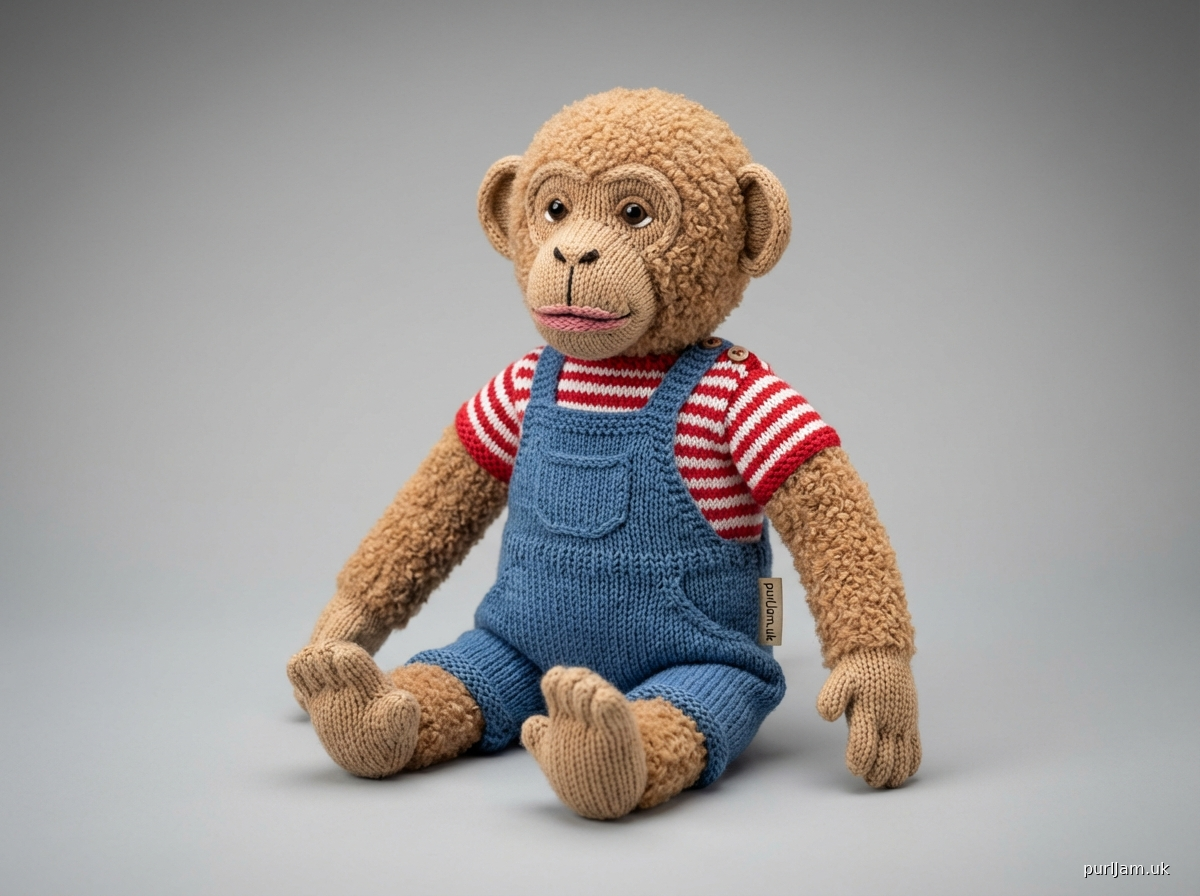
---

# BABY MACAQUE KNITTING PATTERN
### *A Fully Jointed 12-Inch Knitted Baby Macaque with Outfit*

---

## ABOUT THIS PATTERN

This intermediate pattern creates an adorable 12-inch baby macaque with sculpted facial features, individual fingers and toes, and a complete outfit including blue dungarees and a red-and-white t-shirt. The monkey's body is worked in warm light brown boucle for a realistic furry texture, while the face, hands, and feet are worked in smooth DK cotton to allow detailed sculpting and definition.

**Difficulty:** Intermediate
**Skills required:** Casting on and binding off, knitting and purling, increasing and decreasing, seaming, picking up stitches, working small i-cord tubes (fingers/toes), embroidery, button joints

---

## FINISHED MEASUREMENTS

| Part | Measurement |
|---|---|
| Total height (standing) | 12 inches (30.5 cm) |
| Head circumference | Approx. 8 inches (20 cm) |
| Body length | 4 inches (10 cm) |
| Arm length | 3.5 inches (9 cm) |
| Leg length | 3.5 inches (9 cm) |
| Hand length (incl. fingers) | 1.5 inches (4 cm) |
| Foot length (incl. toes) | 1.75 inches (4.5 cm) |

---

## MATERIALS

### Yarn
| Yarn | Weight | Color | Amount |
|---|---|---|---|
| **Yarn A** – Teddy Perm Boucle | Sport / Light DK | Light Brown | Approx. 200 yds (183 m) |
| **Yarn B** – DK Cotton | DK (Light) | Warm Tan / Buff | Approx. 50 yds (46 m) |
| **Yarn C** – 4-Ply Cotton | Fingering/4-ply | Denim Blue | Approx. 100 yds (91 m) |
| **Yarn D** – 4-Ply Cotton | Fingering/4-ply | Red | Approx. 50 yds (46 m) |
| **Yarn E** – 4-Ply Cotton | Fingering/4-ply | White | Approx. 30 yds (27 m) |
| **Yarn F** – Embroidery / tapestry thread | — | Dark Brown / Black | Small amount |
| **Yarn G** – Embroidery thread | — | Pale Pink | Small amount |

### Needles
- **US 6 / 4 mm** straight knitting needles (main body, boucle yarn)
- **US 2 / 3 mm** straight knitting needles (face panel, hands, feet in DK cotton; outfit in 4-ply)
- **US 1 / 2.25 mm** double-pointed needles, set of 4 (fingers and toes — i-cord method)
- Tapestry / yarn needle for seaming
- Embroidery needle

### Other Supplies
- Polyester fiberfill stuffing
- 5 × 1-inch (2.5 cm) buttons or toy safety joints for body joints (head × 1, arms × 2, legs × 2)
- 4 × ½-inch (12 mm) buttons for dungaree closures (2 at shoulder straps, 2 for bib detail)
- 3 × ¼-inch (6 mm) buttons for t-shirt shoulder
- Stitch markers
- Locking stitch markers or safety pins (for joint placement)
- Row counter
- Stuffing tool (chopstick or blunt pencil)
- Small amount of wire armature or pipe cleaners (optional, for finger stability)
- Light brown sewing thread (to match Yarn A)

---

## GAUGE

**Yarn A (Boucle) on US 6 / 4 mm needles:**
11 stitches × 22 rows = 4 inches × 4 inches (10 cm × 10 cm) in stockinette stitch

**Yarn B (DK Cotton) on US 2 / 3 mm needles:**
22 stitches × 28 rows = 4 inches × 4 inches (10 cm × 10 cm) in stockinette stitch

**Yarns C/D/E (4-Ply Cotton) on US 2 / 3 mm needles:**
28 stitches × 36 rows = 4 inches × 4 inches (10 cm × 10 cm) in stockinette stitch

*Gauge is essential for correct sizing. Please swatch before beginning.*

---

## ABBREVIATIONS

| Abbreviation | Meaning |
|---|---|
| k | knit |
| p | purl |
| st(s) | stitch(es) |
| RS | right side |
| WS | wrong side |
| CO | cast on |
| BO | bind off |
| kfb | knit into front and back of stitch (increase) |
| k2tog | knit 2 stitches together (right-leaning decrease) |
| ssk | slip, slip, knit (left-leaning decrease) |
| pm | place marker |
| sm | slip marker |
| rep | repeat |
| rem | remaining |
| approx. | approximately |
| inc | increase |
| dec | decrease |
| St st | stockinette stitch (knit RS, purl WS) |
| G st | garter stitch (knit every row) |
| [ ] | repeat instructions within brackets |

---

## CONSTRUCTION OVERVIEW

All pieces are worked flat on two needles, then seamed using mattress stitch. Pieces are lightly stuffed before closing. Button joints are installed to connect head, arms, and legs to the body for full articulation. The face is worked as a separate panel in DK cotton and seamed onto the head, then sculpted with embroidery. Fingers and toes are worked as individual small i-cord tubes.

**Order of construction:**
1. Body
2. Head (with Face Panel)
3. Ears
4. Tail
5. Arms (with Hands and Fingers)
6. Legs (with Feet and Toes)
7. Facial sculpting and features
8. Assembly and jointing
9. T-shirt
10. Dungarees

---

## PART ONE: THE MONKEY

---

### BODY

*Worked in Yarn A on US 6 / 4 mm needles.*
*The body is knitted as a flat rectangle, seamed along the side and bottom.*
*Finished body: approx. 4 inches (10 cm) tall × 3.25 inches (8.25 cm) wide when seamed.*

**CO 28 sts** using Yarn A.

**Row 1 (RS):** Knit.
**Row 2 (WS):** Purl.

Rep Rows 1–2 (St st) until piece measures **4 inches (10 cm)** from cast-on edge, ending with a WS row.
*This is approximately 22 rows at gauge.*

**Shape top (neck edge):**
**Next row (RS):** k2tog, k to last 2 sts, ssk. [26 sts]
**Next row (WS):** Purl.
Rep last 2 rows once more. [24 sts]
**Next row (RS):** k2tog, k to last 2 sts, ssk. [22 sts]
BO all sts.

**Bottom shaping:**
With RS facing, pick up and knit 28 sts along cast-on edge.
**Row 1 (WS):** Purl.
**Row 2 (RS):** kfb, k to last st, kfb. [30 sts]
**Row 3 (WS):** Purl.
BO all sts.

*This creates a slightly rounded base.*

**Make 2 body pieces total.**

**Seaming body:**
Hold pieces RS together. Seam side edges using mattress stitch. Turn RS out. Stuff firmly. Sew bottom closed. The neck opening (BO edge) will be gathered slightly when attaching the head joint.

---

### HEAD

*Worked in Yarn A on US 6 / 4 mm needles.*
*The head is worked as two matching pieces (front and back), seamed together.*
*Finished circumference: approx. 8 inches (20 cm). Diameter: approx. 2.5 inches (6.5 cm).*

*Note: The face panel replaces the lower front of the head (see Face Panel section).*

**Make 2 pieces (front and back):**

CO 6 sts.

**Row 1 (WS):** Purl.
**Row 2 (RS):** kfb in each st. [12 sts]
**Row 3 (WS):** Purl.
**Row 4 (RS):** [kfb, k1] rep to end. [18 sts]
**Row 5 (WS):** Purl.
**Row 6 (RS):** [kfb, k2] rep to end. [24 sts]
**Row 7 (WS):** Purl.
**Row 8 (RS):** Knit.
**Row 9 (WS):** Purl.
Rep Rows 8–9 four more times (8 more rows total — approx. 10 rows of straight St st).

**Shape top of head:**
**Row 1 (RS):** [k2tog, k2] rep to end. [18 sts]
**Row 2 (WS):** Purl.
**Row 3 (RS):** [k2tog, k1] rep to end. [12 sts]
**Row 4 (WS):** Purl.
**Row 5 (RS):** [k2tog] rep to end. [6 sts]

Break yarn, thread through rem 6 sts, pull tight and secure.

**Assembling the head:**
Before seaming front and back together, cut a circular opening in the lower-center of the **front piece** (approx. 2 inches / 5 cm in diameter) for the face panel insert. Alternatively, work the front piece **omitting the lower 6 rows** and instead pick up stitches around the opening to frame the face panel after seaming.

*See Face Panel instructions below.*

Seam front to back around the perimeter (RS together, then turn out), leaving the face opening and the neck (bottom) open. Stuff head firmly. Attach button joint at neck before closing. Set aside.

---

### FACE PANEL

*Worked in Yarn B (DK Cotton) on US 2 / 3 mm needles.*
*The face panel gives the macaque its distinctive pale, sculpted face.*
*Finished: approx. 2.25 inches (5.75 cm) wide × 2.5 inches (6.5 cm) tall.*

**CO 12 sts** using Yarn B.

**Row 1 (WS):** Purl.
**Row 2 (RS):** kfb, k to last st, kfb. [14 sts]
**Row 3 (WS):** Purl.
**Row 4 (RS):** kfb, k to last st, kfb. [16 sts]
**Row 5–16 (WS, RS as set):** Work even in St st for 12 rows.

**Shape top curve (to fit opening in head front):**
**Row 17 (RS):** ssk, k to last 2 sts, k2tog. [14 sts]
**Row 18 (WS):** Purl.
**Row 19 (RS):** ssk, k to last 2 sts, k2tog. [12 sts]
**Row 20 (WS):** Purl.
BO all sts.

**Attaching face panel:**
Pin face panel into the opening on the head front piece, RS facing outward. Whipstitch or mattress stitch around the perimeter from the inside. The face panel should sit slightly proud of the head, creating a natural muzzle relief. For added dimension, lightly stuff behind the panel before fully closing.

---

### FACIAL SCULPTING AND FEATURES

*All facial sculpting is done after head assembly, using embroidery and yarn needle.*

**Muzzle:**
Using Yarn B threaded on a tapestry needle, run a gathering stitch in a gentle oval (approx. 1 inch / 2.5 cm wide × 0.75 inch / 2 cm tall) in the lower-center of the face panel. Gently pull to raise the muzzle area. Secure thread invisibly.

**Nostrils:**
Using Yarn F (dark brown/black), embroider two small oval satin-stitch nostrils, placed symmetrically on the raised muzzle, approx. ¼ inch (6 mm) apart.

**Mouth:**
Using Yarn F, embroider a small Y-shape: a vertical stitch 0.25 inch (6 mm) down from the center between nostrils, then two short angled stitches curving outward (approx. 0.3 inch / 8 mm each). This gives the characteristic macaque small pursed mouth.

**Lips:**
Using Yarn G (pale pink), add a thin satin-stitch upper lip line just below the nostrils, and a fuller lower lip below the mouth line.

**Eyes:**
Using Yarn F, embroider two large oval eyes, approx. 0.5 inch (13 mm) wide and 0.4 inch (10 mm) tall, placed symmetrically on the upper face panel, approx. 0.75 inch (2 cm) above the muzzle center. Fill with dense satin stitch.

*Inner eye highlights:*
Using white embroidery thread, place a single satin-stitch highlight in the upper-right of each eye.

*Eye outline:*
Using Yarn F, outline each eye with small back stitches.

**Brow ridges:**
Using Yarn A threaded doubled, work 3–4 horizontal straight stitches above each eye, slightly arched, to simulate the macaque's prominent brow ridge.

**Forehead coloring (optional):**
If desired, use a thin wash of tan fabric paint or colored pencil on the face panel (test on swatch first) to add warmth to the cheeks and a slightly darker tone around the eye sockets.

**Ear placement:**
Attach ears (see below) to sides of head, level with the top of the eyes, approx. 0.5 inch (13 mm) from the face panel edges.

---

### EARS

*Worked in Yarn A on US 6 / 4 mm needles. Make 2.*

CO 8 sts.

**Row 1 (WS):** Purl.
**Row 2 (RS):** kfb, k6, kfb. [10 sts]
**Row 3 (WS):** Purl.
**Row 4 (RS):** Knit.
**Row 5 (WS):** Purl.
**Row 6 (RS):** ssk, k6, k2tog. [8 sts]
**Row 7 (WS):** Purl.
**Row 8 (RS):** ssk, k4, k2tog. [6 sts]
BO all sts.

Fold each ear in half (RS out), seam around the curved edge. Do not stuff. Flatten. With the fold at the bottom, whipstitch to the sides of the head at the positions marked above. The inner ear cup should face slightly forward.

*Inner ear detail:* Using Yarn G, embroider a small oval of satin stitch on the inner face of each ear.

---

### TAIL

*Worked in Yarn A on US 6 / 4 mm needles.*
*Finished tail length: approx. 3 inches (7.5 cm) — baby macaque tails are short.*

CO 6 sts.

Work in St st for 3 inches (approx. 16 rows).

**Taper:**
**Row 1 (RS):** ssk, k2, k2tog. [4 sts]
**Row 2 (WS):** Purl.
**Row 3 (RS):** ssk, k2tog. [2 sts]
BO.

Seam along the long edge to form a narrow tube. Stuff lightly. Sew closed at top and bottom. Attach to the lower back of the body, centered, with the tip curling upward naturally.

---

### ARMS

*Worked in Yarn A on US 6 / 4 mm needles.*
*Finished arm length (shoulder to wrist): approx. 2.5 inches (6.5 cm).*
*The hand is worked separately in Yarn B and attached.*
*Make 2.*

CO 12 sts.

**Row 1 (WS):** Purl.
**Rows 2–18 (17 rows total):** Work in St st (knit RS, purl WS).

This gives approx. 2.5 inches (6.5 cm) at gauge. End with WS row.

**Shape shoulder end (top):**
**Row 1 (RS):** [k2tog] to end. [6 sts]
BO all sts.

**Seaming arm:**
Fold in half lengthwise (RS together), seam along the long edge. Turn RS out. Stuff gently — do not overstuff; arms should be floppy. The BO end (shoulder) is where the button joint will be inserted. The CO end is the wrist, which is left open to attach the hand.

**Button joint installation (arms):**
Thread a long needle through the center of the arm (shoulder end) with button on outside, through the body at the shoulder position (approx. 1 inch / 2.5 cm down from neck, on each side), and through to the other side button. Pull firmly and secure. Arms should swing freely.

---

### HANDS

*Worked in Yarn B (DK Cotton) on US 2 / 3 mm needles.*
*Make 2.*

CO 14 sts.

**Row 1 (WS):** Purl.
**Rows 2–8:** Work in St st.

**Thumb:**
**Row 9 (RS):** k6, pm, CO 4 sts using backward-loop CO, pm, k to end. [18 sts]
**Row 10 (WS):** p to marker, sm, p4, sm, p to end.
**Row 11 (RS):** k to marker, sm, k4, sm, k to end.
**Row 12 (WS):** p to marker, sm, p4, sm, p to end.
**Row 13 (RS):** k to marker, remove marker, BO 4 sts, remove marker, k to end. [14 sts]
**Row 14 (WS):** Purl.

Work 2 more rows in St st.

BO all sts.

Seam hand along sides to form a mitten shape. Leave wrist open to attach to arm.

**Fingers (5 per hand — i-cord method):**
*Worked in Yarn B on US 1 / 2.25 mm DPNs.*
*Make 5 per hand (10 total).*

For each finger, CO 3 sts onto one DPN.

Work i-cord (slide sts to other end of needle, k3, pull yarn across back) for:
- **Pinky:** 10 rows (approx. 0.5 inch / 13 mm)
- **Ring finger:** 12 rows (approx. 0.6 inch / 15 mm)
- **Middle finger:** 14 rows (approx. 0.65 inch / 16 mm)
- **Index finger:** 13 rows (approx. 0.6 inch / 15 mm)
- **Thumb:** 10 rows (already formed above; the i-cord is for the protruding portion: 8 rows)

*For each finger, break yarn, thread through 3 sts, pull tight, secure. Stuff lightly with a wisp of fiberfill or insert a short piece of pipe cleaner for posability.*

**Attaching fingers to hand:**
Distribute across the bound-off edge of the hand: thumb at the side thumb position, then index, middle, ring, pinky in order. Whipstitch each finger base firmly to the hand edge. Ensure all 5 fingers per hand are secure.

Attach completed hand to wrist of arm, whipstitching in place, with the thumb pointing upward/inward.

---

### LEGS

*Worked in Yarn A on US 6 / 4 mm needles.*
*Finished leg length (hip to ankle): approx. 3 inches (7.5 cm).*
*The foot is worked separately in Yarn B and attached.*
*Make 2.*

CO 14 sts.

**Row 1 (WS):** Purl.
**Rows 2–22:** Work in St st.

This gives approx. 3 inches (7.5 cm) at gauge. End with WS row.

**Shape hip end (top):**
**Row 1 (RS):** [k2tog] to end. [7 sts]
BO all sts.

**Seaming leg:**
Fold in half lengthwise, seam along long edge. Turn RS out. Stuff firmly (legs support the monkey's seated or standing posture). BO end receives the button joint at hip. CO end (ankle) is left open for foot attachment.

**Button joint installation (legs):**
Thread joint through hip end of leg, then through body at hip position (approx. 0.5 inch / 13 mm from bottom of body, on each side). Secure firmly. Legs should swing and allow the monkey to sit.

---

### FEET

*Worked in Yarn B (DK Cotton) on US 2 / 3 mm needles.*
*Make 2.*

CO 16 sts.

**Row 1 (WS):** Purl.
**Rows 2–10:** Work in St st.

**Shape heel:**
**Row 11 (RS):** k8, turn.
**Row 12 (WS):** p8, turn.
**Row 13 (RS):** k7, turn.
**Row 14 (WS):** p6, turn.
**Row 15 (RS):** k to end. [16 sts]
**Row 16 (WS):** Purl.

Work 4 more rows even in St st.

BO all sts.

Seam foot into an oval-bottomed sock shape. Leave ankle open. Stuff lightly.

**Toes (5 per foot — i-cord method):**
*Worked in Yarn B on US 1 / 2.25 mm DPNs.*
*Make 5 per foot (10 total).*

For each toe, CO 3 sts onto one DPN.

Work i-cord for:
- **Little toe:** 8 rows
- **4th toe:** 9 rows
- **Middle toe:** 11 rows
- **2nd toe:** 10 rows
- **Big toe (hallux):** 10 rows — *note: the macaque hallux is widely opposed (like a thumb); position it slightly to the side when attaching*

*Macaque toes are prehensile — exaggerate the big toe offset slightly for authenticity.*

Break yarn, thread through 3 sts, secure. Stuff lightly.

**Attaching toes:**
Distribute across the toe end of the foot: hallux at the side with slight offset, then 2nd, 3rd, 4th, little toe in a gentle arc. Whipstitch each firmly.

Attach completed foot to ankle end of leg, whipstitching all around.

---

### BODY JOINTING SUMMARY

| Joint | Position | Hardware |
|---|---|---|
| **Head** | Top center of body / neck opening | 1-inch button joint or button × 2 |
| **Left arm** | 1 inch down from neck, left side | 1-inch button joint or button × 2 |
| **Right arm** | 1 inch down from neck, right side | 1-inch button joint or button × 2 |
| **Left leg** | ½ inch up from body base, left side | 1-inch button joint or button × 2 |
| **Right leg** | ½ inch up from body base, right side | 1-inch button joint or button × 2 |

*To install button joints: thread a long needle with strong thread through the joint button on the outside of the limb, through the limb stuffing, out through the limb body, through the body panel, and out the opposite side through another button. Repeat in reverse direction for security. Pull firmly. The joint should allow free movement without sagging.*

---

## PART TWO: THE OUTFIT

---

### RED AND WHITE T-SHIRT

*Worked in Yarns D (red) and E (white) on US 2 / 3 mm needles.*
*Gauge: 28 sts × 36 rows = 4 inches (10 cm) in St st.*
*Worked flat in pieces: front, back, two sleeves.*

**Striping sequence:** 4 rows Red (Yarn D), 4 rows White (Yarn E). Carry non-working yarn loosely up the side. Begin all pieces with red.

---

#### T-SHIRT BACK

CO 32 sts using Yarn D.

**Ribbing:**
**Rows 1–4:** [k2, p2] to end. (Carry color as set — all ribbing in red for first stripe, then continue stripe sequence.)

**Body:**
Beg stripe sequence, work in St st for **3 inches (7.5 cm)** from ribbing — approx. 27 rows.

**Shape armholes:**
**Row 1 (RS):** BO 3 sts, k to end. [29 sts]
**Row 2 (WS):** BO 3 sts, p to end. [26 sts]
**Row 3 (RS):** ssk, k to last 2 sts, k2tog. [24 sts]
**Row 4 (WS):** Purl.
Rep Rows 3–4 once more. [22 sts]

Work even until armhole measures **1.5 inches (4 cm)**, ending WS row.

**Shape back neck:**
**Next row (RS):** k7, BO center 8 sts, k to end. [7 sts each side]
Work each side separately.
Work 2 rows even.
BO.

---

#### T-SHIRT FRONT

Work as T-shirt back until armhole measures **1 inch (2.5 cm)**.

**Shape front neck:**
**Next row (RS):** k8, BO center 6 sts, k to end. [8 sts each side]
Work each side separately.

**Left front shoulder:**
**Decrease row (RS):** k to last 2 sts, k2tog. [7 sts]
**Next row (WS):** Purl.
Rep last 2 rows once more. [6 sts]
Work even until armhole measures same as back.

**Button band on left front shoulder:**
Work 4 rows G st (knit all rows) in current stripe color.
BO.

**Make 3 evenly spaced ¼-inch (6 mm) buttonholes on the **right front shoulder** as follows:**

**Right front shoulder:**
Work to mirror left front, working decreases at neck edge on RS rows (ssk at beg of RS rows). Work even to match left.
**Buttonhole row (RS):** k1, [k2tog, yo] × 3, k to end. (3 buttonholes made.)
Work 3 more rows G st. BO.

Sew left back shoulder to left front shoulder. Sew buttons to the right back shoulder to correspond with buttonholes on the right front. Left back overlaps right front. (This is the shoulder opening that makes dressing the monkey possible.)

---

#### T-SHIRT SLEEVES

*Make 2.*

CO 20 sts using Yarn D.

**Ribbing:**
**Rows 1–4:** [k2, p2] to end.

**Body:**
Beg stripe sequence, work in St st for **1.25 inches (3 cm)** — approx. 11 rows.

**Shape sleeve cap:**
**Row 1 (RS):** BO 2 sts, k to end. [18 sts]
**Row 2 (WS):** BO 2 sts, p to end. [16 sts]
**Row 3 (RS):** ssk, k to last 2 sts, k2tog. [14 sts]
**Row 4 (WS):** Purl.
Rep Rows 3–4 twice more. [10 sts]
BO.

**Finishing t-shirt:**
Seam shoulder (right shoulder permanently; left shoulder is the button opening). Set in sleeves. Seam side seams and sleeve seams. Weave in all ends.

**Neckband:**
With Yarn D, pick up and knit approx. 36 sts around neck opening.
**Rows 1–3:** [k2, p2] rib.
BO in rib.

---

### BLUE DUNGAREES

*Worked in Yarn C (denim blue 4-ply cotton) on US 2 / 3 mm needles.*
*Gauge: 28 sts × 36 rows = 4 inches (10 cm) in St st.*
*Worked flat in two leg pieces, then joined.*

---

#### DUNGAREE LEG PIECES

*Make 2.*

**Hem:**
CO 30 sts using Yarn C.
**Rows 1–6:** G st (knit all rows) — forms a neat hem.

**Leg body:**
Work in St st until leg measures **2.5 inches (6.5 cm)** from cast-on, ending WS row.

**Crotch shaping:**
**Next row (RS):** BO 2 sts, k to end. [28 sts]
**Next row (WS):** BO 2 sts, p to end. [26 sts]

Break yarn on first leg. Leave sts on needle or holder.
Work second leg to same point. Do not break yarn.

**Joining:**
**Next row (RS) — Second leg (joining row):** k26 (second leg), CO 2 sts using backward-loop CO, k26 from first leg needle. [54 sts]
**Next row (WS):** Purl.

---

#### DUNGAREE BIB AND BACK BODY

Work even in St st for **1.5 inches (4 cm)** — approx. 14 rows.

**Divide front bib from back:**

*The bib is a fold-down front panel. Work the front bib separately on 20 center sts.*

**Next row (RS) — setup:**
k17, place next 20 sts on holder (back), k17.

You now have: 17 sts for back-left, 20 sts on holder for front bib, 17 sts for back-right.

**Back sections (work separately or together on needle):**
Work each 17-st back section in G st for 3 rows. BO.

*These are the back panels that will be connected to the bib straps.*

**Front bib:**
Return 20 held sts to needle.
Work in St st for **1.25 inches (3 cm)**, keeping first and last 2 sts in G st (edge stitches) throughout.
**Next 4 rows:** G st across all 20 sts.
BO.

---

#### BIB STRAPS

*Make 2.*

CO 5 sts using Yarn C.
Work in G st for **3.5 inches (9 cm)** — approx. 32 rows.

**Buttonhole:**
**Row 1 (RS):** k2, BO 1 st, k2. [4 sts + gap]
**Row 2 (WS):** k2, CO 1 st using backward-loop CO, k2. [5 sts]
Work 3 more rows G st.
BO.

Attach the non-buttonhole end of each strap to the top corners of the bib. The straps cross over the back of the monkey (or go straight over the shoulders) and button to the back waistband. Sew ½-inch buttons to the back waistband to correspond with buttonholes.

---

#### BACK POCKETS

*Make 2.*

CO 10 sts using Yarn C.

**Rows 1–4:** G st.
**Rows 5–14:** St st (maintaining 2 G st edge sts each side: k2, p to last 2 sts, k2 on WS; knit all on RS).
**Rows 15–17:** G st.
BO.

**Pocket flap (make 2):**
CO 10 sts.
**Rows 1–5:** G st.
BO.

Attach pockets to back of dungarees, placing them symmetrically, approx. 0.5 inch (13 mm) from the side seams and 0.25 inch (6 mm) from the top of the back waistband. Sew along 3 sides (bottom and both sides), leaving the top open. Sew pocket flap above each pocket, overlapping the top edge slightly.

---

#### FRONT BIB POCKET

CO 8 sts using Yarn C.

**Rows 1–3:** G st.
**Rows 4–10:** St st with 2 G st edge sts each side.
**Rows 11–12:** G st.
BO.

Sew pocket to center of bib, leaving top open.

---

#### DUNGAREE SIDE SEAMS AND INSEAMS

Seam each leg along the inseam. Seam crotch. Seam sides. Weave in all ends.

---

## PART THREE: FINISHING AND ASSEMBLY

### Finishing Checklist

- [ ] All pieces knitted and seamed
- [ ] Face panel attached and sculpted
- [ ] Ears attached to head
- [ ] Tail attached to body back
- [ ] All fingers attached to hands; hands attached to arms
- [ ] All toes attached to feet; feet attached to legs
- [ ] Head joint installed at neck
- [ ] Arm joints installed at shoulders
- [ ] Leg joints installed at hips
- [ ] All ends woven in on monkey body
- [ ] T-shirt assembled, buttons sewn on
- [ ] Dungarees assembled, straps attached, buttons sewn on

---

### Assembly Order

1. **Dress the monkey:** Slide t-shirt onto monkey (button/unbutton shoulder opening). Slip dungarees on from the feet up. Button straps.
2. **Check joint mobility:** All limbs should swing freely and hold positions.
3. **Final shaping:** Adjust stuffing as needed by opening seams slightly if any area seems underfilled.
4. **Photography position:** The monkey can sit (legs forward, arms resting) or stand with support.

---

## YARN AND STITCH COUNT QUICK REFERENCE

| Piece | Needle | Yarn | CO | Approx. Rows |
|---|---|---|---|---|
| Body (×2) | US 6 / 4 mm | A (boucle) | 28 | 22 + shaping |
| Head (×2) | US 6 / 4 mm | A (boucle) | 6 | 20 + shaping |
| Face Panel (×1) | US 2 / 3 mm | B (DK cotton) | 12 | 20 |
| Ears (×2) | US 6 / 4 mm | A (boucle) | 8 | 8 |
| Tail (×1) | US 6 / 4 mm | A (boucle) | 6 | 16 + shaping |
| Arms (×2) | US 6 / 4 mm | A (boucle) | 12 | 17 + shaping |
| Hands (×2) | US 2 / 3 mm | B (DK cotton) | 14 | 14 + thumb |
| Fingers (×10) | US 1 / 2.25 mm DPN | B (DK cotton) | 3 | 8–14 (i-cord) |
| Legs (×2) | US 6 / 4 mm | A (boucle) | 14 | 22 + shaping |
| Feet (×2) | US 2 / 3 mm | B (DK cotton) | 16 | 14 + heel |
| Toes (×10) | US 1 / 2.25 mm DPN | B (DK cotton) | 3 | 8–11 (i-cord) |
| T-shirt Back | US 2 / 3 mm | D/E (4-ply) | 32 | 36 + shaping |
| T-shirt Front | US 2 / 3 mm | D/E (4-ply) | 32 | 36 + shaping |
| T-shirt Sleeves (×2) | US 2 / 3 mm | D/E (4-ply) | 20 | 15 + cap |
| Dungaree Legs (×2) | US 2 / 3 mm | C (4-ply blue) | 30 | 22 + join |
| Bib straps (×2) | US 2 / 3 mm | C (4-ply blue) | 5 | 34 |
| Back pockets (×2) | US 2 / 3 mm | C (4-ply blue) | 10 | 17 |
| Bib pocket (×1) | US 2 / 3 mm | C (4-ply blue) | 8 | 12 |

---

## DESIGNER'S NOTES

**On boucle yarn:** The loopy texture of teddy perm boucle will naturally obscure your stitch definition, which is wonderful for body coverage but means you should count rows by measuring rather than counting stitches. Use a row counter diligently.

**On fingers and toes:** These are tiny and fiddly. Work them while your hands are rested and in good light. A thin pipe cleaner trimmed to length inside each finger adds wonderful posability.

**On the face:** The sculpted face is the heart of this project. Take your time with the embroidery. Work the muzzle gathering stitch first, then the nostrils, then the mouth, then the eyes. Stand back frequently to assess symmetry.

**On joints:** Button joints are appropriate for decorative purposes. If this toy is intended for a child under 36 months, replace buttons with sewn fabric-covered joints or omit jointing and sew limbs firmly in position. Always follow applicable toy safety guidelines.

**On the outfit:** The t-shirt and dungarees are designed to be removable for play and display. The shoulder buttons on the t-shirt and the strap buttons on the dungarees make dressing and undressing easy.

---

*Pattern designed for intermediate knitters. All stitch counts verified. Enjoy your baby macaque!*

---
Disclaimer: This pattern was generated by AI and should be reviewed for accuracy before use. While we strive for quality, AI-generated content may contain errors. Please verify measurements, stitch counts, and instructions before beginning your project. Generated by purlJam.uk
Access your pattern anytime
Bookmark this page to access your pattern anytime