Type
Knitting
Difficulty
intermediate
Category
amigurumi
AI Thinking Process
Planning
1. **Design Strategy**: Baby Sally is a small, cuddly plush doll-style toy worked in stockinette in the round. Beginner-friendly with simple shaping (basic increases/decreases) and embroidered features for safety.
2. **Construction Plan**: Five separate pieces (head, body, 2 arms, 2 legs) worked bottom-up/top-down in the round on DPNs, stuffed, then seamed.
3. **Quality Assurance**:
- Tight tension to hide stuffing (use 3.5 mm needles with worsted).
- Symmetrical limb placement during assembly.
- Secure embroidered features for baby-safe finish.
4. **Final Calculations**: Tension 24 sts × 32 rows = 10 cm in st st. Head: cast on 8, increase to 32, ~9 cm diameter. Body: 24 sts, ~10 cm tall. Arms: 12 sts, ~7 cm. Legs: 14 sts, ~8 cm. Total finished height ~22 cm.
Verification
1. **Completeness**: Materials, tension, abbreviations, all 5 pieces, assembly, finishing — all included.
2. **Consistency**: Stitch counts verified at each round; increases/decreases balance.
3. **Constraints**: UK English, metric-first, beginner-level, worsted yarn, plush toy — all met.
4. **Safety**: Embroidered features recommended (baby-safe). Math checked: head 8→16→24→32, body cast-on 24, limbs proportional.
Pattern
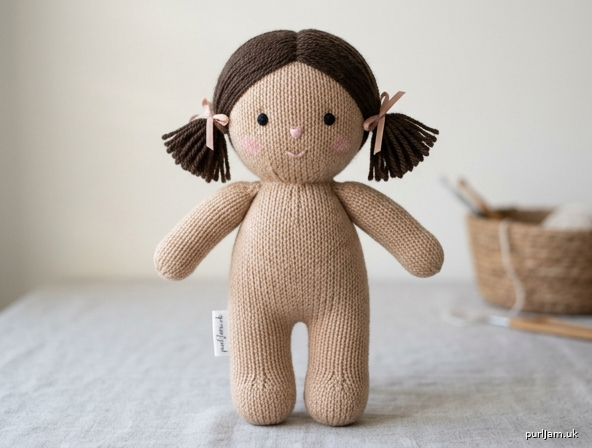
# Baby Sally — Knitted Plush Doll

A sweet, beginner-friendly knitted plush doll, approximately **22 cm (8½")** tall when finished. Worked in the round in stocking stitch using double-pointed needles (DPNs) or the magic loop method. All features are embroidered for safety, making Sally a perfect cuddle companion for little ones.

---

## Skill Level
**Beginner** — if you can knit in the round, increase (kfb), decrease (k2tog), and seam, you can make Baby Sally.

---

## Finished Measurements
- Height: approx. **22 cm (8½")**
- Head circumference: approx. **14 cm (5½")**
- Body width: approx. **10 cm (4")**

---

## Materials

- **Yarn**: Worsted weight (Aran) yarn in your chosen skin colour — approx. **75 g (140 m / 153 yds)**
  - Small amounts of contrast yarn for hair (approx. 15 g) and clothing details if desired
  - Scraps of black and pink yarn or embroidery floss for facial features
- **Needles**: 3.5 mm (UK 9 / US 4) DPNs — set of 4 or 5, **or** one long circular for magic loop
  - *Note: this is 1–2 sizes smaller than the yarn label suggests, to create a tight fabric that won't show stuffing through.*
- **Polyester fibrefill stuffing**: approx. **60–80 g**
- **Tapestry needle** (blunt, large eye)
- **Stitch markers** (1–2)
- **Embroidery needle** for facial features
- **Optional**: small ribbon for a bow

---

## Tension (Gauge)

**24 sts × 32 rows = 10 cm (4")** measured over stocking stitch in the round, after gentle blocking.

Exact tension is not critical for toys, but fabric must be **tight and even** so stuffing does not show through. If you can see stuffing through your swatch, go down a needle size.

---

## Abbreviations (UK terms)

| Abbreviation | Meaning |
|---|---|
| k | knit |
| p | purl |
| st(s) | stitch(es) |
| st st | stocking stitch (k every rnd in the round) |
| rnd(s) | round(s) |
| kfb | knit into front and back of stitch (1 st increased) |
| k2tog | knit two stitches together (1 st decreased) |
| rep | repeat |
| rem | remaining |
| RS / WS | right side / wrong side |

---

## Construction Notes

Baby Sally is made in **5 separate pieces**: head, body, 2 arms, 2 legs. Each is worked in the round in stocking stitch, stuffed firmly, then seamed together with mattress stitch. Facial features and hair are added last.

When dividing stitches onto DPNs, distribute as evenly as possible. Place a marker at the beginning of the round and move it up as you work.

---

## HEAD

Cast on **8 sts**, divide across 3 or 4 DPNs (or magic loop), join to work in the round, being careful not to twist.

- **Rnd 1**: kfb in every st. *(16 sts)* ✓ 8 × 2 = 16
- **Rnd 2**: k all sts.
- **Rnd 3**: (k1, kfb) to end. *(24 sts)* ✓ 16 + 8 = 24
- **Rnd 4**: k all sts.
- **Rnd 5**: (k2, kfb) to end. *(32 sts)* ✓ 24 + 8 = 32
- **Rnds 6–20**: k all sts (15 rnds straight). *(32 sts)*
- **Rnd 21**: (k2, k2tog) to end. *(24 sts)* ✓ 32 − 8 = 24

**Stuff the head firmly now** — it is easier before the opening becomes too small.

- **Rnd 22**: (k1, k2tog) to end. *(16 sts)* ✓ 24 − 8 = 16
- **Rnd 23**: k2tog to end. *(8 sts)* ✓ 16 ÷ 2 = 8

Add more stuffing if needed. Cut yarn leaving a **20 cm tail**, thread through remaining 8 sts, pull tight to close, and fasten off securely on the inside.

---

## BODY

Cast on **24 sts**, divide across DPNs, join in the round.

- **Rnds 1–4**: k all sts. *(24 sts)* — this forms the hips/base.
- **Rnd 5**: (k4, kfb) to last 4 sts, k4. *(28 sts)* — ✓ 24 + 4 = 28
- **Rnds 6–18**: k all sts (13 rnds straight). *(28 sts)*
- **Rnd 19**: (k5, k2tog) to end. *(24 sts)* ✓ 28 − 4 = 24
- **Rnd 20**: k all sts.
- **Rnd 21**: (k4, k2tog) to end. *(20 sts)* ✓ 24 − 4 = 20
- **Rnd 22**: k all sts. — shoulders.

**Stuff the body firmly.**

Cut yarn leaving a **25 cm tail**, thread through remaining 20 sts, pull to gather slightly (do not close fully — this becomes the neck opening to attach to the head). Set aside.

For the cast-on edge, thread a tapestry needle with a 25 cm tail and weave through the cast-on stitches; pull tight to close the bottom of the body and fasten off.

---

## LEGS (make 2)

Cast on **14 sts**, divide across DPNs, join in the round.

- **Rnd 1**: k all sts.
- **Rnd 2**: (kfb, k6) twice. *(16 sts)* ✓ 14 + 2 = 16 — this creates a gentle foot shape.
- **Rnds 3–6**: k all sts. *(16 sts)*
- **Rnd 7**: (k2, k2tog) to end. *(12 sts)* ✓ 16 − 4 = 12
- **Rnds 8–22**: k all sts (15 rnds straight). *(12 sts)*

**Stuff the leg firmly**, keeping the top softer for easier seaming.

Cast off all sts. Cut yarn leaving a **30 cm tail** for sewing to the body.

For the toe end (cast-on edge), use the tail to gather and close as for the body base.

---

## ARMS (make 2)

Cast on **10 sts**, divide across DPNs, join in the round.

- **Rnd 1**: kfb, k to end. *(11 sts)* ✓ 10 + 1 = 11
- **Rnd 2**: kfb, k to end. *(12 sts)* ✓ 11 + 1 = 12 — forms the hand.
- **Rnds 3–6**: k all sts. *(12 sts)*
- **Rnd 7**: k2tog, k to end. *(11 sts)*
- **Rnds 8–20**: k all sts (13 rnds straight). *(11 sts)*

**Stuff the arm lightly** — arms should be soft and floppy for cuddling.

Cast off all sts. Cut yarn leaving a **25 cm tail** for sewing.

Gather and close the cast-on (hand) end with its tail.

---

## ASSEMBLY

Work on a flat surface and pin pieces in place before sewing for symmetry.

1. **Attach head to body**: Position the head over the gathered neck opening of the body. Using the body tail, sew around the join with mattress stitch, adding extra stuffing through the neck before closing fully. Reinforce with a second pass — the neck takes the most strain.

2. **Attach legs**: Pin both legs to the base of the body, spaced evenly (approx. **2 cm apart**). The leg openings should sit flat against the body base. Using the leg tails, sew securely around each leg opening.

3. **Attach arms**: Pin arms to the sides of the body, just below the shoulder shaping, ensuring they are level. Sew securely with the arm tails.

4. **Weave in all ends** to the inside of the body, passing the needle through stuffing and trimming flush.

---

## FACIAL FEATURES & HAIR

**Eyes**: Using black yarn or embroidery floss, embroider two French knots or small satin-stitch ovals on the face, approx. **3 cm apart**, centred horizontally on the head.

**Nose & mouth**: With pink or contrast floss, embroider a tiny V-shape for the nose and a small curved smile below.

**Cheeks** (optional): A few stitches of pale pink yarn in a small circle on each cheek.

**Hair**: Cut lengths of contrast yarn approx. **15 cm** long. Using a tapestry needle, loop each strand through stitches on the top and back of the head (latch-hook style, folded in half and pulled through). Cover the top half of the head densely. Trim to desired length and style — pigtails, a bob, or loose curls.

**Optional bow**: Tie a small ribbon around a pigtail or stitch it onto the head.

---

## FINISHING

- Give Baby Sally a gentle squeeze all over and reshape — add extra stuffing through any soft spots by gently opening a stitch with a tapestry needle, inserting fibrefill, then closing.
- Steam-block lightly if desired (avoid pressing).
- Check that all seams and embroidery are secure before gifting, especially to small children.

---

**Enjoy your Baby Sally!** She is designed to be soft, sweet, and well-loved. Once you've made one, she is easy to customise — try different hair colours, knit a little dress, or make a whole family of dolls in various sizes by changing yarn weight and needle size.
Disclaimer: This pattern was generated by AI and should be reviewed for accuracy before use. While we strive for quality, AI-generated content may contain errors. Please verify measurements, stitch counts, and instructions before beginning your project. Generated by purlJam.uk
Access your pattern anytime
Bookmark this page to access your pattern anytime