Type
Crochet
Difficulty
beginner
Category
hat
AI Thinking Process
Planning
Verification
Pattern
Balaclava Turtleneck
UK crochet terminology · Chunky / bulky yarn · Intermediate
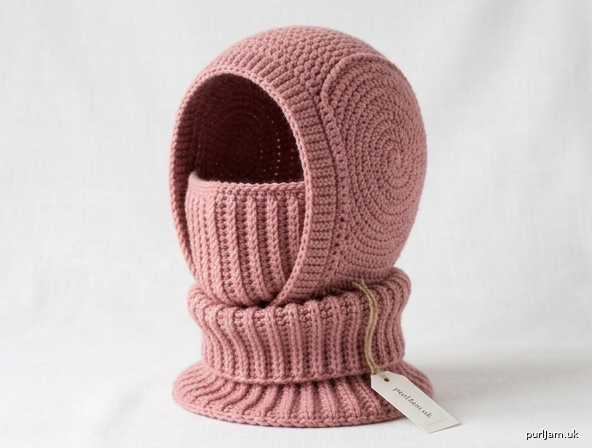
A cosy, fashion-forward balaclava worked as one coordinated accessory: a large rounded hood, a ribbed face covering from the bridge of the nose over the nose, mouth and chin, and a wide, thick turtleneck (polo neck) that sits on the upper chest. The sample is shown in dusty rose.
This is not a beanie, scarf or separate neck warmer. The hood, face panel and collar are designed to be worn together.
Skill level
Intermediate. You should be comfortable with:
- Magic ring and working in a spiral
- Increasing evenly
- Working in rounds and in rows
- Back-loop-only ribbing
- Join-as-you-go ribbing and a small amount of seaming
Sizes
S (M, L) — to fit adult head circumference:
| Size | To fit head | Finished hood circumference |
|---|---|---|
| S | 51–54 cm (20–21¼ in) | 53 cm (21 in) |
| M | 55–58 cm (21¾–22¾ in) | 60 cm (23½ in) |
| L | 59–61 cm (23¼–24 in) | 67 cm (26¼ in) |
The hood is written with a comfortable, slightly rounded fit. Ribbed sections are stretchy and will pull on over the head. Instructions are given for S with M and L in parentheses. When only one number is given, it applies to all sizes.
Finished measurements
(After light blocking; ribbing measured unstretched)
- Hood circumference: 53 (60, 67) cm / 21 (23½, 26¼) in
- Crown to neckline at back: approx. 31 cm (12¼ in)
- Eye opening height: approx. 5.5–6 cm (2¼ in)
- Face covering height: 12.5 cm (5 in)
- Turtleneck height: 18 cm (7 in)
- Turtleneck circumference, unstretched: 47 (54, 60) cm / 18½ (21¼, 23½) in
The turtleneck may be worn standing tall or folded over.
Materials
- Yarn: Chunky (UK) / Bulky, category 5. Approx. 350 (400, 450) g / 420 (480, 540) m.
- Typical put-up: 100 g = 120 m. Choose a smooth, slightly plied wool or wool-blend so the stitches stay visible.
- Sample colour: dusty rose / dusty pink.
- Hook: 6.5 mm (UK 3, US K-10½), or size needed to obtain tension. Optional 6 mm for firmer ribbing if your BLO dc is loose.
- Stitch markers (at least 4)
- Yarn needle
- Scissors
- Tape measure
Tension (gauge)
Work a swatch in the round or flat, unblocked.
Hood fabric (htr): 12 htr × 10 rows = 10 × 10 cm (4 × 4 in) with 6.5 mm hook.
Ribbing (BLO dc, unstretched): 12 BLO dc × 14 rows = 10 × 10 cm (4 × 4 in) with 6.5 mm hook.
If you have too few stitches in 10 cm, use a smaller hook. If you have too many, use a larger hook. Fabric should be dense enough to be warm, with stitches still clearly visible.
Abbreviations (UK)
- BLO — back loop only
- ch — chain
- dc — double crochet (US single crochet)
- htr — half treble (US half double crochet)
- inc — increase (2 htr in the same stitch)
- MR — magic ring (magic circle)
- pm — place marker
- rep — repeat
- rnd(s) — round(s)
- RS — right side
- sl st — slip stitch
- st(s) — stitch(es)
- WS — wrong side
- [] — stitch count at end of rnd/row
Pattern notes
- The pattern uses UK crochet terms throughout. UK dc = US sc; UK htr = US hdc.
- Hood is worked in a spiral (do not join, do not turn) unless stated. Place a marker in the first stitch of every round and move it up.
- From the Face Opening onwards the hood back is worked in rows. Ch 1 at the start of a row does not count as a stitch; work the first htr in the first stitch.
- Face covering and turtleneck are worked sideways in BLO dc so the ribs run vertically.
- Keep a relaxed tension on slip-stitch joins so the ribbing does not pucker.
- Do not skip the try-on checkpoints. Chunky fabric has less stretch than DK.
Construction overview
- Hood crown — magic ring, increase like a top-down beanie until the hood circumference is reached.
- Upper hood — work even in the round to the forehead / top of the eye opening.
- Hood back and neck — work in rows across the back and sides, leaving the centre-front stitches unworked for the face opening.
- Face covering — a ribbed panel sewn to the lower sides of the opening, covering nose, mouth and chin. The upper opening remains the eye window.
- Eye opening edging — one round of dc to neaten.
- Turtleneck — deep BLO dc ribbing joined as you go around the neckline.
Pattern
Hood crown
Worked in a spiral in htr.
Rnd 1: Working into a MR, 8 htr. Pull the ring closed. Pm in the first htr. [8]
Rnd 2: 2 htr in each st around. [16] (8 increases → 8 + 8 = 16 ✓)
Rnd 3: *1 htr, 2 htr in next st; rep from * around. [24] (8 increases → 16 + 8 = 24 ✓)
Rnd 4: *2 htr, 2 htr in next st; rep from * around. [32] (8 increases → 24 + 8 = 32 ✓)
Rnd 5: *3 htr, 2 htr in next st; rep from * around. [40] (8 increases → 32 + 8 = 40 ✓)
Rnd 6: *4 htr, 2 htr in next st; rep from * around. [48] (8 increases → 40 + 8 = 48 ✓)
Rnd 7: *5 htr, 2 htr in next st; rep from * around. [56] (8 increases → 48 + 8 = 56 ✓)
Rnd 8: *6 htr, 2 htr in next st; rep from * around. [64] (8 increases → 56 + 8 = 64 ✓)
Size S only: Do not work Rnds 9–10. Continue to Upper Hood with 64 sts.
Rnd 9: *7 htr, 2 htr in next st; rep from * around. [72] (8 increases → 64 + 8 = 72 ✓)
Size M only: Do not work Rnd 10. Continue to Upper Hood with 72 sts.
Rnd 10: *8 htr, 2 htr in next st; rep from * around. [80] (8 increases → 72 + 8 = 80 ✓)
Size L: Continue to Upper Hood with 80 sts.
You now have 64 (72, 80) sts. Crown should sit nearly flat-to-gently-domed. Diameter is approx. 17 (19, 21) cm / 6¾ (7½, 8¼) in.
Upper hood
Continue in a spiral, working 1 htr in each st around.
Work until the piece measures 13 cm (5¼ in) from the centre of the magic ring.
Approximate extra rounds after the last increase round: 5 (4, 3).
Checkpoint: The fabric should reach from the crown to just above the eyebrows when tried on. Add or remove 1 rnd if needed so this measurement is right for the wearer; keep the same stitch count 64 (72, 80).
On the last round, sl st in the next st to level the spiral. Do not fasten off.
Place the face opening
Identify centre front (the point that will sit on the forehead, above the nose). Pm in that stitch.
Count 12 (14, 16) sts either side of the centre-front marker and place a marker in each of those stitches. The 24 (28, 32) sts lying between these two new markers (including the centre-front st) are the Face Opening and will stay unworked.
The remaining 40 (44, 48) sts are the Hood Back (back of the head and sides).
If you are not currently at the right-hand Face Opening marker (right as worn, RS facing you), htr around until you reach that marker, then proceed. This positioning round is not an extra increase; keep 64 (72, 80) sts.
Hood back and neck
Worked in rows on the 40 (44, 48) Hood Back sts only.
Row 1 (RS): 1 htr in each of the next 40 (44, 48) sts, turn, leaving the marked 24 (28, 32) Face Opening sts unworked. [40 (44, 48)]
Row 2 (WS): Ch 1, 1 htr in each st to end, turn. [40 (44, 48)]
Rows 3–18: Rep Row 2 until the row section measures 18 cm (7 in) from the split, ending with a WS row.
If your row tension differs, work to the 18 cm measurement rather than a fixed row count. You should still have 40 (44, 48) sts.
Do not fasten off if you prefer to continue with the same yarn for the turtleneck later; otherwise fasten off, leaving a long tail.
Checkpoint:
- Total length from crown to the last row (back neckline) is approx. 31 cm (12¼ in).
- Face Opening is a U-shape: 24 (28, 32) sts across the forehead and 18 cm down each side.
- The last row sits at the base of the neck at the back.
Face covering panel
Worked separately in BLO dc, sideways, so the ribs run vertically on the face. Covers from the bridge of the nose down over the nose, mouth and chin.
Foundation: Ch 16.
Row 1 (RS): 1 dc in 2nd ch from hook and in each ch to end, turn. [15] (16 − 1 = 15 ✓)
Row 2: Ch 1, 1 BLO dc in each st to end, turn. [15]
Rep Row 2 until you have 26 (32, 36) rows in total.
Fasten off, leaving a long tail for sewing.
Panel size check (unstretched):
- Height (15 dc): 12.5 cm (5 in)
- Width (26 (32, 36) rows): 18.5 (23, 26) cm / 7¼ (9, 10¼) in
The panel is slightly narrower than the opening so it cups the face.
Attach the panel
With RS of hood and RS of panel facing you (ribs vertical):
- Align the bottom long edge of the panel with the last row of the Hood Back, so the neckline will be level all the way round.
- Pin the right short edge of the panel (15 dc) to the lower inner right side of the Face Opening, starting at the neckline and working up 12.5 cm. Leave the upper 5.5 cm of that side free — this is the side of the eye opening.
- Pin the left short edge to the lower inner left side in the same way.
- The top long edge of the panel sits approx. 5.5–6 cm below the forehead edge and is not sewn across. This is the lower edge of the eye opening.
- Using mattress stitch or slip stitch, sew both short edges in place. Do not sew the top or bottom long edges.
The hood, face covering and neckline should now read as one accessory. The eye window is the unfilled upper part of the opening.
Eye opening edging
With RS facing, join yarn at one upper corner of the Eye Opening.
Rnd 1: Ch 1, work 1 dc evenly around the entire Eye Opening:
- 1 dc in each of the 24 (28, 32) unworked forehead htr,
- approx. 5–6 dc down the first side (into row-ends),
- 1 dc in each row-end across the top of the Face Covering,
- approx. 5–6 dc up the remaining side.
Sl st to the first dc. Fasten off.
Do not pull this round tight or the opening will cup uncomfortably. The finished eye opening should be approx. 5.5–6 cm (2¼ in) high and 20 (23, 27) cm / 8 (9, 10½) in wide, stretching slightly on the head.
Turtleneck collar
Deep ribbed collar, worked join-as-you-go in BLO dc so the ribs run vertically. It wraps the neck and rests on the upper chest.
Prepare the neckline
With RS facing, join yarn at centre back of the last hood row.
Work 1 rnd of dc evenly around the whole neckline, then sl st to the first dc. Do not turn. This gives a firm, even pick-up row:
- 1 dc in each of the 40 (44, 48) htr across the hood back,
- 1 dc in each of the 26 (32, 36) row-ends across the bottom of the Face Covering.
[66 (76, 84) dc] (40 + 26 = 66 ✓; 44 + 32 = 76 ✓; 48 + 36 = 84 ✓)
If you are 1–2 sts out, skip or double-up at the two side junctions so you land on 66 (76, 84). Pm at centre back.
Join-as-you-go ribbing
Still at centre back, ch 23.
Row 1 (WS): 1 dc in 2nd ch from hook and in each ch to end, sl st in the same neckline st as the joining point, sl st in the next neckline st, turn. [22 dc] (23 − 1 = 22 ✓)
Row 2 (RS): Skip the 2 sl sts, 1 BLO dc in each of the 22 dc to end, turn. [22]
Row 3 (WS): Ch 1 (does not count as a st), 1 BLO dc in each st to end, sl st in each of the next 2 neckline sts, turn. [22]
Rep Rows 2 and 3 around the neckline. Each WS row consumes 2 neckline sts (2 slip stitches → 2 neckline sts per 2 rows = 1 ribbing row per neckline stitch ✓).
Continue until every neckline stitch has been used, ending with a RS row. You will have 66 (76, 84) ribbing rows in total (33 (38, 42) attaching rows × 2 neckline sts = 66 (76, 84) ✓).
Join the last row to the foundation chain with mattress stitch or slip stitch, matching stitch for stitch so the centre-back seam is flat.
Optional separate-collar method: Instead of joining as you go, work a rectangle of 22 BLO dc for 66 (76, 84) rows, seam the 22-st edges into a tube, then sew the tube to the neckline, 1 row to 1 neckline st.
Finishing
- Weave in all ends securely on the WS, especially at the magic ring, face-panel seams and centre-back collar join.
- Check that the face covering sits at the bridge of the nose and that the eyes, eyebrows and upper face remain clear of the fabric.
- Block lightly: stuff the hood with a towel to keep the rounded shape. Hover a steam iron over the htr fabric — do not press. Do not steam-crush the ribbing; the vertical ribs should stay raised.
- Try on and adjust: the turtleneck can be left unfolded (tall, on the chest) or folded once for a thicker polo-neck.
Fit and customising
- Taller turtleneck: start with more chains (each extra 1.2 dc ≈ 1 cm of height). Keep an even number if you prefer a balanced edge.
- Deeper face covering: add 2–3 dc to the panel (ch 18 or 20 instead of 16) and sew a little higher on the opening sides, keeping at least 5.5 cm for the eye window.
- Snugger hood: work to the smaller size; chunky htr has modest negative ease.
- Looser, more oversized hood: work to the next size up.
- Colour: any chunky yarn that meets tension. Dusty rose is the sample; charcoal, cream and sage also photograph well.
Care
Follow the ball-band for your yarn. For most wool-blend chunky yarns: hand wash cold, do not wring, dry flat. Reshape the hood while damp. Do not tumble dry.
Stitch-count summary
| Section | S | M | L |
|---|---|---|---|
| Hood after increases | 64 | 72 | 80 |
| Face Opening (unworked) | 24 | 28 | 32 |
| Hood Back (rows) | 40 | 44 | 48 |
| Face panel | 15 dc × 26 rows | 15 dc × 32 rows | 15 dc × 36 rows |
| Neckline / turtleneck rows | 66 | 76 | 84 |
| Turtleneck height | 22 dc | 22 dc | 22 dc |
Increase check: 8-st start, +8 sts each rnd → Rnd 8 = 64, Rnd 9 = 72, Rnd 10 = 80 ✓
Disclaimer: This pattern was generated by AI and should be reviewed for accuracy before use. While we strive for quality, AI-generated content may contain errors. Please verify measurements, stitch counts, charts, and instructions before beginning your project. Generated by purlJam.uk
Love this pattern?
Save this pattern to your free PurlJam libraryAccess your pattern anytime
Bookmark this page to access your pattern anytime