Type
Crochet
Difficulty
beginner
Category
hat
AI Thinking Process
Planning
Verification
Pattern
Petal Plush Balaclava
A beginner-friendly chunky balaclava in pastel baby pink
Skill level: Beginner
Construction: Seamless, top-down, joined rounds (US crochet terms)
Finished-product description
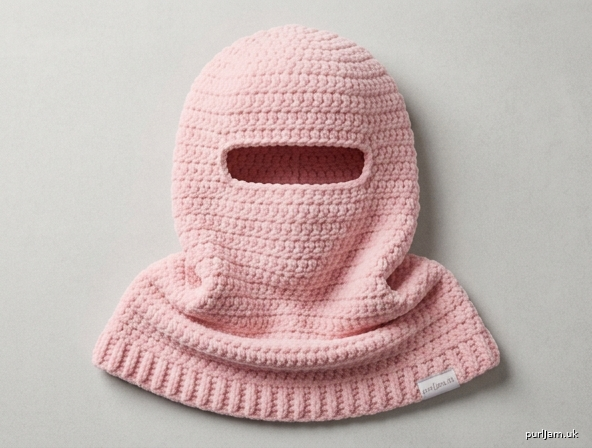
The finished balaclava is a single, uninterrupted piece of plush bulky fabric in pastel baby pink. It reads as a soft winter hood rather than a stiff mask. A smoothly rounded crown sits on top of the head with no point and no seams. The hood comes forward to the brow, then a neat horizontal window frames the eyes only — about 5½ in (14 cm) wide and 2 in (5 cm) tall — with a tidy single-crochet edge so the opening stays snug and does not stretch out of shape.
Below the window, the same pink fabric continues as a solid face covering. Cheeks, nose, and mouth are fully enclosed; the bulky half double crochet sits close without a separate panel or visible join. From under the chin the piece flares into a thick, draped cowl. The cowl is longer and wider than a typical neck warmer: it wraps the neck, then falls over the collarbones and the tops of the shoulders in soft folds. A short back-loop rib at the hem keeps the edge polished and helps the drape hang evenly.
The surface is matte and cozy, with the gentle horizontal rhythm of half double crochet. There is no colorwork, no seam up the back, and no bulky join at the chin. Worn straight, it looks like a cloud of baby pink wrapping the head and shoulders, with only the eyes visible.
Front-view product illustration
                 _____________
              _--             --_
            /                     \
           /     rounded hood      \
          |                         |
          |      _____________      |
          |     |             |     |
          |     |  o       o  |     |   ← snug eye window
          |     |_____________|     |
          |                         |
          |    covered nose/mouth   |
          |                         |
           \                       /
            \      neck join      /
             \                   /
              )                 (
             /                   \
            /    thick draped     \
           /     cowl over neck    \
          /      and shoulders      \
         /___________________________\
                    ribbed hem
Finished measurements (one size, adult)
Blocked, lying flat, unstretched.
| Area | Measurement |
|---|---|
| To fit head circumference | 21–23 in (53–58 cm) |
| Finished hood circumference | 25½ in (65 cm) |
| Crown diameter (after increases) | about 8 in (20.5 cm) |
| Crown to top of eye opening | 7 in (18 cm) |
| Eye opening | 5½ in wide × 2 in tall (14 × 5 cm) |
| Eye opening to under chin (face covering) | 3 in (7.5 cm) |
| Cowl length (under chin to hem) | 10 in (25.5 cm) |
| Cowl hem circumference | 35¼ in (89.5 cm) |
| Total length, crown to hem | about 22½ in (57 cm) |
Materials
- Yarn: Bulky weight (5), pastel baby pink, 480 yd (439 m). Choose a soft acrylic or wool-blend (not splitty chenille) so the stitches stay easy to see. About 4 skeins at 125 yd (114 m) each, or equivalent.
- Hook: US L/11 (8.0 mm), or size needed to obtain gauge
- Notions: 4 stitch markers, tapestry needle, scissors, measuring tape
- Optional: A second hook one size smaller (US K/10.5 / 6.5 mm) for a slightly firmer eye-opening edging
Gauge
10 hdc × 8 rows = 4 × 4 in (10 × 10 cm) in half double crochet with US L/11 (8.0 mm), unblocked.
Work a 6 in (15 cm) swatch, then measure the center 4 in (10 cm).
If you have too few stitches, go down a hook size.
If you have too many stitches, go up a hook size.
Gauge matters here: the 64-stitch hood must measure close to 25½ in (65 cm) around.
Abbreviations (US)
| Abbrev. | Meaning |
|---|---|
| BLO | back loop only |
| ch | chain |
| hdc | half double crochet |
| inc | increase — 2 hdc in the same stitch |
| rnd(s) | round(s) |
| sc | single crochet |
| sl st | slip stitch |
| st(s) | stitch(es) |
| yo | yarn over |
Special stitch — inc: Work 2 hdc into the same stitch (1 st becomes 2).
Pattern notes
- US terms throughout. Imperial measurements first; metric in parentheses.
- Work with the right side facing at all times. Do not turn at the end of a round.
- Each hdc round is joined with a sl st into the first hdc, then ch 1. The ch-1 does not count as a stitch. The first hdc of the next round goes into the same stitch as the join (the first hdc of the previous round).
- Place a marker in the first stitch of every round and move it up as you go. That marker is center back.
- The fabric should feel thick and flexible, not stiff. Bulky yarn on an 8 mm hook gives the plush drape this design needs.
- This is a cold-weather fashion accessory, not protective equipment. Keep the eye opening clear. The crochet fabric is breathable but is not a medical mask.
- Count stitches at the end of every round. Counts are given in bold.
Instructions
Magic ring (beginner method)
Make a loop with the tail hanging behind the working yarn. Insert the hook into the loop, yo, pull up a loop, ch 1. You will work Rnd 1 into this ring, then pull the tail to close.
Alternative if the ring feels awkward: Ch 3, sl st in the first ch to form a small ring. Work Rnd 1 into the ring. Weave the beginning tail tightly to close the hole.
Part 1 — Rounded crown (hood shaping)
Work hdc into both loops.
Rnd 1: 8 hdc into the ring. Pull the tail closed. Join with sl st to first hdc, ch 1. 8 sts.
Rnd 2: Inc in each st around. Join, ch 1.
(8 increases → 8 + 8 = 16 ✓)
Rnd 3: *Hdc in next st, inc in next st; repeat from * around. Join, ch 1.
(8 increases → 16 + 8 = 24 ✓)
Rnd 4: *Hdc in next 2 sts, inc in next st; repeat from * around. Join, ch 1.
(8 increases → 24 + 8 = 32 ✓)
Rnd 5: *Hdc in next 3 sts, inc in next st; repeat from * around. Join, ch 1.
(8 increases → 32 + 8 = 40 ✓)
Rnd 6: *Hdc in next 4 sts, inc in next st; repeat from * around. Join, ch 1.
(8 increases → 40 + 8 = 48 ✓)
Rnd 7: *Hdc in next 5 sts, inc in next st; repeat from * around. Join, ch 1.
(8 increases → 48 + 8 = 56 ✓)
Rnd 8: *Hdc in next 6 sts, inc in next st; repeat from * around. Join, ch 1.
(8 increases → 56 + 8 = 64 ✓)
The crown should now be a flat-ish circle about 8 in (20.5 cm) across and 4 in (10 cm) deep. The 8 increase “spokes” will round out once the hood is worn. If the circle cups tightly, your stitches are too small — go up a hook size and restart. If it ruffles, go down a hook size.
Part 2 — Hood (work even)
Keep 64 sts. The join stays at center back.
Rnds 9–14: Hdc in each st around. Join, ch 1. 64 sts each rnd.
(6 even rounds × ½ in per round = 3 in; crown 4 in + 3 in = 7 in to the eye line ✓)
The tube should measure about 25½ in (65 cm) around (64 sts ÷ 10 sts per 4 in = 25.6 in ✓) and about 7 in (18 cm) from the crown center to the live-stitch edge.
Place two extra markers for the eye opening, which is centered on the front:
- Count 25 sts from the join (center back). Place marker A in the next st (this is the first st you will skip).
- Count 14 sts from marker A, inclusive. Place marker B in that 14th st (the last st you will skip).
(25 + 14 + 25 = 64 ✓; the skipped block sits at center front.)
Part 3 — Eye opening
Chain loosely so the window lies flat. If the chain pulls, go up a hook size for the chains only.
Rnd 15: Hdc in each st to marker A (25 hdc). Ch 14 loosely, skip the 14 marked sts, hdc in each remaining st to the join (25 hdc). Join to first hdc, ch 1.
(25 hdc + ch-14 + 25 hdc = 64 ✓)
The skipped 14 sts form the upper edge of the eye window. Do not work into them again until the finishing edging.
Rnds 16–18: Hdc in each hdc to the chain space (25 hdc), ch 14 loosely, skip the previous ch-14 entirely, hdc in each hdc to the join (25 hdc). Join, ch 1.
64 sts (counting each ch as 1) each rnd.
(4 opening rounds ÷ 2 rows per inch = 2 in tall ✓)
You now have a horizontal window about 5½ in (14 cm) wide (14 sts ÷ 10 sts per 4 in = 5.6 in ✓) and 2 in (5 cm) tall.
Part 4 — Face covering (nose and mouth)
The next round closes the window along the lower edge only. The upper edge stays open.
Rnd 19: Hdc in each of the 25 hdc, hdc in each of the 14 chains, hdc in each of the remaining 25 hdc. Join, ch 1.
(25 + 14 + 25 = 64 ✓)
The nose, cheeks, and mouth are now covered by solid fabric. Work even for depth.
Rnds 20–24: Hdc in each st around. Join, ch 1. 64 sts each rnd.
(Rnd 19 + 5 even rounds = 6 rounds × ½ in = 3 in of face covering ✓)
Try on (or measure): from the lower edge of the eye window to the live stitches should be about 3 in (7.5 cm), reaching under the chin. If you need a longer face covering, add 1–2 even rounds at 64 sts before starting the cowl.
Part 5 — Join the neck and work the draped cowl
You are still in joined rounds; there is no seam to sew. The face tube simply widens into the cowl.
Rnd 25: *Hdc in next 7 sts, inc in next st; repeat from * around. Join, ch 1.
(8 increases → 64 + 8 = 72 ✓)
Rnd 26: *Hdc in next 8 sts, inc in next st; repeat from * around. Join, ch 1.
(8 increases → 72 + 8 = 80 ✓)
Rnd 27: *Hdc in next 9 sts, inc in next st; repeat from * around. Join, ch 1.
(8 increases → 80 + 8 = 88 ✓)
Hem circumference target: 88 sts ÷ 10 sts per 4 in = 35.2 in ✓.
Rnds 28–43: Hdc in each st around. Join, ch 1. 88 sts each rnd.
(16 even rounds × ½ in = 8 in ✓)
Cowl length so far: 3 increase rounds (1½ in) + 8 in even = 9½ in, plus hem below.
Part 6 — Ribbed hem (polished edge)
Work these rounds in BLO for a short, stretchy rib.
Rnds 44–46: Sc BLO in each st around. Join with sl st to first sc. 88 sts each rnd.
(3 sc rounds ≈ 1 in; cowl total ≈ 10½ in ✓)
Invisible join (last round only): Cut yarn leaving an 8 in (20 cm) tail. Pull the tail all the way through the last loop. Thread the tail onto a tapestry needle. Insert the needle under both loops of the first sc of the round (from front to back), then back down into the center of the last sc. Weave in. This mimics a regular stitch and removes the bump at center back.
Assembly and finishing
There is no sewing of panels. Assembly is edging, weaving, and blocking.
1. Eye-opening edging (do this first)
With the right side facing, join yarn with sl st at one corner of the eye window (where the chain meets the hood fabric).
Work sc evenly around the entire window:
- 1 sc in each of the 14 unused sts along the top edge
- 2 sc in the side-corner, then 1 sc in each row-end down the side (4 row-ends)
- 1 sc in each of the 14 sts along the bottom edge
- 2 sc in the corner, then 1 sc in each row-end up the other side
Aim for about 36–40 sc around so the opening stays snug and does not flare. Join with sl st to the first sc. Fasten off with an invisible join.
Optional: use the 6.5 mm hook for this edging only, for a firmer window.
2. Weave in ends
You should have a beginning tail at the crown, a join tail at the hem, and two short tails at the eye edging. Weave each tail along the wrong side for at least 3 in (7.5 cm), reversing direction once so it cannot work free. Because the yarn is bulky, split the ply slightly with the needle so the tail disappears into the fabric.
3. Block
Lay the balaclava flat. Smooth the hood into a rounded shape, pin the eye window to 5½ × 2 in (14 × 5 cm), and arrange the cowl in a gentle flare. Light steam from several inches above (acrylic) or wet-block and dry flat (wool blend). Do not press the iron onto the stitches — you want to keep the plush texture.
4. Wear
Pull the hood on from the crown, settle the eye window so both eyes sit in the center of the opening, and let the cowl fall around the neck and over the shoulders. The face covering should sit close over the nose and mouth with no gap at the cheeks.
Customizing fit
- Larger head (23–25 in / 58–63.5 cm): After Rnd 8, work one more increase round: *hdc in next 7 sts, inc in next st; repeat from * around (72 sts; 72 + 8 = wait — 8 increases → 64 + 8 = 72 ✓). Then work all even hood/face rounds on 72 sts. For the eye window, skip 16 sts with ch 16 loosely, and hdc 28 either side (28 + 16 + 28 = 72 ✓). Increase the cowl from 72 → 80 → 88 → 96.
- Smaller head (19–21 in / 48–53 cm): Stop crown increases at Rnd 7 (56 sts). Eye window: hdc 21, ch 14, skip 14, hdc 21 (21 + 14 + 21 = 56 ✓). Increase the cowl from 56 → 64 → 72 → 80.
- Longer cowl: Add even rounds at 88 sts before the BLO hem.
- Shorter face covering: Work Rnds 20–22 only (instead of 20–24) before the cowl increases.
Quick stitch-count log
| Section | Rounds | Stitches | Running height |
|---|---|---|---|
| Crown | 1–8 | 8 → 64 | 4 in (10 cm) |
| Hood even | 9–14 | 64 | 7 in (18 cm) |
| Eye opening | 15–18 | 64 (with ch-14) | 9 in (23 cm) |
| Close + face | 19–24 | 64 | 12 in (30.5 cm) |
| Cowl increases | 25–27 | 64 → 72 → 80 → 88 | 13½ in (34.5 cm) |
| Cowl even | 28–43 | 88 | 21½ in (54.5 cm) |
| Ribbed hem | 44–46 | 88 BLO sc | 22½ in (57 cm) |
All increase checks: 8+8=16 ✓, 16+8=24 ✓, 24+8=32 ✓, 32+8=40 ✓, 40+8=48 ✓, 48+8=56 ✓, 56+8=64 ✓, 64+8=72 ✓, 72+8=80 ✓, 80+8=88 ✓.
Disclaimer: This pattern was generated by AI and should be reviewed for accuracy before use. While we strive for quality, AI-generated content may contain errors. Please verify measurements, stitch counts, charts, and instructions before beginning your project. Generated by purlJam.uk
Love this pattern?
Save this pattern to your free PurlJam libraryAccess your pattern anytime
Bookmark this page to access your pattern anytime