Type
Knitting
Difficulty
beginner
Category
hat
AI Thinking Process
Planning
Verification
Pattern
Basic Ribbed Beanie
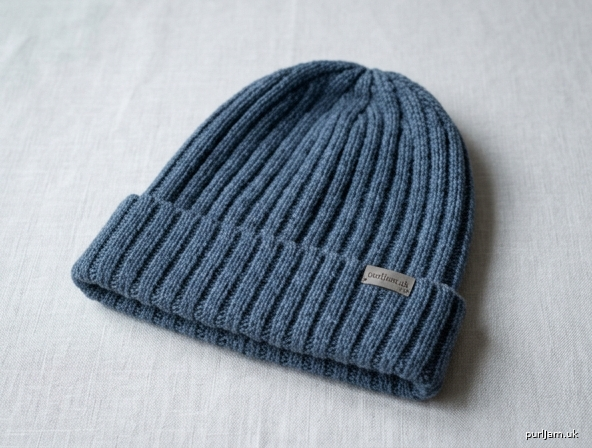
A snug, stretchy beanie worked entirely in k2, p2 ribbing. Knit in the round from the brim up, with a simple decrease crown. Ribbing gives negative ease, warmth, and a classic look that suits most worsted yarns.
Difficulty: Beginner
Sizes
Child (Adult Small, Adult Medium, Adult Large)
To fit head circumference: 18–20 (21, 22–23, 24) in / 45.5–51 (53.5, 56–58.5, 61) cm
Choose the size closest to the wearer’s head measurement. Ribbing is very stretchy; 2–4 in (5–10 cm) of negative ease is intended.
Finished Measurements
Circumference (slightly stretched): 16 (17½, 19¼, 20¾) in / 40.5 (44.5, 49, 52.5) cm
Height: 8 (8½, 9, 9½) in / 20.5 (21.5, 23, 24) cm, after light blocking
Yarn
Worsted weight yarn (CYC 4), wool or wool blend preferred for elasticity and warmth.
Yardage: 100 (125, 150, 175) yd / 90 (115, 135, 160) m
One typical 200–220 yd (180–200 m) skein is enough for any size.
Needles
- US 8 / 5 mm, 16 in (40 cm) circular needle
- US 8 / 5 mm double-pointed needles (DPNs), or a 32–40 in (80–100 cm) circular for magic loop
Use the circular for the body; switch to DPNs or magic loop when the crown no longer reaches comfortably around the 16 in needle.
Notions
- Stitch marker
- Tapestry needle
- Scissors
Gauge
20 stitches and 26 rounds = 4 in (10 cm) in k2, p2 ribbing, slightly stretched, on US 8 / 5 mm needles.
Check gauge on a small tube in the round. If you have too many stitches per 4 in, go up a needle size; if too few, go down a size.
Abbreviations (US)
- BOR — beginning of round
- CO — cast on
- k — knit
- k2tog — knit 2 stitches together (1 stitch decreased)
- p — purl
- p2tog — purl 2 stitches together (1 stitch decreased)
- rep — repeat
- rnd(s) — round(s)
- st(s) — stitch(es)
Notes
- The hat is worked in the round from the brim up. There is no separate brim: the entire hat is k2, p2 ribbing until the crown.
- Cast on loosely, or use a stretchy method (Long-Tail Cast-On is fine if it is not tight). A tight cast-on will not fit over the head.
- Join in the round carefully so the stitches are not twisted.
- On every round, knit the knits and purl the purls so the rib columns stay straight.
- When the fabric no longer slides easily around the circular needle, change to DPNs or magic loop.
- For a folded brim, work the body 1½ in (4 cm) longer than written before starting the crown.
- A pompom is optional and not required.
Pattern
Brim and Body
With circular needle, CO 80 (88, 96, 104) sts using a stretchy cast-on. Place marker for BOR and join to work in the round, being careful not to twist.
Ribbing rnd: *K2, p2; rep from * to end of rnd.
This round uses 80 (88, 96, 104) sts, which is a multiple of 4, so the k2, p2 rib repeats evenly ✓.
Repeat the ribbing rnd until the piece measures 6½ (7, 7½, 8) in / 16.5 (18, 19, 20.5) cm from the cast-on edge.
Crown
Change to DPNs or magic loop when the stitches become tight on the circular needle. Keep the BOR marker.
Rnd 1: *K2, p2tog; rep from * to end. 60 (66, 72, 78) sts. Each 4-st rib becomes 3 sts: 80 × ¾ = 60, 88 × ¾ = 66, 96 × ¾ = 72, 104 × ¾ = 78 ✓.
Rnd 2: *K2, p1; rep from * to end.
Rnd 3: *K2tog, p1; rep from * to end. 40 (44, 48, 52) sts. Each 3-st group becomes 2 sts: 60 × ⅔ = 40, 66 × ⅔ = 44, 72 × ⅔ = 48, 78 × ⅔ = 52 ✓.
Rnd 4: *K1, p1; rep from * to end.
Rnd 5: *K2tog; rep from * to end. 20 (22, 24, 26) sts. 40 ÷ 2 = 20, 44 ÷ 2 = 22, 48 ÷ 2 = 24, 52 ÷ 2 = 26 ✓.
Rnd 6: Knit.
Rnd 7: *K2tog; rep from * to end. 10 (11, 12, 13) sts. 20 ÷ 2 = 10, 22 ÷ 2 = 11, 24 ÷ 2 = 12, 26 ÷ 2 = 13 ✓.
Rnd 8: *K2tog; rep from * to last 0 (1, 0, 1) st, k0 (1, 0, 1). 5 (6, 6, 7) sts remain. 10 ÷ 2 = 5; 11 sts → 5 k2tog + 1 knit = 6; 12 ÷ 2 = 6; 13 sts → 6 k2tog + 1 knit = 7 ✓.
Finishing
Cut yarn, leaving an 8 in (20 cm) tail. Thread the tail onto a tapestry needle, draw it through the remaining 5 (6, 6, 7) sts, and pull snug to close the top. Pass the tail through the stitches a second time for security, then weave it to the wrong side.
Weave in the cast-on tail on the wrong side, closing any small gap at the join if needed.
Block lightly if desired: mist with water and pat into shape, or steam very gently without flattening the rib. Allow to dry. Do not stretch the ribbing out of its natural width.
Wear as is, or fold up the lower edge 1–1½ in (2.5–4 cm) for a cuff.
Disclaimer: This pattern was generated by AI and should be reviewed for accuracy before use. While we strive for quality, AI-generated content may contain errors. Please verify measurements, stitch counts, charts, and instructions before beginning your project. Generated by purlJam.uk
Love this pattern?
Save this pattern to your free PurlJam libraryAccess your pattern anytime
Bookmark this page to access your pattern anytime