Type
Knitting
Difficulty
intermediate
Category
tank
AI Thinking Process
Planning
Verification
Pattern
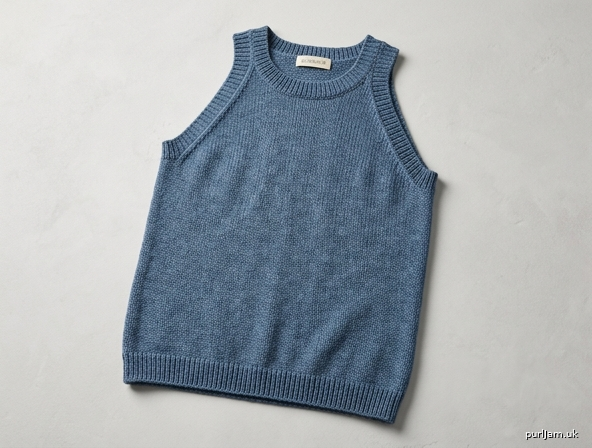
Basic Top-Down Tank Top
Seamless Stockinette Tank (Fingering Weight)
A simple, beginner-friendly tank worked entirely top-down and in the round. The fabric is plain stockinette with tidy 1×1 ribbed edges at neck, armholes, and hem. Straps are formed with a raglan-style yoke; the body is joined at the underarms and worked straight down. Perfect for summer cotton or a light layering piece.
Difficulty: Beginner
Skills used: Cast on, knit, purl, join in the round, place markers, M1L/M1R increases, placing stitches on hold, picking up stitches, bind off.
Sizes
XS (S, M, L, XL, 2X, 3X, 4X, 5X)
Shown in size M.
To fit bust: 30 (34, 38, 42, 46, 50, 54, 58, 62)" / 76 (86.5, 96.5, 106.5, 117, 127, 137, 147.5, 157.5) cm
Finished bust circumference: 32 (36, 40, 44, 48, 52, 56, 60, 64)" / 81.5 (91.5, 101.5, 112, 122, 132, 142, 152.5, 162.5) cm
Intended ease: approximately +2" / 5 cm.
Finished length (shoulder to hem): approximately 21½ (22, 22¾, 23½, 24¼, 25, 25¾, 26½, 27¼)" / 54.5 (56, 58, 59.5, 61.5, 63.5, 65.5, 67.5, 69) cm — easily adjustable.
Yarn
Fingering weight yarn (CYC 1); cotton, linen, or cotton-blend recommended for drape and breathability.
Approximate yardage: 650 (750, 850, 950, 1100, 1250, 1400, 1550, 1700) yd / 595 (685, 775, 870, 1005, 1145, 1280, 1415, 1555) m.
Needles
- US 3 / 3.25 mm circular needle, 24–40" / 60–100 cm (body)
- Same size DPNs or long circular for magic-loop (neck and armhole bands)
- Optional: US 2 / 2.75 mm circular/DPNs for denser ribbing
Adjust needle size to obtain gauge.
Gauge
28 stitches and 36 rows/rounds = 4" / 10 cm in stockinette stitch on larger needle, blocked.
Please swatch and block. Gauge is critical for fit.
Notions
- Stitch markers (4 distinct + 1 unique for beginning of round)
- Waste yarn or stitch holders
- Tapestry needle
- Scissors
- Blocking mats and pins
Abbreviations (US)
BO – bind off
CO – cast on
k – knit
k2tog – knit 2 together (right-leaning decrease)
M1L – make 1 left (lift strand between stitches from front to back, knit through back loop)
M1R – make 1 right (lift strand between stitches from back to front, knit through front loop)
p – purl
pm – place marker
rnd(s) – round(s)
RS – right side
sm – slip marker
ssk – slip, slip, knit (left-leaning decrease)
st(s) – stitch(es)
St st – stockinette stitch (knit every round in the round; knit on RS, purl on WS if flat)
WS – wrong side
wyib – with yarn in back
[ ] – work instructions in brackets as directed
( ) – size instructions; work the number that corresponds to your size
Notes
- The tank is worked top-down in one piece. Yoke is worked in the round with increases beside the straps only (straps stay constant width).
- Body is joined at the underarms and worked in the round.
- All main fabric is stockinette; 1×1 rib is used only for neckband, armhole bands, and hem so edges lie flat.
- When instructed to “work even,” continue in established stitch pattern without increasing or decreasing.
- Length is easily customized: try on after joining the body and work to desired length before the hem ribbing.
- Inline stitch-count checks are marked with ✓.
Pattern Instructions
Neckband
With larger needle (or smaller needle if you prefer firmer rib), CO 96 (104, 116, 124, 136, 144, 156, 164, 176) sts using a stretchy cast-on. Place marker for beginning of round and join to work in the round, being careful not to twist.
Work 1×1 rib (k1, p1) for 1" / 2.5 cm.
Yoke Setup
Switch to larger needle if you used a smaller needle for the rib.
Setup round (place section markers):
K14 (14, 16, 16, 18, 18, 20, 20, 22) for Right Strap, pm,
k34 (38, 42, 46, 50, 54, 58, 62, 66) for Front, pm,
k14 (14, 16, 16, 18, 18, 20, 20, 22) for Left Strap, pm,
k34 (38, 42, 46, 50, 54, 58, 62, 66) for Back to end-of-round marker.
Stitch count remains 96 (104, 116, 124, 136, 144, 156, 164, 176) ✓
(Sections: Right Strap / Front / Left Strap / Back)
Yoke Increases
Work in stockinette stitch (knit every round).
Inc Rnd:
*Knit to 1 st before marker, M1R, k1, sm, k1, M1L; repeat from * to end of round (4 markers → 8 sts increased: 2 sts added to Front and 2 sts added to Back each Inc Rnd; straps unchanged).
Work Inc Rnd every other round 26 (31, 34, 39, 42, 47, 50, 55, 58) times, working one plain knit round between each Inc Rnd.
After all increases:
Front = 86 (100, 110, 124, 134, 148, 158, 172, 182) sts
Back = 86 (100, 110, 124, 134, 148, 158, 172, 182) sts
Each Strap = 14 (14, 16, 16, 18, 18, 20, 20, 22) sts
Total yoke stitches: 200 (228, 252, 280, 304, 332, 356, 384, 408) ✓
Work even in St st (if needed) until armhole depth measures approximately 7 (7½, 8, 8½, 9, 9½, 10, 10½, 11)" / 18 (19, 20.5, 21.5, 23, 24, 25.5, 26.5, 28) cm from cast-on edge, or to desired armhole depth. (Larger sizes will naturally have slightly deeper armholes after the full increase sequence; this is intentional for mobility.)
Separate Straps & Join Body
Next round (divide and cast on underarms):
Place first 14 (14, 16, 16, 18, 18, 20, 20, 22) sts (Right Strap) on waste yarn or holder,
remove marker,
knit across Front 86 (100, 110, 124, 134, 148, 158, 172, 182) sts,
place next 14 (14, 16, 16, 18, 18, 20, 20, 22) sts (Left Strap) on waste yarn,
remove marker,
using backward-loop or knitted cast-on, CO 12 (12, 14, 14, 16, 16, 18, 18, 20) sts for left underarm, pm for new beginning of round (left side),
knit across Back 86 (100, 110, 124, 134, 148, 158, 172, 182) sts,
CO 12 (12, 14, 14, 16, 16, 18, 18, 20) sts for right underarm,
pm (right side marker—optional), join to Front.
Body stitch count: 224 (252, 280, 308, 336, 364, 392, 420, 448) sts ✓
(Front + Back + 2 underarms = bust stitches)
Body
Work even in stockinette stitch (knit every round) until body measures 13 (13, 13½, 13½, 14, 14, 14½, 14½, 15)" / 33 (33, 34.5, 34.5, 35.5, 35.5, 37, 37, 38) cm from underarm cast-on, or 1" / 2.5 cm less than total desired length.
Hem
Work 1×1 rib (k1, p1) for 1" / 2.5 cm.
Bind off loosely in rib pattern.
Armhole Bands (make 2)
Return held strap stitches to larger needle (or smaller needle for firmer rib).
With RS facing, beginning at center of underarm cast-on, pick up and knit 12 (12, 14, 14, 16, 16, 18, 18, 20) sts across underarm,
pick up and knit approximately 3 sts for every 4 rows along the armhole edge up to the strap,
knit across the 14 (14, 16, 16, 18, 18, 20, 20, 22) strap sts,
pick up and knit the same number of sts down the remaining armhole edge.
Total picked-up stitches will vary slightly by row gauge; aim for a multiple of 2 for 1×1 rib (approximately 70–110 sts depending on size). Place marker and join to work in the round.
Work 1×1 rib for ¾–1" / 2–2.5 cm.
Bind off loosely in rib.
Repeat for second armhole.
Neckband Finishing
With RS facing and beginning at left back shoulder/strap edge, pick up and knit stitches evenly around the entire neckline (approximately 1 st per cast-on st along original neck edge, plus a few extra at strap corners if needed for smoothness). Adjust to a multiple of 2.
Join and work 1×1 rib for ¾–1" / 2–2.5 cm.
Bind off loosely in rib.
Finishing
Weave in all ends securely on the wrong side.
Block the tank to finished measurements, pinning the hem, armholes, and neckline gently so edges lie flat and the stockinette fabric relaxes. Allow to dry completely.
Optional: steam or wet-block according to your yarn’s care instructions (cotton/linen often benefits from a good wet block).
Schematic Measurements (blocked)
- Bust: 32 (36, 40, 44, 48, 52, 56, 60, 64)"
- Armhole depth: approx. 7–11" (see yoke instructions)
- Strap width: approx. 2 (2, 2¼, 2¼, 2½, 2½, 2¾, 2¾, 3)"
- Body length from underarm to hem: 14 (14, 14½, 14½, 15, 15, 15½, 15½, 16)" including rib
- Total length adjustable
Customization Tips (Beginner-Friendly)
- Cropped: Work body only 8–10" from underarm before hem rib.
- Longer/tunic: Add 2–4" to body length.
- Closer fit: Choose a size with 0–1" ease.
- Wider straps: Cast on 2 extra stitches per strap at the beginning and keep them throughout.
- Waist shaping (optional): After 3–4" of body, decrease 4 sts (k2tog at each side marker) every 8th round 3 times, then increase back the same way before the hem.
Enjoy your new tank!
Disclaimer: This pattern was generated by AI and should be reviewed for accuracy before use. While we strive for quality, AI-generated content may contain errors. Please verify measurements, stitch counts, charts, and instructions before beginning your project. Generated by purlJam.uk
Love this pattern?
Save this pattern to your free PurlJam libraryAccess your pattern anytime
Bookmark this page to access your pattern anytime