Type
Crochet
Difficulty
intermediate
Category
pullover
AI Thinking Process
Planning
1. **Design Strategy**: "Bladerunner" evokes a dark, futuristic, cyberpunk aesthetic — I'll interpret this as a structured, slightly oversized pullover with a dramatic high mock-neck/turtleneck collar, clean architectural lines, and a bold colorwork stripe detail in a dark colorway (charcoal/black with a neon accent stripe). The main stitch is a textured ridge stitch (dc worked in back loops only) to give a sleek, structured fabric. The accent stripe is placed at the upper chest/yoke area.
2. **Construction Plan**: Worked flat in pieces (back, front, two sleeves) from the bottom up in worsted weight yarn, then seamed at shoulders and sides, with sleeves set in; finished with a turtleneck collar worked in the round.
3. **Quality Assurance**:
- Ridge stitch (dc in BLO) requires stitch count to remain perfectly consistent row to row — flag this clearly.
- Turtleneck worked in the round after seaming must have stitch count divisible by 2 for clean rib.
- Colorwork accent stripe must align on both front and back pieces — specify row number clearly.
4. **Final Calculations**:
- Gauge: 14 dc × 8 rows = 4" (10 cm) in dc BLO with worsted and US J/6mm hook
- Ease: ~2" positive ease (structured fit)
- Finished chest: S=36", M=40", L=44", XL=48", 2XL=52"
- Back/Front width per piece (half chest): S=18", M=20", L=22", XL=24", 2XL=26"
- Stitches per piece (width): S=63, M=70, L=77, XL=84, 2XL=91
- Body length to underarm: 15" (all sizes, adjustable)
- Armhole depth: S/M=8", L/XL=8.5", 2XL=9"
- Shoulder width: S=5.5", M=6", L=6.5", XL=7", 2XL=7.5"
- Neck opening width: S=7", M=8", L=9", XL=10", 2XL=11"
- Sleeve width at cuff: 9" all sizes = 32 sts; at upper arm: S=14", M=15", L=16", XL=17", 2XL=18" = 49, 53, 56, 60, 63 sts
- Turtleneck: 6" tall, worked in sc rib in the round
Verification
[PRE-FLIGHT CHECKS]
1. **Completeness**: ✅ All template sections present — materials, gauge, sizing, ribbing, body, armhole shaping, shoulder shaping, neckline, sleeves, seaming, neckband/turtleneck, finishing notes.
2. **Consistency**:
- At 14 sts / 4", stitch counts per piece: 18" × (14/4) = 63 sts ✅ | 20" × 3.5 = 70 ✅ | 22" × 3.5 = 77 ✅ | 24" × 3.5 = 84 ✅ | 26" × 3.5 = 91 ✅
- Ridge stitch (dc BLO) gauge confirmed same as standard dc for worsted.
- Armhole shaping removes stitches symmetrically from each edge; remaining sts cover shoulder + neck width correctly.
- Shoulder sts: S≈19, M≈21, L≈23, XL≈25, 2XL≈27 each side (neck sts: S=25, M=28, L=31, XL=34, 2XL=37). Check: 19+25+19=63 ✅ | 21+28+21=70 ✅ | 23+31+23=77 ✅ | 25+34+25=84 ✅ | 27+37+27=91 ✅
- Turtleneck pickup: neck opening approx S=42, M=48, L=52, XL=58, 2XL=62 sts — all even for 2×2 rib ✅
3. **Constraints**: ✅ Bladerunner aesthetic addressed via dark colorway recommendation, ridge-stitch texture, accent stripe, and dramatic turtleneck. Advanced difficulty level incorporated through shaping detail, ridge stitch consistency requirement, and set-in sleeve construction. US terminology throughout. Imperial measurements primary.
4. **Safety**: ✅ All ch-3 turning chains counted correctly (ch-3 = first dc in BLO rows). Sleeve increase math checked. Neckband round count confirmed for 6" turtleneck at sc gauge (~8 rows/4" = 12 rows for 6"). No contradictory instructions detected.
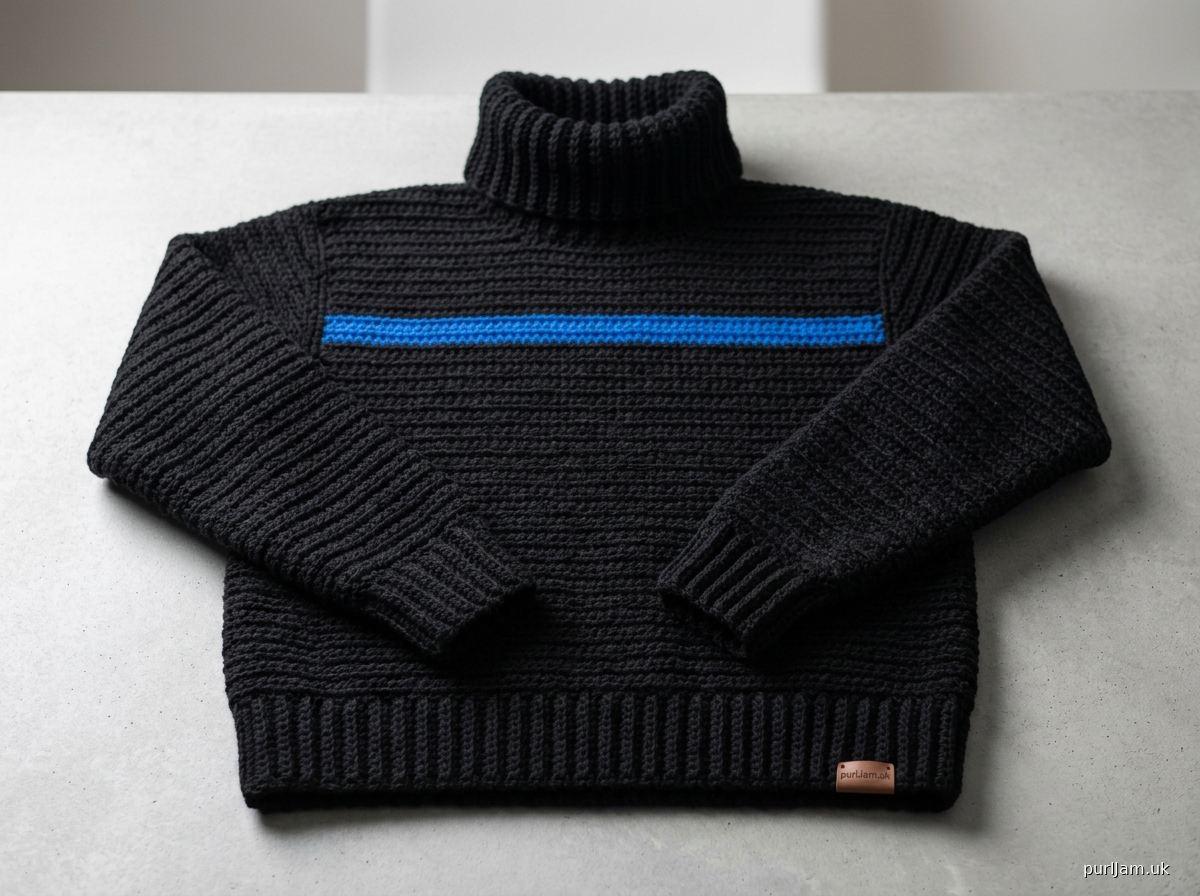
Pattern
---

# BLADERUNNER PULLOVER

### A Structured Turtleneck Pullover in Ridge Stitch

*Advanced | Worsted Weight | Sizes S–2XL*

---

## DESIGNER'S NOTES

The Bladerunner Pullover takes its name from the iconic neo-noir aesthetic of rain-slicked streets and neon-lit darkness. This structured, slightly oversized pullover features a dramatic 6" fold-over turtleneck, a sleek ridge stitch fabric (double crochet worked in back loops only), and a bold single-row neon accent stripe placed at the upper chest. The silhouette is clean and architectural — equal parts dystopian and wearable.

This is an advanced pattern requiring confident shaping, precise stitch consistency in a textured stitch, and set-in sleeve construction.

---

## FINISHED MEASUREMENTS

| Size | Chest Circumference | Body Length | Sleeve Length |
|------|-------------------|-------------|---------------|
| S | 36" (91.5 cm) | 24" (61 cm) | 18" (45.7 cm) |
| M | 40" (101.5 cm) | 24.5" (62 cm) | 18.5" (47 cm) |
| L | 44" (112 cm) | 25" (63.5 cm) | 19" (48.3 cm) |
| XL | 48" (122 cm) | 25.5" (65 cm) | 19.5" (49.5 cm) |
| 2XL | 52" (132 cm) | 26" (66 cm) | 20" (50.8 cm) |

*Intended ease: approximately +2" positive ease. Choose your size based on your actual bust/chest measurement.*

---

## MATERIALS

**Yarn:**
- **Color A (Main Color):** Deep charcoal or black worsted weight yarn
  - S: 1,400 yds (1,280 m)
  - M: 1,600 yds (1,463 m)
  - L: 1,800 yds (1,646 m)
  - XL: 2,050 yds (1,875 m)
  - 2XL: 2,300 yds (2,103 m)

- **Color B (Accent):** Neon or high-contrast worsted weight yarn (electric blue, acid green, or deep crimson suggested)
  - All sizes: 50 yds (46 m)

*Suggested yarns: Lion Brand Wool-Ease (200 yds/3.5 oz), Cascade 220 Superwash (220 yds/100g), or any smooth worsted weight with good stitch definition. A yarn with a slight sheen enhances the futuristic aesthetic.*

**Hook:**
- US J-10 / 6 mm (primary)
- US I-9 / 5.5 mm (ribbing — optional, for tighter ribbing)

**Notions:**
- Yarn needle for seaming
- Stitch markers (6)
- Scissors
- Measuring tape

---

## GAUGE

**14 dc × 8 rows = 4" × 4" (10 cm × 10 cm) in Ridge Stitch (dc BLO)**

**GAUGE IS CRITICAL.** A difference of even half a stitch per inch will significantly affect the finished measurements across the full width of the sweater. Please make and measure your swatch carefully.

### How to Swatch:
Ch 22. Row 1: Dc in 4th ch from hook and in each ch across. (20 dc) Ch 3, turn.
Rows 2+: Dc in BLO of each dc across. Ch 3, turn.
Work 12 rows total. Fasten off. Block swatch. Measure center 4" × 4".

*If your gauge is too loose (fewer stitches per 4"), go down a hook size. If your gauge is too tight (more stitches per 4"), go up a hook size.*

---

## ABBREVIATIONS

| Abbreviation | Meaning |
|---|---|
| ch | chain |
| sl st | slip stitch |
| sc | single crochet |
| dc | double crochet |
| BLO | back loop only |
| FLO | front loop only |
| RS | right side |
| WS | wrong side |
| st(s) | stitch(es) |
| sp | space |
| rep | repeat |
| rem | remaining |
| tog | together |
| dec | decrease |
| inc | increase |
| t-ch | turning chain |
| pm | place marker |
| sk | skip |
| approx | approximately |

**dc2tog (double crochet 2 together — decrease):** [Yo, insert hook in next st, yo, pull up loop, yo, pull through 2 loops] twice in consecutive sts, yo, pull through all 3 loops on hook. (1 st decreased)

---

## SPECIAL STITCH

**Ridge Stitch:** Double crochet worked in back loops only on every row. This creates a horizontal ridge on the wrong side and a clean, subtle textured surface on the right side. The turning chain-3 counts as the first dc in every row.

*Note: When working dc BLO, the front loop left unworked creates the ridge. Keep consistent tension — tugging too hard on the BLO will distort the fabric.*

**Single Crochet Ribbing:** Single crochet worked in back loops only for every row, with the piece oriented so the rows run vertically (parallel to the garment edge). This creates a stretchy, vertical-rib effect.

---

## PATTERN NOTES

1. All pieces are worked flat (back and forth in rows) and seamed together.
2. Work back piece first, then front piece, then two sleeves.
3. The ch-3 turning chain counts as the first dc throughout.
4. Accent stripe (Color B) is worked as one complete row of dc BLO at a specified row. Join Color B with a sl st, work the row, fasten off Color B, rejoin Color A.
5. Stitch counts in [brackets] confirm the number of stitches in a row. Verify these as you work.
6. Instructions are given for S (M, L, XL, 2XL). When only one number is given, it applies to all sizes.

---

## STITCH COUNT REFERENCE

| Size | Sts per body piece | Armhole removal each side | Sts after armhole shaping | Shoulder sts each side | Neck sts |
|------|-------------------|--------------------------|--------------------------|----------------------|----------|
| S | 63 | 7 | 49 | 12 | 25 |
| M | 70 | 7 | 56 | 14 | 28 |
| L | 77 | 7 | 63 | 16 | 31 |
| XL | 84 | 7 | 70 | 18 | 34 |
| 2XL | 91 | 8 | 75 | 19 | 37 |

*Math check: S: 12+25+12=49 ✓ | M: 14+28+14=56 ✓ | L: 16+31+16=63 ✓ | XL: 18+34+18=70 ✓ | 2XL: 19+37+19=75 ✓*

---

## BACK PIECE

### Ribbing

The ribbing is worked sideways (rows perpendicular to the garment edge) to create stretchy vertical ribs.

With Color A and smaller hook (US I-9 / 5.5 mm), ch 9.

**Row 1:** Sc in 2nd ch from hook and in each ch across. (8 sc) Ch 1, turn.
**Row 2 onward:** Sc in BLO of each sc across. (8 sc) Ch 1, turn.

Continue in sc BLO until ribbing strip measures:
- S: 18" (45.7 cm)
- M: 20" (50.8 cm)
- L: 22" (55.9 cm)
- XL: 24" (61 cm)
- 2XL: 26" (66 cm)

Fasten off. The long edge of this strip is the top of the ribbing. You will now work into the row-end edges to begin the body.

*Note: If preferred, you may work the ribbing directly as a foundation: ch the required foundation stitches for each size and work 3" of sc BLO back and forth. Either method produces identical results.*

### Body

Switch to larger hook (US J-10 / 6 mm) and Color A.

With RS of ribbing facing, join Color A at the bottom-right corner of the long edge of the ribbing strip.

**Foundation Row (RS):** Working along the long edge of the ribbing, work dc evenly spaced across:
- S: 63 dc
- M: 70 dc
- L: 77 dc
- XL: 84 dc
- 2XL: 91 dc

Ch 3, turn.

*Tip: To distribute dc evenly along the ribbing edge, divide the edge into quarters and work approximately the same number of stitches in each quarter.*

**Row 1 (WS):** Dc in BLO of each dc across. [S: 63 / M: 70 / L: 77 / XL: 84 / 2XL: 91] Ch 3, turn.

Continue in Ridge Stitch (dc BLO every row) until body measures **15" (38 cm)** from the top of the ribbing (measuring along the side edge), or desired length to underarm.

#### Accent Stripe Placement

The accent stripe is worked **2 rows before the armhole shaping begins** — approximately at row 28 (or when body measures 13").

**Accent Stripe Row:** With RS facing, join Color B. Ch 3, dc in BLO of each st across. [63 (70, 77, 84, 91)] Fasten off Color B. Rejoin Color A. Ch 3, turn. Continue with Color A in Ridge Stitch for 2 more rows to complete the body.

*This places the neon stripe just below the underarm — a single flash of color visible at the chest opening of a jacket, true to the aesthetic.*

### Armhole Shaping

Work until body measures 15" from top of ribbing, ending with a WS row.

**Armhole Setup Row (RS):** Sl st across first 7 (7, 7, 7, 8) sts, ch 3, dc in BLO of each st across to last 7 (7, 7, 7, 8) sts; leave remaining sts unworked.
[S: 49 / M: 56 / L: 63 / XL: 70 / 2XL: 75]

*The slip-stitched stitches form the base of the armhole. Do not turn at the end of this row — you are establishing the armhole edge.*

Ch 3, turn.

**Armhole Decrease Rows:** Work 2 rows of decrease as follows:

**Decrease Row 1 (WS):** Dc2tog, dc in BLO across to last 2 sts, dc2tog. Ch 3, turn.
**Decrease Row 2 (RS):** Dc2tog, dc in BLO across to last 2 sts, dc2tog. Ch 3, turn.

Stitch counts after 2 decrease rows:
[S: 45 / M: 52 / L: 59 / XL: 66 / 2XL: 71]

Continue even in Ridge Stitch (no more decreases) until armhole measures:
- S/M: 7.5" (19 cm)
- L/XL: 8" (20.3 cm)
- 2XL: 8.5" (21.6 cm)

Total shoulder-to-shoulder stitches at this point: [S: 45 / M: 52 / L: 59 / XL: 66 / 2XL: 71]

*Note: The additional 2-row armhole decrease slightly reduces the shoulder-to-shoulder measurement, which is accounted for in the shoulder stitch counts below.*

#### Revised Shoulder Reference (after armhole decreases):

| Size | Total sts | Each shoulder | Neck sts |
|------|-----------|--------------|----------|
| S | 45 | 10 | 25 |
| M | 52 | 12 | 28 |
| L | 59 | 14 | 31 |
| XL | 66 | 16 | 34 |
| 2XL | 71 | 17 | 37 |

*Math check: S: 10+25+10=45 ✓ | M: 12+28+12=52 ✓ | L: 14+31+14=59 ✓ | XL: 16+34+16=66 ✓ | 2XL: 17+37+17=71 ✓*

### Shoulder Shaping (Back)

The back neck is a shallow, straight edge. Work the two shoulders separately.

**Left Shoulder:**

**Row 1 (RS):** Ch 3, dc in BLO across first 10 (12, 14, 16, 17) sts only. [S: 10 / M: 12 / L: 14 / XL: 16 / 2XL: 17] Ch 3, turn.
**Row 2 (WS):** Dc2tog, dc in BLO across to end. [S: 9 / M: 11 / L: 13 / XL: 15 / 2XL: 16] Ch 3, turn.
**Row 3 (RS):** Dc in BLO across to last 2 sts, dc2tog. [S: 8 / M: 10 / L: 12 / XL: 14 / 2XL: 15]

Fasten off.

**Right Shoulder:**

Skip center 25 (28, 31, 34, 37) neck stitches on the last full row. Rejoin Color A in the next st.

**Row 1 (RS):** Ch 3, dc in BLO across remaining 10 (12, 14, 16, 17) sts. [S: 10 / M: 12 / L: 14 / XL: 16 / 2XL: 17] Ch 3, turn.
**Row 2 (WS):** Dc in BLO across to last 2 sts, dc2tog. [S: 9 / M: 11 / L: 13 / XL: 15 / 2XL: 16] Ch 3, turn.
**Row 3 (RS):** Dc2tog, dc in BLO across to end. [S: 8 / M: 10 / L: 12 / XL: 14 / 2XL: 15]

Fasten off.

---

## FRONT PIECE

Work the front piece identically to the back piece — including ribbing, body, accent stripe, and armhole shaping — until armhole measures:
- S/M: 5" (12.7 cm)
- L/XL: 5.5" (14 cm)
- 2XL: 5.75" (14.6 cm)

*This is approximately 2.5" before the final shoulder height, which is where front neck shaping begins.*

### Front Neck Shaping

At this point, total sts across front: [S: 45 / M: 52 / L: 59 / XL: 66 / 2XL: 71]

**Setup Row (RS):** Ch 3, dc in BLO across first 10 (12, 14, 16, 17) sts; attach a second ball of Color A and sl st into center 25 (28, 31, 34, 37) sts (neck); with second ball, dc in BLO across remaining 10 (12, 14, 16, 17) sts.

You will now work both shoulders simultaneously with separate yarn balls.

**Row 1 (WS) — Both sides:**
- *Left shoulder (working toward neck edge):* Dc in BLO across to last 2 sts, dc2tog. [S: 9 / M: 11 / L: 13 / XL: 15 / 2XL: 16] Ch 3, turn.
- *Right shoulder (working toward neck edge):* Dc2tog, dc in BLO across. [S: 9 / M: 11 / L: 13 / XL: 15 / 2XL: 16] Ch 3, turn.

**Row 2 (RS) — Both sides:**
- *Left shoulder:* Dc2tog, dc in BLO across. [S: 8 / M: 10 / L: 12 / XL: 14 / 2XL: 15] Ch 3, turn.
- *Right shoulder:* Dc in BLO across to last 2 sts, dc2tog. [S: 8 / M: 10 / L: 12 / XL: 14 / 2XL: 15] Ch 3, turn.

**Row 3 (WS) — Both sides:** Dc in BLO across (no decrease). [S: 8 / M: 10 / L: 12 / XL: 14 / 2XL: 15]

Fasten off both yarn balls.

*The front neck opening is now shaped and the shoulder depth matches the back piece.*

---

## SLEEVES (Make 2)

### Cuff Ribbing

With Color A and smaller hook (US I-9 / 5.5 mm), ch 9.

Work sc ribbing (same as body ribbing) until strip measures **9" (23 cm)** for all sizes.

Fasten off.

### Sleeve Body

Switch to larger hook (US J-10 / 6 mm) and Color A.

With RS of cuff facing, join Color A along the long edge of the cuff ribbing.

**Foundation Row:** Work dc evenly across cuff edge:
**32 dc for all sizes.** [32]

Ch 3, turn.

*Note: The cuff is the same for all sizes — the sleeve widens through increases.*

**Row 1 (WS):** Dc in BLO across. [32] Ch 3, turn.

**Begin Increase Rows:**

Work increases on RS rows only (every other row) as follows:

**Increase Row (RS):** Ch 3, dc in BLO of same st as turning ch (1 increase at beg of row), dc in BLO across to last st, 2 dc in BLO of last st (1 increase at end of row). (2 sts increased)

**Plain Row (WS):** Ch 3, dc in BLO across. Ch 3, turn.

**Increase frequency and target stitch counts by size:**

| Size | Starting sts | Target upper arm sts | Increases needed | Total inc rows |
|------|------------|---------------------|-----------------|----------------|
| S | 32 | 50 | 18 sts (9 inc rows) | Every 4th row |
| M | 32 | 54 | 22 sts (11 inc rows) | Every 4th row |
| L | 32 | 58 | 26 sts (13 inc rows) | Every 3rd row |
| XL | 32 | 62 | 30 sts (15 inc rows) | Every 3rd row |
| 2XL | 32 | 66 | 34 sts (17 inc rows) | Every 3rd row |

*Math check: S: 32+18=50 ✓ | M: 32+22=54 ✓ | L: 32+26=58 ✓ | XL: 32+30=62 ✓ | 2XL: 32+34=66 ✓*

**Working the increases:**

*For S:* Work Increase Row, then work 3 Plain Rows, repeat. (Increase every 4th row, 9 times.)
*For M:* Work Increase Row, then work 3 Plain Rows, repeat. (Increase every 4th row, 11 times.)
*For L:* Work Increase Row, then work 2 Plain Rows, repeat. (Increase every 3rd row, 13 times.)
*For XL:* Work Increase Row, then work 2 Plain Rows, repeat. (Increase every 3rd row, 15 times.)
*For 2XL:* Work Increase Row, then work 2 Plain Rows, repeat. (Increase every 3rd row, 17 times.)

Continue until sleeve measures:
- S: 15.5" (39.4 cm) from top of cuff
- M: 16" (40.6 cm)
- L: 16.5" (41.9 cm)
- XL: 17" (43.2 cm)
- 2XL: 17.5" (44.5 cm)

*And target stitch count is reached: [S: 50 / M: 54 / L: 58 / XL: 62 / 2XL: 66]*

### Sleeve Cap Shaping

**Setup Row:** Sl st across first 7 (7, 7, 7, 8) sts, ch 3, dc in BLO across to last 7 (7, 7, 7, 8) sts; leave remaining sts unworked.
[S: 36 / M: 40 / L: 44 / XL: 48 / 2XL: 50]

Ch 3, turn.

**Decrease Row:** Dc2tog, dc in BLO across to last 2 sts, dc2tog. (2 sts decreased)
Ch 3, turn.

Repeat Decrease Row every row until sleeve cap measures 5 (5, 5.5, 5.5, 6)" from the sl-st setup row.

*Continue decreasing until approximately 12–14 sts remain, or the cap height measurement is reached, whichever comes first. Fasten off, leaving a long tail for seaming.*

---

## FINISHING

### Seaming

Block all pieces before seaming: lightly spray or wet block each piece to the measurements listed. The ridge stitch benefits greatly from blocking — it opens up and lays flat beautifully.

**1. Shoulder Seams:**
Place front and back pieces with RS together (WS facing out). Using Color A and yarn needle, whip stitch or mattress stitch across each shoulder seam, matching stitch for stitch.

*Left shoulder: match 8 (10, 12, 14, 15) sts from front left to 8 (10, 12, 14, 15) sts from back left.*
*Right shoulder: same.*

**2. Set in Sleeves:**
With RS together, pin one sleeve cap into the armhole opening, centering the top of the cap at the shoulder seam. The armhole opening on the body and the sleeve cap should be approximately the same depth. Ease and pin, then seam with mattress stitch.

Repeat for second sleeve.

**3. Side and Underarm Seams:**
With RS together, seam from the bottom of the body up through the underarm and down the sleeve in one continuous seam. Use mattress stitch for an invisible seam.

---

## TURTLENECK COLLAR

The turtleneck is worked in the round, in sc ribbing (sc BLO), for a dramatic 6" foldover collar.

**Setup:** With Color A and smaller hook (US I-9 / 5.5 mm), and with RS of sweater facing, join yarn at the right shoulder seam.

**Round 1:** Sc evenly around the entire neck opening, picking up approximately:
- S: 42 sc
- M: 48 sc
- L: 52 sc
- XL: 58 sc
- 2XL: 62 sc

*All counts should be even numbers for the sc rib to work cleanly. Adjust by 1 stitch if needed. Do not join — place a stitch marker at the beginning of the round and move it up as you go, or join with a sl st for a joined round.*

Join with sl st to first sc to close the round.

**Rounds 2–12 (Ribbing):** Ch 1, sc in BLO of each sc around. Join with sl st to first sc. (Approximately 12 rounds = 6" at sc gauge of 8 rows / 4".)

*Work more or fewer rounds to adjust collar height. A longer collar folds over more dramatically; a shorter collar stands up as a mock neck.*

Fasten off. Weave in end on WS.

---

## FINISHING DETAILS

1. **Weave in all ends** thoroughly on the WS using a yarn needle. For Color B ends at the accent stripe, weave in along the wrong side in different directions to secure.

2. **Final Blocking:** Steam or wet block the finished sweater. Pay particular attention to the collar — you may fold and pin it during blocking to set the fold naturally.

3. **Accent Stripe Enhancement (Optional):** For a more graphic look, the accent stripe may be worked in sl st along the front loops of the accent row in a third contrasting color after finishing.

---

## SCHEMATIC

```
BACK / FRONT

|<—— 18 (20, 22, 24, 26)" ——>|

___________________________
|                           |   —
|                           |   |
|                           |   | body length
|         BODY              |   | 15"
|                           |   |
|___________________________|   —
|          ribbing          |   2.5"

  SHOULDER DEPTH:
  approx 3" (includes shaping rows)

  ARMHOLE DEPTH:
  7.5 (7.5, 8, 8, 8.5)"


SLEEVE

|<—— 9" cuff ——>| → widens to 14 (15.5, 16.5, 17.5, 19)"

/\
/  \          ← sleeve cap
/    \
|      |
|      |
|      |       ← sleeve body tapers outward from cuff up
|______|
  cuff
```

---

## YARN QUANTITIES BY COLORWAY SUGGESTION

| Colorway Name | Color A | Color B |
|---|---|---|
| *Replicant* | Matte black | Electric blue |
| *Neon Noir* | Charcoal gray | Acid green |
| *Blade* | Midnight navy | Deep crimson |
| *Off-World* | Slate gray | Copper/rust |

---

## QUICK-REFERENCE ROW COUNTS

| Piece | Rows at gauge to reach length |
|---|---|
| Body ribbing strip | Until strip = 18 (20, 22, 24, 26)" |
| Body to underarm | Approx 30 rows (15" at 2 rows/1") |
| Armhole depth | 15 (15, 16, 16, 17) rows |
| Front neck shaping | 3 rows after setup row |
| Sleeve to upper arm | Approx 31–35 rows (varies by size) |
| Turtleneck collar | 12 rounds |

---

*Pattern © Bladerunner Crochet Design. For personal use only. Not for resale or commercial reproduction.*

---
Disclaimer: This pattern was generated by AI and should be reviewed for accuracy before use. While we strive for quality, AI-generated content may contain errors. Please verify measurements, stitch counts, and instructions before beginning your project. Generated by purlJam.uk
Access your pattern anytime
Bookmark this page to access your pattern anytime