Type
Knitting
Difficulty
beginner
Category
amigurumi
Pattern
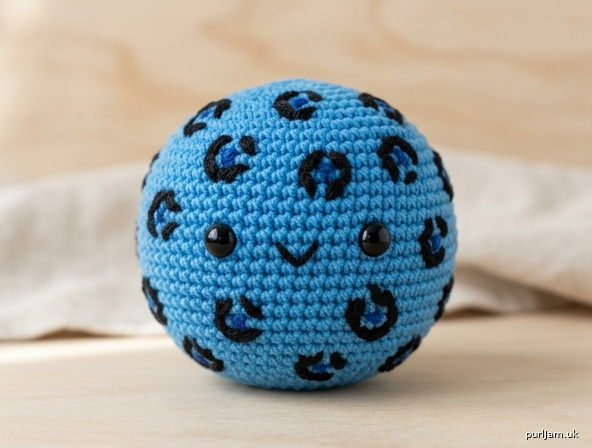
# Bluey the Leopard-Spot Ball
### A Beginner Crochet Amigurumi Pattern (UK Terminology)

A cheerful, palm-sized blue ball decorated with classic leopard-print spots. Perfect first amigurumi project — uses only the magic ring, double crochet (dc), increases, and decreases. Great as a stress ball, baby-safe toy (omit safety eyes), or pocket pal.

---

## Finished Size
- Approximately **8 cm (3¼ in)** diameter

## Tension (Gauge)
- 16 dc x 16 rounds = 10 cm (4 in) square, worked in continuous rounds
- Exact tension is not critical — just work tightly enough that stuffing does not show through.

## Materials
- **Yarn**: Worsted weight (DK/Aran category 4) acrylic or cotton
  - **MC**: Bright blue — approx. 30 g
  - **CC1**: Black — small amount for spots
  - **CC2**: Royal/dark blue — small amount for spot centres (optional contrast)
- **Hook**: 3.5 mm (UK 9 / US E-4)
- **Notions**:
  - Polyester fibrefill stuffing (approx. 20 g)
  - Stitch marker
  - Yarn/tapestry needle
  - Scissors
  - Optional: 6 mm safety eyes (insert between Rnds 5 and 6)

## Abbreviations (UK Terms)
| Abbrev. | Meaning |
|---|---|
| ch | chain |
| dc | double crochet (= US sc) |
| MR | magic ring |
| inc | 2 dc in same stitch (increase) |
| dec | invisible decrease (work 2 dc together through front loops) |
| st(s) | stitch(es) |
| rnd | round |
| sl st | slip stitch |
| [ ] | total stitch count at end of round |

## Notes Before You Begin
- Work in **continuous spirals** — do NOT join rounds. Place a stitch marker in the first stitch of each round and move it up as you go.
- Work into the **back loops only? No** — work through both loops unless stated.
- Use the **invisible decrease** for a smoother finish: insert hook through the front loops of the next 2 sts, yarn over, pull through 2 loops, yarn over, pull through 2.

---

## Pattern Instructions

### The Body (make 1 in MC – Blue)

**Rnd 1:** 6 dc in MR. **[6 sts]** ✓ *(6 = 6)*

**Rnd 2:** inc in each st around. **[12 sts]** ✓ *(6 × 2 = 12)*

**Rnd 3:** (dc in next st, inc) 6 times. **[18 sts]** ✓ *(6 × 3 = 18)*

**Rnd 4:** (dc in next 2 sts, inc) 6 times. **[24 sts]** ✓ *(6 × 4 = 24)*

**Rnd 5:** dc in each st around. **[24 sts]**

**Rnd 6:** dc in each st around. **[24 sts]**
*(Optional: insert safety eyes between Rnds 5 and 6, approx. 4 sts apart, centred over Rnds 5–6.)*

**Rnd 7:** dc in each st around. **[24 sts]**

**Rnd 8:** dc in each st around. **[24 sts]**

**Rnd 9:** (dc in next 2 sts, dec) 6 times. **[18 sts]** ✓ *(6 × 3 = 18)*

→ **Begin stuffing firmly** with fibrefill. Continue stuffing as you decrease.

**Rnd 10:** (dc in next st, dec) 6 times. **[12 sts]** ✓ *(6 × 2 = 12)*

→ Top up stuffing — make it firm and round.

**Rnd 11:** dec 6 times. **[6 sts]** ✓ *(6 ÷ 2 × 1 = 6 decreases of 2 sts → 6)*

**Fasten off**, leaving a 15 cm tail. Thread tail onto yarn needle, weave through the front loops of the remaining 6 sts, pull tight to close the hole. Knot and bury the tail inside the ball.

**Stitch count check:** 6 → 12 → 18 → 24 → 24 → 24 → 24 → 24 → 18 → 12 → 6 ✓ (classic sphere progression)

---

### Leopard Spots (Surface Embroidery)

Leopard spots are added as **embroidered rings** rather than crocheted pieces — much easier for beginners and gives a true leopard look.

**To make one spot:**
1. Thread CC1 (black) onto a yarn needle.
2. Bring needle up through the ball surface.
3. Embroider a small, irregular "C" or broken ring shape, approx. 1–1.5 cm across, using 4–6 small straight stitches. Do not close the ring fully — leopard spots are open shapes.
4. Optionally, fill the centre of the ring with 1–2 small straight stitches in CC2 (darker blue) for the classic two-tone leopard effect.
5. Pull yarn through to the next spot location inside the ball, or fasten off and re-start.

**Placement:**
- Scatter **8–12 spots** randomly across the surface of the ball.
- Vary the size and shape slightly — real leopard spots are irregular!
- Keep spots roughly 1.5–2 cm apart.
- Avoid placing spots directly over the magic ring or the closing hole.

---

### Optional Face
If making as a character rather than a print ball:
- **Eyes**: 6 mm safety eyes (inserted at Rnd 5–6) OR embroider two small black satin-stitch ovals.
- **Nose/mouth**: Embroider a small pink or black triangle nose with a tiny V-shaped mouth below using CC1.

---

## Finishing
1. Weave in all loose ends, burying them inside the stuffed ball.
2. Gently roll the finished ball between your palms to even out the shape.
3. Steam lightly (do not press) if using acrylic yarn to smooth the surface.

---

## Care Instructions
- Hand wash in cool water with mild detergent.
- Squeeze gently (do not wring) and air dry flat.
- Reshape while damp.

---

## Troubleshooting Tips
- **Holes between stitches?** Go down a hook size (try 3.0 mm).
- **Lumpy shape?** Stuff in small pinches, not big clumps. Push stuffing into the edges first.
- **Losing your round?** Always move the stitch marker up into the first stitch of each new round.
- **Spots look messy?** Use shorter embroidery stitches and pull tension even — practise on a swatch first.

---

**Designer's Note**: Once you've mastered this simple sphere, try making a whole "wild ball" collection — pink with cheetah spots, orange with tiger stripes, or yellow with giraffe patches. The base sphere pattern stays the same; only the surface embroidery changes. Happy hooking! 🧶💙
Disclaimer: This pattern was generated by AI and should be reviewed for accuracy before use. While we strive for quality, AI-generated content may contain errors. Please verify measurements, stitch counts, and instructions before beginning your project. Generated by purlJam.uk
Access your pattern anytime
Bookmark this page to access your pattern anytime