Type
Knitting
Difficulty
beginner
Category
pullover
Pattern
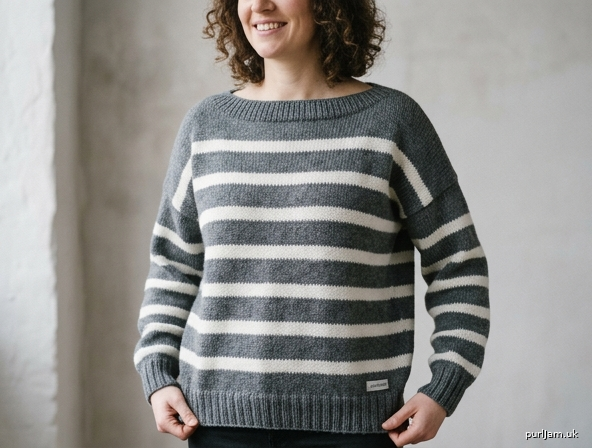
# Boxy Striped Drop-Shoulder Sweatshirt
### A Beginner Boatneck Pullover in Grey with White Stripes

A relaxed, oversized sweatshirt-style jumper worked in simple stocking stitch with bold horizontal stripes. With straight sides, dropped shoulders and an easy boatneck, there is almost no shaping — making it a perfect first garment.

---

## Sizes
| Size | S | M | L | XL | 2XL |
|------|---|---|---|----|-----|
| Finished chest | 102 cm | 112 cm | 122 cm | 132 cm | 142 cm |
| Body length | 60 cm | 62 cm | 64 cm | 66 cm | 68 cm |
| Armhole depth | 22 cm | 23 cm | 24 cm | 25 cm | 26 cm |

*Designed with 10–18 cm positive ease for a boxy fit. Choose your size based on finished chest, not body measurement.*

Figures are given as S (M, L, XL, 2XL) throughout. Where only one number appears, it applies to all sizes.

---

## Materials
- **Yarn:** Worsted (aran/medium) weight wool or wool blend.
  - **Main Colour (MC) – Grey:** approx. 700 (780, 860, 950, 1040) m
  - **Contrast Colour (CC) – White:** approx. 200 (220, 240, 260, 290) m
- **Needles:**
  - 5 mm (UK 6) needles for main fabric
  - 4 mm (UK 8) needles for ribbing
  - A 5 mm circular needle (optional, useful for picking up sleeve stitches)
- **Notions:** Stitch markers, tapestry/darning needle, tape measure.

---

## Tension (Gauge)
**18 sts and 24 rows = 10 cm** over stocking stitch on 5 mm needles, after blocking.
Take time to check your tension — it determines the finished size.

---

## Abbreviations (UK)
- **k** – knit
- **p** – purl
- **st(s)** – stitch(es)
- **st st** – stocking stitch (k on RS, p on WS)
- **RS / WS** – right side / wrong side
- **CO / BO** – cast on / bind (cast) off
- **MC / CC** – main colour (grey) / contrast colour (white)
- **rep** – repeat

---

## Stripe Sequence
Worked throughout the body and sleeves in stocking stitch:
- **8 rows MC (grey)**
- **4 rows CC (white)**

Repeat this 12-row sequence. Always begin counting the sequence from the first row after the ribbing.
*Tip: Carry the unused colour loosely up the left edge of the work; twist the two yarns once at the start of every other stripe row to avoid long floats.*

---

## BACK

Using 4 mm needles and MC, CO **92 (100, 110, 118, 128) sts**.

**Ribbing:**
Row 1 (RS): *k1, p1; rep from * to end.
Row 2 (WS): *k1, p1; rep from * to end.
Continue in k1, p1 rib until work measures **6 cm**, ending with a WS row.

**Body:**
Change to 5 mm needles. Beginning with a knit (RS) row, work in st st **following the Stripe Sequence**, starting with 8 rows MC.

Continue straight (no shaping) until Back measures **60 (62, 64, 66, 68) cm** from cast-on edge, ending with a WS row.

*Check: at tension, 92 sts ÷ 18 × 10 = 51.1 cm wide = half of 102 cm chest. ✓*

**Shoulders / Neck:**
Place a marker each side of the centre **36 sts** — these will be left unworked for the boatneck.
You will have **28 (32, 37, 41, 46) sts** at each shoulder.
BO all **92 (100, 110, 118, 128) sts** loosely. (28 shoulder + 36 centre + 28 shoulder = 92 ✓ for S; counts confirmed for all sizes.)

---

## FRONT

Work exactly as for the Back, including the same Stripe Sequence so stripes match at the side seams.

Because this is a **boatneck**, no neck shaping is required — work straight to the same length as the Back and bind off all sts.

---

## JOIN SHOULDERS

With RS together (or using mattress stitch from the RS), seam the **outer 28 (32, 37, 41, 46) sts** of each shoulder, leaving the centre **36 sts** of Front and Back open to form the boatneck.

*This gives a neck opening of approximately 40 cm — comfortable to pull over the head with no shaping.*

---

## SLEEVES (make 2, worked from the top down)

Lay the joined body flat and measure **22 (23, 24, 25, 26) cm** down from the shoulder seam along each straight side edge, marking this point on both Front and Back. This span is the armhole.

With RS facing, 5 mm needles and MC, pick up and knit **80 (82, 86, 90, 94) sts** evenly along the armhole edge (between your two markers, centred on the shoulder seam).

*Check: 22 cm armhole depth × 2 sides = 44 cm edge → 44 ÷ 10 × 18 ≈ 79 → 80 sts. ✓ (pick up roughly 3 sts for every 4 rows).*

Beginning with a purl (WS) row, work in st st **following the Stripe Sequence** (start with 8 rows MC) AND shape the sleeve as follows:

**Sleeve shaping:**
Decrease Row (RS): k1, k2tog, k to last 3 sts, ssk, k1. (2 sts decreased)
Work the Decrease Row on the **next RS row, then every following 6th row** a total of **14 (14, 15, 16, 17) times**.

Sts remaining: **52 (54, 56, 58, 60) sts**.

Continue straight until sleeve measures **40 (41, 42, 43, 44) cm** from pick-up edge, or 5 cm short of desired length, ending with a WS row.

**Cuff:**
Change to 4 mm needles and MC. Work in k1, p1 rib for **6 cm**.
BO loosely in rib.

Repeat for the second sleeve.

---

## NECK EDGING (Boatneck)

With RS facing, 4 mm needles and MC, beginning at one shoulder seam, pick up and knit evenly around the neck opening:
- **36 sts** across the Back centre
- a few sts at each shoulder seam (about 3 sts)
- **36 sts** across the Front centre
- a few sts at the second shoulder seam (about 3 sts)

Total approx. **78 sts**. Place a marker and join to work in the round.

Work in k1, p1 rib for **3 cm**. BO loosely in rib.
*Keep the bind-off relaxed so the neck stretches over the head.*

---

## FINISHING

1. **Side seams:** With MC and mattress stitch, seam each side from the cast-on hem up to the underarm (the point where the sleeve was picked up). Match the stripes carefully.
2. **Sleeve seams:** Seam each sleeve from underarm to cuff in one continuous line.
3. **Weave in all ends**, paying attention to the colour-change points so stripes stay crisp.
4. **Block** the finished jumper to the measurements given, smoothing the stripes flat and squaring the corners.

---

## Schematic (approximate, S size)
```
        |<------ 51 cm ------>|
        ____________________
       |   [28]  [36]  [28]  |   shoulders + boatneck
       |                     |
       |    grey/white       |  60 cm
       |    stripes          |
       |_____________________|
       |  6 cm k1,p1 rib     |
        ---------------------
   sleeves picked up 22 cm down each side,
   tapered to 52 sts, ending in 6 cm cuff.
```

---

### Designer's Notes
- **Beginner tip:** The whole jumper is just stocking stitch and rib — the only "shaping" is the gentle sleeve taper. If you prefer even simpler sleeves, you may skip the decreases and work straight, though they will be wider at the cuff.
- **Stripe alignment:** Starting every piece with the same 8-row grey block ensures the white stripes line up at all seams.
- **Customising length:** For a cropped look, work fewer body rows (e.g. 48–52 cm before shoulders); for a longline version, add rows in full 12-row stripe repeats to keep the pattern balanced.

Enjoy your cosy striped sweatshirt!
Disclaimer: This pattern was generated by AI and should be reviewed for accuracy before use. While we strive for quality, AI-generated content may contain errors. Please verify measurements, stitch counts, and instructions before beginning your project. Generated by purlJam.uk
Access your pattern anytime
Bookmark this page to access your pattern anytime