Type
Crochet
Difficulty
intermediate
Category
pullover
AI Thinking Process
Planning
Verification
Pattern
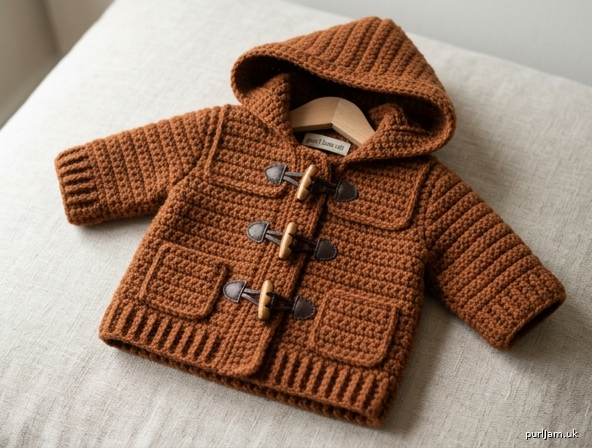
Build-A-Bear Duffel Coat
Classic Mini Toggle Coat — Crochet Pattern
Skill level: Intermediate
Size: One size — fits standard Build-A-Bear and similar 15–18" (38–46 cm) plush toys
Finished measurements:
- Chest (closed, with overlap): 16" (40.5 cm)
- Length (shoulder to hem): 7½" (19 cm)
- Sleeve length (underarm to cuff): 4½" (11.5 cm)
- Armhole depth: 2¾" (7 cm)
- Hood height (center back): approx. 4½" (11.5 cm)
Yarn
Worsted weight yarn (CYC 4), approx. 175 yd / 160 m main color (MC)
Small amount contrasting color (CC) optional for pocket lining or toggle accent (~10 yd)
Suggested: Wool or acrylic worsted that holds structure (e.g., Cascade 220, Red Heart Super Saver, Lion Brand Vanna’s Choice)
Hook & Notions
- US H/8 (5.0 mm) crochet hook, or size needed to obtain gauge
- US G/6 (4.0 mm) hook for tighter ribbing/bands (optional)
- Yarn needle
- Stitch markers
- 4–6 duffel toggles (wood/horn/plastic, ~¾–1" / 2–2.5 cm) or 4–6 buttons ⅝–¾" (1.5–2 cm)
- Matching sewing thread and needle for toggles
- Scissors
Gauge
14 dc and 8 rows = 4" (10 cm) in double crochet with larger hook
Work a 5" swatch, block lightly, and measure center 4".
Toy garments are unforgiving of gauge errors — check before starting. If you have fewer sts per 4", go down a hook; if more, go up.
Abbreviations (US)
ch – chain
st(s) – stitch(es)
sl st – slip stitch
sc – single crochet
sc blo – single crochet in back loop only
hdc – half double crochet
dc – double crochet
inc – increase (2 dc in same st)
dc2tog – double crochet 2 together (decrease)
RS – right side
WS – wrong side
MC – main color
rep – repeat
rem – remaining
Notes
- Coat is worked flat in pieces bottom-up (Back, Left Front, Right Front, Sleeves), then seamed. Hood, pockets, and front bands are added after.
- Turning ch-2 at start of dc rows counts as first dc unless noted.
- Turning ch-1 for sc/ribbing does not count as a st.
- Ribbing is worked in sc blo for stretch.
- Fronts include built-in overlap for classic duffel double-breasted look.
- Keep seams snug but not tight so the coat still flexes over stuffed limbs.
- Inline counts are validated with ✓ markers.
BACK
Ribbing
With larger hook and MC, ch 7.
Row 1: Sc in 2nd ch from hook and in each ch across, turn. — 6 sc
Rows 2–28: Ch 1, sc blo in each st across, turn. — 6 sc
Ribbing strip should measure approx. 8" (20.5 cm) relaxed.
Body
Rotate to work along long edge of ribbing.
Row 1 (RS): Ch 2 (counts as dc), work 27 dc evenly across long edge (about 1 dc per ribbing row end), turn. — 28 dc ✓ (8" × 3.5 dc/in = 28)
Rows 2–8: Ch 2, dc in each st across, turn. — 28 dc
Piece measures approx. 4" (10 cm) from top of ribbing / 5¼" (13.5 cm) total.
Armhole shaping
Row 9: Sl st in first 3 sts, ch 2, dc in next 22 sts, leave last 3 sts unworked, turn. — 23 dc ✓ (28 − 3 − 3 + turning structure = 23 working dc including ch-2 as first)
Count: skip 3 each side → 28 − 6 = 22 sts + ch-2 replacing first of remaining = treat as 23 dc total.
Rows 10–14: Ch 2, dc in each st across, turn. — 23 dc
Armhole depth approx. 2¾" (7 cm) over 6 rows. Total length from hem approx. 7½" (19 cm).
Shoulders
Row 15: Ch 2, dc in next 5 sts, hdc in next 2 sts, sc in next 7 sts (neck), hdc in next 2 sts, dc in last 6 sts. Fasten off.
Shoulder platforms: 6 sts each side; center neck 7 sts ✓ (6+2+7+2+6 = 23).
LEFT FRONT (as worn)
Ribbing
Ch 7.
Row 1: Sc in 2nd ch from hook and each ch across, turn. — 6 sc
Rows 2–16: Ch 1, sc blo across, turn. — 6 sc
Ribbing ≈ 4½" (11.5 cm).
Body
Rotate; work along long edge.
Row 1 (RS): Ch 2, work 15 dc evenly across, turn. — 16 dc ✓
Rows 2–8: Ch 2, dc across, turn. — 16 dc
Armhole shaping (armhole at side edge — end of RS rows)
Row 9 (RS): Ch 2, dc in next 12 sts, leave last 3 sts unworked, turn. — 13 dc ✓ (16 − 3 = 13)
Rows 10–12: Ch 2, dc across, turn. — 13 dc
Neck shaping (neck at center-front edge — beg of RS rows)
Row 13 (RS): Sl st in first 3 sts, ch 2, dc in each st to end, turn. — 10 dc ✓ (13 − 3 = 10)
Row 14: Ch 2, dc across to last 2 sts, dc2tog, turn. — 9 dc ✓
Row 15 (shoulder): Ch 2, dc in next 5 sts, hdc in next 2 sts, sc in last st. Fasten off. — 9 sts shaped to shoulder ✓
Mark RS. Front edge is the straight side opposite armhole (before neck sl sts).
RIGHT FRONT (as worn)
Ribbing
Work same as Left Front ribbing: ch 7, 6 sc, 16 rows sc blo.
Body
Row 1 (RS): Ch 2, 15 dc evenly across long edge, turn. — 16 dc
Rows 2–8: Ch 2, dc across, turn. — 16 dc
Armhole shaping (armhole at side edge — beg of RS rows)
Row 9 (RS): Sl st in first 3 sts, ch 2, dc in each st to end, turn. — 13 dc ✓
Rows 10–12: Ch 2, dc across, turn. — 13 dc
Neck shaping (neck at center-front — end of RS rows)
Row 13 (RS): Ch 2, dc to last 3 sts, leave last 3 unworked, turn. — 10 dc ✓
Row 14: Ch 2, dc2tog, dc in each st to end, turn. — 9 dc ✓
Row 15 (shoulder): Ch 1, sc in first st, hdc in next 2 sts, dc in last 6 sts. Fasten off. — 9 sts ✓
SLEEVES (make 2)
Cuff ribbing
Ch 7.
Row 1: Sc in 2nd ch from hook and each ch across, turn. — 6 sc
Rows 2–14: Ch 1, sc blo across, turn. — 6 sc
Cuff ≈ 4" (10 cm) relaxed.
Sleeve body
Rotate; work along long edge.
Row 1 (RS): Ch 2, work 13 dc evenly across, turn. — 14 dc ✓
Row 2: Ch 2, dc across, turn. — 14 dc
Row 3 (inc): Ch 2, dc in same st as ch-2 (inc), dc to last st, 2 dc in last st, turn. — 16 dc ✓ (14 + 2)
Row 4: Ch 2, dc across, turn. — 16 dc
Row 5 (inc): Rep Row 3. — 18 dc ✓
Row 6: Ch 2, dc across, turn. — 18 dc
Row 7 (inc): Rep Row 3. — 20 dc ✓
Row 8: Ch 2, dc across, turn. — 20 dc
Row 9 (inc): Rep Row 3. — 22 dc ✓
Rows 10–11: Ch 2, dc across, turn. — 22 dc
Sleeve length from cuff edge ≈ 4½–4¾" (11.5–12 cm). Fasten off, leaving a 12" (30 cm) tail for seaming.
HOOD
Seam both shoulders first (see Finishing) so neckline is one opening, then pick up for hood.
Pick-up round foundation
With RS facing, larger hook, MC: join yarn at right front neck edge.
Work sc evenly: 9 sts up right front neck, 7 sts across back neck, 9 sts down left front neck. — 25 sc ✓
Turn; hood is worked flat in rows and seamed at top.
Row 1: Ch 2, dc in each sc across, turn. — 25 dc
Row 2: Ch 2, dc across, turn. — 25 dc
Row 3 (inc for depth): Ch 2, dc in next 11 sts, 2 dc in next st, dc in next st (center), 2 dc in next st, dc in rem 11 sts, turn. — 27 dc ✓ (25 + 2)
Rows 4–8: Ch 2, dc across, turn. — 27 dc
Fold hood in half (RS together), seam top edge with whip st or sl st through both layers (13–14 sts). Fasten off.
Optional: work 1 rnd sc around front hood opening for a neat edge.
PATCH POCKETS (make 2)
With MC (or CC for lining look):
Ch 11.
Row 1: Dc in 3rd ch from hook and each ch across, turn. — 9 dc
Rows 2–5: Ch 2, dc across, turn. — 9 dc
Row 6 (top rib look): Ch 1, sc blo across. Fasten off, leave long tail to sew.
Pocket ≈ 2½" wide × 2½" tall (6.5 × 6.5 cm).
FRONT BANDS & TOGGLE LOOPS
Left front band (button / loop side as preferred)
With RS facing, join MC at left front hem.
Work 1 row sc evenly up front edge to hood join (~28–30 sc), turn.
Next 2 rows: Ch 1, sc in each st, turn. Fasten off.
Right front band
Mirror on right front (hem to hood).
Toggle loops (make 4, or 3 if preferred)
With MC and smaller hook if desired:
Ch 10 (adjust length to fit snugly around your toggle).
Sl st in first ch to form ring/loop, ch 1, sc firmly around the ring until filled and firm, sl st to join. Fasten off, leave tails to sew.
Sew loops evenly spaced along right front band (as worn), aligned where toggles will sit — typical placement: upper chest, mid-chest, lower chest, and optional near hem. Space approx. 1½" (4 cm) apart.
Toggles
Sew toggles to left front band to match loop positions, set slightly in from edge so coat closes with classic overlap.
(If using buttons instead of toggles, work ch-5 button loops on the right band at the same intervals, or sew buttons on left and loops on right.)
FINISHING
- Shoulders: Already seamed before hood; reinforce if needed with whip st on WS.
- Set in sleeves: Pin sleeve top (22 dc edge) into armhole; ease evenly. Sew with whip st or mattress st.
- Side & underarm seams: Seam each front to back at sides, continuing down sleeve underarm in one line.
- Pockets: Pin pockets to fronts approx. 1" (2.5 cm) above hem and ¾" (2 cm) in from side seams. Sew three sides with yarn tail; leave top open.
- Hood: Top already seamed; weave in ends. Optional sc edging around face opening.
- Bands & closures: Attach loops and toggles securely (toys get rough play — knot and weave ends well).
- Weave in all ends; steam-block or wet-block lightly to shape. Do not flatten ribbing.
Fit check on bear
- Chest should close with ½–1" overlap without gaping.
- Sleeves should reach mid-paw; cuff ribbing should hug lightly.
- Hood should sit back or pull up over ears without choking the neck seam.
If tight in chest, add 1 extra dc row before armholes on back/fronts next time, or go up one hook size for body only.
Stitch-count quick reference
| Piece | Key count | Validation |
|---|---|---|
| Back ribbing | 28 rows | → 28 dc body ✓ |
| Back body | 28 dc → 23 dc at armhole | 28 − 6 = 22 + structure ✓ |
| Each front | 16 dc → 13 dc armhole → 9 shoulder | stepwise −3/−3/−1 ✓ |
| Sleeve | 14 → 16 → 18 → 20 → 22 dc | +2 four times ✓ |
| Hood pick-up | 9 + 7 + 9 = 25 → 27 after inc | ✓ |
Optional variations
- Striped duffel: Change color every 2 dc rows on body/sleeves.
- Faux fur hood trim: Surface-crochet or sew a short faux-fur strip around hood opening.
- Longer coat: Add 2–4 extra dc rows before armhole shaping (each 2 rows ≈ +1").
- No hood: Pick up neckline and work 3 rnds sc for a simple collar instead.
Care: Follow yarn label. Many worsted acrylics are machine wash cold, gentle; reshape flat to dry. Remove toggles before washing if they are wood or glued.
Enjoy your mini duffel — perfect for chilly teddy adventures.
Disclaimer: This pattern was generated by AI and should be reviewed for accuracy before use. While we strive for quality, AI-generated content may contain errors. Please verify measurements, stitch counts, charts, and instructions before beginning your project. Generated by purlJam.uk
Love this pattern?
Save this pattern to your free PurlJam libraryAccess your pattern anytime
Bookmark this page to access your pattern anytime