Type
Crochet
Difficulty
intermediate
Category
tank
AI Thinking Process
Planning
Verification
Pattern
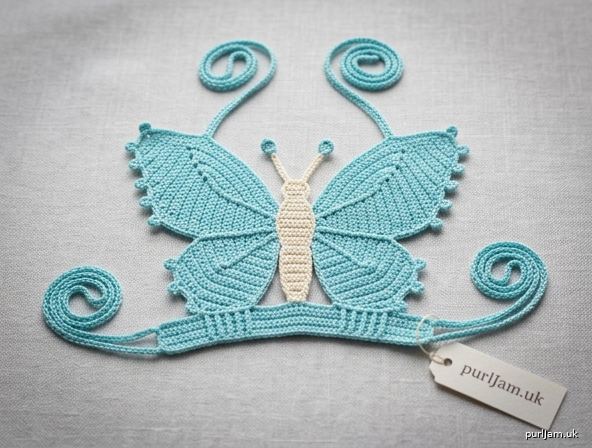
Butterfly Tank Top for Classic Barbie
Construction: Route C, doll-scale — modular butterfly wings picked up from a center thorax, then a front bodice/band worked downward. Open back with ties. Halter straps.
Skill level: Intermediate (miniature gauge, picking up stitches, two-lobe wing shaping). A confident beginner who can work even sc, increases, sc2tog, and pick up stitches can make this top.
Sizes
One size: classic 11.5" (29 cm) fashion doll with a 5" (12.7 cm) bust (Mattel-style Barbie and similar bodies).
Finished measurements (blocked, lying flat):
- Front width at underbust band: 2⅛" (5.4 cm)
- Butterfly / thorax height: 1⅛" (2.8 cm)
- Band + short bodice depth: ⅝" (1.6 cm)
- Total front length: about 1¾" (4.5 cm) — cropped, sits from upper bust to high waist
- Each upper wing span from thorax: about ⅞" (2.2 cm)
- Each lower wing span from thorax: about ⅝" (1.6 cm)
- Back: open; underbust ties and nape ties adjust the fit (close-fitting, about 0 to −¼" / 0 to −0.5 cm ease once tied)
Do not close this top into a tube. The opening is what allows it to go on the doll.
Materials
- Yarn: Size 12 crochet cotton thread (US size 12 / similar extra-fine mercerized cotton), not worsted. About 50 yd (46 m) MC for wings, band, and straps; about 8 yd (7 m) CC for thorax and antennae. One-color version: use MC throughout.
- Hook: 1.0 mm steel hook (US steel 12), or 0.75 mm (US steel 14) for a firmer fabric. Size to gauge.
- Notions: 2 stitch markers, fine tapestry needle, scissors, blocking pins. Optional: 2 size 11 seed beads for antennae tips (sew on firmly; display use only).
Yardage is small; one ball of size 12 thread will make several tops.
Gauge
Worked flat in sc, blocked:
14 sc and 16 rows = 1" (2.5 cm)
At this scale, gauge is fit. If you have fewer than 14 sc per inch, go down to 0.75 mm. If you have more, loosen slightly or go up a fraction of a millimeter. Measure the thorax (it should be ⅜" / 1 cm wide) before picking up the wings.
Stitch guide (US terms)
- ch — chain
- sl st — slip stitch
- sc — single crochet
- hdc — half double crochet
- dc — double crochet
- sc BLO — single crochet in back loop only
- sc2tog — single crochet 2 stitches together (1 stitch decreased)
- ch-sp — chain space
- picot — ch 3, sl st in the sc just made
- RS / WS — right side / wrong side
Notes
- The fabric is solid sc — opaque at doll scale; no lining needed.
- Wings are identical in stitch pattern; placement on left and right of the thorax creates the butterfly.
- Keep inner-edge pickup at 1 sc per thorax row-end so the wing does not ruffle or cup.
- Try straps and ties on the doll before weaving in those ends.
- US terms throughout (sc, hdc, dc). Imperial measurements first.
Thorax (butterfly body)
With CC (or MC), ch 6.
Row 1 (RS): Sc in 2nd ch from hook and in each ch across — 5 sc.
Rows 2–18: Ch 1, turn, sc in each st across — 5 sc.
Fasten off. Piece measures ⅜" × 1⅛" (1 × 2.8 cm) (5 sts = ⅜" ✓; 18 rows = 1⅛" ✓). Mark the RS. The two long edges (18 row-ends each) are the wing pick-up edges.
Right wing
With MC and RS of thorax facing, join with sl st in the top right row-end (head end of the thorax).
Row 1 (RS): Work 18 sc evenly down the right long edge, 1 sc in each row-end — 18 sc (18 row-ends → 18 sc ✓).
Split here: upper lobe on the first 11 sts (top); lower lobe on the remaining 7 sts (bottom).
Upper lobe
Row 2: Ch 1, turn, sc in first 11 sts, leave rem 7 unworked — 11 sc.
Row 3: Ch 1, turn, 2 sc in first st, sc in next 9 sts, 2 sc in last st — 13 sc (11 + 2 = 13 ✓).
Row 4: Ch 1, turn, sc in each st — 13 sc.
Row 5: Ch 1, turn, 2 sc in first st, sc in next 11 sts, 2 sc in last st — 15 sc (13 + 2 = 15 ✓).
Row 6: Ch 1, turn, sc in each st — 15 sc.
Row 7: Ch 1, turn, 2 sc in first st, sc in next 13 sts, 2 sc in last st — 17 sc (15 + 2 = 17 ✓).
Row 8: Ch 1, turn, sc in each st — 17 sc.
Row 9: Ch 1, turn, sc2tog, sc in next 13 sts, sc2tog — 15 sc (17 − 2 = 15 ✓).
Row 10: Ch 1, turn, sc2tog, sc in next 11 sts, sc2tog — 13 sc.
Row 11: Ch 1, turn, sc2tog, sc in next 9 sts, sc2tog — 11 sc.
Row 12: Ch 1, turn, sc2tog, sc in next 7 sts, sc2tog — 9 sc.
Row 13: Ch 1, turn, sc2tog, sc in next 5 sts, sc2tog — 7 sc.
Row 14: Ch 1, turn, sc2tog, sc in next 3 sts, sc2tog — 5 sc.
Fasten off.
Lower lobe
With RS facing, join MC in the first unworked st of Row 1 (the 12th st).
Row 2: Ch 1, sc in same st and in rem 6 sts — 7 sc.
Row 3: Ch 1, turn, 2 sc in first st, sc in next 5 sts, 2 sc in last st — 9 sc (7 + 2 = 9 ✓).
Row 4: Ch 1, turn, sc in each st — 9 sc.
Row 5: Ch 1, turn, 2 sc in first st, sc in next 7 sts, 2 sc in last st — 11 sc (9 + 2 = 11 ✓).
Row 6: Ch 1, turn, sc in each st — 11 sc.
Row 7: Ch 1, turn, sc2tog, sc in next 7 sts, sc2tog — 9 sc (11 − 2 = 9 ✓).
Row 8: Ch 1, turn, sc2tog, sc in next 5 sts, sc2tog — 7 sc.
Row 9: Ch 1, turn, sc2tog, sc in next 3 sts, sc2tog — 5 sc.
Row 10: Ch 1, turn, sc2tog, sc in next st, sc2tog — 3 sc (5 − 2 = 3 ✓).
Fasten off.
Left wing
Mirror placement, same numbers.
With RS of thorax facing, join MC with sl st in the top left row-end.
Row 1 (RS): Work 18 sc evenly down the left long edge, 1 sc in each row-end — 18 sc.
Work Upper lobe on the first 11 sts and Lower lobe on the remaining 7 sts exactly as for the Right wing (same row-by-row counts: upper 11-13-13-15-15-17-17-15-13-11-9-7-5; lower 7-9-9-11-11-9-7-5-3).
Wing edging (work on each wing)
With RS facing, join MC at the top inner corner (thorax junction). Sc evenly around the outer edge only of both lobes, skipping the inner edge already joined to the thorax:
- 1 sc in each st or row-end along the sides.
- 3 sc in each lobe tip (the 5-st upper tip and the 3-st lower tip) so the curves stay flat.
- At the valley between lobes, work sc2tog over the two stitches closest to the indent — this cinches the butterfly notch.
- On each outer curve only, work picots: *sc in next 2 sts, picot in next st; repeat from * as it fits, placing 4 picots on the upper lobe and 3 picots on the lower lobe.
Sl st to the bottom inner corner. Fasten off. Do not picot the thorax join.
Underbust band and short bodice
The band is the close-fitting line; the extra sc rows make it a cropped tank rather than a bralette.
With RS facing, join MC at the bottom inner corner of the left lower lobe (left side as worn).
Row 1 (RS): Work 29 sc evenly across the entire lower edge — 12 sc along the left lower lobe, 5 sc across the thorax foundation, 12 sc along the right lower lobe (12 + 5 + 12 = 29 ✓). Front width = 29 sts ÷ 14 sts per inch = 2⅛" ✓.
Rows 2–4: Ch 1, turn, sc BLO in each st across — 29 sc. (Tiny rib, about ¼" / 0.6 cm.)
Rows 5–10: Ch 1, turn, sc in each st through both loops — 29 sc.
Fasten off. Bodice depth from pickup through Row 10 = 10 rows ÷ 16 = ⅝" ✓.
Back ties
With RS facing, join MC at the right-hand end of Row 1 (underbust line, not the hem). Ch 50, fasten off.
Join MC at the left-hand end of Row 1, ch 50, fasten off.
Each tie is about 4–4½" (10–11.5 cm). Wrap around the doll’s underbust (4¼–5" / 10.8–12.7 cm) and tie a bow at center back.
Halter straps (make 2)
Mark the outer upper-lobe edge on each wing at Row 5 (the 15-st row, near the top of the wing, not the tip).
Join MC at the marker.
Ch 32, sc in 2nd ch from hook and in each ch back to the wing — 31 sc. Sl st to the same marked stitch on the wing. Fasten off, leaving a 4" (10 cm) tail.
Strap length is about 2¼" (5.7 cm) of sc plus the starting chain ease. Put the top on the doll, bring both straps to the nape, and adjust (add or remove chains) before weaving in. Tie the two straps together at the nape, or sew the last 3 sc of each strap to each other for a fixed halter.
Antennae (optional)
With CC, join with sl st in the top edge of the thorax, 1 st in from the right.
First antenna: Ch 8, sl st in 3rd ch from hook (picot), sl st in each remaining ch back down, sl st in the same thorax stitch.
Second antenna: Skip the center st of the thorax top, sl st in the next st, ch 8, sl st in 3rd ch from hook, sl st back down, sl st in the same thorax stitch.
Fasten off. Optional: stitch one seed bead to each picot.
Finishing
- Weave in ends on the WS, running them along solid sc columns, never across a picot or ch-sp.
- Block the piece before putting it on the doll — essential. Pin the thorax straight. Pin each upper lobe into a rounded teardrop and each lower lobe into a smaller teardrop, pulling the sc2tog valley in so the wing reads as two lobes. Pin picots out. Spray-block or steam lightly (cotton); dry fully.
- No side or shoulder seams. The only joins are the pick-up rows already worked.
- Dressing the doll: slide the front into place, wrap the underbust ties around the back and bow them, then tie the halter at the nape. Adjust so the thorax sits on the center sternum and the upper lobes cover the bust.
- Neckline finish is the picot wing edge — do not add a separate neckband; it would hide the butterfly. Hem is the last sc row of the bodice; no extra edging round is required. If the hem curls, work 1 row of sl st loosely across Row 10 on the RS.
Schematic (key dimensions)
- Thorax: ⅜" wide × 1⅛" tall (1 × 2.8 cm)
- Assembled butterfly front (wingtip to wingtip, blocked): about 2¼–2½" (5.7–6.4 cm)
- Underbust band: 2⅛" (5.4 cm) across 29 sc, plus ch-50 ties
- Cropped length: 1¾" (4.5 cm)
- Halter straps: try-on length, start at ch 32 / 31 sc
Color and variation notes
- Two-color (classic butterfly): CC thorax and antennae; MC wings, band, straps.
- One color: Work every section in MC.
- More coverage: Repeat Rows 5–10 of the bodice 4 more times (14 sc rows below the rib = ⅞" / 2.2 cm extra) for a longer tank that reaches the doll’s waist.
- No antennae / no picots: Omit them; the two-lobe outline still reads as a butterfly after blocking.
Disclaimer: This pattern was generated by AI and should be reviewed for accuracy before use. While we strive for quality, AI-generated content may contain errors. Please verify measurements, stitch counts, charts, and instructions before beginning your project. Generated by purlJam.uk
Love this pattern?
Save this pattern to your free PurlJam libraryAccess your pattern anytime
Bookmark this page to access your pattern anytime