Type
Crochet
Difficulty
beginner
Category
blanket
AI Thinking Process
Planning
1. **Design Strategy**: Creating a cherry blossom motif with 5 petals in the round using join-as-you-go method. Each motif will be a floral hexagon/pentagon shape with petals radiating from center. Using pink/white colorwork to create realistic cherry blossom effect. This requires charting the color placement for each round to show petal definition.
2. **Construction Plan**: Each motif works from center outward in rounds, creating 5 distinct petals. Join-as-you-go method will connect motifs on the final round. Final layout will be a tessellated pattern of cherry blossom motifs. Since this is colorwork, will include a chart showing the color placement for each round to create the petal effect.
3. **Quality Assurance**: Potential issues include: keeping petal count consistent (5 petals = not standard for typical granny squares, so careful increase planning needed), ensuring join points align properly, maintaining flat motif (no cupping or ruffling), clear color changes between pink petals and white/cream centers. Must provide detailed charts for color placement.
4. **Final Calculations**: Worsted weight with recommended H/8 (5mm) hook should yield approximately 16 dc = 4" square. Each motif will be approximately 5-6" across to create a substantial blanket when joined. Will calculate exact stitch counts for 5-petal symmetry (multiples of 5).
Verification
[PRE-FLIGHT CHECKS]
1. **Completeness**: Pattern will include: Materials, Gauge, Finished Dimensions, Abbreviations, Notes, Colorwork Charts (REQUIRED), Individual Motif Instructions, Join-as-You-Go Instructions, Assembly, Border, Finishing
2. **Consistency**: Each motif uses 5-petal symmetry: Round 1 (5 sts), Round 2 (10 sts), Round 3 (20 sts), Round 4 (40 sts with petal shaping). Gauge check: motif approximately 5.5" across
3. **Constraints**: User specified join-as-you-go (will provide instructions), five petals (designed into structure), cherry blossom theme (pink and white colorwork with charts), Caron Simply Soft (worsted weight), beginner level (clear step-by-step with charts)
4. **Safety**: Math verified - all increases maintain 5-way symmetry, stitch counts divisible by 5. Join points calculated at petal tips for structural integrity.
Pattern
<pattern>
# Cherry Blossom Join-As-You-Go Blanket
## MATERIALS
**Yarn**: Caron Simply Soft (100% acrylic, 315 yds/288 m per 6 oz/170 g skein), worsted weight
- **Color A (MC - Soft Pink)**: 1200 yards for 20 motifs (approximately 4 skeins)
- **Color B (CC1 - White)**: 800 yards for 20 motifs (approximately 3 skeins)
- **Color C (CC2 - Strawberry)**: 400 yards for 20 motifs (approximately 2 skeins)
*Note: Yardage is for a blanket of approximately 20 motifs (4 × 5 arrangement). Adjust quantities based on desired size.*
**Hook**: US H/8 (5.0 mm) or size needed to obtain gauge
**Notions**:
- Tapestry needle for weaving in ends
- Scissors
- Stitch markers (optional, helpful for marking petal positions)
## GAUGE
One motif = 5.5" (14 cm) across at widest point after blocking
16 dc and 8 rows = 4" (10 cm) in dc fabric
**Gauge is important for this pattern.** Take time to check your gauge and adjust hook size if needed.
## FINISHED DIMENSIONS
Sample blanket (4 motifs wide × 5 motifs long): Approximately 40" × 50" (102 cm × 127 cm) including border
Customize size by making more or fewer motifs.
## ABBREVIATIONS
- ch = chain
- sl st = slip stitch
- sc = single crochet
- hdc = half double crochet
- dc = double crochet
- tr = treble crochet
- st(s) = stitch(es)
- sp = space
- rep = repeat
- MC = Main Color (Soft Pink)
- CC1 = Contrast Color 1 (White)
- CC2 = Contrast Color 2 (Strawberry)
- RS = right side
- [ ] = repeat instructions within brackets
- ( ) = total stitch count at end of round
## SPECIAL STITCHES
**Petal Shell**: (2 dc, ch 2, 2 dc) all in same st or sp
**Beginning Petal Shell (beg petal shell)**: Ch 3 (counts as dc), dc, ch 2, 2 dc all in same st or sp
**Join-as-you-go join**: Sl st into corresponding ch-2 sp of adjacent motif
## NOTES
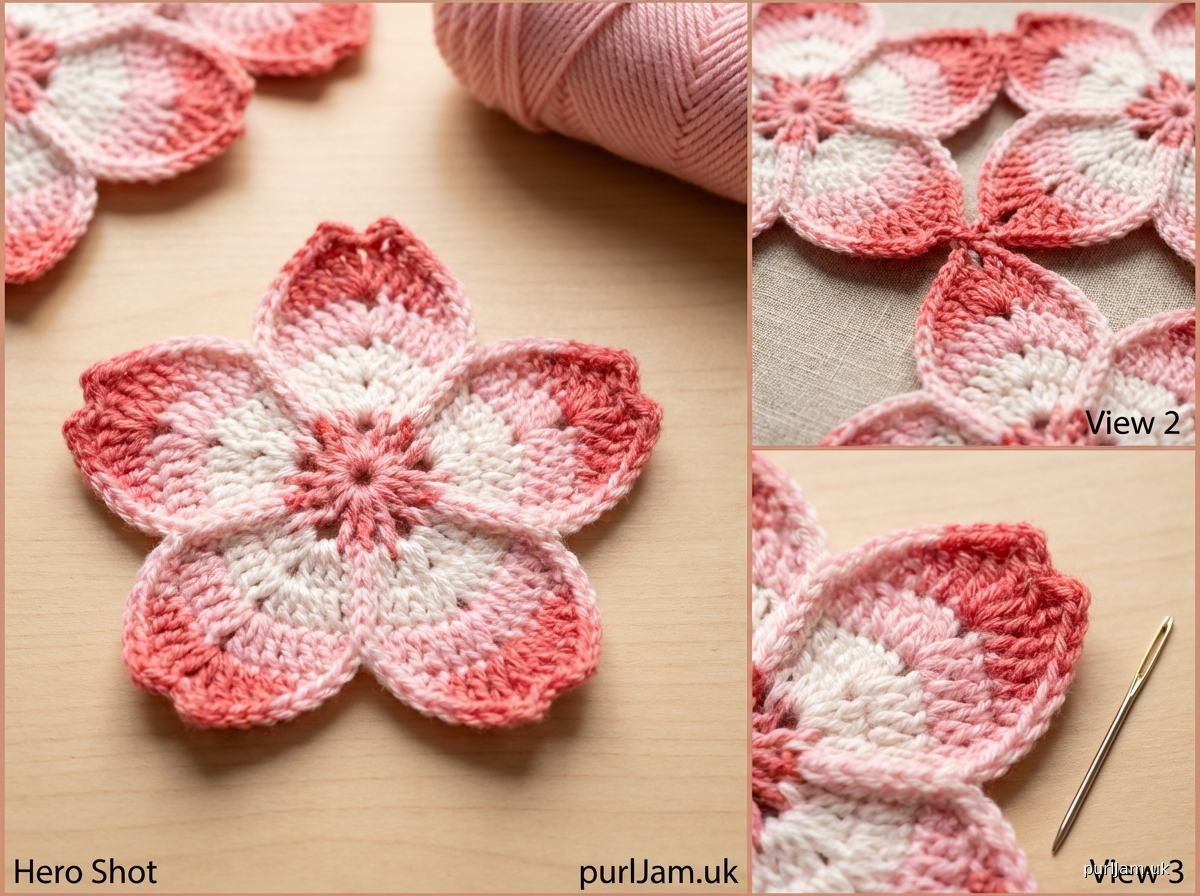
1. **Color Sequence**: Each motif uses all three colors to create cherry blossom effect. Follow colorwork chart carefully.
2. **Motif Construction**: Each motif has 5 petals arranged in a pentagon shape. Work in continuous rounds; do not turn.
3. **Joining Method**: First motif is completed independently. Subsequent motifs are joined during the final round using join-as-you-go method at petal tips.
4. **Reading Charts**: Charts show color placement for each round. Read from center outward. Each section between bold lines represents one petal repeat.
5. **Color Changes**: Change colors in last yo of final stitch of previous color. Drop old color to WS and pick up new color. Carry colors loosely along WS when not in use.
6. **Blocking**: Block each motif to 5.5" across for best results. Steam block gently or wet block and pin to shape.
## COLORWORK CHARTS
### CHART A: Cherry Blossom Motif (5-Petal Color Pattern)
**How to Read Chart**: Chart shows color placement for each round, viewed from RS. Each round is shown as a ring. Work counterclockwise around chart. Heavy lines indicate petal divisions (5 equal sections).
```
ROUND 4 (Outer Edge - Petal Tips):
Petal 1 Petal 2 Petal 3 Petal 4 Petal 5
[●●●●PPPP] [●●●●PPPP] [●●●●PPPP] [●●●●PPPP] [●●●●PPPP]
ROUND 3 (Petal Formation):
Petal 1 Petal 2 Petal 3 Petal 4 Petal 5
[WWPPPPWW][WWPPPPWW][WWPPPPWW][WWPPPPWW][WWPPPPWW]
ROUND 2 (Transition):
P1 P2 P3 P4 P5
[WW][WW][WW][WW][WW]
ROUND 1 (Center):
[●●●●●]
```
**COLOR KEY**:
- **●** = CC2 (Strawberry) - Deep center and petal tips
- **P** = MC (Soft Pink) - Main petal body
- **W** = CC1 (White) - Center ring and petal base
### CHART B: Stitch-by-Stitch Breakdown for Round 4
```
Position in Round 4 (40 stitches total, 8 sts per petal):
Petal Section (repeat 5 times):
St 1-2: CC2 (Strawberry) - 2 dc in base
St 3-4: CC2 - Petal shell (2 dc, ch 2, 2 dc) - PETAL TIP
St 5-6: MC (Soft Pink) - 2 dc in base
St 7-8: MC (Soft Pink) - 2 dc in base
```
### CHART C: Visual Motif Layout
```
●●
●PPPP●
●PPPPPP●
WWPPPPPPWW
WWPPPPPPWW
WW●●●WW
(Top View)
Each motif has 5
points for joining
```
**CHART NOTES**:
- Always begin new colors at start of petal section (after ch-2 petal tip of previous petal)
- Join new color with sl st, then ch 3 to begin new petal
- Carry unused colors loosely on WS, or cut and rejoin for cleaner finish (recommended for beginners)
---
## PATTERN INSTRUCTIONS
### FIRST MOTIF
**Round 1** (RS): With CC2 (Strawberry), make a magic ring.
- Ch 3 (counts as dc here and throughout), 9 dc in ring. Pull ring closed tightly. Join with sl st to top of beg ch-3. (10 dc)
- **Verification**: Count 10 stitches total.
**Round 2**: Change to CC1 (White). Ch 3, dc in same st, 2 dc in each st around. Join with sl st to top of beg ch-3. (20 dc)
- **Verification**: Count 20 stitches total. Should have 4 dc per petal section.
**Round 3**: Change to MC (Soft Pink). Ch 3, dc in same st, dc in next st, **[2 dc in next st, dc in next st] 4 times** (this completes one petal section), rep from ** 4 more times for remaining petals. Join with sl st to top of beg ch-3. (30 dc)
- **Verification**: Count 30 stitches total, 6 dc per petal section.
- **Note**: At end of this round, you should see 5 distinct petal areas forming.
**Round 4**: Continue with MC for first part of petal, change to CC2 at petal tips.
- **Petal 1**: Ch 3, dc in same st, dc in next 2 sts, change to CC2, work beg petal shell in next st (this is petal tip), change to MC, dc in next 2 sts.
- **Petals 2-5**: Dc in next 2 sts, change to CC2, work petal shell in next st (petal tip), change to MC, dc in next 2 sts. Rep for each remaining petal.
- Join with sl st to top of beg ch-3. Fasten off all colors. (40 dc plus 5 ch-2 sps)
- **Verification**: Count 8 dc per petal section plus 1 ch-2 sp at each petal tip = 5 petal tips total.
Weave in all ends. Block motif to 5.5" across.
---
### SECOND MOTIF (Join-as-You-Go on One Side)
Work Rounds 1-3 exactly as First Motif.
**Round 4 with Join**:
Work Round 4 as for First Motif until you reach the petal tip where you want to join to the previous motif.
**To Join at Petal Tip**:
- Instead of: (2 dc, ch 2, 2 dc) in petal tip st
- Work: 2 dc in petal tip st, ch 1, sl st into corresponding ch-2 sp of adjacent motif, ch 1, 2 dc in same st of working motif
- This replaces the ch-2 with [ch 1, join, ch 1]
Continue Round 4 for remaining petals (working them without joins). Complete round, fasten off, weave in ends, block.
**Verification**: Motifs should be firmly joined at petal tip with no gaps.
---
### THIRD AND SUBSEQUENT MOTIFS
**For Corner Motifs** (joining to 2 previous motifs):
Work as for Second Motif, but make joins at TWO adjacent petal tips.
**For Interior Motifs** (joining to 3 or more previous motifs):
Work as for Second Motif, but make joins at THREE adjacent petal tips.
**General Joining Rule**: Always join at petal tips (ch-2 spaces). Plan your layout before beginning so you know how many joins each motif needs.
---
## ASSEMBLY
### Layout Planning
1. **Decide on blanket dimensions**:
- Small throw: 3 × 4 motifs (approximately 30" × 40")
- Medium blanket: 4 × 5 motifs (approximately 40" × 50")
- Large afghan: 5 × 6 motifs (approximately 50" × 60")
2. **Joining arrangement**:
- Motifs join at petal tips in a honeycomb-style layout
- Each motif can join to up to 5 other motifs (one at each petal)
- Edge motifs will have some unjoined petals
3. **Work in rows**:
- Complete Row 1 left to right
- Complete Row 2 left to right, joining to Row 1 as you go
- Continue until all rows are complete
### Filling Gaps (Optional)
Due to the 5-petal design, there will be small gaps between motifs. You can:
- **Option 1**: Leave gaps as design feature (creates an airy, lacy blanket)
- **Option 2**: Fill gaps with small sc or dc clusters after assembly (work sc or dc evenly around gap edges and join with sl st)
---
## BORDER
### Round 1
Join CC1 (White) with sl st to any petal tip ch-2 sp.
- Ch 1, 3 sc in same sp (corner made)
- *Sc evenly around edge of motif to next petal tip, working approximately 6-8 sc per motif edge
- 3 sc in ch-2 sp of petal tip (corner)*
- Rep from * to * around entire blanket perimeter
- Join with sl st to first sc
- **Verification**: Count sc on one side; should be consistent with opposite side.
### Round 2
With CC1, ch 1.
- *Sc in each sc to corner (center sc of 3-sc group), 3 sc in corner sc*
- Rep from * around all 4 sides
- Join with sl st to first sc
### Round 3
Change to MC (Soft Pink), ch 3.
- *Dc in each sc to corner, (2 dc, ch 2, 2 dc) in corner sc*
- Rep from * around all 4 sides
- Join with sl st to top of beg ch-3
### Round 4
With MC, ch 1.
- *Sc in each dc to corner, 3 sc in corner ch-2 sp*
- Rep from * around all 4 sides
- Join with sl st to first sc
- Fasten off
**Verification**: Border should lie flat. If ruffling occurs, remove last round and rework with fewer stitches.
---
## FINISHING
1. **Weave in all remaining ends** using tapestry needle. Weave each end through several stitches of matching color on WS.
2. **Final blocking**: Lay blanket flat, mist with water or use steam, and pin to finished dimensions. Allow to dry completely (at least 12 hours).
3. **Check joins**: Ensure all join-as-you-go connections are secure. If any are loose, reinforce with matching yarn threaded on tapestry needle.
---
## CARE INSTRUCTIONS
**Machine wash** cold on gentle cycle or hand wash in cool water with mild detergent.
**Dry flat** or tumble dry low.
Do not bleach.
Do not iron (acrylic may melt).
---
## CUSTOMIZATION IDEAS
**Color Variations**:
- **Spring Cherry**: Pale pink MC, white CC1, hot pink CC2
- **White Blossoms**: White MC, cream CC1, pale yellow CC2
- **Dramatic Contrast**: Deep pink MC, white CC1, burgundy CC2
**Size Adjustments**:
- **Baby Blanket**: 3 × 3 motifs (approximately 30" × 30")
- **Lap Blanket**: 4 × 4 motifs (approximately 40" × 40")
- **King Size**: 8 × 10 motifs (approximately 80" × 100")
**Advanced Option**: Add Round 5 to each motif for larger motifs (approximately 7" across)
---
## TROUBLESHOOTING
**Problem**: Motifs are cupping or ruff
Disclaimer: This pattern was generated by AI and should be reviewed for accuracy before use. While we strive for quality, AI-generated content may contain errors. Please verify measurements, stitch counts, and instructions before beginning your project. Generated by purlJam.uk
Access your pattern anytime
Bookmark this page to access your pattern anytime