Type
Crochet
Difficulty
intermediate
Category
bag
AI Thinking Process
Planning
Verification
Pattern
Christmas Hanging Pocket
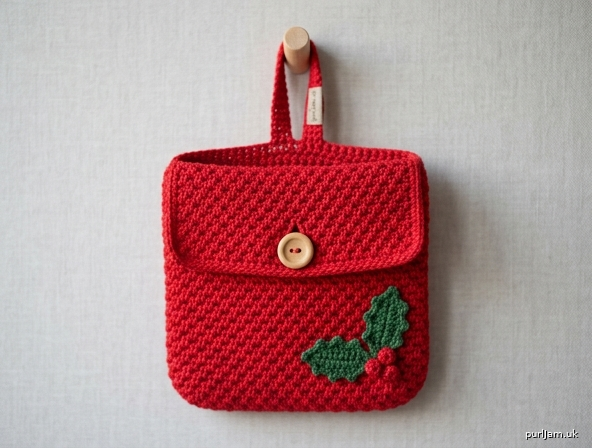
A rectangular hanging pocket with rounded bottom corners, worked in a dense even-moss texture. A wide flap folds over the opening and closes with a natural wooden button; a red crochet loop hangs the pocket. Optional white edging and holly appliqués are included.
Skill level: Intermediate
UK crochet terminology is used throughout (see Abbreviations for US equivalents).
Finished measurements
Measured after light steaming, pocket lying flat.
| Area | Metric | Imperial |
|---|---|---|
| Pocket width | 14.5 cm | 5¾ in |
| Pocket height (to opening) | 16 cm | 6¼ in |
| Flap height | 8 cm | 3¼ in |
| Hanging loop (finished length) | 9 cm | 3½ in |
| Overall hanging length (loop + body) | 25 cm | 9¾ in |
The pocket is flat, with a shallow oval base (about 1.5–2 cm depth) so it will hold cards, sweets, or a small gift.
Materials
Yarn — Sport weight (5-ply / 12–14 wpi; Yarn Weight Category 2), 100% cotton or a cotton-rich blend. Cotton is recommended for a firm pocket that holds its shape.
- MC Bright Christmas red: 80 g / approx. 240 m (buy one 100 g ball)
- CC1 (optional) White: oddment, approx. 10 g
- CC2 (optional) Forest or Christmas green: oddment, approx. 10 g
Sample yardage guide: a 100 g ball of sport cotton at 280–320 m/100 g is sufficient for MC plus a little leftover.
Hook: 3.5 mm (US E-4), or size needed to obtain tension
Notions
- 1 natural light-brown wooden button, 20–22 mm (¾–⅞ in) diameter
- 3 stitch markers
- Tapestry needle
- Scissors
- Optional: small amount of matching sewing thread to seat the button firmly
Not a toy. The button and hanging loop are choking/strangulation hazards for babies and very young children. Display out of reach if needed.
Tension (gauge)
22 sts and 28 rows = 10 cm × 10 cm (4 in × 4 in) in even moss stitch, using 3.5 mm hook, measured unstretched after light steaming.
Work a swatch of 28 sts × 34 rows. Measure the inner 22 sts and 28 rows.
- Too few sts in 10 cm → try a smaller hook
- Too many sts in 10 cm → try a larger hook
Pocket fabric should feel dense, with little daylight through the stitches.
Abbreviations (UK)
| Abbrev. | Meaning | US equivalent |
|---|---|---|
| BLO | back loop only | BLO |
| CC | contrast colour | contrast color |
| ch | chain | chain |
| dc | double crochet | single crochet (sc) |
| htr | half treble crochet | half double crochet (hdc) |
| MC | main colour | main color |
| pm | place marker | place marker |
| rep | repeat | repeat |
| rnd(s) | round(s) | round(s) |
| RS | right side | right side |
| sl st | slip stitch | slip stitch |
| st(s) | stitch(es) | stitch(es) |
| tr | treble crochet | double crochet (dc) |
| WS | wrong side | wrong side |
| yrh | yarn round hook | yarn over (yo) |
| *…; rep from * | repeat the instructions between asterisks | same |
Reverse dc (crab stitch): dc worked from left to right (the reverse direction). Used only for optional flap edging.
Pattern notes
- The pocket is worked from the bottom up in joined rounds, then the flap is worked in rows across the back stitches only.
- The first two rounds are dc, forming an elongated oval (this is what rounds the bottom corners). The body is even moss stitch.
- Even moss rounds are joined and turned so the stitch pairing stays correct.
- Stitch counts are given in square brackets at the end of a round or row.
- The beginning ch-1 of even moss does not count as a stitch.
- Place the round join at a side fold; it will disappear into the edge of the pocket.
- When flattening, half the stitches form the front and half the back: 32 + 32 = 64 ✓.
Special stitch — even moss stitch
Worked over a multiple of 2 sts.
In rows (flap):
- Row 1: ch 1 (does not count as a st), *1 sl st in next st, 1 htr in next st; rep from * to end. Turn.
- Following rows: ch 1, *1 sl st in next htr, 1 htr in next sl st; rep from * to end. Turn.
Always work a sl st into a htr and a htr into a sl st. The fabric is bumpy, dense, and slightly ridged.
In joined, turned rounds (body): as rows, then sl st in the first sl st to join, and turn.
Height check: 28 rows of even moss = 10 cm ✓.
Base — oval (rounded bottom corners)
With MC and 3.5 mm hook, ch 27.
Rnd 1 (RS): 2 dc in 2nd ch from hook, 1 dc in each of next 24 ch, 4 dc in last ch; rotate to work along the opposite side of the foundation chain, 1 dc in each of next 24 ch, 2 dc in the same ch as the beginning 2-dc. Sl st in first dc to join. Do not turn.
[2 + 24 + 4 + 24 + 2 = 56 dc ✓]
The two long sides have 24 dc each; each rounded end has 4 dc (4 + 4 + 24 + 24 = 56 ✓).
Rnd 2: ch 1 (does not count as a st), 2 dc in each of next 4 sts (first end), 1 dc in each of next 24 sts, 2 dc in each of next 4 sts (second end), 1 dc in each of next 24 sts. Sl st in first dc to join. Do not turn.
[8 increases → 56 + 8 = 64 dc ✓]
Each end is now 8 dc; each long side remains 24 dc (8 + 24 + 8 + 24 = 64 ✓).
Pm in the first st of the rnd (join = future side fold). Pm in st 33 (opposite side fold). The remaining marker may be used as a travelling round marker.
Body — even moss, worked in the round
Work even moss in joined, turned rounds. Maintain 64 sts throughout (32 front + 32 back when flattened ✓).
Rnd 3 (RS): ch 1, *1 sl st in next st, 1 htr in next st; rep from * around, sl st in first sl st to join, turn. [64 sts ✓]
Rnd 4 (WS): ch 1, *1 sl st in next htr, 1 htr in next sl st; rep from * around, sl st in first sl st to join, turn. [64 sts ✓]
Rnds 5–44: rep Rnds 3 and 4. [42 even-moss rounds in total: Rnds 3–44 ✓]
Height check: 42 moss rounds = 42 ÷ 28 × 10 = 15 cm, plus ~1 cm oval base = 16 cm ✓.
Keep the two side markers in the side-fold stitches, moving them up as you go. The join should sit at one marked side.
Do not fasten off.
Divide for flap
Flatten the pocket so the oval ends sit at left and right (rounded bottom corners) and the markers sit on the side folds.
The back is the 32 sts running from one side marker to the other, on the side that will carry the flap. The front is the remaining 32 sts (pocket opening).
Check: 32 back + 32 front = 64 ✓.
From the side-fold join, work across the back 32 sts only. Leave the front 32 sts unworked.
Flap (worked in rows)
Continue in even moss, keeping the established pairing (sl st in each htr, htr in each sl st).
Row 1 (RS): ch 1, work even moss across 32 back sts. Turn. [32 sts ✓]
Rows 2–18: ch 1, even moss to end. Turn. [32 sts ✓]
Row 19 — buttonhole (WS or RS, as it falls): ch 1, work 14 sts in even moss (7 complete sl st/htr pairs ✓), ch 4, skip 4 sts, work remaining 14 sts in even moss (7 pairs ✓). Turn.
[14 + 4 skipped + 14 = 32 ✓]
The skipped 4 sts measure about 1.8 cm — correct for a 20–22 mm button ✓.
Row 20: ch 1, work 14 sts in even moss, work (1 sl st, 1 htr, 1 sl st, 1 htr) in the ch-4 space (4 sts ✓), work 14 sts in even moss. Turn. [32 sts ✓]
Rows 21–22: ch 1, even moss to end. Turn. [32 sts ✓]
Flap height check: 22 rows = 22 ÷ 28 × 10 = 7.9 cm, finishing at 8 cm after the edging ✓.
Do not fasten off.
Flap and opening edging
Flap edging (MC): ch 1, work 1 dc in each st and row-end around the three free sides of the flap (down the side, across the outer edge, up the other side), working 3 dc in each of the two outer corners. Sl st to the pocket body at the flap join. Fasten off MC.
Opening edging (MC): join MC with sl st at one side marker on the front opening. Ch 1, 1 dc in each of the 32 front sts, sl st in the opposite side marker. Fasten off.
This firms the opening so it does not stretch around the button.
Hanging loop
With MC, ch 41.
Row 1: 1 dc in 2nd ch from hook and in each ch to end. [40 dc ✓]
Length check: 40 dc at 22 sts/10 cm = 18.2 cm; folded in half = 9.1 cm loop ✓.
Fasten off, leaving a 20 cm tail.
Fold the strip in half. Using the tail, sew both ends side by side to the outside of the back, centred on the fold line at the top of the pocket (where the flap begins). The loop should stand above the pocket, not on the flap face.
Work over the ends securely on the WS.
Button
Fold the flap down over the front (RS of flap facing out). The buttonhole should sit on the front of the pocket, roughly 6.5–7 cm below the opening.
Using MC (or matching sewing thread), sew the wooden button to the front only — do not stitch through the back, or the pocket will not open. Align the button with the buttonhole after folding, then mark the spot with a pin before sewing.
Open and close the flap once to confirm the button seats without straining the buttonhole.
Optional Christmas accents
White flap trim (CC1)
With CC1, join with sl st in any dc of the flap edging.
Work 1 rnd reverse dc (crab stitch) around the three edged sides of the flap, or work 1 rnd ordinary dc if reverse dc is not preferred. Fasten off.
Optional: work 1 rnd dc in CC1 along the 32 front opening sts as well.
Holly leaves (CC2) — make 2
Ch 7.
Work along the chain: 1 sl st in 2nd ch from hook, 1 dc in next ch, 1 htr in next ch, 1 tr in next ch, 1 htr in next ch, 3 dc in last ch; rotate and work along the opposite side of the chain: 1 htr in next ch, 1 tr in next ch, 1 htr in next ch, 1 dc in next ch, 1 sl st in last ch.
Fasten off, leaving a tail for sewing.
Berries (MC) — make 3
Ch 2, 4 dc in 2nd ch from hook, sl st in first dc to join. Fasten off.
Sew the two leaves in a shallow V on one lower corner of the flap (or just above the buttonhole, offset to the side). Cluster the three berries at the leaf join. Alternatively, work three French knots in MC at the same spot.
A small white snowflake may be embroidered with CC1 on the opposite flap corner using six lazy-daisy or straight stitches radiating from one centre point.
Finishing and assembly
- Weave in all ends on the WS. Take particular care with the oval join, the flap division, and the loop ends.
- Lightly steam-block the pocket to measurements: 14.5 cm wide × 16 cm body height, flap 8 cm. Do not stretch the even moss; hover the iron and pat flat. Shape the two bottom corners into smooth curves with your fingers while damp.
- Confirm the hanging loop is centred and both ends are sewn through the back fabric only.
- Confirm the button is sewn to the front only and aligns with the buttonhole when the flap is folded down.
- If using holly, sew leaves and berries through the flap only so they do not close the pocket.
- Hang from a hook, knob, or mantel using the crochet loop.
Assembly check: oval base 64 sts → body 64 sts × 42 moss rnds → flap 32 sts × 22 rows with 4-st buttonhole → 40-dc loop folded to 9 cm → one 20–22 mm wooden button on the front. All counts held ✓.
Schematic (not to scale)
              ┌─ hanging loop 9 cm ─┐
              │                     │
         ┌────┴─────────────────────┴────┐
         │           flap  8 cm          │  ← buttonhole near lower edge
         │         (folds forward)       │
         ├───────────────────────────────┤  ← pocket opening, 14.5 cm
         │                               │
         │         pocket body           │
         │           16 cm               │
         │                               │
         \_______________________________/  ← rounded bottom corners
                    14.5 cm
When hung, the flap folds down over the front and the wooden button closes it. The rounded oval base reads as a rectangle with softened bottom corners.
Care
Cotton: cool hand wash, reshape, dry flat. Do not tumble-dry. Re-steam the corners if they sharpen after washing. Check the button and loop stitching before each season’s use.
Disclaimer: This pattern was generated by AI and should be reviewed for accuracy before use. While we strive for quality, AI-generated content may contain errors. Please verify measurements, stitch counts, charts, and instructions before beginning your project. Generated by purlJam.uk
Love this pattern?
Save this pattern to your free PurlJam libraryAccess your pattern anytime
Bookmark this page to access your pattern anytime