Type
Crochet
Difficulty
beginner
Category
hat
AI Thinking Process
Planning
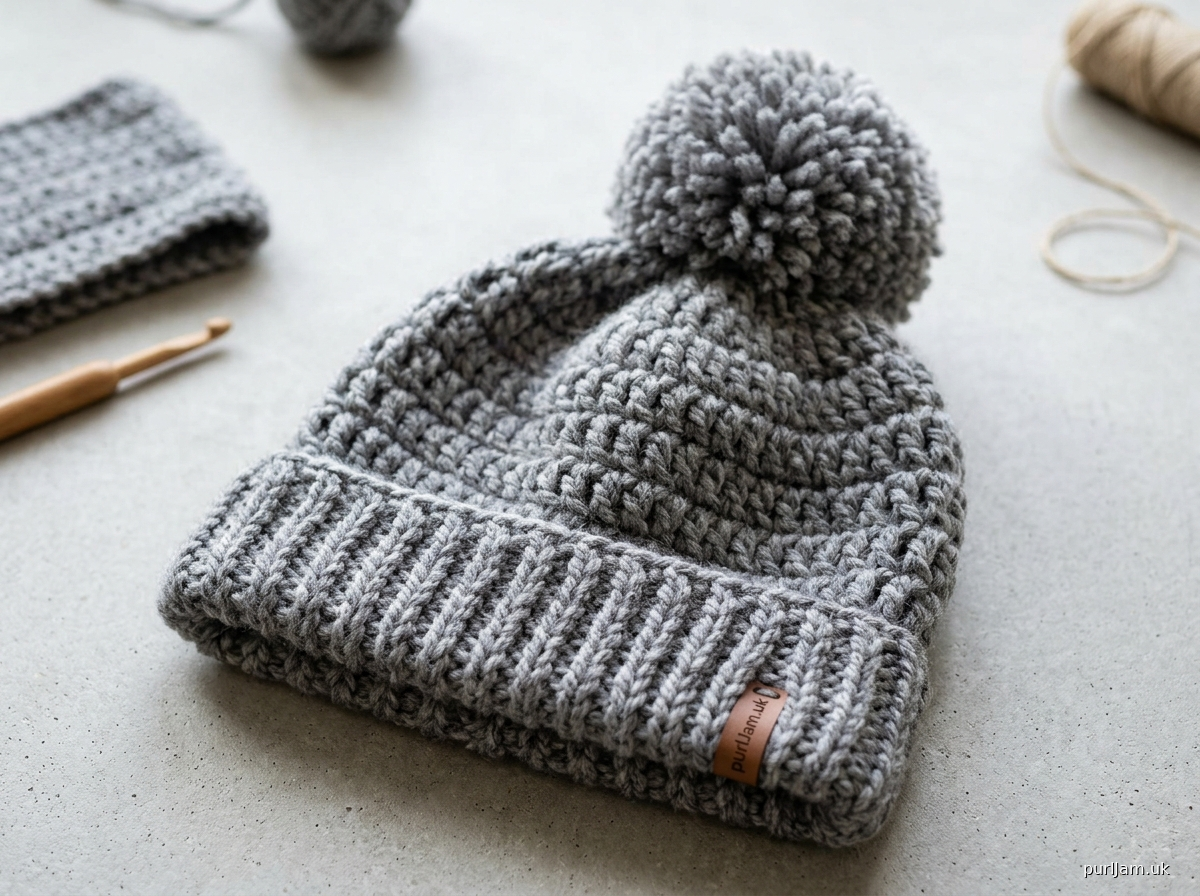
1. **Design Strategy**: Classic fitted bulky beanie with a large pompom (matches reference image - chunky knit-look beanie with fluffy pompom). Use FPDC/BPDC ribbed brim for true ribbed look, dc body for chunky texture.
2. **Construction Plan**: Top-down seamless construction in joined rounds: magic ring crown → dc body → post-stitch ribbed brim → pompom.
3. **Quality Assurance**:
- Bulky yarn requires fewer increase rounds (stop at 48 sts for adult medium)
- Joining rounds need consistent ch-2 or ch-3 turning
- Pompom must be attached securely through crown center
4. **Final Calculations**:
- Gauge: 11 dc x 6 rounds = 4" with 6.5mm hook, bulky yarn
- Adult Medium: 22" head circumference; hat fits with negative ease at ~20" relaxed circumference
- Crown: increase to 48 dc (48 ÷ 11 × 4 = 17.4"... need to verify)
- Recalc: 48 sts at 11 sts/4" = 17.45" — too small. Need 55 sts. Round to 54 sts (divisible by 6 for clean increases).
- Final: increase to 54 sts, work even ~5", ribbed brim 1.5", total height ~8".
Verification
1. **Completeness**: Crown, body, brim, pompom, finishing — all included ✓
2. **Consistency**: 54 sts ÷ 11 sts/4" = 19.6" relaxed; stretches to fit 21-22" head ✓
3. **Constraints**: Bulky yarn, pompom beanie matching reference image ✓
4. **Safety**: Increase rounds: 12→24→36→48→54 verified; 54 divisible by 6 ✓
Pattern
# Chunky Pompom Beanie

A cozy, classic-fit beanie worked in bulky yarn with a true ribbed post-stitch brim and a fluffy oversized pompom on top. Quick to make and perfect for cold-weather gifting.

---

## Skill Level
Intermediate (uses front/back post stitches and joined rounds)

## Finished Size
**Adult Medium** — fits head circumference 21–22" (53–56 cm)
- Relaxed circumference: ~19.5" (49.5 cm) — stretches to fit
- Total height: ~8.5" (21.5 cm) including pompom base

---

## Materials
- **Yarn**: ~150 yards (140 m) bulky weight (Weight 5) yarn
  - Suggested: Lion Brand Wool-Ease Thick & Quick, Bernat Softee Chunky, or similar
  - Sample uses 1 skein in heathered gray
- **Hook**: US K-10.5 / 6.5 mm
- **Notions**:
  - Stitch marker
  - Yarn needle
  - Scissors
  - Pompom maker (3.5"–4") or cardboard circles
  - Optional: small piece of contrasting yarn for tying pompom

---

## Gauge
**11 dc × 6 rounds = 4" (10 cm)** in double crochet, blocked.

Gauge swatch: ch 14, dc in 3rd ch from hook and across (12 dc). Work 5 more rows. Measure center 4".

> ⚠️ **Gauge matters!** A bulky-yarn hat can vary 2"+ in finished size. Check before starting.

---

## Abbreviations (US Terms)
- **ch** — chain
- **st(s)** — stitch(es)
- **sl st** — slip stitch
- **dc** — double crochet
- **dc2tog** — double crochet 2 together (decrease)
- **FPDC** — front post double crochet
- **BPDC** — back post double crochet
- **MR** — magic ring
- **rnd** — round
- **[ ]** — stitch count at end of round

---

## Construction Notes
- Worked **top-down** in joined rounds (do not turn).
- Beginning **ch-2 does NOT count as a stitch** — work first dc into same st as join.
- Join each round with sl st in top of first dc.
- Place a stitch marker in the join if helpful.

---

## Pattern

### CROWN

**Rnd 1:** Make a magic ring. Ch 2 (does not count), 12 dc into ring. Pull ring tight. Join with sl st to top of first dc. **[12 dc]**

**Rnd 2:** Ch 2, 2 dc in same st, 2 dc in each remaining st around. Join. **[24 dc]**
✓ *Math check: 12 × 2 = 24 ✓*

**Rnd 3:** Ch 2, dc in same st, *2 dc in next st, dc in next st;* repeat from * around to last st, 2 dc in last st. Join. **[36 dc]**
✓ *Math check: 24 + 12 increases = 36 ✓*

**Rnd 4:** Ch 2, dc in same st, dc in next st, *2 dc in next st, dc in next 2 sts;* repeat from * around to last 2 sts, 2 dc in next st, dc in last st. Join. **[48 dc]**
✓ *Math check: 36 + 12 increases = 48 ✓*

**Rnd 5:** Ch 2, dc in same st, dc in next 7 sts, *2 dc in next st, dc in next 7 sts;* repeat from * around to last st, 2 dc in last st. Join. **[54 dc]**
✓ *Math check: 48 + 6 increases = 54. 54 ÷ 6 = 9 — even spacing ✓*

> Crown should now measure approximately **6.5" (16.5 cm)** across, lying flat like a circle.

---

### BODY

**Rnds 6–12:** Ch 2, dc in same st and in each st around. Join with sl st to top of first dc. **[54 dc]**

*(7 rounds worked even)*

> Body should measure approximately **5" (12.5 cm)** from end of Rnd 5. Try on — hat should reach just above your eyebrows. Add or remove a round to adjust length before brim.

---

### RIBBED BRIM (Post Stitch)

**Rnd 13 (Set-up):** Ch 2, *FPDC around next st, BPDC around next st;* repeat from * around. Join with sl st to top of first FPDC. **[54 post sts]**

**Rnds 14–16:** Ch 2, *FPDC around next FPDC, BPDC around next BPDC;* repeat from * around. Join. **[54 post sts]**

> ✓ *Brim should measure ~1.5" (4 cm) and have a clear vertical knit-look ribbed texture.*

**Fasten off** leaving a 6" tail. Weave in ends securely.

---

### POMPOM

1. Using a 3.5"–4" pompom maker (or two 4" cardboard circles with 1.5" hole), wrap bulky yarn **80–100 times** around the form. Use more wraps for a fuller pompom.
2. Cut yarn at outer edge between the two halves.
3. Tie a 12" length of yarn **very tightly** through the center, knotting twice. Leave long tails for attaching.
4. Remove pompom maker. Fluff and trim into a round shape (~3.5–4" diameter).
5. Using yarn needle, thread tails through the top center of the beanie crown (through the magic ring) and tie securely on the inside. Knot multiple times.
6. Weave tail ends into the inside of the hat.

---

## Finishing
- Weave in all ends with yarn needle, working in different directions for security.
- **Block lightly**: stuff hat with a rolled towel or balloon and lightly mist with water. Allow to dry fully to set the shape.
- Fluff pompom and trim any uneven strands for a tidy round shape.

---

## Size Adjustments

| Size | Final Stitch Count | Body Rounds | Total Height |
|---|---|---|---|
| Toddler | 42 sts (stop at Rnd 4 + 6 incs to 42) | 4 rnds | 6.5" |
| Child | 48 sts (stop at Rnd 4) | 5 rnds | 7" |
| Teen/Small Adult | 54 sts | 6 rnds | 8" |
| **Adult Medium (written)** | **54 sts** | **7 rnds** | **8.5"** |
| Adult Large | 60 sts (add Rnd 5b: inc 6 more) | 7 rnds | 9" |

> 💡 In bulky yarn, each stitch ≈ 0.36". Adjust circumference in multiples of 6 sts for even crown increases.

---

## Pattern Summary Math Check
- Crown rounds increase: 12 → 24 → 36 → 48 → 54 ✓
- Final circumference: 54 sts × (4"/11 sts) = **19.6"** relaxed; stretches comfortably to 22" ✓
- Crown depth: ~3" + Body 5" + Brim 1.5" = **9.5"** unstretched height (sits ~8.5" on head when worn) ✓

Enjoy your cozy chunky pompom beanie! 🧶
Disclaimer: This pattern was generated by AI and should be reviewed for accuracy before use. While we strive for quality, AI-generated content may contain errors. Please verify measurements, stitch counts, and instructions before beginning your project. Generated by purlJam.uk
Access your pattern anytime
Bookmark this page to access your pattern anytime