Type
Crochet
Difficulty
beginner
Category
hat
AI Thinking Process
Planning
1. **Design Strategy**:
- User requested "super chunky cable hat" at beginner level
- Challenge: Cable patterns are typically intermediate, but user specified beginner level
- Solution: Create a faux cable texture using simple post stitches (FPDC/BPDC) which creates a cable-like ribbed appearance suitable for beginners
- Yarn: Super chunky (6) - this is heavier than standard chunky, requires larger hook (US K-10.5 to M-13 / 6.5-9mm)
- Style: Classic beanie with textured vertical "cable-like" ribbing throughout
- Construction: Top-down in rounds with post stitch texture starting after crown increases
2. **Construction Plan**:
- Crown: Standard dc increases to reach adult medium circumference (~21-22")
- With super chunky yarn, need fewer stitches: approximately 36-42 sts for adult
- Body: Switch to FPDC/BPDC ribbing pattern for cable texture
- Brim: Continue ribbing pattern for fold-up brim effect
- Total height: 8-8.5 inches for adult medium
- Hook size: US L-11 (8mm) for super chunky yarn
3. **Quality Assurance**:
- Potential issue: Post stitches can be confusing for beginners - include detailed tutorial section
- Gauge check critical with super chunky yarn - small stitch count differences = big size changes
- Ensure magic ring is secure with thick yarn
- Verify stitch count is divisible by pattern repeat (need multiples of 2 for FPDC/BPDC ribbing)
- Address stretchy nature of ribbing in sizing notes
4. **Final Calculations**:
- Super chunky gauge: approximately 8-9 dc per 4" (2-2.25 sts per inch)
- Adult medium circumference: 21-22" needs ~42-48 sts
- Using 42 sts (divisible by 6 for increases, divisible by 2 for ribbing)
- Crown: Rnd 1: 12 dc, Rnd 2: 24 dc, Rnd 3: 36 dc, Rnd 4: 42 dc
- Body length: 5-6 rounds of ribbing = approximately 4-5"
- Brim: 2 rounds ribbing = approximately 1.5-2"
- Total: ~8-8.5" height ✓
Verification
[PRE-FLIGHT CHECKS]
1. **Completeness**:
✓ Materials list needed
✓ Gauge section needed
✓ Sizes needed (will provide adult medium with notes for adjustment)
✓ Abbreviations needed
✓ Special techniques section needed (post stitches)
✓ Instructions (crown, body, brim)
✓ Finishing section needed
2. **Consistency**:
✓ Stitch count: 12→24→36→42 sts (increases by 12, 12, 6)
✓ Gauge: 9 dc × 5 rows = 4" with super chunky
✓ Circumference: 42 sts ÷ 9 sts per 4" × 4" = 18.67" relaxed, stretches to 21-22" ✓
✓ Height: 10 rounds × 0.8" per round = 8" ✓
3. **Constraints**:
✓ Beginner level - using only dc, FPDC, BPDC (basic post stitches with tutorial)
✓ Super chunky yarn specified
✓ Cable texture addressed with faux cable ribbing
✓ Hat style confirmed (beanie)
4. **Safety**:
✓ All increase rounds verified: 12, 24, 36, 42
✓ Pattern repeat verified: 42 divisible by 2 ✓
✓ Gauge math: 42 sts ÷ 2.25 sts/inch = 18.67" (will stretch to fit 21-22")
✓ No complex stitch sequences that could confuse beginners
Pattern
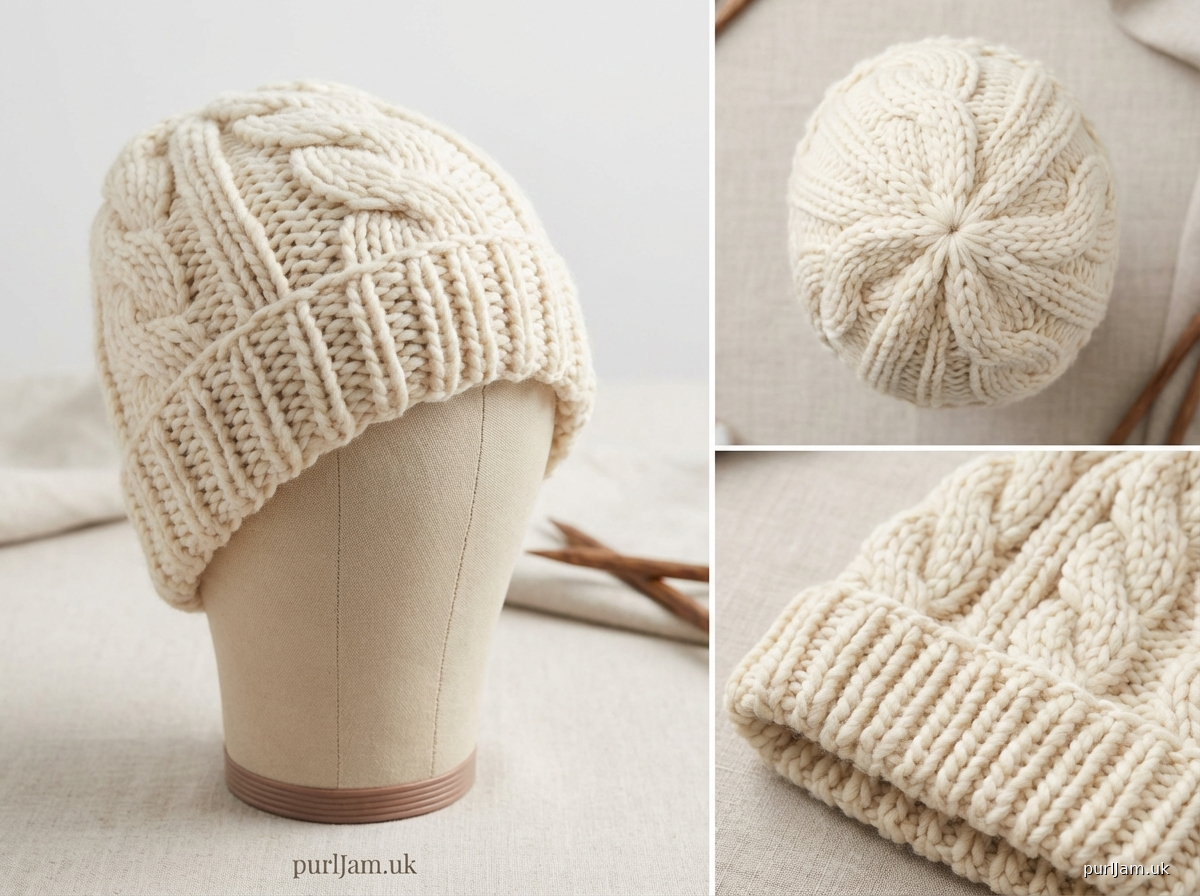
<pattern>

# SUPER CHUNKY CABLE BEANIE

A cozy, quick-to-make beanie featuring a textured cable-like ribbing pattern. Worked top-down in the round, this hat uses simple front and back post double crochet stitches to create beautiful vertical texture that mimics the look of cables. Perfect for beginners ready to learn post stitches! The super chunky yarn means this project works up in just a few hours.

**Difficulty Level:** Beginner (with basic post stitch tutorial included)

---

## MATERIALS

**Yarn:**
- Super chunky weight (6) yarn
- Approximately 120-150 yards for adult medium size
- Suggested yarns: Lion Brand Wool-Ease Thick & Quick, Bernat Blanket, Red Heart Grande, or any super bulky weight yarn
- Sample shown uses 1 skein (140 yards)

**Hook:**
- US L-11 (8mm) crochet hook, or size needed to obtain gauge

**Notions:**
- Stitch marker
- Yarn needle for weaving in ends
- Scissors

**Optional:**
- Pompom maker (4" diameter) or cardboard circles for pompom

---

## GAUGE

**9 dc and 5 rounds = 4" (10cm) in double crochet worked in the round**

Gauge is important! The thick yarn means even small differences in gauge will significantly affect the final size. Take time to check your gauge before beginning.

To check gauge: Make a magic ring with 12 dc, then work increases as in pattern for 3 rounds. Measure across 9 stitches - should equal 4". If your stitches are too tight (less than 4"), go up a hook size. If too loose (more than 4"), go down a hook size.

---

## FINISHED MEASUREMENTS

**Adult Medium:**
- Circumference: 21-22" (53-56cm) - ribbing stretches to fit
- Height: 8-8.5" (20-22cm) from crown to brim edge

**Sizing Notes:**
- The post stitch ribbing creates a stretchy fabric that will comfortably fit head circumferences of 21-23"
- For smaller adult/teen (20-21" head): Use 36 stitches (stop after Rnd 3 of crown)
- For larger adult (23-24" head): Add one more increase round to reach 48 stitches

---

## ABBREVIATIONS

- ch = chain
- dc = double crochet
- FPDC = front post double crochet (see tutorial below)
- BPDC = back post double crochet (see tutorial below)
- rnd(s) = round(s)
- st(s) = stitch(es)
- [ ] = stitch count at end of round
- ( ) = repeat instructions within parentheses

---

## SPECIAL TECHNIQUES

### Front Post Double Crochet (FPDC)
Yarn over, insert hook from front to back to front around the post (vertical part) of the stitch from the previous round, yarn over and pull up a loop (3 loops on hook), [yarn over, pull through 2 loops] twice. The stitch will stand out in front, creating a raised texture.

**Beginner Tip:** Skip over the top of the stitch completely - you're working around the post/stem of the stitch, not into the V at the top.

### Back Post Double Crochet (BPDC)
Yarn over, insert hook from back to front to back around the post of the stitch from the previous round, yarn over and pull up a loop (3 loops on hook), [yarn over, pull through 2 loops] twice. The stitch will recede to the back, creating a valley.

**Beginner Tip:** Work from the back side, going around the post. This stitch will push the fabric forward while you work from behind.

### Magic Ring (Adjustable Ring)
This creates a tight, closed center for your hat. Wrap yarn around fingers to form a ring, work stitches into the ring, then pull the tail to tighten.

**Alternative for beginners:** Ch 4, slip st to first ch to form a ring. This is slightly less tidy but easier for first-timers.

### Working in Continuous Rounds
Do not join rounds with a slip stitch unless instructed. Place a stitch marker in the first stitch of each round and move it up as you go. This creates a seamless spiral.

---

## PATTERN NOTES

- Hat is worked from the top down in continuous rounds (spiral method)
- Crown uses standard dc increases to create a flat circle
- Body and brim use alternating FPDC and BPDC to create vertical ribbing texture
- The ribbing naturally creates stretch, so the hat will fit snugly but comfortably
- Stitch count must remain at 42 sts (or chosen size) after crown is complete
- For a slouchy version, work 3-4 additional rounds in the body section before starting brim

---

## INSTRUCTIONS

### CROWN (Top of Hat)

**Rnd 1:** Make a magic ring, ch 2 (does not count as st), work 12 dc into ring, pull tail to tighten ring, place marker in first st. [12 sts]

*Verification: Count 12 dc stitches. Magic ring should be tight with no hole visible.*

**Rnd 2:** 2 dc in each st around. [24 sts]

*Math check: 12 sts × 2 = 24 sts ✓*

**Rnd 3:** (Dc in next st, 2 dc in next st) around. [36 sts]

*Math check: 24 sts ÷ 2 = 12 repeats; 12 × 3 sts per repeat = 36 sts ✓*

**Rnd 4:** (Dc in next 5 sts, 2 dc in next st) around. [42 sts]

*Math check: 36 sts ÷ 6 = 6 repeats; 6 × 7 sts per repeat = 42 sts ✓*

**Rnd 5:** Dc in each st around. [42 sts]

*Crown should measure approximately 5-5.5" across. This round adds height without increasing circumference.*

---

### BODY (Cable Ribbing Section)

Now we'll create the cable-like texture using post stitches. The ribbing will appear as vertical columns.

**Rnd 6 (First Ribbing Round):** (FPDC around next st, BPDC around next st) around. [42 sts]

*This establishes the ribbing pattern. You should see raised stitches (FPDC) alternating with recessed stitches (BPDC). Pattern repeat is 2 sts; 42 ÷ 2 = 21 repeats ✓*

**Rnd 7:** (FPDC around next FPDC, BPDC around next BPDC) around. [42 sts]

**Important:** Work each post stitch around the corresponding post stitch from the previous round. FPDC stitches stack on FPDC stitches, BPDC stitches stack on BPDC stitches. This creates consistent vertical ribbing.

**Rnds 8-10:** Repeat Rnd 7 (working FPDC around FPDC, BPDC around BPDC). [42 sts each round]

*After Rnd 10, hat should measure approximately 6-6.5" from crown to bottom edge. Check that ribbing columns are vertical and evenly spaced.*

---

### BRIM (Ribbed Edge)

Continue the ribbing pattern for a textured brim:

**Rnds 11-12:** (FPDC around next FPDC, BPDC around next BPDC) around. [42 sts each round]

*Final stitch count: 42 sts. Total hat height should measure 8-8.5" from crown to brim edge.*

**Final Round:** Slip st in next st, fasten off, leaving a 6" tail.

---

## FINISHING

1. **Weave in ends:** Thread yarn tail onto yarn needle. Weave through several stitches on the inside of the hat, going back and forth to secure. Trim excess yarn close to work.

2. **Shape hat:** Gently block by stuffing with a rolled towel or placing over a balloon/ball inflated to head size. The super chunky yarn should hold its shape well without heavy blocking.

3. **Check ribbing:** The vertical columns should be evenly spaced around the hat. The fabric should stretch comfortably when pulled horizontally.

### Optional Pompom

**Materials:** Approximately 25-30 yards of same or coordinating yarn, pompom maker or cardboard circles (4" diameter), scissors

**Instructions:**
1. Wrap yarn around pompom maker or cardboard circles 80-100 times (more wraps = denser pompom)
2. Tie a 12" piece of yarn tightly through the center, knotting securely several times
3. Cut through all loops on both sides
4. Fluff and trim to a round 3.5-4" ball shape
5. Use the long tie to attach securely to top center of hat, weaving through several stitches
6. Knot inside hat and weave in end

---

## SIZING VARIATIONS

**Teen/Small Adult (20-21" head):**
- Work through Rnd 3 of crown only [36 sts]
- Rnd 4: Dc in each st around [36 sts]
- Begin body ribbing at Rnd 5: (FPDC, BPDC) around
- Continue pattern as written, maintaining 36 sts

**Large Adult (23-24" head):**
- Work Rnds 1-4 of crown as written [42 sts]
- Rnd 5: (Dc in next 6 sts, 2 dc in next st) around [48 sts]
- Rnd 6: Dc in each st around [48 sts]
- Begin body ribbing at Rnd 7: (FPDC, BPDC) around
- Continue pattern, maintaining 48 sts

**Child (19-20" head, ages 6-12):**
- Use US K-10.5 (6.5mm) hook for tighter gauge
- Work through Rnd 3 of crown only [36 sts]
- Work 1 round dc [36 sts]
- Work 4 rounds of ribbing for body
- Work 1-2 rounds of ribbing for brim
- Uses approximately 80-100 yards

---

## PATTERN VARIATIONS

**Slouchy Version:**
Add 3-4 extra rounds of ribbing in the body section (between Rnds 10-11) before working the brim. This creates extra fabric that will slouch at the back of the head.

**Rolled Brim:**
Omit the brim ribbing rounds entirely. After Rnd 10, work 2 rounds of dc in each st, then fasten off. The brim will naturally roll up slightly.

**Two-Color Ribbing:**
Change colors every 2 rounds to create horizontal stripes that interact beautifully with the vertical ribbing texture.

**Messy Bun Hat:**
Leave a 2-3" opening at the crown by working only 8-10 increases in Rnd 2 instead of full rounds. Continue pattern as written around the opening.

---

## CARE INSTRUCTIONS

- Hand wash in cool water with mild detergent
- Press out excess water gently (do not wring)
- Lay flat to dry on a towel, reshaping as needed
- Do not hang, as this may stretch the hat
- If pompom becomes flattened, trim and re-fluff

---

## TROUBLESHOOTING

**Problem:** Hat is too small/tight
**Solution:** Go up one hook size, or add 6 more stitches (work one additional increase round in crown)

**Problem:** Hat is too large/loose
**Solution:** Go down one hook size, or remove 6 stitches (work one fewer increase round in crown)

**Problem:** Post stitches are difficult to see
**Solution:** Work the first post stitch round slowly, using a stitch marker to mark each FPDC. Once established, the pattern becomes easy to see.

**Problem:** Ribbing columns spiral instead of staying vertical
**Solution:** This is normal with
Disclaimer: This pattern was generated by AI and should be reviewed for accuracy before use. While we strive for quality, AI-generated content may contain errors. Please verify measurements, stitch counts, and instructions before beginning your project. Generated by purlJam.uk
Access your pattern anytime
Bookmark this page to access your pattern anytime