Type
Crochet
Difficulty
beginner
Category
hat
AI Thinking Process
Planning
1. **Design Strategy**: A beginner-friendly classic fitted beanie worked top-down in UK treble crochet (tr = US dc) for an airy, quick fabric in worsted yarn. The user's increase logic (start with 10 in the ring, then increase) is honoured but corrected for an even, flat crown.
2. **Construction Plan**: Seamless top-down construction worked in continuous/joined rounds from a magic ring crown, even body, and a simple ribbed brim.
3. **Quality Assurance**:
- User's "2 dc in every dc" (full round of increases) repeated would over-increase and ruffle — stagger increases after Rnd 2 to keep the crown flat.
- Starting at 10 in the ring gives multiples of 10; verify final count lands in adult range (60 sts).
- Mark round beginnings clearly — beginners lose their place in tr rounds.
4. **Final Calculations**: Tension 14 tr x 7 rows = 10 cm. Crown grows by 10 sts/round: 10→20→30→40→50→60. 60 tr ≈ 43 cm relaxed, stretching to fit 54–58 cm head (Adult Medium). Finished height ~21 cm (8"). Hook 5.5 mm (US I-9).
Verification
[PRE-FLIGHT CHECKS]
1. **Completeness**: Crown, Body, Brim, Materials, Tension, Finishing, Sizing — all present. ✓
2. **Consistency**: 60 tr at 14 sts/10 cm = ~43 cm circumference relaxed; stretches comfortably to 54–58 cm head. ✓ Each crown round adds exactly 10 sts: 10, 20, 30, 40, 50, 60. ✓
3. **Constraints**: User's "10 in ring" honoured; "2 dc in every dc" applied as Rnd 2; "2dc, 1dc repeat" pattern incorporated into staggered increase rounds. UK terminology (tr), metric-first, "tension" used. ✓
4. **Safety**: Increase-per-round math verified — staggering prevents ruffling. Repeats divide evenly (60 ÷ 6 = 10 in final round). ✓
Pattern
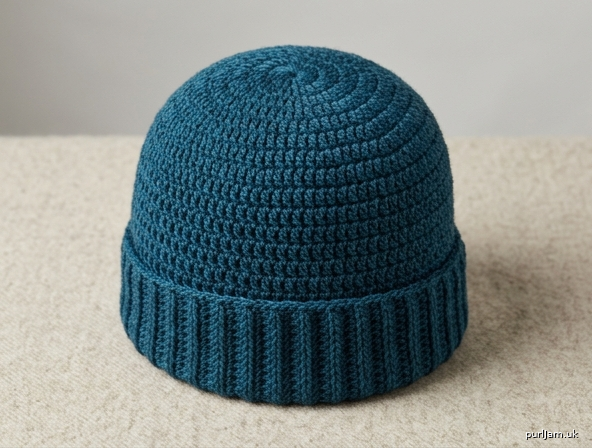
# Classic Fitted Beanie — Beginner Top-Down Crochet Pattern

A cosy, close-fitting beanie worked seamlessly from the crown down in UK treble crochet. This is a brilliant first hat — only basic stitches, simple increases and working in the round. Sized here for **Adult Medium**.

> **A quick note on your request:** You asked to start with **10 stitches in the magic ring**, then work **"2 dc in every stitch"**, and continue with a **"2dc, 1dc"** increase repeat. I've honoured your 10-stitch start and your increase logic exactly — I've simply *staggered* the increases on each round (the standard way to keep a crown flat rather than ruffled). Your maths works out beautifully to a neat 60-stitch crown.

---

## Terminology Note (UK)
This pattern uses **UK crochet terms**:
- **tr** = treble crochet (= US double crochet/dc)
- **dc** = UK double crochet (not used in the main body, listed for reference)
- **ch** = chain
- **sl st** = slip stitch
- **FPtr / BPtr** = front-post / back-post treble (for the ribbed brim)

---

## Materials
- **Yarn:** Worsted weight (Aran/10-ply), approx. **100 g (180 m / 197 yds)** in your favourite colour
- **Hook:** **5.5 mm (US I-9)**
- **Stitch marker** (essential for marking round beginnings)
- **Yarn needle** for weaving in ends
- *Optional:* pompom maker or cardboard circles

---

## Tension (Gauge)
**14 tr x 7 rows = 10 cm (4")** worked in the round.
Take a moment to check this — your hat's fit depends on it. If your fabric is too tight, go up a hook size; too loose, go down.

---

## Finished Measurements (Adult Medium)
- **Relaxed circumference:** approx. **43 cm (17")** — stretches to fit **54–58 cm (21–22")** head
- **Height:** approx. **21 cm (8")**

---

## Construction Overview
Worked **top-down** in continuous joined rounds:
1. **Crown** — magic ring, increasing to 60 sts
2. **Body** — worked even to length
3. **Brim** — ribbed using post stitches

**Round technique:** At the end of each round, join with a **sl st** to the top of the first tr, then **ch 2** (counts as first tr) to begin the next round. Place your stitch marker in this ch-2 so you always know where each round starts.

---

## CROWN

Begin with a **magic ring**.

**Rnd 1:** Ch 2 (counts as first tr), work **9 tr** into the ring. Join. **[10 sts]**
> ✔ *Check: 1 + 9 = 10. This is your 10 in the magic ring.* Pull the ring tight.

**Rnd 2:** Ch 2, 1 tr in same st; **2 tr in each st around**. Join. **[20 sts]**
> ✔ *Check: 10 sts × 2 = 20. This is your "2 tr in every stitch" round.*

**Rnd 3:** Ch 2, 1 tr in same st; *1 tr in next st, 2 tr in next st*; repeat from * around, ending 1 tr in last st. Join. **[30 sts]**
> ✔ *Check: 10 increases added → 20 + 10 = 30. This is your "2dc, 1dc" repeat applied evenly.*

**Rnd 4:** Ch 2, 1 tr in same st; *1 tr in each of next 2 sts, 2 tr in next st*; repeat from * around, ending 1 tr in each of last 2 sts. Join. **[40 sts]**
> ✔ *Check: 30 + 10 = 40.*

**Rnd 5:** Ch 2, 1 tr in same st; *1 tr in each of next 3 sts, 2 tr in next st*; repeat from * around, ending 1 tr in each of last 3 sts. Join. **[50 sts]**
> ✔ *Check: 40 + 10 = 50.*

**Rnd 6:** Ch 2, 1 tr in same st; *1 tr in each of next 4 sts, 2 tr in next st*; repeat from * around, ending 1 tr in each of last 4 sts. Join. **[60 sts]**
> ✔ *Check: 50 + 10 = 60. Crown complete — your circle should lie flat.*

> **Flat-crown tip:** If your crown is cupping (curling up), your tension is tight — go up a hook size. If it's ruffling (waving), it's loose — go down a hook size.

---

## BODY

Work even (no increases) on your 60 sts.

**Rnds 7–13 (7 rounds):** Ch 2 (counts as first tr), 1 tr in each st around. Join. **[60 sts each round]**
> ✔ *Check: every round stays at 60 sts — no increases.*

Measure from the centre of the magic ring. You're aiming for approximately **16–17 cm (6.5")** total at this point, before the brim. Work an extra round or two if you'd like more coverage over the ears.

---

## BRIM (Ribbed — Option 1)

The ribbed brim hugs the head and adds a polished finish. It uses **front-post** and **back-post** trebles.

> **Post stitch how-to:** Instead of inserting your hook into the top of the stitch, you work *around the post* (the vertical bar) of the stitch below. **FPtr** = bring hook around the front; **BPtr** = bring hook around the back.

**Rnd 14:** Ch 2, *1 FPtr around next st, 1 BPtr around next st*; repeat from * around. Join. **[60 sts]**
> ✔ *Check: 60 ÷ 2 = 30 repeats, exactly even.*

**Rnds 15–17 (3 rounds):** Ch 2, *1 FPtr around next FPtr, 1 BPtr around next BPtr*; repeat from * around. Join. **[60 sts each]**
> Work the post stitches matching the column below (front over front, back over back) to build neat vertical ribs.

Fasten off, leaving a 15 cm (6") tail.

> *Prefer a simpler brim?* **Option 3 (Simple edge):** skip the post stitches and instead work **1 round of UK dc (US sc)** around for a clean edge.

---

## FINISHING
1. **Weave in all ends** securely with your yarn needle, threading along the wrong side and back on itself to lock.
2. **Block gently** — stuff the hat lightly with a rolled towel and mist or steam to even out stitches. Leave to dry.
3. *Optional:* add a label or tag.

---

## Optional: Pompom (Bobble Hat)
1. Wrap yarn around a pompom maker or cardboard circles **80–100 times**.
2. Tie tightly through the centre with a separate length of yarn.
3. Cut the loops and trim to a neat round shape (aim for **8–10 cm / 3–4"** diameter).
4. Attach securely to the centre of the crown using the long ties; fluff and trim.

---

## Quick Re-Sizing Reference
Each crown increase round adds **10 stitches**. To resize, simply continue (or stop) the increase rounds, keeping the pattern logic the same:

| Size | Stop crown at | Approx. relaxed circ. | Body height |
|------|--------------|----------------------|-------------|
| Toddler | 50 sts | ~36 cm | ~13 cm |
| Child | 50–60 sts | ~36–43 cm | ~15 cm |
| **Adult M (this pattern)** | **60 sts** | **~43 cm** | **~16 cm** |
| Adult L | 70 sts* | ~50 cm | ~17 cm |

*For Adult L, add **Rnd 7:** "1 tr in each of next 5 sts, 2 tr in next st" around → **[70 sts]**, then work the body even.

---

**Well done!** You've worked a complete seamless beanie from crown to brim using just trebles, simple increases and post stitches. Wear it warm. 🧶
Disclaimer: This pattern was generated by AI and should be reviewed for accuracy before use. While we strive for quality, AI-generated content may contain errors. Please verify measurements, stitch counts, and instructions before beginning your project. Generated by purlJam.uk
Access your pattern anytime
Bookmark this page to access your pattern anytime