Type
Crochet
Difficulty
beginner
Category
blanket
AI Thinking Process
Planning
Verification
Pattern
Classic Granny Square Throw
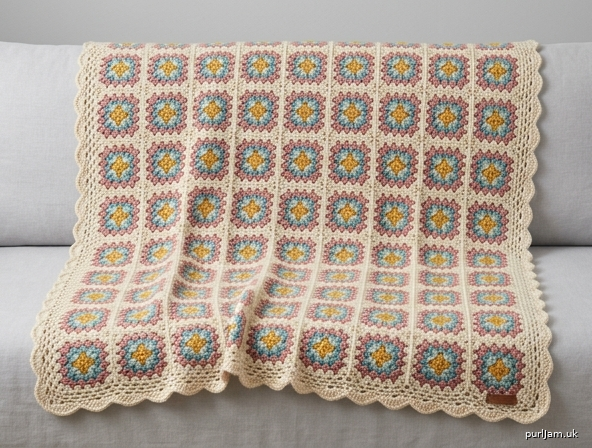
A timeless multi-color granny square blanket made square-by-square, then joined as you go for a neat, seamless finish. Trimmed with a simple border. Difficulty: Intermediate.
Finished Measurements
- Body (squares only): approx. 40.5 in × 54 in (103 × 137 cm)
- With border: approx. 44.5 in × 58 in (113 × 147 cm) — generous throw size
- Layout: 9 squares wide × 12 squares tall = 108 squares
Materials
- Yarn: DK-weight yarn (light worsted / weight 3). Sample uses 4 colors (A, B, C = square rounds; D = border/join).
- Approx. total: 1,900–2,100 yds (1,740–1,920 m)
- Suggested split: Color A ~500 yds, Color B ~500 yds, Color C ~500 yds, Color D (border + final round) ~500–600 yds
- Hook: US H-8 (5 mm)
- Notions: Tapestry needle, scissors, stitch markers (optional)
Substitute any DK yarn that meets gauge. Any color arrangement works — the pattern is written for a repeating A/B/C center with a shared final round in D so all squares join uniformly.
Gauge
- One completed 4-round square = 4.5 in × 4.5 in (11.5 × 11.5 cm)
- Rounds 1–2 alone should measure approx. 2.25 in (5.75 cm) across.
- Gauge is critical: all squares must match so joins align. Adjust hook size if needed.
Abbreviations (US terms)
- ch = chain
- sl st = slip stitch
- sc = single crochet
- dc = double crochet
- sp = space
- st(s) = stitch(es)
- beg = beginning
- rep = repeat
- RS = right side
Special Notes
- 3-dc group = "shell." Each side of a granny square gains one more shell per round.
- Squares are worked in the round with the RS always facing (do not turn).
- Join new colors at the beginning of a round with a standing dc or a sl-st join, as you prefer.
THE GRANNY SQUARE (Make 108)
Work Rounds 1–3 in your chosen center colors (A, B, C), then work Round 4 in Color D for all squares.
Foundation: With Color A, ch 4; join with sl st to first ch to form a ring. (Alternatively, make a magic ring.)
Round 1 (Color A)
Ch 3 (counts as first dc), 2 dc into ring, ch 2, [3 dc into ring, ch 2] 3 times, join with sl st to top of beg ch-3. Fasten off A.
- Count check: 4 shells (3-dc groups) + 4 corner ch-2 sps. ✓ (4 × 3 = 12 dc)
Round 2 (Color B)
Join B in any corner ch-2 sp. Ch 3, (2 dc, ch 2, 3 dc) all in same corner sp — first corner made. [ch 1, (3 dc, ch 2, 3 dc) in next corner ch-2 sp] rep from * around 3 more times, ch 1, join with sl st to top of beg ch-3. Fasten off B.
- Count check: 8 shells, 4 corners, 4 side ch-1 sps. ✓ (8 × 3 = 24 dc)
Round 3 (Color C)
Join C in any corner ch-2 sp. Ch 3, (2 dc, ch 2, 3 dc) in same corner sp. [ch 1, 3 dc in next ch-1 side sp], ch 1, (3 dc, ch 2, 3 dc) in next corner sp] rep around, working the side sequence on each side, ending ch 1, join with sl st to top of beg ch-3. Fasten off C.
- Per side now: corner — side shell — corner. Count check: 12 shells, 4 corners, 8 side ch-1 sps. ✓ (12 × 3 = 36 dc)
Round 4 (Color D) — worked on FIRST square only as written; see Joining for all others
Join D in any corner ch-2 sp. Ch 3, (2 dc, ch 2, 3 dc) in same corner sp. [ch 1, 3 dc in next side sp] twice, ch 1, (3 dc, ch 2, 3 dc) in next corner sp] rep around, ending after the final side sequence with ch 1, join with sl st to top of beg ch-3. Fasten off D; weave in ends.
- Count check: 16 shells, 4 corners, 12 side ch-1 sps (2 side sps per side). ✓ (16 × 3 = 48 dc)
Each finished square has, per side: corner ch-2 sp, then 3 shells separated by ch-1 sps along that side. This uniform edge is what makes joining line up.
JOINING: Join-As-You-Go (JAYGO)
Work the first square's Round 4 fully (above). For every subsequent square, work Round 4 in Color D but join to neighboring squares while completing the round, replacing the ch-1 (sides) and one ch of the corner ch-2 with joins.
Layout order: Build row by row. Join each new square to the square on its left, and (from Row 2 onward) also to the square above.
Joining a single side (to one neighbor)
Work Round 4 as normal until you reach the side that faces the neighbor. At each point where you would ch 1:
- Replace ch 1 with: ch 1, remove hook, insert hook from front into the corresponding ch-1 sp of the neighbor, pull the working loop through, ch 1 — then continue with your 3-dc shell.
At each corner where two squares meet:
- Work (3 dc, ch 1, join to neighbor's corner ch-2 sp with a sl st, ch 1, 3 dc) in your corner sp instead of the usual ch-2.
Simplified working rule per shared side: For a shared side you will make 3 joins — one at each of the two ch-1 side gaps and one shared corner meeting point (the second corner is joined when you reach it).
Joining an inner (four-corner) intersection
When a new square meets three existing squares at one corner, join into the same central corner sp shared by the diagonal square so all four corners meet cleanly. Insert hook into the joint of the previously joined corners.
Alternative Joining: Whip Stitch
Prefer to make all 108 squares first? Complete Round 4 on every square, block them, then lay out 9 × 12. With Color D and a tapestry needle, place two squares RS together and whip stitch through the back loops only across each edge, stitch-for-stitch (48 dc per edge → whip through each dc and ch). Join all vertical seams first, then all horizontal seams.
- Seam check: 9 columns → 8 vertical seams per row; 12 rows → 11 horizontal seams. All edges are equal length (each 4.5 in), so seams align. ✓
BORDER (Optional — included)
Once all 108 squares are joined (40.5 × 54 in), work a continuous border in Color D with RS facing.
Round 1 (establish even edge)
Join D in any corner ch-2 sp. Ch 3, (2 dc, ch 2, 3 dc) in corner. Work 3 dc in each ch-1 sp and each seam junction along every side, working (3 dc, ch 2, 3 dc) in each of the four outer corner sps. Join with sl st to top of beg ch-3.
- This regularizes the edge into evenly spaced shells.
Round 2 (granny border)
Sl st into corner ch-2 sp. Ch 3, (2 dc, ch 2, 3 dc) in same sp. ch 1, 3 dc in each gap between shells to next corner, (3 dc, ch 2, 3 dc) in each corner sp. Join.
Round 3 (scalloped finish)
Sl st to first ch-1 sp. Ch 1, sc in same sp, 5 dc in next gap, sc in next gap rep around, working an extra dc into each corner to keep it flat. Join with sl st to first sc. Fasten off.
- Corner check: each corner keeps a (…, 5 dc, …) fan so the border lies flat, adding ~2 in per side → final 44.5 × 58 in. ✓
FINISHING
- Weave in all ends securely (there are many at color changes — weave as you go to save time).
- Blocking: Wet-block or steam-block the finished blanket to open up the stitches and even out the squares. Pin to 44.5 × 58 in and let dry fully.
- Trim any remaining tails after blocking.
Math Summary (verification)
- Square edge: 4.5 in. Width: 9 × 4.5 = 40.5 in. Length: 12 × 4.5 = 54 in. ✓
- Squares: 9 × 12 = 108. ✓
- Round dc counts: 12 → 24 → 36 → 48 (increases of 12 per round, one added shell per side each round). ✓
- Border adds ~2 in each side: 40.5 + 4 = 44.5 in; 54 + 4 = 58 in. ✓
Enjoy your classic granny square throw!
Disclaimer: This pattern was generated by AI and should be reviewed for accuracy before use. While we strive for quality, AI-generated content may contain errors. Please verify measurements, stitch counts, and instructions before beginning your project. Generated by purlJam.uk
Access your pattern anytime
Bookmark this page to access your pattern anytime