Type
Crochet
Difficulty
beginner
Category
blanket
AI Thinking Process
Planning
Verification
Pattern
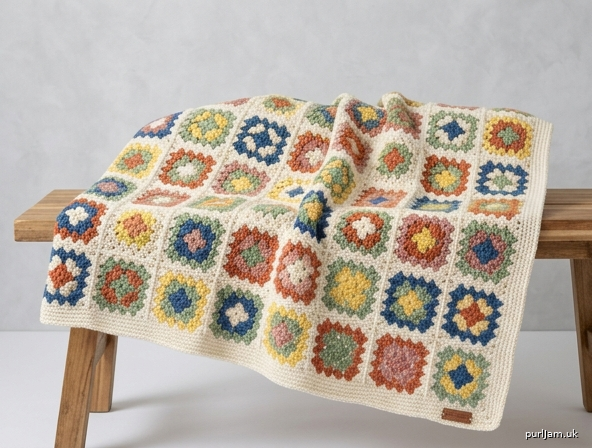
Classic Granny Square Throw Blanket
Skill level: Beginner
Construction: Individual granny squares, joined, with optional border
A traditional throw worked as separate granny squares, then joined. Squares may be solid or a new color each round. Two joining methods are given: join-as-you-go (fewer seams to sew) and whip stitch (all squares finished first). A simple two-round border is optional.
Finished measurements
One square (blocked): 4½" × 4½" (11.5 × 11.5 cm)
Blanket including border: approximately 56" × 65" (142 × 165 cm)
Layout: 12 squares wide × 14 squares long = 168 squares
(12 × 4½" = 54"; 14 × 4½" = 63"; border adds about 1" on each edge → 56" × 65" ✓)
To change the size, add or remove whole squares. Each square added to the width adds 4½" (11.5 cm); each square added to the length adds 4½" (11.5 cm), plus the same border.
Materials
Yarn: Worsted weight (medium / category 4), approximately 3,000 yd (2,745 m) total.
- A mix of colors for the squares is traditional. Plan on about 2,700 yd (2,470 m) for 168 squares (about 16 yd / 15 m per square).
- Set aside about 300 yd (275 m) of one color for the border (and for joining if you use whip stitch).
- If Round 4 of every square, the joins, and the border are all one unifying color, allow about 1,200 yd (1,100 m) of that color and 1,800 yd (1,645 m) mixed for Rounds 1–3.
Shown-style suggestion: 5 or 6 colors of washable acrylic worsted (for example 100 g / 210 yd skeins). You will need 14–16 skeins total.
Hook: US H/8 (5 mm), or size needed to obtain gauge
Notions: Yarn needle, scissors, blocking mat and pins (or blocking boards), locking stitch markers (optional, to mark corners while joining)
Gauge
One 4-round granny square = 4½" × 4½" (11.5 × 11.5 cm), blocked.
Make one square and block it.
- If the square is larger than 4½" (11.5 cm), use a smaller hook.
- If the square is smaller, use a larger hook (US I/9 / 5.5 mm is a common next step).
Consistent square size matters more than matching a stitch-per-inch gauge. Do not join unblocked squares of mixed sizes.
Abbreviations (US)
- beg – beginning
- ch – chain
- ch-sp – chain space
- dc – double crochet
- rep – repeat
- rnd(s) – round(s)
- RS – right side
- sc – single crochet
- sk – skip
- sl st – slip stitch
- sp(s) – space(s)
- st(s) – stitch(es)
- WS – wrong side
Notes
- Worked in the round with the right side always facing. Do not turn at the end of a round.
- Beginning ch 3 counts as 1 dc throughout.
- All 3-dc groups are worked into chain spaces, not into the tops of stitches. That is what makes a classic granny square.
- Corners are ch 2. Sides are ch 1 between 3-dc groups.
- Solid square: At the end of a round, sl st to join, then sl st across to the next corner ch-2 sp and start the next round in that space.
- Color-change square (optional): Fasten off at the end of the round. Join the new color with a sl st in any corner ch-2 sp and begin the next round with ch 3. Weave ends as you go.
- Block every square to 4½" (11.5 cm) before joining (whip stitch) or after Rounds 1–3 if you prefer to block before a JAYG Round 4.
- Stitch counts are given at the end of every round. Count the 3-dc groups; if the group count is right, the square will lie flat.
Granny square
Make 168.
Foundation: Ch 4, sl st in first ch to form a ring.
(Optional tighter center: make a magic ring instead, then work Round 1 into the ring and pull closed.)
Round 1: Ch 3 (counts as dc here and throughout), 2 dc in ring, ch 2, [3 dc in ring, ch 2] 3 times, sl st in top of beg ch-3.
Count: 4 groups of 3 dc = 12 dc, 4 ch-2 corner sps. (4 × 3 = 12 dc ✓)
Round 2: Sl st in next 2 dc and into the next ch-2 sp (or fasten off and join a new color in any ch-2 sp).
(Ch 3, 2 dc, ch 2, 3 dc) in same ch-2 sp (first corner made), ch 1, *(3 dc, ch 2, 3 dc) in next ch-2 sp, ch 1; rep from * 2 more times, sl st in top of beg ch-3.
Count: 8 groups of 3 dc = 24 dc, 4 ch-2 corner sps, 4 ch-1 sps. (4 corners × 2 groups = 8 groups; 8 × 3 = 24 dc ✓)
Round 3: Sl st in next 2 dc and into the corner ch-2 sp (or join new color in any corner).
(Ch 3, 2 dc, ch 2, 3 dc) in same corner, ch 1, 3 dc in next ch-1 sp, ch 1, *(3 dc, ch 2, 3 dc) in next corner, ch 1, 3 dc in next ch-1 sp, ch 1; rep from * 2 more times, sl st in top of beg ch-3.
Count: 12 groups of 3 dc = 36 dc, 4 ch-2 corner sps, 8 ch-1 sps. (3 groups per side × 4 sides = 12 groups; 12 × 3 = 36 dc ✓)
Round 4 (when the square will not be joined on this round — use this for all squares if you will whip stitch later):
Sl st in next 2 dc and into the corner ch-2 sp (or join new color in any corner).
(Ch 3, 2 dc, ch 2, 3 dc) in same corner, ch 1, [3 dc in next ch-1 sp, ch 1] twice, *(3 dc, ch 2, 3 dc) in next corner, ch 1, [3 dc in next ch-1 sp, ch 1] twice; rep from * 2 more times, sl st in top of beg ch-3. Fasten off.
Count: 16 groups of 3 dc = 48 dc, 4 ch-2 corner sps, 12 ch-1 sps. (4 groups per side × 4 sides = 16 groups; 16 × 3 = 48 dc ✓)
Per side: 4 groups and 3 ch-1 sps between the two corner groups.
Weave in ends. Block to 4½" × 4½" (11.5 × 11.5 cm).
Assembly
Arrange 12 squares across and 14 squares down, RS facing you, until the color layout looks right. Photograph the layout before you join.
Method A — Join-as-you-go (recommended)
Work Squares 1 through 168 through Round 3, and block them. Round 4 is the joining round.
First square of the blanket: Work Round 4 exactly as written above. Fasten off.
Joining one side (used for the rest of Row 1, and for the first square of each new row, which joins only to the square below):
Work Round 4 until you reach the side that should attach to a finished square. On that shared side, replace each ch 1 with a sl st into the matching ch-1 sp of the adjacent square, and replace the corner ch 2 as follows:
- Work 3 dc in the current square’s corner sp,
- ch 1, sl st in the adjacent square’s corner ch-2 sp, ch 1,
- 3 dc in the same current corner sp.
Then continue any unjoined sides with ordinary ch-1 and ch-2.
Check on a one-side join: The shared side still has 4 groups of 3 dc; the ch-1 sps have become sl sts into the other square. (4 groups ✓)
Joining two sides (used for every remaining square — it joins to the square on the right and the square below, or left and below, depending on your direction):
Work Round 4, joining the first shared side as above. At the corner that touches two already-joined squares:
- 3 dc in the current corner sp,
- ch 1, sl st in the corner of the first adjacent square, sl st in the corner of the second adjacent square, ch 1,
- 3 dc in the same current corner sp.
Join the second shared side the same way as a one-side join. Finish any free sides with ordinary ch-1 / ch-2. Sl st in top of beg ch-3. Fasten off.
Suggested order: Complete Row 1 left to right (each new square joins on one side). For Row 2, join the first square to the square below only; join each following square on two sides. Repeat for Rows 3–14. (12 + 13 two-side joins per later row is expected; 14 rows × 12 squares = 168 ✓)
Keep RS facing. Do not twist the join. After every few squares, lay the work flat and check that corners line up.
Method B — Whip stitch
Work all 168 squares through Round 4, weave in ends, and block.
Hold two squares WS together, edges matching. With a yarn needle and worsted yarn (the border color, or a color that matches one edge):
- Whip stitch through the back loops only of corresponding dc stitches, and through one loop of each chain, working from corner to corner.
- Match 3-dc group to 3-dc group so clusters stay aligned.
- At corners, take one extra stitch through both ch-2 sps so the corner does not gape.
Join squares into 14 strips of 12, then join the strips. Weave in joining tails on the WS.
Border (optional)
Worked with RS facing, in a unifying color, after all squares are joined. Join yarn with sl st in any blanket-corner ch-2 sp.
Border Round 1 (granny round):
(Ch 3, 2 dc, ch 2, 3 dc) in the same corner sp, ch 1.
Along each side: *3 dc in next ch-1 sp, ch 1; rep from * across, and at each place where two squares meet, work 3 dc into the join (the joined corner sps), ch 1.
At each of the next 3 blanket corners, work (3 dc, ch 2, 3 dc), ch 1.
Sl st in top of beg ch-3.
Count check (do not count the 4 corner groups):
- Short sides (12 squares): 12 × 3 ch-1 sps + 11 joins = 47 groups of 3 dc. (36 + 11 = 47 ✓)
- Long sides (14 squares): 14 × 3 ch-1 sps + 13 joins = 55 groups of 3 dc. (42 + 13 = 55 ✓)
If a side is off by one group, you skipped or doubled a join. Fix it on this round; do not wait.
Border Round 2 (neat edge):
Ch 1, sc in each dc around, 1 sc in each ch-1 sp, and (sc, ch 1, sc) in each corner ch-2 sp. Sl st in first sc. Fasten off.
(Prefer an all-granny edge? Replace Round 2 with another cluster round: (3 dc, ch 2, 3 dc) in each corner, ch 1, 3 dc in each ch-1 sp around.)
Finishing
Weave in every remaining tail on the WS. Block the finished blanket: pin to 56" × 65" (142 × 165 cm), mist or steam according to the yarn label (acrylic: hover-steam only, do not melt the fibers), and let dry completely.
Quick reference
| Round | 3-dc groups | dc | Corner sps | Side ch-1 sps |
|---|---|---|---|---|
| 1 | 4 | 12 | 4 ch-2 | 0 |
| 2 | 8 | 24 | 4 ch-2 | 4 |
| 3 | 12 | 36 | 4 ch-2 | 8 |
| 4 | 16 | 48 | 4 ch-2 | 12 |
Groups per round = 4 × round number. Dc per round = 12 × round number. ✓
Disclaimer: This pattern was generated by AI and should be reviewed for accuracy before use. While we strive for quality, AI-generated content may contain errors. Please verify measurements, stitch counts, charts, and instructions before beginning your project. Generated by purlJam.uk
Love this pattern?
Save this pattern to your free PurlJam libraryAccess your pattern anytime
Bookmark this page to access your pattern anytime