Type
Crochet
Difficulty
beginner
Category
blanket
AI Thinking Process
Planning
Verification
Pattern
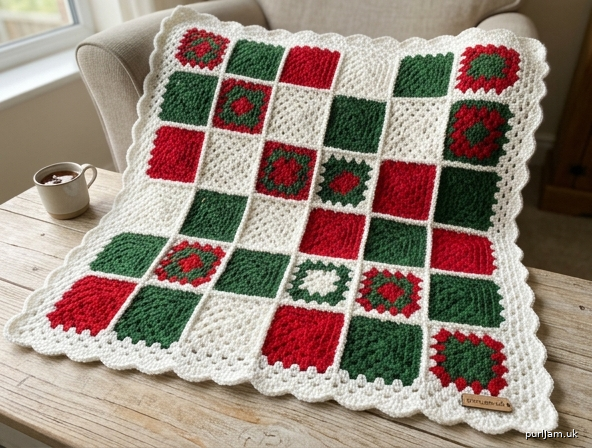
Cozy Christmas Granny Square Blanket
Beginner · Worsted Weight · Approx. 40" × 40" (102 × 102 cm)
A cheerful traditional granny-square throw in classic Christmas red, green, and white. Perfect first blanket project: simple stitches, modular squares you can make anywhere, and a straightforward join.
Skill Level
Beginner
Finished Size
Approximately 40" × 40" (102 × 102 cm) after light blocking, including border.
Yarn
Worsted weight (Category 4) acrylic or wool-blend, approx. 1,400 yd (1,280 m) total:
- Color A (Red): 500 yd (457 m)
- Color B (Green): 500 yd (457 m)
- Color C (White/Off-white): 400 yd (366 m)
Suggested: Red Heart Super Saver, Caron One Pound, or equivalent.
Hook
US H/8 (5 mm), or size needed to obtain gauge.
Notions
- Yarn needle
- Scissors
- Stitch markers (optional)
- Blocking mats and pins (recommended)
Gauge
One 4-round granny square = 4" × 4" (10 × 10 cm) blocked. Take time to check gauge; adjust hook size if your square is larger or smaller.
Abbreviations (US Terms)
- ch – chain
- dc – double crochet
- sl st – slip stitch
- sp – space
- st(s) – stitch(es)
- rnd – round
- RS – right side
- WS – wrong side
- yo – yarn over
- FO – fasten off
Special Stitches
Granny cluster (3-dc group): 3 dc in same space or stitch.
Corner space: ch-2 space at each corner.
Pattern Notes
- Blanket is made of 36 individual granny squares (6 × 6 layout), joined, then edged with a simple border.
- Each square is worked in joined rounds with RS always facing.
- Ch 3 at start of rnd counts as first dc.
- Color changes: finish the last yarn-over of the final st of the rnd with the new color, or FO and join new color in any corner sp.
- Weave in ends as you go for easiest finishing.
- Block squares lightly before joining for best results.
Color Recipes (make the following)
| Square Type | Colors | Quantity |
|---|---|---|
| Solid Red | A throughout | 12 |
| Solid Green | B throughout | 12 |
| Solid White | C throughout | 6 |
| Red center + Green outer | Rnds 1–2 A, Rnds 3–4 B | 3 |
| Green center + Red outer | Rnds 1–2 B, Rnds 3–4 A | 3 |
Total = 36 squares.
Granny Square (make 36)
Foundation: With first color, ch 4. Sl st in first ch to form ring. (Or magic ring if preferred.)
Rnd 1: Ch 3 (counts as dc), 2 dc in ring, ch 2, [3 dc in ring, ch 2] 3 times. Join with sl st to top of beg ch-3. (4 clusters, 4 corner ch-2 sps) — 12 dc + 4 ch-2 sps ✓
Rnd 2: Sl st in next 2 dc and into first ch-2 sp. Ch 3, (2 dc, ch 2, 3 dc) in same sp (first corner), ch 1, [(3 dc, ch 2, 3 dc) in next ch-2 sp, ch 1] 3 times. Join with sl st to top of beg ch-3. (8 clusters) — Each side: cluster, ch 1, cluster; corners ch-2 ✓
Rnd 3: Cont with same color or change as per recipe. Sl st to first ch-2 sp. Ch 3, (2 dc, ch 2, 3 dc) in same sp, ch 1, 3 dc in next ch-1 sp, ch 1, [(3 dc, ch 2, 3 dc) in next ch-2 sp, ch 1, 3 dc in next ch-1 sp, ch 1] 3 times. Join. (12 clusters)
Rnd 4: Sl st to first ch-2 sp. Ch 3, (2 dc, ch 2, 3 dc) in same sp, ch 1, [3 dc in next ch-1 sp, ch 1] twice, [(3 dc, ch 2, 3 dc) in next ch-2 sp, ch 1, (3 dc in next ch-1 sp, ch 1) twice] 3 times. Join. (16 clusters) FO, leaving a 12" tail if you plan to whip-stitch with the tail; otherwise weave in.
Size check: Square should measure 4" × 4" after light steam or wet block. (4 rnds → 4" ✓)
Blocking
Weave in all ends. Wet-block or steam-block each square to 4" × 4". Pin corners firmly so sides are straight. Allow to dry completely.
Layout
Arrange squares RS up in a 6 × 6 grid. Alternate colors for a balanced Christmas look (e.g., checker or random scatter of red/green with white accents). Take a photo for reference before joining.
Joining Method 1 – Whip Stitch (recommended for beginners)
- Hold two squares WS together, RS facing out, aligning stitches and corner spaces.
- Thread yarn needle with matching or contrasting yarn (Color C works well for a snowy look).
- Whip stitch through both loops of corresponding stitches along one side, working from corner ch-2 to corner ch-2.
- Join squares into 6 strips of 6, then join the strips together the same way.
- Keep tension even—snug but not tight—so the blanket lies flat.
Joining Method 2 – Join-As-You-Go (optional)
On Rnd 4 of each new square, when working a side that touches a previous square, replace each ch-1 with a sl st into the corresponding ch-1 sp of the adjacent square, and replace corner ch-2 with (ch 1, sl st in neighbor’s corner sp, ch 1). Complete all other stitches normally. Work left-to-right, row by row.
Border (optional but recommended)
Join Color C (white) with sl st in any outer corner ch-2 sp of the assembled blanket.
Border Rnd 1: Ch 3, (2 dc, ch 2, 3 dc) in same corner sp, *ch 1, 3 dc in next sp; repeat along side, working (3 dc, ch 2, 3 dc) in each blanket corner; at each square-join “valley,” work 3 dc in the join to keep the edge even. Join with sl st to top of beg ch-3.
Border Rnd 2: Sl st to corner ch-2 sp. Ch 3, (2 dc, ch 2, 3 dc) in corner, *ch 1, 3 dc in next ch-1 sp; repeat around, placing (3 dc, ch 2, 3 dc) in each corner. Join.
Border Rnd 3 (scallop finish): Ch 1, sc in same st as join, *skip 2 sts, 5 dc in next ch-1 sp or center st of cluster, skip 2 sts, sc in next st; repeat around, adjusting skips near corners so scallops sit neatly. In each corner ch-2 sp work 7 dc for a fuller scallop. Join with sl st to first sc. FO and weave in ends.
(For a simpler edge, stop after Border Rnd 2 and work one rnd of sc evenly around.)
Finishing
Weave in any remaining ends. Give the finished blanket a final light block or steam to open the stitches and set the border. Allow to dry flat.
Care
Machine wash gentle cold (acrylic) or hand wash (wool blend); lay flat to dry. Do not wring.
Stitch Count Validation Summary
- Rnd 1: 4 clusters × 3 dc = 12 dc ✓
- Rnd 2: 8 clusters ✓
- Rnd 3: 12 clusters ✓
- Rnd 4: 16 clusters ✓
- Layout: 6 × 6 = 36 squares ✓
- Finished size target: 6 squares × 4" = 24" + ~1½" joins + ~2–3" border each side ≈ 40" ✓
Enjoy your handmade Christmas granny square blanket—wrap up and stay cozy!
Disclaimer: This pattern was generated by AI and should be reviewed for accuracy before use. While we strive for quality, AI-generated content may contain errors. Please verify measurements, stitch counts, charts, and instructions before beginning your project. Generated by purlJam.uk
Love this pattern?
Save this pattern to your free PurlJam libraryAccess your pattern anytime
Bookmark this page to access your pattern anytime