Type
Knitting
Difficulty
beginner
Category
cardigan
AI Thinking Process
Planning
Verification
Pattern
Classic Ladies’ Stocking-Stitch Cardigan
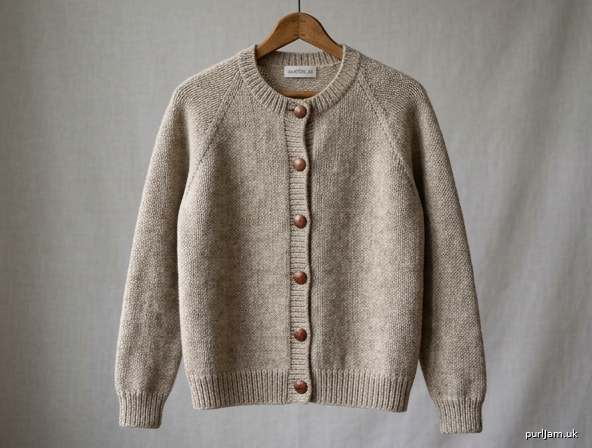
A relaxed, round-neck cardigan worked flat in pieces from the hem up. The fabric is plain stocking stitch with 1×1 rib at hems, cuffs, front bands and neckband. Set-in sleeves; six buttons. Designed for a first garment: no short rows, no cables, no colourwork.
Materials
Yarn: Aran / worsted-weight yarn (10-ply), approx. 180–200 m per 100 g, in a fibre that blocks well (wool or wool-blend recommended).
Metres / yards: 1100 (1200, 1350, 1500, 1650) m [1200 (1310, 1475, 1640, 1800) yd].
Allow 6 (7, 7, 8, 9) × 100 g balls if your yarn is 180–200 m / 100 g. Always buy an extra ball if you are close to the top of a range.
Needles:
- 4.5 mm (UK 7 / US 7) straight or circular needles for stocking stitch
- 3.75 mm (UK 9 / US 5) straight or circular needles for ribbing
- Spare 3.75 mm needle or circular for the neckband (optional)
Notions:
- 6 buttons, 18 mm diameter
- 2 stitch holders (or waste yarn)
- Tapestry needle
- Stitch markers
- Measuring tape
Tension (Gauge)
20 stitches and 26 rows = 10 cm (4 in) over stocking stitch on 4.5 mm needles, after blocking.
Work a swatch at least 15 × 15 cm, wash and dry it as you will the cardigan, then measure the centre 10 cm. Change needle size if needed: larger needles if you have too many stitches to 10 cm; smaller if you have too few. Matching tension is essential — the stitch counts below are built on 20 sts / 10 cm.
Rib tension is not critical; it should look neat and slightly firm on 3.75 mm needles.
Sizes
Instructions are written for five sizes: S (M, L, XL, XXL).
Figures in parentheses apply to the larger sizes in order. When only one figure is given, it applies to every size. Circle your size throughout before you begin.
| S | M | L | XL | XXL | |
|---|---|---|---|---|---|
| To fit bust | 81–86 cm (32–34 in) | 91–97 cm (36–38 in) | 102–107 cm (40–42 in) | 112–117 cm (44–46 in) | 122–127 cm (48–50 in) |
| Finished bust, buttoned | 96 cm (37¾ in) | 104 cm (41 in) | 116 cm (45¾ in) | 128 cm (50½ in) | 136 cm (53½ in) |
| Finished length | 56 cm (22 in) | 58 cm (22¾ in) | 60 cm (23½ in) | 62 cm (24½ in) | 65 cm (25½ in) |
| Length to underarm | 37 cm (14½ in) | 38 cm (15 in) | 39 cm (15¼ in) | 40 cm (15¾ in) | 41 cm (16¼ in) |
| Armhole depth | 19 cm (7½ in) | 20 cm (8 in) | 21 cm (8¼ in) | 22 cm (8¾ in) | 24 cm (9½ in) |
| Sleeve length to underarm | 44 cm (17¼ in) | 44 cm (17¼ in) | 45 cm (17¾ in) | 45 cm (17¾ in) | 46 cm (18 in) |
| Upper arm | 28 cm (11 in) | 32 cm (12½ in) | 36 cm (14¼ in) | 40 cm (15¾ in) | 44 cm (17¼ in) |
Ease is approximately 10–15 cm of positive ease at the bust — a comfortable everyday fit, not close-fitting.
Abbreviations
beg — beginning cm — centimetre(s) cont — continue dec — decrease(s) / decreasing foll — following inc — increase(s) / increasing k — knit k2tog — knit 2 stitches together (right-leaning decrease) kfb — knit into the front and back of the same stitch (1 stitch increased) p — purl rem — remain(s) / remaining rep — repeat RS — right side ssk — slip 1 knitwise, slip 1 knitwise, knit the 2 slipped stitches together through the back loop (left-leaning decrease) st(s) — stitch(es) st st — stocking stitch (knit RS rows, purl WS rows) WS — wrong side
Notes
- The cardigan is worked flat in five pieces: back, left front, right front, and two sleeves. Pieces are seamed. Front bands and the neckband are picked up afterwards.
- Stocking stitch: knit every RS row, purl every WS row.
- 1×1 rib (even stitch count): every row
*k1, p1; rep from * to end. - Armhole and sleeve decreases (RS): k1, ssk, knit to last 3 sts, k2tog, k1.
- Neck decreases, left front (neck at end of RS rows): knit to last 3 sts, k2tog, k1.
- Neck decreases, right front (neck at beg of RS rows): k1, ssk, knit to end.
- Sleeve increases (RS): k1, kfb, knit to last 2 sts, kfb, k1. (2 sts increased.)
- Women’s fastening: buttonholes sit on the right front (as worn); buttons on the left front.
- A single number applies to all sizes. Keep to one size for every instruction.
- Cast on using a simple thumb or long-tail method. Do not cast on tightly.
- When you pick up stitches along a vertical edge, aim for 3 stitches for every 4 rows so the rib sits flat.
Back
With 3.75 mm needles, cast on 92 (100, 112, 124, 132) sts.
Work 5 cm in 1×1 rib, ending after a WS row.
Change to 4.5 mm needles.
Beginning with a knit (RS) row, work in st st until the back measures 37 (38, 39, 40, 41) cm from the cast-on edge, ending after a WS row.
Shape armholes
Cast off 4 (4, 5, 6, 6) sts at the beg of the next 2 rows. 84 (92, 102, 112, 120) sts remain. [92 − 8 = 84 ✓; 100 − 8 = 92 ✓; 112 − 10 = 102 ✓; 124 − 12 = 112 ✓; 132 − 12 = 120 ✓]
Dec 1 st at each end of the next 3 (4, 5, 6, 7) RS rows as follows: RS dec row: k1, ssk, knit to last 3 sts, k2tog, k1. WS rows: purl. 78 (84, 92, 100, 106) sts remain. [84 − 6 = 78 ✓; 92 − 8 = 84 ✓; 102 − 10 = 92 ✓; 112 − 12 = 100 ✓; 120 − 14 = 106 ✓]
Cont in st st without shaping until the armhole measures 19 (20, 21, 22, 24) cm, ending after a WS row.
Shape shoulders
Next row (RS): cast off 23 (25, 28, 30, 32) sts, knit until there are 32 (34, 36, 40, 42) sts on the right needle, slip these centre sts onto a holder for the neck, cast off the remaining 23 (25, 28, 30, 32) sts. [23 + 32 + 23 = 78 ✓; 25 + 34 + 25 = 84 ✓; 28 + 36 + 28 = 92 ✓; 30 + 40 + 30 = 100 ✓; 32 + 42 + 32 = 106 ✓]
Fasten off. The two shoulder groups match the fronts.
Fronts
The two fronts are mirror images. The left front is the wearer’s left (buttons). The right front is the wearer’s right (buttonholes).
Left front (as worn)
With 3.75 mm needles, cast on 50 (54, 60, 66, 70) sts.
Work 5 cm in 1×1 rib, ending after a WS row.
Change to 4.5 mm needles.
Beginning with a knit (RS) row, work in st st until the front measures 37 (38, 39, 40, 41) cm from the cast-on edge, matching the back to the underarm, ending after a WS row.
Shape armhole (armhole sits at the beg of RS rows):
Next row (RS): cast off 4 (4, 5, 6, 6) sts, knit to end. 46 (50, 55, 60, 64) sts. [50 − 4 = 46 ✓; 54 − 4 = 50 ✓; 60 − 5 = 55 ✓; 66 − 6 = 60 ✓; 70 − 6 = 64 ✓]
Next row (WS): purl.
Dec 1 st at the armhole edge of the next 3 (4, 5, 6, 7) RS rows: RS: k1, ssk, knit to end. WS: purl. 43 (46, 50, 54, 57) sts remain. [46 − 3 = 43 ✓; 50 − 4 = 46 ✓; 55 − 5 = 50 ✓; 60 − 6 = 54 ✓; 64 − 7 = 57 ✓]
Cont in st st until the armhole measures 11 (12, 12.5, 13.5, 14.5) cm, ending after a RS row (so the next row is WS, ready to cast off at the neck).
Shape neck (neck sits at the beg of WS rows / end of RS rows):
Next row (WS): cast off 10 (12, 12, 14, 14) sts, purl to end. 33 (34, 38, 40, 43) sts. [43 − 10 = 33 ✓; 46 − 12 = 34 ✓; 50 − 12 = 38 ✓; 54 − 14 = 40 ✓; 57 − 14 = 43 ✓]
Dec 1 st at the neck edge of the next 10 (9, 10, 10, 11) RS rows: RS: knit to last 3 sts, k2tog, k1. WS: purl. 23 (25, 28, 30, 32) sts remain. [33 − 10 = 23 ✓; 34 − 9 = 25 ✓; 38 − 10 = 28 ✓; 40 − 10 = 30 ✓; 43 − 11 = 32 ✓]
Cont without shaping until the armhole measures 19 (20, 21, 22, 24) cm, matching the back, ending after a WS row.
Cast off the remaining 23 (25, 28, 30, 32) shoulder sts.
Right front (as worn)
With 3.75 mm needles, cast on 50 (54, 60, 66, 70) sts.
Work 5 cm in 1×1 rib, ending after a WS row.
Change to 4.5 mm needles.
Beginning with a knit (RS) row, work in st st until the front measures 37 (38, 39, 40, 41) cm from the cast-on edge, matching the back and left front, ending after a RS row (so the next row is WS, ready to cast off at the armhole).
Shape armhole (armhole sits at the beg of WS rows):
Next row (WS): cast off 4 (4, 5, 6, 6) sts, purl to end. 46 (50, 55, 60, 64) sts.
Dec 1 st at the armhole edge of the next 3 (4, 5, 6, 7) RS rows: RS: knit to last 3 sts, k2tog, k1. WS: purl. 43 (46, 50, 54, 57) sts remain.
Cont in st st until the armhole measures 11 (12, 12.5, 13.5, 14.5) cm, ending after a WS row (so the next row is RS, ready to cast off at the neck).
Shape neck (neck sits at the beg of RS rows):
Next row (RS): cast off 10 (12, 12, 14, 14) sts, knit to end. 33 (34, 38, 40, 43) sts.
Next row (WS): purl.
Dec 1 st at the neck edge of the next 10 (9, 10, 10, 11) RS rows: RS: k1, ssk, knit to end. WS: purl. 23 (25, 28, 30, 32) sts remain.
Cont without shaping until the armhole measures 19 (20, 21, 22, 24) cm, matching the back, ending after a WS row.
Cast off the remaining 23 (25, 28, 30, 32) shoulder sts.
Sleeves
Work two alike.
With 3.75 mm needles, cast on 40 (42, 44, 46, 48) sts.
Work 5 cm in 1×1 rib, ending after a WS row.
Change to 4.5 mm needles.
Beginning with a knit (RS) row, work 2 rows in st st.
Shape sleeve
Inc row (RS): k1, kfb, knit to last 2 sts, kfb, k1. (2 sts increased.)
Work this inc row on the next RS row (the 3rd st-st row), then on every foll 12th (8th, 6th, 6th, 4th) row 7 (10, 13, 16, 19) times more. 56 (64, 72, 80, 88) sts. [40 + (8 × 2) = 56 ✓; 42 + (11 × 2) = 64 ✓; 44 + (14 × 2) = 72 ✓; 46 + (17 × 2) = 80 ✓; 48 + (20 × 2) = 88 ✓]
Cont in st st without shaping until the sleeve measures 44 (44, 45, 45, 46) cm from the cast-on edge, ending after a WS row.
Shape sleeve cap
Cast off 4 (4, 5, 6, 6) sts at the beg of the next 2 rows. 48 (56, 62, 68, 76) sts remain. [56 − 8 = 48 ✓; 64 − 8 = 56 ✓; 72 − 10 = 62 ✓; 80 − 12 = 68 ✓; 88 − 12 = 76 ✓]
Dec 1 st at each end of every RS row 4 (5, 6, 7, 8) times. 40 (46, 50, 54, 60) sts. [48 − 8 = 40 ✓; 56 − 10 = 46 ✓; 62 − 12 = 50 ✓; 68 − 14 = 54 ✓; 76 − 16 = 60 ✓]
Dec 1 st at each end of every 4th row 5 times (that is, work 3 rows even, then a RS dec row; rep this 4-row sequence 5 times). 30 (36, 40, 44, 50) sts. [40 − 10 = 30 ✓; 46 − 10 = 36 ✓; 50 − 10 = 40 ✓; 54 − 10 = 44 ✓; 60 − 10 = 50 ✓]
Dec 1 st at each end of every RS row 5 (6, 7, 8, 10) times. 20 (24, 26, 28, 30) sts remain. [30 − 10 = 20 ✓; 36 − 12 = 24 ✓; 40 − 14 = 26 ✓; 44 − 16 = 28 ✓; 50 − 20 = 30 ✓]
Cast off remaining sts.
The cap should measure approximately 16 (17, 18, 19, 21) cm from the first underarm cast-off to the final cast-off. A little variation is fine — the cap is eased into the armhole when seaming.
Button Bands
Block the five pieces to the measurements in Sizes and allow them to dry fully before joining. (See Finishing.)
Join both shoulder seams with mattress stitch (or a firm backstitch just inside the cast-off edge), matching the 23 (25, 28, 30, 32) shoulder sts of each front to the corresponding back shoulders.
Left front button band (buttons)
With RS facing, 3.75 mm needles and starting at the neck edge of the left front, pick up and knit 95 (99, 103, 107, 111) sts evenly down the centre-front edge to the hem.
Pickup guide: 3 sts for every 4 rows along the vertical edge. 95 is an odd number so the rib can begin and end with k1.
Row 1 (WS): *p1, k1; rep from * to last st, p1.
Row 2 (RS): *k1, p1; rep from * to last st, k1.
These two rows set 1×1 rib with a knit stitch at each RS edge.
Rep Rows 1–2 until the band measures 3.5 cm, ending after a WS row.
Cast off evenly in rib.
Right front buttonhole band
With RS facing, 3.75 mm needles and starting at the hem of the right front, pick up and knit 95 (99, 103, 107, 111) sts evenly up the centre-front edge to the neck.
Work 3 rows in 1×1 rib as for the left band, ending after a WS row.
Place 6 buttonholes on the next RS row.
Mark the positions first: the lowest buttonhole 2 cm above the hem, the highest 1.5 cm below the neck edge, and the remaining four spaced evenly between. On the cardigan these marks sit on the picked-up stitches of this band.
Buttonhole row (RS): rib to the first marker, yo, k2tog, [rib to the next marker, yo, k2tog] 5 times, rib to end.
(Each yo, k2tog makes one 1-st buttonhole and keeps the stitch count unchanged: 95 sts throughout ✓.)
Cont in rib until the band measures 3.5 cm, matching the left band, ending after a WS row.
Cast off evenly in rib.
Neckband
With RS facing and 3.75 mm needles, beginning at the outer (cast-off) edge of the right front band, pick up and knit:
- 8 sts across the top of the right front band,
- 22 (23, 24, 26, 27) sts up the right front neck (along the cast-off and the decrease slope to the shoulder),
- 32 (34, 36, 40, 42) sts from the back-neck holder,
- 22 (23, 24, 26, 27) sts down the left front neck,
- 8 sts across the top of the left front band.
92 (96, 100, 108, 112) sts. [8 + 22 + 32 + 22 + 8 = 92 ✓; 8 + 23 + 34 + 23 + 8 = 96 ✓; 8 + 24 + 36 + 24 + 8 = 100 ✓; 8 + 26 + 40 + 26 + 8 = 108 ✓; 8 + 27 + 42 + 27 + 8 = 112 ✓]
Work 3 cm in 1×1 rib, beginning the first row (WS) with *k1, p1; rep from * to end.
Cast off evenly in rib. Do not cast off tightly — a tight neckband will not sit well and will be uncomfortable.
Finishing
-
Block (if you have not already blocked the pieces). Pin each piece to the schematic measurements, mist or wet-block according to your yarn, and dry flat. Blocking evens the stocking stitch and makes seaming much easier.
-
Set in the sleeves. With RS together (or RS facing you if you prefer mattress stitch), pin the centre of the sleeve cap to the shoulder seam, and pin the underarm cast-offs of sleeve and body together. Ease the remaining cap evenly around the armhole — there is a little extra fabric at the top of a set-in cap; that is correct. Sew in place with mattress stitch or a thin backstitch just inside the edge.
-
Join side and sleeve seams in one continuous mattress-stitch seam from the hem rib, up the side, and down the sleeve to the cuff (or sew body sides and sleeve underarms separately if you prefer). Match the top of the hem rib and the top of the cuff rib carefully.
-
Buttons. Sew six buttons to the left front band, each opposite a buttonhole. Use the yarn or matching sewing thread, and take the stitches through to the WS of the band only so they do not show on the inside of the cardigan.
-
Weave in all remaining ends on the WS. Work them along the rib or along a seam where possible.
-
Final press. Lightly steam the seams on the WS if the fibre allows (do not flatten the rib). Let the cardigan rest flat overnight.
To wear: button the right front over the left. The finished cardigan should hang straight, with the bands meeting without pulling and the sleeves sitting smoothly in the armholes.
Pattern for personal use. Check your tension, circle your size, and tick each instruction as you complete it. Happy knitting.
Disclaimer: This pattern was generated by AI and should be reviewed for accuracy before use. While we strive for quality, AI-generated content may contain errors. Please verify measurements, stitch counts, charts, and instructions before beginning your project. Generated by purlJam.uk
Love this pattern?
Save this pattern to your free PurlJam libraryAccess your pattern anytime
Bookmark this page to access your pattern anytime