Type
Crochet
Difficulty
beginner
Category
hat
AI Thinking Process
Planning
Verification
Pattern
Classic Pointed Witch Hat
With Crescent Moon & Copper Beaded Band
Beginner-friendly · US crochet terms · Worsted weight
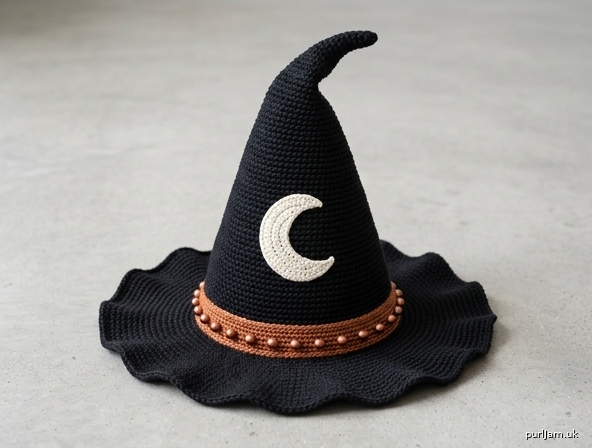
A wearable 3-D witch hat with a tall tapered cone, a slightly curved natural point, a wide softly rippled scalloped brim, a cream crescent-moon applique on the front, and a thin decorative band of copper/rose-gold bead (or optional battery LED) accents at the cone–brim join.
Skill Level
Beginner-friendly. You will work in the round, count stitches, increase evenly, and sew on a small applique and beads.
Sizes
Child (Adult, Large Adult)
Instructions are written for Child, with Adult and Large Adult in parentheses. When only one number is given, it applies to all sizes.
| Child | Adult | Large Adult | |
|---|---|---|---|
| To fit head circ. | 18–20 in (45.5–51 cm) | 21–23 in (53.5–58.5 cm) | 23.5–25 in (59.5–63.5 cm) |
| Cone base circ. | 19.5 in (49.5 cm) | 22.5 in (57 cm) | 24 in (61 cm) |
| Cone height | 9.75 in (25 cm) | 12.5 in (32 cm) | 13.25 in (33.5 cm) |
| Brim width | 3.5 in (9 cm) | 4.5 in (11.5 cm) | 4.75 in (12 cm) |
| Approx. outer brim diameter | 13.5 in (34 cm) | 16.5 in (42 cm) | 17.5 in (44.5 cm) |
The Adult size matches the classic tall reference hat. Make a gauge swatch before you start — cotton has almost no stretch, so stitch count is the fit.
Finished Measurements (blocked)
See table above. Cone is measured from the point to the decorative band. Brim is measured from the band to the outer scallop tips.
Materials
Yarn — worsted weight (CYC 4), 100% cotton or cotton blend (smooth, tightly spun; recommended for stitch definition and shape).
- Color A — Black: 300 (400, 500) yd / 275 (365, 455) m
Example yarns: Lion Brand 24/7 Cotton, Paintbox Yarns Cotton Aran, Lily Sugar’n Cream Solids (hold to gauge), WeCrochet Dishie. - Color B — Cream / off-white: 25 yd / 23 m (moon)
- Color C — Copper or rose gold (optional): 30 yd / 27 m (band). If you skip Color C, work the band in Color A.
Hooks
- US H/8 (5 mm) — hat
- US G/6 (4 mm) — moon applique (firmer, neater)
Notions
- Yarn needle
- Stitch marker
- Scissors
- Pins
- Small amount of polyester fiberfill (optional, for the tip)
- 20 (24, 28) round metallic copper or rose-gold beads, 6–8 mm, with large enough holes to sew through
- Strong sewing thread in copper, black, or matching bead color
- Cone-shaped blocking form (cardboard cone, tall vase, or tightly bunched plastic bags wrapped in a towel)
- Optional: fabric-safe starch or fabric stiffener
- Optional costume lights: battery-operated warm-white or warm-copper micro LED fairy lights with a small battery pack (see Safety, below)
Gauge
16 sc and 18 rnds = 4 in (10 cm) in single crochet worked in the round with US H/8 (5 mm), unblocked.
Work a swatch in the round: magic ring, increase as for a flat circle until the piece measures at least 4 in (10 cm) across, then measure the inner 4 in (10 cm).
- Too few stitches in 4 in (10 cm) = hat will be larger. Go down a hook size.
- Too many stitches in 4 in (10 cm) = hat will be smaller. Go up a hook size.
For a standing cone, slightly firm gauge is better than a loose, drapey gauge.
Abbreviations (US)
- BLO — back loop only
- ch — chain
- dc — double crochet
- FO — fasten off
- hdc — half double crochet
- hdc2tog — half double crochet 2 together (decrease)
- inc — increase (2 stitches in the same stitch)
- MR — magic ring (magic circle)
- rep — repeat
- rnd(s) — round(s)
- RS — right side
- sc — single crochet
- sl st — slip stitch
- st(s) — stitch(es)
- tr — treble (triple) crochet
- yo — yarn over
Required Stitches & Techniques
Magic ring: Wrap yarn around a finger to form a loop, insert hook, yo, pull up a loop, ch 1, work the first-round stitches into the ring, then pull the tail to close.
Alternative (no magic ring): Ch 2, work Rnd 1 into the 2nd ch from the hook. Weave the beginning tail through the first-round stitches and pull to close the hole.
sc: Insert hook, yo, pull up a loop, yo, pull through both loops.
hdc: Yo, insert hook, yo, pull up a loop, yo, pull through all 3 loops.
dc: Yo, insert hook, yo, pull up a loop, yo, pull through 2 loops, yo, pull through 2 loops.
tr: Yo twice, insert hook, yo, pull up a loop, (yo, pull through 2 loops) 3 times.
inc (sc): 2 sc in the same st.
hdc2tog: Yo, insert hook in next st, yo, pull up a loop, yo, insert hook in following st, yo, pull up a loop, yo, pull through all 5 loops on the hook.
Working in a spiral: Do not join and do not turn at the end of a round. Place a marker in the first st of the round and move it up every round.
Joined rounds: At the end of the round, sl st in the first st of the round to join. The turning chain does not count as a stitch unless noted.
Scallop: Skip 1 st, 5 dc in the next st, skip 1 st, sl st in the next st.
Pattern Notes
- The cone is worked in a continuous spiral of sc so there is no joining seam. Use a stitch marker.
- The brim is worked in joined hdc rounds so the scalloped edge sits evenly. After the last cone round, sl st in the next st to level the spiral, then begin the brim.
- The right side faces you as you crochet (outside of the hat).
- Count stitches at the end of every round. Black yarn hides stitches — work in bright light.
- Do not turn the work.
- Cotton blooms and evens out with wet blocking. The brim waves are created by extra stitches, then set in blocking.
- Optional texture: work all cone rounds after Rnd 2 in BLO sc for horizontal ridges. Both-loop sc (as written) is firmer and easier for a first hat.
Instructions
Crown / Cone
With Color A and US H/8 (5 mm). Work in a spiral. RS facing.
Pointed tip
Rnd 1: 6 sc in MR. Pull tail tight to close. Place marker in first sc. (6 sts)
Rnd 2: Sc in each st around. (6 sts)
These two tight rounds form the natural pointed tip. Do not stuff them yet.
Rnd 3: 2 sc in each st around. (6 increases → 6 + 6 = 12 ✓)
Rnd 4: Sc in each st around. (12 sts)
Rnd 5: *Sc in next st, 2 sc in next st; rep from * around. (6 increases → 12 + 6 = 18 ✓)
Rnds 6–7: Sc in each st around. (18 sts)
Rnd 8: *Sc in next 2 sts, 2 sc in next st; rep from * around. (6 increases → 18 + 6 = 24 ✓)
Rnds 9–10: Sc in each st around. (24 sts)
Rnd 11: *Sc in next 3 sts, 2 sc in next st; rep from * around. (6 increases → 24 + 6 = 30 ✓)
Child cone — continue here
Rnds 12–13: Sc in each st around. (30 sts)
Rnd 14: *Sc in next 4 sts, 2 sc in next st; rep from * around. (6 increases → 30 + 6 = 36 ✓)
Rnds 15–16: Sc in each st around. (36 sts)
Rnd 17: *Sc in next 5 sts, 2 sc in next st; rep from * around. (6 increases → 36 + 6 = 42 ✓)
Rnds 18–19: Sc in each st around. (42 sts)
Rnd 20: *Sc in next 6 sts, 2 sc in next st; rep from * around. (6 increases → 42 + 6 = 48 ✓)
Rnds 21–22: Sc in each st around. (48 sts)
Rnd 23: *Sc in next 7 sts, 2 sc in next st; rep from * around. (6 increases → 48 + 6 = 54 ✓)
Rnds 24–25: Sc in each st around. (54 sts)
Rnd 26: *Sc in next 8 sts, 2 sc in next st; rep from * around. (6 increases → 54 + 6 = 60 ✓)
Rnds 27–29: Sc in each st around. (60 sts)
Rnd 30: *Sc in next 9 sts, 2 sc in next st; rep from * around. (6 increases → 60 + 6 = 66 ✓)
Rnds 31–33: Sc in each st around. (66 sts)
Rnd 34: *Sc in next 10 sts, 2 sc in next st; rep from * around. (6 increases → 66 + 6 = 72 ✓)
Rnds 35–37: Sc in each st around. (72 sts)
Rnd 38: *Sc in next 12 sts, 2 sc in next st; rep from * around. (6 increases → 72 + 6 = 78 ✓)
Rnds 39–44: Sc in each st around. (78 sts)
Cone measures about 9.75 in (25 cm) tall and 19.5 in (49.5 cm) around. Do not fasten off. Go to Child Brim.
Adult cone — continue from Rnd 11 (30 sts)
Rnds 12–14: Sc in each st around. (30 sts)
Rnd 15: *Sc in next 4 sts, 2 sc in next st; rep from * around. (6 increases → 30 + 6 = 36 ✓)
Rnds 16–18: Sc in each st around. (36 sts)
Rnd 19: *Sc in next 5 sts, 2 sc in next st; rep from * around. (6 increases → 36 + 6 = 42 ✓)
Rnds 20–22: Sc in each st around. (42 sts)
Rnd 23: *Sc in next 6 sts, 2 sc in next st; rep from * around. (6 increases → 42 + 6 = 48 ✓)
Rnds 24–26: Sc in each st around. (48 sts)
Rnd 27: *Sc in next 7 sts, 2 sc in next st; rep from * around. (6 increases → 48 + 6 = 54 ✓)
Rnds 28–30: Sc in each st around. (54 sts)
Rnd 31: *Sc in next 8 sts, 2 sc in next st; rep from * around. (6 increases → 54 + 6 = 60 ✓)
Rnds 32–34: Sc in each st around. (60 sts)
Rnd 35: *Sc in next 9 sts, 2 sc in next st; rep from * around. (6 increases → 60 + 6 = 66 ✓)
Rnds 36–38: Sc in each st around. (66 sts)
Rnd 39: *Sc in next 10 sts, 2 sc in next st; rep from * around. (6 increases → 66 + 6 = 72 ✓)
Rnds 40–42: Sc in each st around. (72 sts)
Rnd 43: *Sc in next 11 sts, 2 sc in next st; rep from * around. (6 increases → 72 + 6 = 78 ✓)
Rnds 44–46: Sc in each st around. (78 sts)
Rnd 47: *Sc in next 12 sts, 2 sc in next st; rep from * around. (6 increases → 78 + 6 = 84 ✓)
Rnds 48–50: Sc in each st around. (84 sts)
Rnd 51: *Sc in next 13 sts, 2 sc in next st; rep from * around. (6 increases → 84 + 6 = 90 ✓)
Rnds 52–56: Sc in each st around. (90 sts)
Cone measures about 12.5 in (32 cm) tall and 22.5 in (57 cm) around.
Adult: Do not fasten off. Go to Adult Brim.
Large Adult: Do not fasten off. Continue below.
Large Adult cone — continue from Adult Rnd 51 (90 sts)
Rnds 52–53: Sc in each st around. (90 sts)
Rnd 54: *Sc in next 14 sts, 2 sc in next st; rep from * around. (6 increases → 90 + 6 = 96 ✓)
Rnds 55–60: Sc in each st around. (96 sts)
Cone measures about 13.25 in (33.5 cm) tall and 24 in (61 cm) around. Do not fasten off. Go to Large Adult Brim.
Shaping the pointed top
The first 2 rounds stay very small, so the tip forms a point instead of a dome. For a slightly curved, natural tip (as in the reference), leave the first 1 in (2.5 cm) unstuffed and gently bend the point to one side during blocking. For a straighter spike, stuff the top 2–3 in (5–7.5 cm) lightly with fiberfill after the cone is finished, keeping the very last ½ in (1.5 cm) empty so the point stays sharp, not round.
Wide Wavy Brim
Level the spiral: sl st in the next st (does not count). From here, join every round and do not turn. The first hdc of each round is worked in the same st as the join. Ch 1 at the start of a round does not count as a stitch.
The extra stitches make the fabric ripple. Do not try to flatten the brim as you go.
Child Brim (starts with 78 sts)
Brim Rnd 1: Ch 1, *hdc in next 2 sts, 2 hdc in next st; rep from * around, join with sl st to first hdc. (26 increases → 78 + 26 = 104 ✓)
Brim Rnd 2: Ch 1, *hdc in next 3 sts, 2 hdc in next st; rep from * around, join. (26 increases → 104 + 26 = 130 ✓)
Brim Rnd 3: Ch 1, hdc in each st around, join. (130 sts)
Brim Rnd 4: Ch 1, *hdc in next 4 sts, 2 hdc in next st; rep from * around, join. (26 increases → 130 + 26 = 156 ✓)
Brim Rnd 5: Ch 1, hdc in each st around, join. (156 sts)
Brim Rnd 6: Ch 1, *hdc in next 5 sts, 2 hdc in next st; rep from * around, join. (26 increases → 156 + 26 = 182 ✓)
Brim Rnd 7: Ch 1, hdc2tog, hdc in next 89 sts, hdc2tog, hdc in next 89 sts, join. (2 decreases → 182 − 2 = 180 ✓)
The two decreases sit opposite each other so the scallops divide evenly.
Brim Rnd 8 (scalloped edge): Ch 1, *sl st in next st, skip next st, 5 dc in next st, skip next st; rep from * around, join with sl st to first sl st. (45 scallops → 45 × 4 sts = 180 ✓)
FO. Weave in the brim end on the WS.
Adult Brim (starts with 90 sts)
Brim Rnd 1: Ch 1, *hdc in next 4 sts, 2 hdc in next st; rep from * around, join with sl st to first hdc. (18 increases → 90 + 18 = 108 ✓)
Brim Rnd 2: Ch 1, *hdc in next 5 sts, 2 hdc in next st; rep from * around, join. (18 increases → 108 + 18 = 126 ✓)
Brim Rnd 3: Ch 1, hdc in each st around, join. (126 sts)
Brim Rnd 4: Ch 1, *hdc in next 6 sts, 2 hdc in next st; rep from * around, join. (18 increases → 126 + 18 = 144 ✓)
Brim Rnd 5: Ch 1, hdc in each st around, join. (144 sts)
Brim Rnd 6: Ch 1, *hdc in next 7 sts, 2 hdc in next st; rep from * around, join. (18 increases → 144 + 18 = 162 ✓)
Brim Rnd 7: Ch 1, hdc in each st around, join. (162 sts)
Brim Rnd 8: Ch 1, *hdc in next 8 sts, 2 hdc in next st; rep from * around, join. (18 increases → 162 + 18 = 180 ✓)
Brim Rnd 9: Ch 1, hdc in each st around, join. (180 sts)
Brim Rnd 10 (scalloped edge): Ch 1, *sl st in next st, skip next st, 5 dc in next st, skip next st; rep from * around, join with sl st to first sl st. (45 scallops → 45 × 4 sts = 180 ✓)
FO. Weave in the brim end on the WS.
Large Adult Brim (starts with 96 sts)
Brim Rnd 1: Ch 1, *hdc in next 5 sts, 2 hdc in next st; rep from * around, join with sl st to first hdc. (16 increases → 96 + 16 = 112 ✓)
Brim Rnd 2: Ch 1, *hdc in next 6 sts, 2 hdc in next st; rep from * around, join. (16 increases → 112 + 16 = 128 ✓)
Brim Rnd 3: Ch 1, hdc in each st around, join. (128 sts)
Brim Rnd 4: Ch 1, *hdc in next 7 sts, 2 hdc in next st; rep from * around, join. (16 increases → 128 + 16 = 144 ✓)
Brim Rnd 5: Ch 1, hdc in each st around, join. (144 sts)
Brim Rnd 6: Ch 1, *hdc in next 8 sts, 2 hdc in next st; rep from * around, join. (16 increases → 144 + 16 = 160 ✓)
Brim Rnd 7: Ch 1, hdc in each st around, join. (160 sts)
Brim Rnd 8: Ch 1, *hdc in next 9 sts, 2 hdc in next st; rep from * around, join. (16 increases → 160 + 16 = 176 ✓)
Brim Rnd 9: Ch 1, hdc in each st around, join. (176 sts)
Brim Rnd 10 (scalloped edge): Ch 1, *sl st in next st, skip next st, 5 dc in next st, skip next st; rep from * around, join with sl st to first sl st. (44 scallops → 44 × 4 sts = 176 ✓)
FO. Weave in the brim end on the WS.
Crocheted Crescent Moon Applique
With Color B and US G/6 (4 mm). The taller stitches in the center make the piece curve into a crescent by themselves. Do not panic if it looks like a banana — that is the shape you want.
Adult & Large Adult moon
Foundation: Ch 19.
Row 1 (RS): Sl st in 2nd ch from hook, sc in next ch, hdc in next 2 ch, dc in next 3 ch, tr in next 4 ch, dc in next 3 ch, hdc in next 2 ch, sc in next ch, sl st in last ch. (18 sts)
Count check: 1 sl st + 1 sc + 2 hdc + 3 dc + 4 tr + 3 dc + 2 hdc + 1 sc + 1 sl st = 18 ✓
Do not turn. Ch 1, rotate the piece so you can work into the opposite side of the foundation chain (the unused loops).
Inner curve: Sl st in each of the 18 chain loops across. Join with sl st to the first sl st of Row 1.
The slip-stitch inner edge is shorter than the treble outer edge, which pulls the piece into a crescent. FO, leaving an 18 in (45 cm) tail for sewing.
Finished moon is about 4 in (10 cm) wide and 1½ in (4 cm) tall at the center.
Child moon
Foundation: Ch 16.
Row 1 (RS): Sl st in 2nd ch from hook, sc in next ch, hdc in next 2 ch, dc in next 2 ch, tr in next 3 ch, dc in next 2 ch, hdc in next 2 ch, sc in next ch, sl st in last ch. (15 sts)
Count check: 1 + 1 + 2 + 2 + 3 + 2 + 2 + 1 + 1 = 15 ✓
Do not turn. Ch 1, rotate, sl st in each of the 15 chain loops on the opposite side of the foundation. Join to the first sl st of Row 1. FO, leaving a 16 in (40 cm) tail.
Finished moon is about 3¼ in (8.5 cm) wide.
Decorative Lower Band
Worked separately, then sewn to the hat where the cone meets the brim.
With Color C (or A) and US H/8 (5 mm).
Foundation: Ch 78 (90, 96). Join with sl st to first ch, taking care not to twist. (78 (90, 96) ch)
Band Rnd 1: Ch 1, sc in each ch around, join with sl st to first sc. (78 (90, 96) sts)
Band Rnd 2: Ch 1, sc in each st around, join. (78 (90, 96) sts)
FO, leaving a 30 in (75 cm) tail for sewing.
The band should sit flat around the cone base. If it is tight, re-chain 2–4 extra stitches and sc the same count; if it is loose, reduce by 2–4.
Copper / Rose-Gold Accents (safe methods)
Method 1 — Beads (recommended, default, washable)
Using sewing thread and a sharp needle, sew one 6–8 mm copper or rose-gold bead to Band Rnd 2 every 1 in (2.5 cm), about every 4th stitch.
- Child: 20 beads on 78 sts
- Adult: 24 beads on 90 sts
- Large Adult: 28 beads on 96 sts
Take the thread through each bead twice and knot on the WS of the band. Beads sit on the outside of the band, like a ring of warm lights.
Method 2 — Optional battery LED accents
Use only ready-made, battery-operated micro LED fairy lights sold for crafts or costumes (button-cell or AA pack).
Do
- Weave the light wire on the surface of the band, looping it through sc stitches so the tiny LEDs sit where beads would sit.
- Seat the battery pack in a small pouch sewn to the inside back of the hat, above the band, where you can reach it to switch it off.
- Choose warm-white or warm-copper LEDs.
- Remove the lights before washing, blocking, or storing damp.
- Use on a costume hat for short periods, with adult supervision for children.
Do not
- Use plug-in, USB-mains, or homemade wired lights.
- Bury batteries or wires in stuffing or inside the cone.
- Leave lights on unattended, on a heater, or while sleeping.
- Give a lighted hat to a child under 3 (choking hazard from beads and batteries).
If you want the look without any electronics, Method 1 matches the reference closely.
Assembly
- Weave in the magic-ring tail on the WS of the tip, pulling it extra tight so the point stays closed.
- Weave in all remaining hat ends except the band tail.
- Stuff the tip (optional): Push a grape-sized amount of fiberfill into the top 2–3 in (5–7.5 cm) of the cone. Leave the last ½ in (1.5 cm) empty. Do not pack it hard or the point will go blunt.
- Attach the moon: Pin the crescent on the front of the cone, centered left-to-right. Place the widest part of the moon about one-third of the way up from the band (roughly 3 in / 7.5 cm above the band on Child, 4–5 in / 10–12.5 cm on Adult/Large). The inner curve faces slightly downward, like a sky-crescent. With the cream tail, whipstitch around the entire moon edge, catching the hat fabric under each stitch. Knot on the WS. The moon should lie flat with no puckers.
- Attach the band: Pin the band around the hat so it covers the join between the last cone round and Brim Rnd 1. The bead/LED side faces out. With the long tail, whipstitch the top edge of the band to the cone, then the bottom edge to the brim, working from the inside where possible. Keep the band snug but not so tight that it cinches the hat.
- Check that the moon sits above the band at the front and the battery pouch (if using) sits at the back.
Finishing
- Weave in every remaining tail on the WS.
- Trim yarn close after weaving through at least 6 stitches in two directions.
- If a spiral “step” shows at the cone–brim join, the band will hide it.
- Do not cut the LED wire; coil extra length into the pouch.
Blocking and Shaping
Cotton relaxes and the brim waves set only with wet blocking.
- Soak the hat in lukewarm water for 15–20 minutes. If you used battery lights, remove them first. Beads may stay on.
- Squeeze out water — do not wring. Roll in a towel and press.
- Stand a cone-shaped form on a blocking mat (cardboard cone, poster-board taped into a cone, or a tall bottle wrapped in a towel). The form should be as tall as your cone and about as wide as the cone base.
- Pull the hat down over the form. Smooth the cone so increases are even. Pinch the tip into a point and lean it slightly to one side for a natural curve.
- Arrange the brim around the base. Pin each scallop out, lifting every other scallop a little higher so the edge ripples instead of lying in a flat circle. The brim should measure about 3.5 (4.5, 4.75) in / 9 (11.5, 12) cm from band to scallop tips.
- Optional: mist with fabric-safe starch for a crisper cone. Let dry fully — 24 hours or more — before taking it off the form.
- Re-insert lights only after the hat is completely dry.
Tips for Maintaining the Tall Pointed Shape
- Keep gauge firm. If the cone already feels floppy while you crochet, drop to a US G/6 (4 mm) for the rest of the cone.
- Cotton holds a block better than acrylic. If you substitute acrylic, expect more drape and use starch.
- Light stuffing in the upper third supports the point without making a gnome hat.
- Store on a cone form or stuffed with tissue, never crushed in a drawer.
- For display-only hats, a lightweight plastic-canvas or felt cone slipped inside (not sewn in) will hold the spike indefinitely. Remove it to wear the hat.
- If the brim droops over the eyes, pin-block it flatter and wider, or add one more even hdc round before the scallops next time.
Sizing Adjustments
The three sizes above cover most children and adults. To customize further, stay at 16 sc = 4 in (10 cm) and change stitch counts in multiples of 6 (the increase repeat).
Head circumference → target cone-base stitches
Target sts = head circumference in inches × 4.
Examples: 18 in → 72 sc; 20 in → 80 sc (use 78 or 84, the nearest multiple of 6); 22 in → 88 sc (pattern uses 90); 24 in → 96 sc.
To make the hat smaller
- Stop increasing when the cone base matches the head (try on as you go).
- Work 4–6 even rounds after the last increase so the hat has a short “headband” area before the brim.
- For a shorter spike, skip one even-round group between increases (for example, work 1 even round instead of 2).
- Use the Child moon and 20 beads.
To make the hat larger
- Continue the established increase pattern: after Adult Rnd 51 (90 sts), the next increase is
*sc in next 14 sts, 2 sc in next st; rep from *= 96, then*sc 15, inc*= 102, then*sc 16, inc*= 108, and so on. Each of those rounds adds 6 sts → +1.5 in (4 cm) around. - Add 2 even rounds between increases for a taller, gentler taper, or 4 even rounds for a very tall hat.
- For the brim, keep increasing 16 or 18 times per increase round until the brim is as wide as you like, then work one even round and a scallop round. The scallop round needs a multiple of 4 stitches: if you are 1–3 sts over, hdc2tog that many times, spaced evenly, on the even round before the scallops.
To make the brim wavier Work 2 hdc in every stitch for one extra round before the scallops (this doubles the stitch count; only do it if you want a strong ruffle).
To make the brim calmer Skip every other brim increase round (work even instead). You will have fewer stitches and a flatter, wider plate rather than a ripple.
Children vs adults, quick pick
- Toddler (17–18 in / 43–45.5 cm): follow Child but stop increasing at 72 sc (
*sc 10, inc*round) and work 5 even rounds. Brim: start Brim Rnd 1 as*hdc in next 3 sts, 2 hdc in next st*around (72 + 18 = 90), then follow Adult Brim Rnds 2–10 scaled to your count, ending on a multiple of 4. - Child: as written (78 sc).
- Adult: as written (90 sc).
- Large Adult / oversized costume: as written (96 sc), or continue to 102–108 sc for a hat that sits above the ears rather than fitting close.
Quick Reference — Stitch Counts
| Section | Child | Adult | Large Adult |
|---|---|---|---|
| Cone start | 6 | 6 | 6 |
| Cone end | 78 | 90 | 96 |
| Cone rounds | 44 | 56 | 60 |
| Brim start | 78 | 90 | 96 |
| Brim before scallops | 180 | 180 | 176 |
| Scallops | 45 | 45 | 44 |
| Band | 78 | 90 | 96 |
| Beads | 20 | 24 | 28 |
Care
Remove battery lights. Hand-wash cold, squeeze, do not wring. Reshape on a cone form and dry flat. Do not machine-dry. Beads may stay on for washing if sewn firmly; check they are secure afterward.
Pattern uses US crochet terminology throughout. All round counts have been checked so each increase round adds the stated number of stitches and every scallop round divides evenly.
Disclaimer: This pattern was generated by AI and should be reviewed for accuracy before use. While we strive for quality, AI-generated content may contain errors. Please verify measurements, stitch counts, charts, and instructions before beginning your project. Generated by purlJam.uk
Love this pattern?
Save this pattern to your free PurlJam libraryAccess your pattern anytime
Bookmark this page to access your pattern anytime