Type
Knitting
Difficulty
beginner
Category
hat
AI Thinking Process
Planning
Verification
Pattern
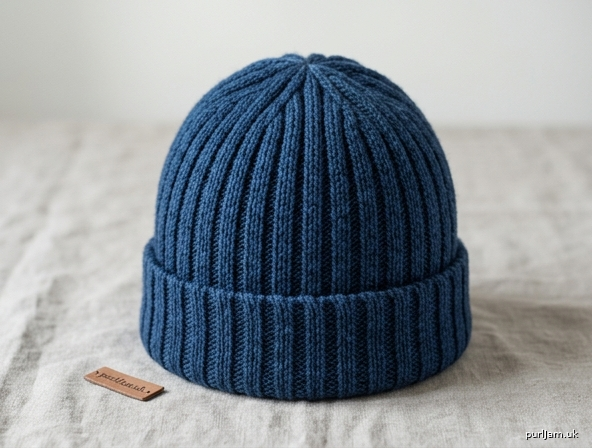
Classic Ribbed Beanie
A snug, stretchy beanie worked entirely in k2, p2 rib. Knitted in the round from the brim up, with simple paired decreases at the crown. The rib hugs a range of head sizes and can be worn with a folded brim or unfolded. Add a pompom if you like.
Difficulty: Beginner
Skills used: Cast on, knit, purl, joining and working in the round, k2tog, p2tog, weaving in ends.
Sizes
S (M, L)
To fit head circumference: 51 (56, 61) cm (20 (22, 24) in)
Shown in size M. Choose the size closest to the wearer’s head measurement; the ribbing has a great deal of stretch.
Finished measurements
Circumference (unstretched): 40 (43.5, 46.5) cm (15¾ (17¼, 18¼) in)
Circumference (comfortably stretched): approx. 51 (56, 61) cm (20 (22, 24) in)
Length from cast-on edge to crown, unstretched: 22 (24, 26) cm (8¾ (9½, 10¼) in)
This length allows a 5–6 cm (2–2½ in) folded brim. For a child’s hat, work size S and begin the crown when the piece measures 15 cm (6 in). For a slouchier hat, work 2–4 cm (¾–1½ in) extra before the crown.
Yarn
Worsted weight (aran / 10-ply) yarn, 90 (100, 115) g / 180 (200, 230) m (195 (220, 250) yd)
Any worsted or aran yarn that meets tension. Smooth, springy wools and wool blends show the rib clearly and keep their shape.
Suggested yarns: Cascade 220, Paintbox Yarns Wool Mix Aran, Stylecraft Special Aran, King Cole Big Value Aran, Hayfield Bonus Aran.
A 100 g skein of 200 m (218 yd) is enough for sizes S and M. Size L may need a second skein, especially if you add a pompom (allow an extra 20–30 g).
Needles
- 4.5 mm (UK 7 / US 7) circular needle, 40 cm (16 in) long
- 4.5 mm (UK 7 / US 7) double-pointed needles (DPNs), set of 4 or 5
or a second 4.5 mm circular needle, 80–100 cm (32–40 in) long, for magic loop
Use whichever method you prefer for small-circumference knitting at the crown.
If you tend to cast on tightly, use a 5 mm (UK 6 / US 8) needle for the cast-on row only, then change to 4.5 mm.
Notions
- Stitch marker
- Tapestry needle
- Scissors
- Optional: pompom maker, 7–9 cm (3–3½ in), or cardboard rings
Tension (gauge)
24 stitches and 28 rounds = 10 cm (4 in) over k2, p2 rib, unstretched, using 4.5 mm needles.
To check tension, cast on 32 stitches, join to work in the round, and work k2, p2 rib for at least 8 cm (3 in). Measure the unstretched fabric away from the cast-on edge.
- Too many stitches in 10 cm: the fabric is tight — try 5 mm needles.
- Too few stitches in 10 cm: the fabric is loose — try 4 mm needles.
Ribbing is very stretchy, so a small tension difference is usually fine. If your unstretched swatch is more than 1 cm off, change needle size.
Abbreviations
| Abbreviation | Meaning |
|---|---|
| cm | centimetre(s) |
| g | gram(s) |
| in | inch(es) |
| k | knit |
| k2tog | knit 2 stitches together (1 stitch decreased) |
| m | metre(s) |
| mm | millimetre(s) |
| p | purl |
| p2tog | purl 2 stitches together (1 stitch decreased) |
| pm | place marker |
| rem | remain(ing) |
| rep | repeat |
| rnd(s) | round(s) |
| st(s) | stitch(es) |
| yd | yard(s) |
Pattern notes
- The hat is worked in the round from the brim to the crown. There is no seam.
- Instructions are given for size S, with M and L in parentheses: S (M, L). When only one number is given, it applies to all sizes.
- The rib is k2, p2 around. After the join, every round is the same until the crown: knit the knits and purl the purls.
- A stretchy cast-on is important. Long-tail cast-on is ideal for beginners. Do not cast on tightly.
- Place the beginning-of-round marker and slip it every round.
- When the stitches no longer sit comfortably on the 40 cm circular needle (usually during the first two crown decrease rounds), change to DPNs or magic loop.
- k2tog: insert the right needle into the next 2 stitches as if to knit, wrap the yarn, and pull through both stitches together.
- p2tog: insert the right needle into the next 2 stitches as if to purl, wrap the yarn, and pull through both stitches together.
Pattern
Cast on and join
Using 4.5 mm needles and a stretchy method (long-tail recommended), cast on 96 (104, 112) stitches.
96 (104, 112) is a multiple of 4, so the k2, p2 rib fits exactly (24 (26, 28) repeats of 4 sts ✓).
Spread the stitches evenly along the needle. Check that the cast-on edge is not twisted — the little “purl bumps” of the cast-on should all run along the same side of the needle.
Join to work in the round, being careful not to twist. Place a stitch marker to mark the beginning of the round.
Brim and body
Rib round: *k2, p2; rep from * to end of round.
Repeat the Rib round until the piece measures 18 (20, 22) cm (7 (8, 8¾) in) from the cast-on edge.
You still have 96 (104, 112) sts ✓.
This length includes fabric for a folded brim. If you prefer no fold, you may begin the crown 5 cm (2 in) earlier.
Crown
Change to DPNs or magic loop when the stitches feel stretched on the circular needle.
Crown round 1: *k2, p2tog; rep from * to end of round.
72 (78, 84) sts rem (96 − 24 = 72; 104 − 26 = 78; 112 − 28 = 84 ✓).
Crown round 2: *k2, p1; rep from * to end of round.
72 (78, 84) sts ✓.
Crown round 3: *k2tog, p1; rep from * to end of round.
48 (52, 56) sts rem (72 − 24 = 48; 78 − 26 = 52; 84 − 28 = 56 ✓).
Crown round 4: *k1, p1; rep from * to end of round.
48 (52, 56) sts ✓.
Crown round 5: *k2tog; rep from * to end of round.
24 (26, 28) sts rem (48 ÷ 2 = 24; 52 ÷ 2 = 26; 56 ÷ 2 = 28 ✓).
Crown round 6: Knit to end of round.
24 (26, 28) sts ✓.
Crown round 7: *k2tog; rep from * to end of round.
12 (13, 14) sts rem (24 ÷ 2 = 12; 26 ÷ 2 = 13; 28 ÷ 2 = 14 ✓).
Size M ends on 13 stitches; this is correct. The remaining stitches are gathered in the next step.
Close the crown
Cut the yarn, leaving a tail of about 20 cm (8 in). Thread the tail onto a tapestry needle, slip it through the remaining 12 (13, 14) stitches, and pull up firmly to close the hole. Pass the needle through the stitches a second time for strength, then take the tail to the wrong side.
Finishing
Weave in all ends on the wrong side. If you folded the brim, weave the cast-on tail into the fold so it cannot be seen.
Shape the hat with your hands so the rib runs straight and the crown sits neatly. Lightly mist with water if needed and leave to dry flat. Do not stretch the rib while it dries, or the hat will grow and lose its bounce.
To wear: fold up 5–6 cm (2–2½ in) of brim, or leave unfolded.
Optional pompom
Make a pompom 7–9 cm (3–3½ in) across.
- Wrap yarn generously around a pompom maker or two cardboard rings with a 7–9 cm outer diameter and a 2.5–3 cm (1–1¼ in) hole.
- Tie the centre as tightly as you can with a separate 30 cm (12 in) length of yarn. This tie is what holds the pompom on the hat, so use a strong strand and a double knot.
- Cut the loops, trim to a round shape, and leave the two long tie ends.
- Using a tapestry needle, take both tie ends down through the centre of the crown to the wrong side. Pull the pompom snug against the hat. Knot the ends firmly on the inside (tie them around a few stitches of the crown if you can) and weave them in.
A pompom uses roughly 20–30 g of extra yarn.
Schematic (measurements)
                    gathered crown
                         ●
                       /   \
                      /     \
                     /       \
                    |         |   total length
                    |  k2 p2  |   22 (24, 26) cm
                    |   rib   |   (8¾ (9½, 10¼) in)
                    |         |
                    |_________|
                    ←--------→
              unstretched circumference
              40 (43.5, 46.5) cm
              (15¾ (17¼, 18¼) in)

              to fit head 51 (56, 61) cm
                         (20 (22, 24) in)
Folded brim (optional): turn up the lower 5–6 cm (2–2½ in).
Beginner tips
- Count stitches after the cast-on and after each crown decrease round. The numbers in the pattern should match what is on your needles.
- If the join looks a little loose at the beginning of the first round, you can pull the tails to tidy it when you weave in.
- Keep the marker at the beginning of the round; it is the only marker you need.
- On k2, p2 rib, the knits look like little Vs and the purls look like bumps. If you lose your place, look at the stitch you are about to work: knit the Vs, purl the bumps.
- The hat will look narrow as you knit it. That is the rib contracting. It will stretch on the head.
Yarn used in sample (for reference): 100 g worsted / aran wool, 200 m per 100 g, 4.5 mm needles, size M, no pompom.
Enjoy your beanie.
Disclaimer: This pattern was generated by AI and should be reviewed for accuracy before use. While we strive for quality, AI-generated content may contain errors. Please verify measurements, stitch counts, charts, and instructions before beginning your project. Generated by purlJam.uk
Love this pattern?
Save this pattern to your free PurlJam libraryAccess your pattern anytime
Bookmark this page to access your pattern anytime