Type
Crochet
Difficulty
intermediate
Category
tank
AI Thinking Process
Planning
Verification
Pattern
Colette Square-Neck Tank
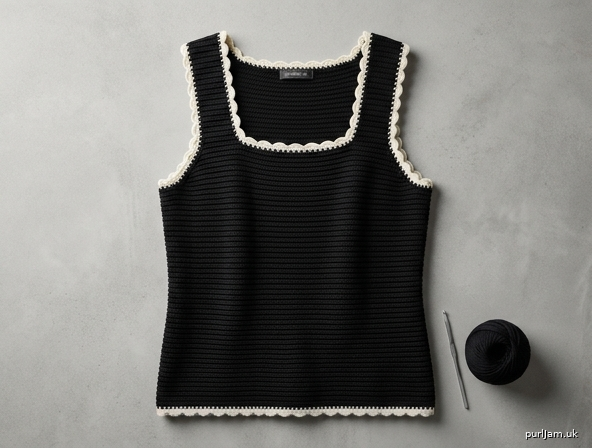
A waist-length sleeveless tank with a wide square neckline and a slightly fitted, straight silhouette. The body is worked in a dense-but-light Horizontal Ridge Stitch that reads as fine ottoman ribbing — structured, flat, and opaque, with a vintage French character. Neckline, armholes, and hem are finished with a contrasting ivory scalloped edging, each scallop topped with a small chain loop.
Construction: Route A — Front and Back worked flat, bottom-up, as identical panels, then seamed at the sides and shoulders. Edging is worked last in the contrasting color.
Difficulty: Intermediate (confident beginners who can keep an even hdc BLO fabric and follow armhole/neck splits will succeed).
Terminology: US crochet terms throughout.
Sizes
XS (S, M, L, XL, XXL)
Shown in size S. Instructions are written for XS with larger sizes in parentheses. When only one number is given, it applies to all sizes.
To fit bust: 30 (34, 38, 42, 46, 50)" / 76 (86.5, 96.5, 106.5, 117, 127) cm
Finished bust: 31 (35, 39, 43, 47, 51)" / 78.5 (89, 99, 109, 119.5, 129.5) cm
Intended ease: slightly fitted; about 1" (2.5 cm) positive ease. Choose the size closest to your bust measurement.
Finished length (shoulder to hem, including edging): 19 (19.5, 20, 20.5, 21, 21.5)" / 48.5 (49.5, 51, 52, 53.5, 54.5) cm
Armhole depth (including edging): 7½ (7½, 8, 8½, 8½, 9)" / 19 (19, 20.5, 21.5, 21.5, 23) cm
Upper front / back width after armholes: 13¼ (14½, 16, 17¼, 18¾, 20)" / 33.5 (37, 40.5, 44, 47.5, 51) cm
Shoulder strap width: 2½ (2½, 2¾, 3, 3¼, 3½)" / 6 (6.5, 7, 7.5, 8, 8.5) cm
Square neck width (each side): 8½ (9¼, 10½, 11¼, 12½, 13¼)" / 21.5 (23.5, 26.5, 28.5, 31.5, 33.5) cm
Square neck depth: 3½ (3½, 4, 4, 4, 4)" / 9 (9, 10, 10, 10, 10) cm
Materials
Yarn: Sport weight (Category 2), mercerized cotton or cotton blend, approx. 174–218 yd (160–200 m) per 50 g. Mercerized cotton gives the slight sheen this silhouette wants.
- Color A (body) — Black: 600 (700, 800, 950, 1100, 1250) yd / 550 (640, 730, 870, 1005, 1145) m
- Color B (edging) — Ivory or cream: 80 (90, 100, 110, 120, 130) yd / 75 (80, 90, 100, 110, 120) m
Hook: 3.5 mm (US E-4), or size needed to obtain gauge. A 3 mm hook firms the fabric; a 4 mm hook adds drape — match gauge, not the label. Optional: 3 mm for the edging only, for a slightly denser trim.
Notions: 4 stitch markers; tapestry needle; scissors.
Gauge
20 sts and 16 rows = 4" (10 cm) in Horizontal Ridge Stitch (hdc BLO every row), worked flat, measured after wet blocking.
Swatch at least 6" (15 cm) square. Block it the same way you will block the garment (wet block, pin to measurements, dry fully). If you have too many stitches per 4", go up a hook; too few, go down. This fabric has little vertical give — gauge is the fit.
Abbreviations (US)
- BLO — back loop only
- ch — chain
- dc — double crochet
- hdc — half double crochet
- hdc BLO — hdc worked in the back loop only
- hdc2tog BLO — yo, insert hook in BLO of next st, yo and pull up a loop, yo, insert hook in BLO of following st, yo and pull up a loop, yo and pull through all 5 loops on hook (1 st decreased)
- rep — repeat
- rnd — round
- RS — right side
- sc — single crochet
- sc3tog — insert hook in next st, yo and pull up a loop, (insert hook in next st, yo and pull up a loop) twice, yo and pull through all 4 loops on hook (2 sts decreased)
- sl st — slip stitch
- st(s) — stitch(es)
- WS — wrong side
- yo — yarn over
Stitch Guide
Horizontal Ridge Stitch (any number of sts)
Worked flat.
- Setup row (RS): Ch 2 (does not count as a st here or throughout), hdc in each st across, turn.
- All following rows: Ch 2, hdc BLO in each st across, turn.
The BLO rows form a clean horizontal ridge on the RS. Fabric is structured, slightly dense, and essentially opaque — not lacy.
Scallop-and-Loop Edging (multiple of 6 sts)
Worked in the round on a base of sc.
- *Skip 2 sc, (3 dc, ch 3, sl st in 3rd ch from hook, 2 dc) in next sc, skip 2 sc, sc in next sc; rep from * around.
Each scallop sits on one stitch; the ch-3 picot is the small decorative loop.
Pattern Notes
- Turning ch-2 does not count as a stitch. Work the first hdc (or hdc BLO) of every row into the first stitch of the row. Do not work into the turning chain at the end of the row.
- The RS is the side facing you on odd-numbered rows of each panel. The ridges are more defined on the RS; keep that side consistent when seaming.
- Front and Back are identical.
- Stitch counts appear in bold at the end of shaping rows.
- Do not weave in the body yarn tails at the underarms or shoulders until after seaming; they can be used to start the seams.
- Wet-block both panels to the schematic measurements before seaming. Cotton relaxes and the ridges settle.
- Side seams run from hem to underarm only. The unworked underarm stitches become part of the armhole opening, not a closed seam.
Back
With Color A and 3.5 mm hook, ch 80 (90, 100, 110, 120, 130).
Row 1 (RS): Hdc in 3rd ch from hook and in each ch across, turn — 78 (88, 98, 108, 118, 128) hdc. (80 − 2 = 78; 90 − 2 = 88; 100 − 2 = 98; 110 − 2 = 108; 120 − 2 = 118; 130 − 2 = 128 ✓)
Rows 2–46 (48, 48, 48, 50, 50): Ch 2, hdc BLO in each st across, turn — 78 (88, 98, 108, 118, 128) hdc.
Panel should measure approx. 15½ (17½, 19½, 21½, 23½, 25½)" / 39.5 (44.5, 49.5, 54.5, 59.5, 65) cm wide and 11½ (12, 12, 12, 12½, 12½)" / 29 (30.5, 30.5, 30.5, 32, 32) cm high. Place a marker at each end of the last row to mark the underarm.
Armhole shaping
Row 1 (RS): Sl st in first 4 (5, 6, 7, 8, 9) sts, ch 2, hdc BLO in next st and in each st across to last 4 (5, 6, 7, 8, 9) sts, leave remaining sts unworked, turn — 70 (78, 86, 94, 102, 110) hdc. (78 − 8 = 70; 88 − 10 = 78; 98 − 12 = 86; 108 − 14 = 94; 118 − 16 = 102; 128 − 18 = 110 ✓)
Row 2 (WS): Ch 2, hdc BLO in each st across, turn — 70 (78, 86, 94, 102, 110) hdc.
Row 3 (RS, decrease): Ch 2, hdc2tog BLO, hdc BLO in each st to last 2 sts, hdc2tog BLO, turn — 68 (76, 84, 92, 100, 108) hdc.
Row 4: Ch 2, hdc BLO in each st across, turn.
Row 5 (decrease): Ch 2, hdc2tog BLO, hdc BLO in each st to last 2 sts, hdc2tog BLO, turn — 66 (74, 82, 90, 98, 106) hdc.
Sizes S, M, L, XL, and XXL only
Row 6: Ch 2, hdc BLO in each st across, turn.
Row 7 (decrease): Ch 2, hdc2tog BLO, hdc BLO in each st to last 2 sts, hdc2tog BLO, turn — — (72, 80, 88, 96, 104) hdc.
Sizes L, XL, and XXL only
Next row: Ch 2, hdc BLO in each st across, turn.
Next row (decrease): Ch 2, hdc2tog BLO, hdc BLO in each st to last 2 sts, hdc2tog BLO, turn — — (—, —, 86, 94, 102) hdc.
Sizes XL and XXL only — XL is now complete (94 hdc). XXL continues:
XXL only — next row: Ch 2, hdc BLO in each st across, turn.
XXL only — next row (decrease): Ch 2, hdc2tog BLO, hdc BLO in each st to last 2 sts, hdc2tog BLO, turn — 100 hdc. (110 − 10 = 100 ✓)
All sizes
Armhole decreases are now complete — 66 (72, 80, 86, 94, 100) hdc. (70 − 4 = 66; 78 − 6 = 72; 86 − 6 = 80; 94 − 8 = 86; 102 − 8 = 94; 110 − 10 = 100 ✓)
Work even in hdc BLO until 14 (14, 14, 16, 16, 18) rows have been worked from the start of armhole shaping (Row 1 of Armhole), ending with a WS row. Piece measures approx. 3½ (3½, 3½, 4, 4, 4½)" / 9 (9, 9, 10, 10, 11.5) cm from the underarm markers.
Square neck — divide for shoulders
Place markers 12 (13, 14, 15, 16, 17) sts in from each edge. Center neck = 42 (46, 52, 56, 62, 66) sts. (12 + 42 + 12 = 66; 13 + 46 + 13 = 72; 14 + 52 + 14 = 80; 15 + 56 + 15 = 86; 16 + 62 + 16 = 94; 17 + 66 + 17 = 100 ✓)
Right shoulder (as worn; this is the first shoulder you work, RS facing):
Next row (RS): Ch 2, hdc BLO in first 12 (13, 14, 15, 16, 17) sts, turn, leaving remaining sts unworked — 12 (13, 14, 15, 16, 17) hdc.
Next 13 (13, 15, 15, 15, 15) rows: Ch 2, hdc BLO in each st across, turn.
Fasten off, leaving a 12" (30 cm) tail for the shoulder seam.
Left shoulder:
With RS facing, skip the center 42 (46, 52, 56, 62, 66) sts, join Color A with sl st in the next st (first st of left strap).
Next row (RS): Ch 2, hdc BLO in same st as join and in each remaining st across, turn — 12 (13, 14, 15, 16, 17) hdc.
Next 13 (13, 15, 15, 15, 15) rows: Ch 2, hdc BLO in each st across, turn.
Fasten off, leaving a 12" (30 cm) tail.
Armhole from underarm marker to shoulder should measure approx. 7 (7, 7½, 8, 8, 8½)" / 18 (18, 19, 20.5, 20.5, 21.5) cm. Total panel length from cast-on edge to shoulder: 18½ (19, 19½, 20, 20½, 21)" / 47 (48.5, 49.5, 51, 52, 53.5) cm.
Front
Work exactly as for Back.
Finishing
Block. Wet-block both panels. Pin to:
- Width: 15½ (17½, 19½, 21½, 23½, 25½)" / 39.5 (44.5, 49.5, 54.5, 59.5, 65) cm
- Length, hem to shoulder: 18½ (19, 19½, 20, 20½, 21)" / 47 (48.5, 49.5, 51, 52, 53.5) cm
- Armhole depth: 7 (7, 7½, 8, 8, 8½)" / 18 (18, 19, 20.5, 20.5, 21.5) cm
- Each strap: 2½ (2½, 2¾, 3, 3¼, 3½)" / 6 (6.5, 7, 7.5, 8, 8.5) cm wide
Dry completely.
Shoulders. With RS facing each other (WS out), join the 12 (13, 14, 15, 16, 17) strap stitches of Front to Back using mattress stitch and Color A. Two shoulder seams.
Side seams. With RS facing each other, mattress-stitch each side from the hem up to the underarm marker. Stop at the marker; do not sew the unworked underarm stitches closed. Two side seams.
Weave in remaining Color A ends on the WS, running them along a ridge rather than across the fabric.
Edging (Color B)
All edging is worked with Color B. Use 3.5 mm, or 3 mm for a firmer trim. Do not turn at the end of rounds; join and continue. Keep the RS of the garment facing you.
Work sc into row-ends at a rate of 1 sc in each row-end along hdc edges (the ch-2 turning chains sit at the edge — work around or into them so the edge does not flare). Work 1 sc in each stitch along horizontal edges (hem stitches, underarm stitches, neck stitches).
Hem
Join Color B with sl st at one side seam on the lower edge.
Rnd 1 (setup): Ch 1, sc evenly around the entire hem, working 1 sc in each foundation ch. Adjust by increasing or decreasing a few stitches so you finish with a multiple of 6 — target 156 (174, 198, 216, 234, 252) sc. Join with sl st to first sc.
Rnd 2 (scallops): Ch 1, sc in same st as join, *skip 2 sc, (3 dc, ch 3, sl st in 3rd ch from hook, 2 dc) in next sc, skip 2 sc, sc in next sc; rep from * around, omitting the last sc of the final repeat, join with sl st to first sc.
Fasten off.
Armholes (make 2)
Join Color B with sl st at the underarm, at the side seam.
Rnd 1 (setup): Ch 1, sc evenly around the armhole. Along the underarm, work 1 sc in each unworked st of Front and Back. Along the vertical edges, work 1 sc in each row-end. Adjust to a multiple of 6. Join with sl st to first sc.
Rnd 2 (scallops): Work as Hem Rnd 2.
Fasten off. Repeat for the second armhole.
Square neckline
Join Color B with sl st at one shoulder seam on the neck edge.
Rnd 1 (setup): Ch 1, sc evenly around the neck opening as follows:
- 1 sc in each st across each horizontal neck edge (the unworked center sts of Front and Back)
- 1 sc in each row-end along each vertical neck edge
- At each of the four inner corners, work sc3tog over the 3 stitches that meet at the corner so the edging turns the square cleanly and does not cup
Adjust the round (avoiding the four corner sc3tog) so the total is a multiple of 6. Join with sl st to first sc.
Rnd 2 (scallops): Work as Hem Rnd 2. If a scallop lands awkwardly on a corner, shift the repeat by one stitch at the start of the round so a valley (the sc) sits near each inner corner.
Fasten off.
Final
Weave in all Color B ends on the WS. Steam the edging lightly from the WS if needed, without flattening the picot loops. Do not stretch the scallops.
The tank is designed to hit at the natural waist. If you want it a touch longer, add an even number of body rows before the underarm on both panels (every 4 rows ≈ 1" / 2.5 cm) and buy extra Color A.
Care
Hand wash cool or machine wash gentle, cotton cycle. Reshape and dry flat. Mercerized cotton may feel slightly stiff until the first wash; the ridges soften without losing definition.
Disclaimer: This pattern was generated by AI and should be reviewed for accuracy before use. While we strive for quality, AI-generated content may contain errors. Please verify measurements, stitch counts, charts, and instructions before beginning your project. Generated by purlJam.uk
Love this pattern?
Save this pattern to your free PurlJam libraryAccess your pattern anytime
Bookmark this page to access your pattern anytime