Type
Crochet
Difficulty
intermediate
Category
custom
AI Thinking Process
Planning
Verification
Pattern
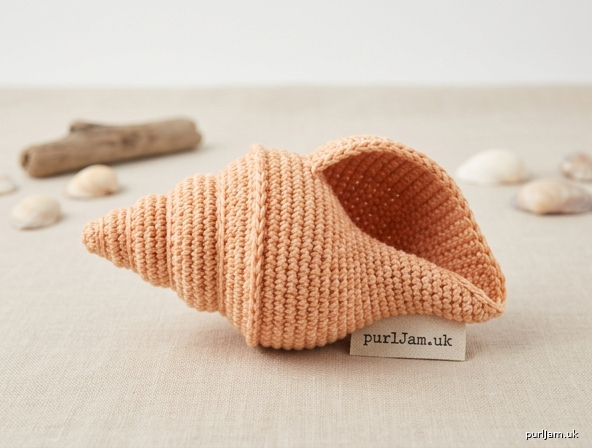
Concha Espiral (Spiral Conch Shell)
Worked Flat — Back and Forth (Ida y Vuelta)
A beginner-friendly spiral conch shell crocheted in rows. One-sided increases make a curved strip that rolls into a classic spiral seashell. Perfect as a decoration, appliqué, play food, or part of a beach mobile.
Materials
- Yarn: Worsted weight (category 4), approx 50 yd (46 m). Smooth cotton or acrylic in cream, sand, peach, coral, or soft variegated colors works well.
- Hook: US H/8 (5.0 mm), or size needed for a firm fabric
- Notions: Yarn needle, scissors, 1 stitch marker (optional, to mark increase edge)
- Optional: Tiny bit of fiberfill if you want slightly padded coils
Gauge
16 sc and 18 rows = 4" (10 cm) in single crochet
Gauge is not critical for this project; a firm fabric holds the spiral shape better. If stitches are very loose, go down one hook size.
Finished Size
After rolling and seaming (one size):
Approx 4½" (11.5 cm) long × 2½" (6.5 cm) at the widest opening
To make a larger or smaller shell, work more or fewer rows (see Pattern Notes).
Abbreviations (US Terms)
| Abb | Meaning |
|---|---|
| ch | chain |
| sc | single crochet |
| st(s) | stitch(es) |
| RS | right side |
| WS | wrong side |
| BLO | back loop only |
| rep | repeat |
Pattern Notes
- Worked flat in turned rows (ida y venida), not in the round.
- Ch 1 at the start of every row does not count as a stitch.
- Work in both loops unless you choose the optional ridged version (BLO).
- Increase edge: You always add 1 stitch on the same physical edge (the outer spiral edge).
- On RS rows: 2 sc in the last stitch.
- On WS rows: 2 sc in the first stitch.
Place a marker on that edge if it helps.
- Stitch count rule: Every row increases by 1 sc.
Row n ends with (n + 1) sc.
Example: Row 10 → 11 sc; Row 35 → 36 sc. ✓ - Turning: Turn at the end of every row as written.
- Optional texture: For ridge lines like real shell growth rings, work all sc in BLO from Row 2 onward.
- Custom size: Stop earlier for a mini shell (e.g. Row 25 = 26 sc) or continue past Row 35 for a larger conch (e.g. Row 45 = 46 sc). Yardage increases with size.
Pattern Instructions
Shell Body
With worsted yarn and US H/8 (5.0 mm) hook:
Foundation: Ch 2.
Row 1 (RS): 2 sc in 2nd ch from hook, turn.
(2 sc)
Row 2 (WS): Ch 1, 2 sc in first st, sc in next st, turn.
(3 sc) ← 1 increase at outer edge
Row 3 (RS): Ch 1, sc in first st, sc in next st, 2 sc in last st, turn.
(4 sc)
Row 4 (WS): Ch 1, 2 sc in first st, sc in each st across, turn.
(5 sc)
Row 5 (RS): Ch 1, sc in each st across to last st, 2 sc in last st, turn.
(6 sc)
Row 6 (WS): Ch 1, 2 sc in first st, sc in each st across, turn.
(7 sc)
Rows 7–35: Continue in established pattern:
- Every WS row: Ch 1, 2 sc in first st, sc in each remaining st across, turn.
- Every RS row: Ch 1, sc in each st across to last st, 2 sc in last st, turn.
Each row adds exactly 1 sc.
At the end of Row 35 you will have 36 sc.
(Check: Row 35 → 35 + 1 = 36 sc ✓)
Tip (beginner count check every 5 rows):
Row 10 = 11 sc · Row 15 = 16 sc · Row 20 = 21 sc · Row 25 = 26 sc · Row 30 = 31 sc · Row 35 = 36 sc
Do not fasten off yet if your seaming tail will come from this end; or fasten off leaving a 24" (60 cm) tail for sewing the spiral (recommended).
Finishing
- Weave in the starting tail at the tip (Row 1) securely on the WS, or leave it to bury inside the spiral.
- Shape the conch:
- Lay the piece with RS facing you (or WS out if you prefer the other look).
- Begin at the narrow tip (Row 1).
- Roll tightly toward the wide end, like a cinnamon roll or party streamer, keeping the increase edge as the outer rim of the opening.
- Aim for a cone/spiral: tip stays pointed; wide edge forms the shell mouth. Adjust tension so coils sit snugly.
- Secure: Thread the long tail on a yarn needle. Take small stitches through all layers of the coils, working from tip toward opening and back as needed so the spiral cannot unwind. Catch the outer rim occasionally so the mouth holds an open oval/round shape.
- Optional: Tuck a pinch of fiberfill between a couple of outer coils for a softer, thicker shell—do not overstuff or the spiral will gap.
- Weave in remaining ends inside the coils. Steam-block very lightly only if needed; do not flatten the 3D spiral.
Optional Variations (still beginner)
- Ridged shell: Work Rows 2–35 in BLO only.
- Two-tone: Change color every 5–8 rows for “growth band” stripes.
- Appliqué: Do not roll fully; sew the curved flat piece onto a bag or blanket as a seashell motif.
- Keychain/mini: Stop at Row 18–22 and roll as usual.
Quick Reference — Increase Edge
| Row type | What to do | Count after row |
|---|---|---|
| Row 1 (RS) | 2 sc in foundation ch | 2 |
| WS rows | 2 sc in first st, sc across | previous + 1 |
| RS rows | sc across, 2 sc in last st | previous + 1 |
| Row 35 | — | 36 sc |
Enjoy your concha espiral — a simple strip of single crochet that becomes a little spiral seashell with just a roll and a few stitches.
Disclaimer: This pattern was generated by AI and should be reviewed for accuracy before use. While we strive for quality, AI-generated content may contain errors. Please verify measurements, stitch counts, charts, and instructions before beginning your project. Generated by purlJam.uk
Love this pattern?
Save this pattern to your free PurlJam libraryAccess your pattern anytime
Bookmark this page to access your pattern anytime