Type
Knitting
Difficulty
intermediate
Category
amigurumi
AI Thinking Process
Planning
Verification
Pattern
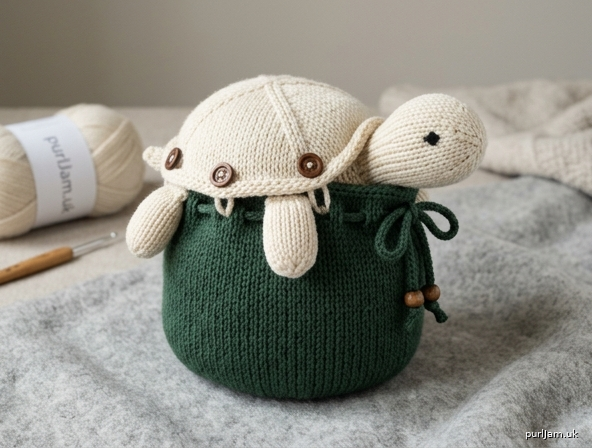
Convertible Turtle-to-Bag — Knit Amigurumi
Skill Level: Beginner (uses only knit, purl, kfb, k2tog, yo, and simple sewing/seaming)
Concept: This turtle is really two pieces that button together! The shell unit (shell + head + legs + tail) buttons onto the body, which is a self-standing drawstring pouch. Unbutton the shell and the body becomes a little bag — perfect for coins, treasures, or a gift card.
Finished Measurements
- Assembled turtle: approx. 5in long x 4.5in wide x 4in tall (12.5 x 11.5 x 10cm)
- Body alone (as a bag): approx. 4in tall x 3.8in diameter (10 x 9.5cm)
Materials
- DK weight yarn: Color A (shell/head/legs/tail) approx. 150 yds (140m); Color B (body/bag) approx. 160 yds (145m). One standard 100g/230yd skein of each color is more than sufficient.
- Needles: US 4 (3.5mm) set of 4-5 DPNs, or a 24in circular for Magic Loop. (Label recommends US 6/4mm — we size down to keep stitches tight so stuffing won't show.)
- Polyester fiberfill stuffing — approx. 50g (1.75oz) total
- 2 safety eyes, 6mm (or black embroidery floss + tapestry needle for embroidered eyes)
- 4 sew-on buttons, 1/2–5/8in (12–15mm), sturdy and flat
- Tapestry needle, stitch markers, scissors, sewing thread (optional, for extra-secure buttons)
Safety note: Buttons and safety eyes are choking hazards. For a toy intended for a child under 3, embroider the eyes with floss, and instead of buttons, sew the shell unit permanently to the body along two points (sacrificing the bag-conversion feature) or use soft fabric snap tape sewn on securely.
Gauge
24 sts x 32 rnds = 4in (10cm) in stockinette, worked in the round, on US 4 (3.5mm) needles. Gauge note: Exact stitch count matters less than fabric density — knit tightly enough that no stuffing peeks through. Swatch in the round if possible, since row gauge worked flat is often looser.
Abbreviations
k = knit | p = purl | kfb = knit into front and back of same stitch (increase) | k2tog = knit 2 together (decrease) | yo = yarn over | rnd(s) = round(s) | st(s) = stitch(es) | MR = magic ring
Special Techniques
- Magic Ring (MR): Adjustable loop cast-on that closes a tight hole at the center of a round piece.
- Whip stitch / mattress stitch seaming: Used to sew closed pieces onto other pieces invisibly; matching stitch bumps for a smooth join.
- I-cord: Knit 2 (or 3) sts on DPNs, slide sts to other end of needle without turning, pull yarn snug across the back, repeat — forms a narrow tube used here for the drawstring and button loops.
PIECE 1: BODY (doubles as the bag)
Using Color B, MR 6 sts.
- Rnd 1: kfb around (6 → 12) ✓
- Rnd 2: k1, kfb; rep around (12 → 18) ✓
- Rnd 3: k2, kfb; rep around (18 → 24) ✓
- Rnd 4: k3, kfb; rep around (24 → 30) ✓
- Rnd 5: k4, kfb; rep around (30 → 36) ✓
- Rnd 6: k5, kfb; rep around (36 → 42) ✓
- Rnd 7: k6, kfb; rep around (42 → 48) ✓
- Rnd 8: k7, kfb; rep around (48 → 54) ✓
- Rnd 9: k8, kfb; rep around (54 → 60) ✓
- Rnd 10: k9, kfb; rep around (60 → 66) ✓
- Rnd 11: k10, kfb; rep around (66 → 72) ✓
This flat circle is the bag's base (diameter ≈3.8in).
- Rnds 12–39: Knit even, 72 sts (28 rounds — this forms the sides, height ≈3.5in).
- Rnd 40 (eyelet round for drawstring): yo, k2tog; rep around (72 sts maintained) ✓ — creates 36 small eyelets.
- Rnds 41–44: Knit even, 72 sts (4 rounds, collar).
- Bind off all sts loosely knitwise.
Weave in the starting tail at the base. Leave the bind-off tail for now — it can help tack down the collar edge neatly.
Mark button positions on the body
Place 4 markers evenly around the collar (Rnd 39, just below the eyelet round), roughly every 18 sts (72 ÷ 4 = 18) ✓. Sew one button flat to the outside of the body at each marked point.
Make and insert the drawstring
With Color B, cast on 3 sts and work a 3-st I-cord for 16in (40cm). Bind off, weave in ends. Thread the cord through the Rnd 40 eyelets all the way around, and knot or bead the ends so it doesn't pull free.
PIECE 2: SHELL (fully closed, lentil-shaped)
Using Color A, MR 6 sts.
- Rnd 1: kfb around (6 → 12) ✓
- Rnd 2: k1, kfb; rep around (12 → 18) ✓
- Rnd 3: k2, kfb; rep around (18 → 24) ✓
- Rnd 4: k3, kfb; rep around (24 → 30) ✓
- Rnd 5: k4, kfb; rep around (30 → 36) ✓
- Rnd 6: k5, kfb; rep around (36 → 42) ✓
- Rnd 7: k6, kfb; rep around (42 → 48) ✓
- Rnd 8: k7, kfb; rep around (48 → 54) ✓
- Rnd 9: k8, kfb; rep around (54 → 60) ✓
- Rnds 10–11: Knit even, 60 sts (2 rounds — this is the shell's equator/rim).
- Rnd 12: k8, k2tog; rep around (60 → 54) ✓
- Rnd 13: k7, k2tog; rep around (54 → 48) ✓
- Rnd 14: k6, k2tog; rep around (48 → 42) ✓
- Rnd 15: k5, k2tog; rep around (42 → 36) ✓
- Rnd 16: k4, k2tog; rep around (36 → 30) ✓
- Rnd 17: k3, k2tog; rep around (30 → 24) ✓ — begin stuffing firmly now, adding more as you go.
- Rnd 18: k2, k2tog; rep around (24 → 18) ✓
- Rnd 19: k1, k2tog; rep around (18 → 12) ✓
- Rnd 20: k2tog; rep around (12 → 6) ✓
Finish stuffing firmly, cut yarn leaving a long tail, thread through remaining 6 sts, and cinch tightly closed. Weave in ends. You now have a firm, self-contained lentil/UFO-shaped shell, approx. 3.2in diameter.
PIECE 3: HEAD
Using Color A, MR 6 sts.
- Rnd 1: kfb around (6 → 12) ✓
- Rnd 2: k1, kfb; rep around (12 → 18) ✓
- Rnd 3: k2, kfb; rep around (18 → 24) ✓
- Rnds 4–9: Knit even, 24 sts (6 rounds).
- On Rnd 6, insert safety eyes (or plan embroidery placement) about 6–7 sts apart, centered on the front.
- Rnd 10: k2, k2tog; rep around (24 → 18) ✓
- Rnd 11: Knit even, 18 sts.
- Rnd 12: k1, k2tog; rep around (18 → 12) ✓ Stuff firmly.
- Rnd 13: k2tog; rep around (12 → 6) ✓
Cut yarn, thread through rem 6 sts, cinch closed. Leave a long tail for sewing to the shell.
PIECE 4: LEGS (make 4 identical)
Using Color A, MR 6 sts.
- Rnd 1: kfb around (6 → 12) ✓
- Rnds 2–5: Knit even, 12 sts (4 rounds).
Stuff firmly. Bind off all 12 sts, leaving a long tail — do not close into a point; this open bound-off edge will be sewn flat against the shell.
PIECE 5: TAIL
Using Color A, MR 6 sts.
- Rnds 1–4: Knit even, 6 sts (4 rounds, no increases — this forms a tiny tube).
Stuff lightly. Bind off, leaving a long tail for sewing.
ASSEMBLY
1. Prepare the shell's equator. Place a marker at the shell's cinched-closed "bottom" point and divide the 60-st equator (Rnds 10–11) into 6 equal sections of 10 sts each (60 ÷ 6 = 10) ✓, marking each division point.
2. Attach head, legs, and tail to the shell (permanent).
- Sew the head's cinched point to Section 1 (front center) using the tail and whip stitch, tucking the join neatly so the head sits just below the shell's front edge.
- Sew a leg's open (bound-off) edge flat to Sections 2, 3, 5, and 6, stuffing a little extra if needed before closing each seam completely.
- Sew the tail's open edge to Section 4 (back center, directly opposite the head).
3. Add the button loops to the shell. With Color A, cast on 2 sts and work a 2-st I-cord approx. 1.5in (4cm) long; bind off. Make 4 loops. Sew each loop's two ends to the shell equator in the gaps between the head/leg/tail attachment points, spacing them as evenly as possible around the remaining space (exact stitch-perfect symmetry isn't necessary for a handmade toy — evenly "by eye" is fine).
4. Weave in all remaining ends securely inside the head, legs, tail, and shell before proceeding.
5. Attach limbs symmetrically — double-check that all 4 legs sit at the same height around the shell and that head and tail are true opposites, so the assembled turtle sits level.
6. Join shell unit to body. Line up the 4 loops on the shell with the 4 buttons on the body collar and button them together. Your turtle is complete!
CONVERTING TO A BAG
Simply unbutton all 4 loops to separate the shell unit (shell + head + legs + tail) from the body. The body stands on its own as a drawstring pouch — pull the I-cord drawstring to close it. Set the shell unit aside, or button it back on anytime to turn your bag back into a turtle.
Finishing Tips
- Weave in every yarn end inside the stuffing, not along a visible surface — tug gently and trim close.
- If buttons ever feel loose, reinforce with a few extra stitches of sewing thread through the yarn and fabric.
- Hand wash only, lay flat to dry, to protect the stuffing and button attachments.
Disclaimer: This pattern was generated by AI and should be reviewed for accuracy before use. While we strive for quality, AI-generated content may contain errors. Please verify measurements, stitch counts, and instructions before beginning your project. Generated by purlJam.uk
Love this pattern?
Save this pattern to your free PurlJam libraryAccess your pattern anytime
Bookmark this page to access your pattern anytime