Type
Knitting
Difficulty
intermediate
Category
amigurumi
AI Thinking Process
Planning
Verification
Pattern
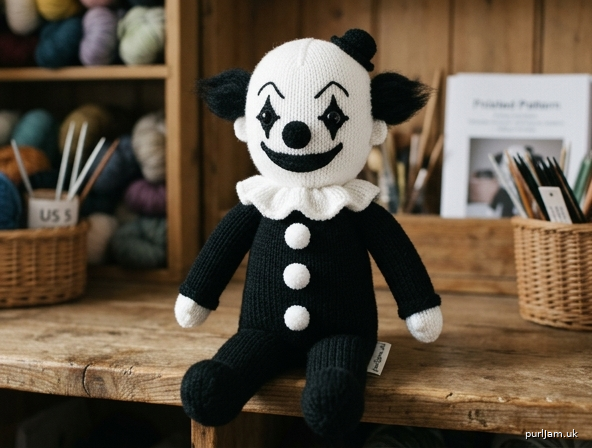
Art the Clown — Knitted Amigurumi Doll
Difficulty: Beginner | Finished size: approx. 10–11 in (25–28 cm) tall
A note on this design: Art the Clown is a horror-movie character. This pattern is intended as a novelty display piece for teens/adult fans and collectors. If gifting to a young child, embroider the eyes and nose instead of using safety eyes or a glued pom-pom, and secure hair tufts extra firmly.
MATERIALS
- Worsted weight yarn:
- Black – approx. 150 g (2 skeins of ~100 g/190 yd) — body, arms, legs, hair
- White – approx. 50 g (1 skein) — head, hands, ruffle collar, buttons
- Small scrap of black for the pom-pom nose (included in black total)
- US 5 (3.75 mm) DPNs (set of 5) or a 24 in (60 cm) circular needle for Magic Loop
- Polyester fiberfill stuffing – approx. 3–3.5 oz (85–100 g)
- 2 x 9 mm black safety eyes (optional — see note above; embroidered eyes recommended for children's toys)
- Black and white embroidery floss (or scrap yarn) + tapestry needle
- Stitch markers
- Small pom-pom maker or cardboard (for nose and buttons), optional
GAUGE
20 sts x 28 rows = 4 in (10 cm) in stockinette stitch, worked in the round on US 5 (3.75 mm) needles. Note: This is a deliberately tight gauge (2 needle sizes smaller than the yarn label suggests) so the stuffing won't peek through. Exact stitch count matters less than achieving a firm, dense fabric — knit a quick swatch and go down a needle size again if you can see gaps between stitches.
ABBREVIATIONS
k – knit | p – purl | kfb – knit into front and back of stitch (increase) | k2tog – knit 2 together (decrease) | st(s) – stitch(es) | rnd(s) – round(s) | RS – right side | WS – wrong side
HEAD (make 1, White)
Cast on 6 sts using a magic ring or your preferred method. Distribute sts across needles, place marker, join to work in the round.
- Rnd 1: knit (6)
- Rnd 2: [kfb] x6 (6 → 12) ✓
- Rnd 3: knit (12)
- Rnd 4: [k1, kfb] x6 (12 → 18) ✓
- Rnd 5: knit (18)
- Rnd 6: [k2, kfb] x6 (18 → 24) ✓
- Rnd 7: knit (24)
- Rnd 8: [k3, kfb] x6 (24 → 30) ✓
- Rnd 9: knit (30)
- Rnd 10: [k4, kfb] x6 (30 → 36) ✓
- Rnds 11–20: knit even (36 sts) — 10 rounds
Around Rnd 15, insert safety eyes (if using) spaced about 1 in (2.5 cm) apart, roughly centered on the face. If embroidering, mark the spot with scrap yarn and embroider later.
- Rnd 21: [k4, k2tog] x6 (36 → 30) ✓
- Rnd 22: knit (30)
- Rnd 23: [k3, k2tog] x6 (30 → 24) ✓
- Rnd 24: knit (24)
- Rnd 25: [k2, k2tog] x6 (24 → 18) ✓
- Rnd 26: knit (18) — begin stuffing firmly now
- Rnd 27: [k1, k2tog] x6 (18 → 12) ✓
- Rnd 28: [k2tog] x6 (12 → 6) ✓
Add final stuffing to firm the top. Cut yarn leaving a 6 in tail, thread through tapestry needle, draw through remaining 6 sts, pull tight and secure. Weave in end inside head.
BODY (make 1, Black)
Cast on 6 sts, join to work in the round.
- Rnd 1: knit (6)
- Rnd 2: [kfb] x6 (6 → 12) ✓
- Rnd 3: knit (12)
- Rnd 4: [k1, kfb] x6 (12 → 18) ✓
- Rnd 5: knit (18)
- Rnd 6: [k2, kfb] x6 (18 → 24) ✓
- Rnd 7: knit (24)
- Rnd 8: [k3, kfb] x6 (24 → 30) ✓
- Rnd 9: knit (30)
- Rnd 10: [k4, kfb] x6 (30 → 36) ✓
- Rnd 11: knit (36)
- Rnd 12: [k5, kfb] x6 (36 → 42) ✓
- Rnds 13–24: knit even (42 sts) — 12 rounds (this is the torso)
- Rnd 25: [k5, k2tog] x6 (42 → 36) ✓
- Rnd 26: knit (36)
- Rnd 27: [k4, k2tog] x6 (36 → 30) ✓
- Rnd 28: knit (30) — begin stuffing firmly
- Rnd 29: [k3, k2tog] x6 (30 → 24) ✓
- Rnd 30: [k2, k2tog] x6 (24 → 18) ✓
- Rnd 31: [k1, k2tog] x6 (18 → 12) ✓
- Rnd 32: [k2tog] x6 (12 → 6) ✓
Finish stuffing, cut yarn leaving a long tail, draw through remaining 6 sts, cinch closed. Do not weave in the tail yet — you'll use it to attach the head.
ARMS (make 2, White + Black)
With White, cast on 6 sts, join to work in the round.
- Rnd 1: knit (6)
- Rnd 2: [kfb] x6 (6 → 12) ✓
- Rnds 3–5: knit even (12 sts) — this forms the hand
Switch to Black, continuing without a break in the round:
- Rnds 6–20: knit even (12 sts) — 15 rounds, this forms the arm
Stuff lightly to keep the arm soft and poseable-looking. Cut yarn leaving a long tail. Flatten the last round and whip-stitch closed, leaving tail for seaming to body.
LEGS (make 2, Black)
Cast on 6 sts, join to work in the round.
- Rnd 1: knit (6)
- Rnd 2: [kfb] x6 (6 → 12) ✓
- Rnd 3: [k1, kfb] x6 (12 → 18) ✓ — this rounds out the foot
- Rnds 4–7: knit even (18 sts) — 4 rounds
- Rnd 8: [k1, k2tog] x6 (18 → 12) ✓ — ankle shaping
- Rnds 9–28: knit even (12 sts) — 20 rounds, this forms the leg
Stuff firmly as you go. Cut yarn leaving a long tail. Flatten last round and whip-stitch closed, leaving tail for seaming to body.
RUFFLE COLLAR (make 1, White) — worked FLAT, not in the round
Using the same needles held as straight needles (or any spare straight/circular needle), cast on 60 sts.
- Row 1 (WS): purl
- Row 2 (RS): knit
- Row 3 (WS): purl
- Bind off all sts loosely, knitwise.
This strip is intentionally longer than the neck circumference so it gathers into a ruffle. Set aside — you'll gather and sew it on during assembly.
FACE, HAIR & DETAILS
Face (embroider in black yarn/floss):
- Two elongated teardrop or triangle shapes in satin stitch around/above the eyes (clown-style eye makeup)
- Angled eyebrow lines above the eye shapes for a sinister look
- A wide, slightly asymmetric smile in backstitch or stem stitch
Nose: Make a small black pom-pom, approx. 1 in (2.5 cm) diameter. Trim neatly and stitch securely to the center of the face, below the eyes.
Hair: Cut 8–10 lengths of black yarn, about 3 in (7.5 cm) each. Fold each in half and attach with a fringe/lark's-head knot through the head fabric at the sides and back only, leaving the top and front bald. Trim tufts evenly to about 1.5 in (4 cm).
Buttons: Make 3 small white pom-poms (or tight French knots), about 0.5 in (1.25 cm) each, and stitch evenly spaced down the front center of the body to resemble jumpsuit buttons.
ASSEMBLY
Work in this order for symmetry and to keep seams hidden:
- Weave in ends on head, arms, and legs pieces first (leave body and collar tails as instructed above).
- Attach the ruffle collar: gather the cast-on edge slightly with a length of white yarn so it fits around the top opening of the body (where the neck will be). Pin in place and whip-stitch around, with the ruffle facing outward/upward.
- Attach the head: center the head on top of the body, over the ruffle collar, so the collar edge peeks out slightly. Using the tail left at the body's top, mattress-stitch around the seam, stuffing a little extra fiberfill into the neck gap before closing fully.
- Attach the arms: pin one arm to each side of the body at shoulder height (roughly at the level where the torso's straight rounds begin), checking both are at matching height and angle. Whip-stitch or mattress-stitch each arm securely around its flattened opening.
- Attach the legs: pin both legs to the base of the body, evenly spaced, so the toy can stand upright. Sew securely around each opening, adding a pinch more stuffing into the leg tops if needed for stability.
- Weave in all remaining ends inside the body through the nearest seam gap.
- Add the face embroidery, nose pom-pom, hair tufts, and button pom-poms as described above.
FINISHING NOTES
- Steam-block gently (avoid direct heat on acrylic yarn) to even out stitches if desired.
- Check that both arms and both legs are symmetrical before final stuffing is closed — it's much easier to adjust now than after seaming.
- Store or display away from open flame and out of reach of small children/pets due to small embellishment pieces (pom-poms, safety eyes).
Enjoy your Art the Clown amigurumi!
Disclaimer: This pattern was generated by AI and should be reviewed for accuracy before use. While we strive for quality, AI-generated content may contain errors. Please verify measurements, stitch counts, and instructions before beginning your project. Generated by purlJam.uk
Love this pattern?
Save this pattern to your free PurlJam libraryAccess your pattern anytime
Bookmark this page to access your pattern anytime