Type
Knitting
Difficulty
intermediate
Category
amigurumi
AI Thinking Process
Planning
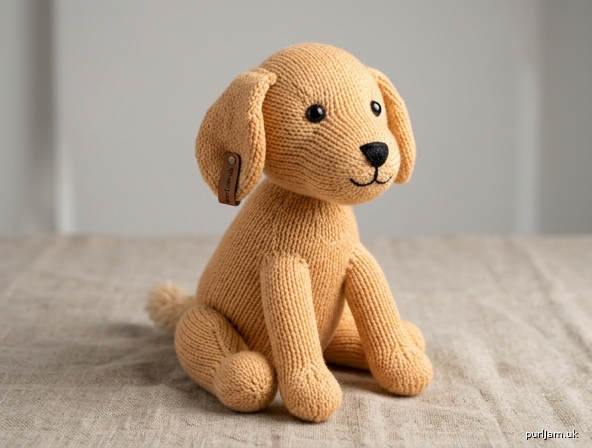
1. **Design Strategy**: A cute, cuddly cockapoo amigurumi knitted in worsted yarn with a textured curly coat suggested via reverse stockinette accents and loopy ears. Worked seamlessly in the round on four DPNs for an easy beginner project with embroidered features.
2. **Construction Plan**: Separate pieces (head, body, four legs, two floppy ears, tail, muzzle) worked in the round on DPNs, stuffed firmly, then seamed with mattress stitch.
3. **Quality Assurance**:
- Loose tension showing stuffing — use 3.5mm needles (tighter than worsted standard 4.5mm).
- Symmetry of leg/ear placement — mark positions before seaming.
- Magic-ring style closures on small pieces — gather tightly to avoid gaps.
4. **Final Calculations**: Tension 22 sts × 30 rows = 10cm over st st on 3.5mm. Head cast-on builds to 36 sts max (~16cm circumference ≈ 5cm diameter). Body max 30 sts. Legs 12 sts, ears 10 sts. Finished toy ~20cm tall. Stuffing ~80–100g.
Verification
[PRE-FLIGHT CHECKS]
1. **Completeness**: All template sections present — materials, tension note, head/body/limbs in the round, stuffing, mattress-stitch assembly, finishing. ✓
2. **Consistency**: Head increases 6→36 in multiples of 6 (6,12,18,24,30,36) verified. Body 6→30. Legs and ears counts verified below. ✓
3. **Constraints**: "4 needle" honoured (DPN/4-needle method specified); cockapoo features (floppy curly ears, muzzle, fluffy tail) added. UK English & metric-first used. ✓
4. **Safety**: Increase/decrease rounds checked; decrease rounds return to multiples of 6 cleanly. ✓
Pattern
# Cuddly Cockapoo — Knitted Amigurumi (4-Needle Method)

**Difficulty:** Easy
**Technique:** Worked in the round on a set of four double-pointed needles (DPNs), stocking stitch throughout.
**Finished size:** Approximately 20 cm (8 in) tall when seated.

---

## Materials

- **Yarn:** Worsted weight (Aran) yarn — approx. 100 g main colour (cream, apricot or grey to suit your favourite cockapoo). Small amount of brown or black for nose/embroidery.
- **Needles:** Set of four 3.5 mm DPNs (UK metric). *Note: this is 1 size smaller than the typical 4–4.5 mm recommended for worsted, to create a firm fabric.*
- **Polyester fibre filling:** approx. 80–100 g.
- **Tapestry needle** (blunt) for seaming and embroidery.
- **Black embroidery floss** (or 6 mm safety eyes if preferred — insert before closing the head).
- **Stitch markers** and locking markers for placement.

---

## Tension (Gauge)

22 sts and 30 rounds = 10 cm (4 in) over stocking stitch on 3.5 mm needles, worked firmly.

**Toy tension note:** Exact stitch count matters less than fabric density — your knitting should be tight and even so the filling does not show through. If you can see stuffing, drop a needle size.

---

## Abbreviations (UK)

- **k** — knit
- **p** — purl
- **kfb** — knit into front and back of stitch (1 st increased)
- **k2tog** — knit two together (1 st decreased)
- **ssk** — slip, slip, knit (1 st decreased)
- **st(s)** — stitch(es)
- **rnd(s)** — round(s)
- **st st** — stocking stitch (knit every round in the round)

---

## Working in the Round on Four Needles

Distribute stitches evenly across three DPNs and knit with the fourth. Place a marker (or use the tail) to mark the start of the round. When increasing/decreasing, redistribute stitches as needed to keep them even across the three working needles.

To begin small pieces, cast 6 sts onto one needle, divide 2-2-2 across three needles, and join to work in the round (a tight cast-on edge gathers neatly when finished).

---

## HEAD

Cast on 6 sts, divide across three needles, join to work in the round.

- **Rnd 1:** kfb in every st → **12 sts**
- **Rnd 2:** k all
- **Rnd 3:** (k1, kfb) × 6 → **18 sts**
- **Rnd 4:** k all
- **Rnd 5:** (k2, kfb) × 6 → **24 sts**
- **Rnd 6:** k all
- **Rnd 7:** (k3, kfb) × 6 → **30 sts**
- **Rnd 8:** k all
- **Rnd 9:** (k4, kfb) × 6 → **36 sts**
- **Rnds 10–18:** k all (9 rounds straight)

**Shape back of head:**
- **Rnd 19:** (k4, k2tog) × 6 → **30 sts**
- **Rnd 20:** k all
- **Rnd 21:** (k3, k2tog) × 6 → **24 sts**
- **Rnd 22:** (k2, k2tog) × 6 → **18 sts**

*Insert safety eyes now if using, approx. 5 rounds apart and 6 rounds up from the muzzle position. Stuff the head firmly.*

- **Rnd 23:** (k1, k2tog) × 6 → **12 sts**
- **Rnd 24:** (k2tog) × 6 → **6 sts**

Break yarn, thread through remaining 6 sts, pull tight and fasten off. ✔ *Math check: increases 6→12→18→24→30→36 and mirror-decreases 36→30→24→18→12→6 — all clean multiples of 6.*

---

## MUZZLE

Cast on 6 sts, join in the round.

- **Rnd 1:** kfb in every st → **12 sts**
- **Rnd 2:** (k1, kfb) × 6 → **18 sts**
- **Rnds 3–6:** k all (4 rounds)

Cast off loosely, leaving a long tail (~30 cm) for sewing. Lightly stuff before attaching. Embroider a small triangular nose in brown/black at the centre top.

---

## BODY

Cast on 6 sts, join in the round.

- **Rnd 1:** kfb in every st → **12 sts**
- **Rnd 2:** (k1, kfb) × 6 → **18 sts**
- **Rnd 3:** (k2, kfb) × 6 → **24 sts**
- **Rnd 4:** (k3, kfb) × 6 → **30 sts**
- **Rnds 5–22:** k all (18 rounds straight) — forms a gently tapering body
- **Rnd 23:** (k3, k2tog) × 6 → **24 sts**
- **Rnd 24:** k all
- **Rnd 25:** (k2, k2tog) × 6 → **18 sts**

Stuff body firmly.

- **Rnd 26:** (k1, k2tog) × 6 → **12 sts**
- **Rnd 27:** (k2tog) × 6 → **6 sts**

Break yarn, thread through remaining sts, pull tight and fasten off. ✔ *Math check: 6→12→18→24→30, then 30→24→18→12→6.*

---

## LEGS (make 4)

Cast on 6 sts, join in the round.

- **Rnd 1:** kfb in every st → **12 sts**
- **Rnds 2–14:** k all (13 rounds straight)

Stuff lightly (legs should stay a little soft to bend). Cast off, leaving a 25 cm tail for sewing. ✔ *All four legs identical = 12 sts each — symmetry guaranteed.*

---

## EARS (make 2) — Floppy Cockapoo Ears

Cast on 8 sts, join in the round.

- **Rnd 1:** kfb in every st → **16 sts**
- **Rnds 2–4:** k all
- **Rnd 5:** (k2, k2tog) × 4 → **12 sts**
- **Rnds 6–8:** k all
- **Rnd 9:** (k1, k2tog) × 4 → **8 sts**
- **Rnds 10–11:** k all
- **Rnd 12:** (k2tog) × 4 → **4 sts**

Do **not** stuff — ears should be flat and floppy. Break yarn, thread through remaining 4 sts, pull tight and fasten off. Leave a tail for sewing. ✔ *16→12→8→4, all multiples of 4.*

---

## TAIL — Fluffy

Cast on 6 sts, join in the round.

- **Rnds 1–8:** k all

Stuff lightly. Cast off, leaving a tail for sewing. *(For extra fluff, leave a loose loop of yarn at the tip and trim into a small pompom-style tuft.)*

---

## Curly Coat (Optional, Easy)

For a curly cockapoo texture, lightly brush the surface of the finished body and head with a slicker brush, or work small surface-embroidered loops over the back and head. The base pattern is smooth stocking stitch and looks lovely as-is.

---

## MAKING UP (Assembly)

Work all seams with **mattress stitch** using matching yarn. **Assembly order matters** — follow these steps:

1. **Muzzle to head:** Centre the muzzle on the lower front of the head, just below and between the eyes. Sew all around, adding a touch more filling before closing.
2. **Embroider features:** If not using safety eyes, embroider two eyes in black floss above the muzzle. Add a small smile line beneath the nose.
3. **Ears to head:** Pin the ears symmetrically to either side of the head, about 2 rounds down from the crown. Check they hang level before sewing the cast-on edge securely so they flop naturally.
4. **Head to body:** Position the head centrally on the top of the body. Sew firmly all the way around for a stable neck join — add filling if needed.
5. **Legs:** Attach the four legs symmetrically. Pin the two front legs at the lower front of the body and the two rear legs at the lower back/sides. **Measure placement** so each pair is level and evenly spaced before sewing.
6. **Tail:** Sew the tail to the centre-back of the body, angled slightly upward.

---

## Finishing

- Weave in all ends securely **inside the body** using the tapestry needle, then snip close.
- Give the toy a gentle shape with your hands; add small amounts of filling through any seam if firmer areas are wanted.
- Check all small parts (eyes, embroidery) are very securely fastened if the toy is intended for a young child — embroidered features are safest for babies.

---

**Enjoy your cuddly cockapoo!** 🐾
Disclaimer: This pattern was generated by AI and should be reviewed for accuracy before use. While we strive for quality, AI-generated content may contain errors. Please verify measurements, stitch counts, and instructions before beginning your project. Generated by purlJam.uk
Access your pattern anytime
Bookmark this page to access your pattern anytime