Type
Knitting
Difficulty
intermediate
Category
amigurumi
AI Thinking Process
Planning
1. **Design Strategy**: A small, cuddly knitted elephant amigurumi in worsted weight yarn, worked in stockinette in the round. Beginner-friendly with simple shaping (basic increases/decreases) and separate pieces seamed together.
2. **Construction Plan**: Five separate pieces (head with attached trunk, body, 4 legs, 2 ears, tail) all worked in the round on DPNs/Magic Loop, stuffed and seamed.
3. **Quality Assurance**:
- Tight tension essential to prevent stuffing show-through (use 3.5mm needles with worsted)
- Safety eyes must be inserted before closing head
- Symmetrical leg/ear placement during assembly
4. **Final Calculations**: Tension 24 sts × 32 rows = 10 cm in st st. Head ~24 sts max diameter (~10 cm circumference). Body ~30 sts max. Finished elephant ~18 cm tall.
Verification
1. **Completeness**: Materials, tension, abbreviations, all pieces (head/trunk, body, 4 legs, 2 ears, tail), assembly, finishing — all included.
2. **Consistency**: Stitch counts increase/decrease symmetrically; final counts match seaming requirements.
3. **Constraints**: UK English ✓, metric first ✓, "tension" used ✓, beginner-level simple shaping ✓, worsted weight ✓.
4. **Safety**: All increase/decrease rounds verified — counts add up at every stage.
Pattern
# Elefante — A Knitted Elephant Amigurumi

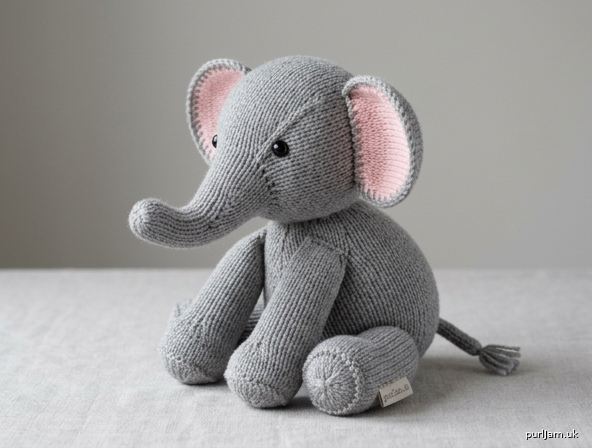
A sweet, cuddly little elephant worked in the round in simple stockinette stitch. Perfect for confident beginners ready to try amigurumi: only basic increases, decreases, and seaming required. Finished elephant measures approximately **18 cm tall** and **16 cm long** (7 × 6¼ inches).

---

## Materials

- **Yarn**: Approximately 100 g of worsted weight yarn in main colour (MC) — soft grey is traditional, but pastel pink, blue, or lavender are lovely alternatives. A small amount (5 g) in a contrast colour (CC) for inner ears is optional.
- **Needles**: 3.5 mm (UK 9 / US 4) double-pointed needles (DPNs), set of 4 or 5 — OR a long circular needle for Magic Loop. *Note: this is 1–2 sizes smaller than the label typically recommends for worsted, to create a tight fabric.*
- **Notions**:
  - Polyester fibrefill stuffing (approx. 40–60 g)
  - One pair 9 mm safety eyes (or black embroidery floss for embroidered eyes — recommended for children under 3 years)
  - Tapestry needle (blunt, large eye)
  - Stitch markers
  - Scrap yarn or a removable marker for tracking rounds

---

## Tension (Gauge)

**24 sts × 32 rounds = 10 cm (4 in)** in stockinette stitch worked in the round, after light blocking.

A tight, even fabric is more important than matching tension exactly. Hold the fabric up to the light — if you can see daylight through the stitches, go down another needle size.

---

## Abbreviations (UK)

- **k** — knit
- **p** — purl
- **st(s)** — stitch(es)
- **st st** — stockinette stitch (every round knit, when working in the round)
- **kfb** — knit into front and back of stitch (1 st increased)
- **k2tog** — knit 2 stitches together (1 st decreased)
- **ssk** — slip, slip, knit those 2 stitches together through back loops (1 st decreased)
- **rnd(s)** — round(s)
- **MC / CC** — main colour / contrast colour
- **pm** — place marker
- **sm** — slip marker

---

## Notes Before You Begin

- All pieces are worked in the round from the cast-on edge. Join to work in the round being careful not to twist.
- Leave a long tail (approx. 30 cm) at cast-on of each piece — useful for closing and seaming.
- Stuff each piece **firmly but not overstuffed** before closing the final opening, except the ears (which remain flat).
- To close a piece: cut yarn leaving a 20 cm tail, thread through remaining live sts with a tapestry needle, pull tight, and weave end inside.

---

## Pattern

### HEAD & TRUNK (make 1, in MC)

The trunk is worked first as a small tube, then stitches are increased dramatically for the head.

**Trunk:**

Cast on 8 sts. Divide evenly across 3 or 4 DPNs (or arrange for Magic Loop). Join to work in the round, pm to mark beginning of round.

- **Rnds 1–6**: Knit every round. *(8 sts)*
- **Rnd 7**: (kfb, k1) 4 times. *(12 sts)* — math check: 8 + 4 = 12 ✓
- **Rnds 8–10**: Knit.
- **Rnd 11**: (kfb, k2) 4 times. *(16 sts)* — 12 + 4 = 16 ✓
- **Rnds 12–13**: Knit.

**Begin Head shaping:**

- **Rnd 14**: (kfb, k3) 4 times. *(20 sts)* — 16 + 4 = 20 ✓
- **Rnd 15**: Knit.
- **Rnd 16**: (kfb, k4) 4 times. *(24 sts)* — 20 + 4 = 24 ✓
- **Rnd 17**: Knit.
- **Rnd 18**: (kfb, k5) 4 times. *(28 sts)* — 24 + 4 = 28 ✓
- **Rnds 19–28**: Knit (10 rounds straight). The head will now look like a rounded ball.

**Insert safety eyes** between rnds 22 and 24, approximately 6 sts apart on either side of the trunk join. Secure backings firmly.

**Begin stuffing** the trunk and head as you decrease — stuff trunk lightly, head firmly.

- **Rnd 29**: (k2tog, k5) 4 times. *(24 sts)* — 28 − 4 = 24 ✓
- **Rnd 30**: Knit.
- **Rnd 31**: (k2tog, k4) 4 times. *(20 sts)* — 24 − 4 = 20 ✓
- **Rnd 32**: (k2tog, k3) 4 times. *(16 sts)* — 20 − 4 = 16 ✓
- **Rnd 33**: (k2tog, k2) 4 times. *(12 sts)* — 16 − 4 = 12 ✓
- **Rnd 34**: (k2tog, k1) 4 times. *(8 sts)* — 12 − 4 = 8 ✓
- **Rnd 35**: (k2tog) 4 times. *(4 sts)* — 8 − 4 = 4 ✓

Finish stuffing firmly. Cut yarn, thread through remaining 4 sts, pull tight, fasten off inside.

---

### BODY (make 1, in MC)

Cast on 8 sts. Join in the round.

- **Rnd 1**: (kfb) 8 times. *(16 sts)* — 8 + 8 = 16 ✓
- **Rnd 2**: Knit.
- **Rnd 3**: (kfb, k1) 8 times. *(24 sts)* — 16 + 8 = 24 ✓
- **Rnd 4**: Knit.
- **Rnd 5**: (kfb, k2) 8 times. *(32 sts)* — 24 + 8 = 32 ✓
- **Rnds 6–20**: Knit (15 rounds straight) — this forms the rounded body.
- **Rnd 21**: (k2tog, k6) 4 times. *(28 sts)* — 32 − 4 = 28 ✓
- **Rnd 22**: Knit.
- **Rnd 23**: (k2tog, k5) 4 times. *(24 sts)* — 28 − 4 = 24 ✓
- **Rnd 24**: (k2tog, k4) 4 times. *(20 sts)* — 24 − 4 = 20 ✓

**Begin stuffing firmly.**

- **Rnd 25**: (k2tog, k3) 4 times. *(16 sts)*
- **Rnd 26**: (k2tog, k2) 4 times. *(12 sts)*
- **Rnd 27**: (k2tog, k1) 4 times. *(8 sts)*

Top up stuffing. Cut yarn, thread through remaining 8 sts, pull tight, fasten off. This top opening will be seamed to the head.

---

### LEGS (make 4, in MC)

Cast on 12 sts. Join in the round.

- **Rnd 1**: Purl 1 round (this creates a defined foot edge).
- **Rnds 2–4**: Knit.
- **Rnd 5**: (k2tog, k4) 2 times. *(10 sts)* — 12 − 2 = 10 ✓
- **Rnds 6–12**: Knit (7 rounds straight).

Cast off loosely, leaving a long tail (approx. 25 cm) for seaming. Stuff the leg firmly with a small amount of fibrefill — keep the top opening flat for easier seaming.

---

### EARS (make 2, in MC; or MC on outside, CC on inside)

Worked flat would be possible, but for consistency we work in the round and flatten.

Cast on 16 sts. Join in the round.

- **Rnds 1–6**: Knit.
- **Rnd 7**: (k2tog) 8 times. *(8 sts)* — 16 − 8 = 8 ✓

Cut yarn, thread through remaining 8 sts, pull tight, fasten off. Flatten the ear so the join sits at the back. Do **not** stuff.

---

### TAIL (make 1, in MC)

Cast on 6 sts. Join in the round.

- **Rnds 1–8**: Knit.

Cut yarn, thread through 6 sts, pull tight. Add a small tassel at the tip if desired: cut 3 short strands of MC (4 cm each), fold in half, and use the closing tail to bind them at the tail end. Trim neatly.

---

## Assembly & Finishing

Work on a flat surface and pin pieces in place before sewing — symmetry is everything in toy-making.

1. **Attach head to body**: Position the head so the trunk faces forward. Using the long tail from the body's top opening, seam the head to the body with mattress stitch, working twice around for security. Add a little extra stuffing through the seam gap if needed before closing.

2. **Attach legs**: Pin all four legs to the body first to check symmetry. The two front legs sit just below the head-body join; the back legs sit toward the lower rear of the body, spaced so the elephant stands flat on a table. Seam each leg to the body using mattress stitch, working twice around the join.

3. **Attach ears**: Pin the ears flat against the sides of the head, slightly toward the top and back. Sew the cast-on edge of each ear to the head with whip stitch or mattress stitch. The ears should flop slightly outward.

4. **Attach tail**: Stitch to the centre back of the body, opposite the trunk.

5. **Embroider features** (if not using safety eyes): Use black embroidery floss to satin-stitch two small oval eyes between rnds 22–24 of the head, about 6 sts apart. Optionally add tiny pink cheeks with a few stitches of contrast yarn.

6. **Weave in all ends** securely inside the body, passing the tapestry needle through the stuffing to anchor.

7. **Light steam-block** if desired — hold a steam iron 2–3 cm above the fabric, never pressing.

---

## Finished Measurements

- **Height** (top of head to base of feet): approx. 18 cm (7 in)
- **Length** (tip of trunk to tail): approx. 16 cm (6¼ in)
- **Body circumference**: approx. 13 cm (5 in)

---

## Care

Hand wash gently in cool water with mild detergent. Reshape while damp and lay flat to dry. Do not tumble dry — stuffing may clump.

Enjoy your new little Elefante! 🐘
Disclaimer: This pattern was generated by AI and should be reviewed for accuracy before use. While we strive for quality, AI-generated content may contain errors. Please verify measurements, stitch counts, and instructions before beginning your project. Generated by purlJam.uk
Access your pattern anytime
Bookmark this page to access your pattern anytime