Type
Knitting
Difficulty
beginner
Category
amigurumi
Pattern
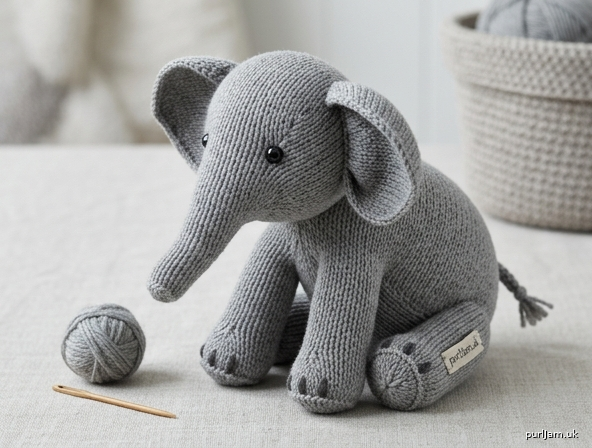
# Little Grey Elephant — Knitted Amigurumi

A charming pocket-sized elephant worked in the round using DPNs. Designed for confident beginners — if you can knit, purl, increase (kfb), and decrease (k2tog/ssk), you can make this elephant. Finished height approximately **18 cm (7 in)** including ears.

---

## Materials

- **Yarn**: Worsted weight (Aran) 100% wool or acrylic, approximately **60 g in grey** (MC). Small amount of black or dark grey for embroidered details (optional).
- **Needles**: Set of 3.5 mm (US 4) double-pointed needles (DPNs) — one size smaller than typical for worsted weight, to create a tight fabric.
- **Stuffing**: Approximately **40–50 g polyester fibrefill**.
- **Notions**:
  - Tapestry needle (blunt-tipped, large eye)
  - 2 × 6 mm safety eyes (or black embroidery floss for embroidered eyes — recommended for children under 3)
  - Stitch marker (optional, to mark beginning of round)
  - Sharp scissors

---

## Tension (Gauge)

**22 sts × 30 rounds = 10 cm (4 in)** in stocking stitch (st st) worked in the round on 3.5 mm DPNs.

> **Note**: Exact tension is less important than producing a tight, even fabric. Stuffing should not be visible through the stitches. If it is, go down another needle size.

---

## Abbreviations (UK)

- **k** — knit
- **p** — purl
- **st(s)** — stitch(es)
- **kfb** — knit into front and back of stitch (1 st increased)
- **k2tog** — knit 2 stitches together (1 st decreased, right-leaning)
- **ssk** — slip, slip, knit the two slipped sts together through back loops (1 st decreased, left-leaning)
- **st st** — stocking stitch (knit every round when working in the round)
- **rnd(s)** — round(s)
- **MC** — main colour

---

## Construction Overview

The elephant is made from **7 pieces**, all worked seamlessly in the round (except the ears, worked flat):

1. Head with attached trunk (1 piece)
2. Body (1 piece)
3. Legs (4 pieces, identical)
4. Ears (2 pieces, worked flat)
5. Tail (1 small piece, optional i-cord or twisted strands)

Each piece is stuffed firmly before closing, then seamed together using mattress stitch.

---

## Pattern Instructions

### HEAD & TRUNK (worked as one piece, start at tip of trunk)

With MC, cast on **6 sts**, distribute over 3 DPNs (2 sts per needle), and join in the round, being careful not to twist.

**Trunk section:**
- **Rnds 1–10**: Knit every round. *(6 sts)*

**Begin trunk shaping (gentle widening):**
- **Rnd 11**: (kfb, k2) twice. *(8 sts)* ✓ *check: 2 increases added → 6 + 2 = 8*
- **Rnds 12–15**: Knit. *(8 sts)*
- **Rnd 16**: (kfb, k3) twice. *(10 sts)*
- **Rnds 17–18**: Knit.

**Lightly stuff the trunk now** (push small amounts of stuffing with the blunt end of a DPN — keep it slim).

**Head shaping (increase rounds):**
- **Rnd 19**: (kfb, k1) around. *(15 sts)* ✓ *5 increases → 10 + 5 = 15*
- **Rnd 20**: Knit.
- **Rnd 21**: (kfb, k2) around. *(20 sts)* ✓ *5 increases*
- **Rnd 22**: Knit.
- **Rnd 23**: (kfb, k3) around. *(25 sts)*
- **Rnds 24–32**: Knit (9 rounds straight). *(25 sts)*

**Insert safety eyes** between rnds 22 and 24, approximately 5 sts apart, positioned just behind where the trunk meets the head. Secure backings firmly.

**Head decrease (close top of head):**
- **Rnd 33**: (k3, k2tog) around. *(20 sts)* ✓
- **Rnd 34**: Knit.
- **Rnd 35**: (k2, k2tog) around. *(15 sts)*
- **Rnd 36**: (k1, k2tog) around. *(10 sts)*

**Stuff the head firmly.**

- **Rnd 37**: (k2tog) around. *(5 sts)*

Cut yarn leaving a 20 cm tail. Thread tail through remaining 5 sts and pull tight to close. Weave end into head interior.

---

### BODY

With MC, cast on **8 sts**, distribute over 3 DPNs, and join in the round.

- **Rnd 1**: Knit. *(8 sts)*
- **Rnd 2**: kfb in every st. *(16 sts)* ✓
- **Rnd 3**: Knit.
- **Rnd 4**: (kfb, k1) around. *(24 sts)* ✓ *8 increases*
- **Rnd 5**: Knit.
- **Rnd 6**: (kfb, k5) around. *(28 sts)* ✓ *4 increases*
- **Rnds 7–20**: Knit (14 rounds straight). *(28 sts)*

**Begin shoulder/neck decreases:**
- **Rnd 21**: (k5, k2tog) around. *(24 sts)*
- **Rnd 22**: Knit.
- **Rnd 23**: (k4, k2tog) around. *(20 sts)*
- **Rnd 24**: (k3, k2tog) around. *(16 sts)*

**Stuff the body firmly.**

- **Rnd 25**: (k2, k2tog) around. *(12 sts)*
- **Rnd 26**: (k1, k2tog) around. *(8 sts)*

Cut yarn leaving a 30 cm tail (extra long for seaming head). Thread through remaining 8 sts and pull to close.

---

### LEGS (make 4)

With MC, cast on **12 sts**, distribute over 3 DPNs, and join in the round.

- **Rnds 1–4**: Purl 1 round, then knit 3 rounds (the purl round creates a small foot ridge). *(12 sts)*
- **Rnds 5–14**: Knit (10 rounds straight). *(12 sts)*

Cast off loosely OR cut yarn leaving a 25 cm tail and thread through live sts (do not pull closed yet — the opening will be seamed to the body).

**Stuff each leg lightly** — keep the top open and flexible for attaching.

---

### EARS (make 2, worked flat)

With MC, cast on **10 sts** on a single DPN or straight needle.

- **Row 1 (RS)**: Knit.
- **Row 2 (WS)**: Purl.
- **Row 3**: kfb, k to last st, kfb. *(12 sts)*
- **Row 4**: Purl.
- **Rows 5–6**: Repeat rows 3–4. *(14 sts)*
- **Rows 7–10**: Work 4 rows in st st (k RS rows, p WS rows). *(14 sts)*
- **Row 11**: ssk, k to last 2 sts, k2tog. *(12 sts)*
- **Row 12**: Purl.
- **Row 13**: ssk, k to last 2 sts, k2tog. *(10 sts)*
- **Row 14**: Purl.
- Cast off all 10 sts.

The ears are intentionally flat — they will be folded slightly when attached for a natural floppy shape.

---

### TAIL

With MC, cast on **4 sts** on a DPN.

Work a 4-st i-cord for 12 rounds:
- *Knit 4, do not turn. Slide sts to other end of DPN, pull yarn firmly across back, knit 4 again.* Repeat for 12 rounds.

Cast off, leaving a 15 cm tail. Fluff out a small tassel at the end by unravelling 1 cm and brushing the plies, if desired.

---

## Assembly

Work on a flat surface. Use long yarn tails and a tapestry needle. **Mattress stitch** gives the cleanest seams.

1. **Attach head to body**: Position the head at the narrow (cast-on) end of the body. Pin in place so the trunk faces forward. Using the long tail from the body, seam around the join, going through both layers. Add a tiny bit more stuffing at the neck before fully closing for support.

2. **Attach legs**: Find the body's underside. Mark 4 positions for the legs — two front legs just behind the head/neck join, two back legs near the body's cast-on end. Space symmetrically (approx 2 cm apart side-to-side, and 5 cm front-to-back). Sew each leg's open top to the body using mattress stitch, working all the way around for stability.

3. **Attach ears**: Position one ear on each side of the head, just above and behind the eyes. Fold the cast-on edge slightly so the ear cups forward. Stitch the cast-on edge to the head along a curve of about 3 cm.

4. **Attach tail**: Sew the i-cord tail to the centre back of the body at the rear.

5. **Embroider details** (optional): With dark grey or black floss, embroider tiny toenails on each foot (3 small straight stitches) and, if not using safety eyes, embroider French knots or small satin-stitch ovals for eyes.

6. **Weave in all ends**: Bury all yarn tails deep inside the body or head, never on the surface. Trim flush.

---

## Finishing Notes

- **Firmness**: Your elephant should feel firm but slightly squishable. Under-stuffed toys look saggy; over-stuffed toys distort.
- **Safety**: If gifting to a child under 3, **do not use safety eyes** — embroider all features and ensure no small parts can detach.
- **Care**: Spot clean only. Hand wash gently if needed and air dry flat.

---

## Quick Stitch-Count Validation

| Piece | Cast-on | Max sts | Final closure |
|---|---|---|---|
| Head & Trunk | 6 | 25 | 5 (gathered) ✓ |
| Body | 8 | 28 | 8 (gathered) ✓ |
| Leg ×4 | 12 | 12 | 12 (seamed open) ✓ |
| Ear ×2 | 10 | 14 | 10 (cast off) ✓ |
| Tail | 4 | 4 | 4 (cast off) ✓ |

Enjoy your little grey elephant! 🐘
Disclaimer: This pattern was generated by AI and should be reviewed for accuracy before use. While we strive for quality, AI-generated content may contain errors. Please verify measurements, stitch counts, and instructions before beginning your project. Generated by purlJam.uk
Access your pattern anytime
Bookmark this page to access your pattern anytime