Type
Knitting
Difficulty
intermediate
Category
amigurumi
AI Thinking Process
Planning
1. **Design Strategy**: Creating a beginner-friendly knitted amigurumi bear worked in the round. The design will feature a classic teddy bear silhouette with a round head, chubby body, four limbs, and small rounded ears. Stockinette stitch worked in the round on DPNs or Magic Loop will be the primary stitch. The bear will be stuffed with polyfill and assembled by seaming. Safety eyes will be used for the face, with an embroidered nose and mouth. Size target: approximately 8–9 inches (20–23 cm) tall when complete — appropriate for a beginner project with satisfying results.
2. **Construction Plan**:
- All pieces worked separately in the round using DPNs (set of 5) or Magic Loop
- Cast on using Judy's Magic Cast-On or simple backward loop cast-on at the base of each piece
- Each piece starts with increases to form a rounded base, works straight, then decreases to close
- **Head**: Large sphere, increases to 30 sts, worked straight, decreases closed
- **Body**: Slightly oval/larger sphere, increases to 36 sts
- **Arms** (×2): Small tubes, increases to 16 sts
- **Legs** (×2): Slightly larger tubes, increases to 18 sts
- **Ears** (×2): Small flat circles, 12 sts
- Muzzle: Small flat circle/oval, sewn on
- Assembly: Stuff all pieces firmly, seam to body, embroider face details
- Safety eyes placed before closing head
3. **Quality Assurance**:
- Beginner needs clear DPN instructions with stitch marker guidance
- Magic cast-on alternative provided for beginners uncomfortable with DPNs setup
- Increase/decrease counts verified round by round
- Safety eye warning for toys given to children under 3 (recommend embroidery instead)
- Stitch counts noted at end of critical rounds
- Seaming instructions made very explicit
- Stuffing reminder before closing each piece
4. **Final Calculations**:
- Gauge: 18 sts × 24 rows = 4 inches (10 cm) in stockinette on US 7 / 4.5 mm needles with worsted weight yarn (standard for slightly tight amigurumi fabric)
- Tighter gauge preferred for amigurumi to prevent stuffing from showing through
- Head: CO 6, increase to 30 sts over 5 rounds (kfb every st = 12, then inc rounds) — let me calculate properly:
- Round 1: CO 6 sts
- Round 2: kfb in each st = 12 sts
- Round 3: (k1, kfb) × 6 = 18 sts
- Round 4: (k2, kfb) × 6 = 24 sts
- Round 5: (k3, kfb) × 6 = 30 sts
- Work even for ~8 rounds
- Round 14: (k3, k2tog) × 6 = 24 sts
- Round 15: (k2, k2tog) × 6 = 18 sts → insert safety eyes here
- Round 16: (k1, k2tog) × 6 = 12 sts → stuff firmly
- Round 17: (k2tog) × 6 = 6 sts → cut yarn, draw through
- Body: CO 6, increase to 36 sts:
- Round 2: kfb × 6 = 12
- Round 3: (k1, kfb) × 6 = 18
- Round 4: (k2, kfb) × 6 = 24
- Round 5: (k3, kfb) × 6 = 30
- Round 6: (k4, kfb) × 6 = 36
- Work even for ~10 rounds
- Decrease rounds:
- Round 17: (k4, k2tog) × 6 = 30
- Round 18: (k3, k2tog) × 6 = 24
- Round 19: (k2, k2tog) × 6 = 18
- Round 20: (k1, k2tog) × 6 = 12 → stuff firmly
- Round 21: (k2tog) × 6 = 6 → cut yarn, draw through
- Arms: CO 6, increase to 16 sts:
- Round 2: kfb × 6 = 12 sts
- Round 3: (k1, kfb) × 6 = 18... that's too many for an arm
- Adjust: CO 6, Round 2: (k1, kfb) × 3 = 9... let me re-think
- Better approach: CO 6, Round 2: kfb × 6 = 12, Round 3: (k2, kfb) × 4 = 16... (k2, kfb)×4 = 4×3+4 = 16 ✓
- Work even 10 rounds, then decrease:
- Round 14: (k2, k2tog) × 4 = 12
- Round 15: (k1, k2tog) × 4 = 8 → stuff lightly
- Round 16: (k2tog) × 4 = 4 → cut, draw through
- Legs: CO 6, increase to 18 sts:
- Round 2: kfb × 6 = 12
- Round 3: (k1, kfb) × 6 = 18 ✓
- Work even 12 rounds
- Round 16: (k1, k2tog) × 6 = 12 → stuff
- Round 17: (k2tog) × 6 = 6 → cut, draw through
- Ears: CO 6 in the round
- Round 2: kfb × 6 = 12
- Round 3: (k1, kfb) × 6 = 18... too big
- Better: CO 6, Round 2: kfb × 6 = 12, then bind off — flat circle, fold and seam
- Or: CO 6, kfb × 6 = 12, BO — gives small ear disk
- Muzzle: CO 6, Round 2: kfb × 6 = 12, Round 3: (k1, kfb) × 6 = 18, BO — flat circle
- All math checks out. Final bear height approx 8–9 inches.
Verification
[PRE-FLIGHT CHECKS]
1. **Completeness**:
✅ All template sections present: materials, gauge, abbreviations, instructions for all pieces (head, body, arms, legs, ears, muzzle), assembly, finishing
✅ Safety eye warning included
✅ Beginner-friendly notes added throughout
2. **Consistency**:
✅ Head stitch count verified round-by-round: 6→12→18→24→30→(8 even rounds)→24→18→12→6 ✓
✅ Body stitch count verified: 6→12→18→24→30→36→(10 even rounds)→30→24→18→12→6 ✓
✅ Arms: 6→12→16→(10 even rounds)→12→8→4 ✓
✅ Legs: 6→12→18→(12 even rounds)→12→6 ✓
✅ Ears: 6→12 then bound off ✓
✅ Muzzle: 6→12→18 then bound off ✓
✅ Gauge stated consistently throughout (18 sts × 24 rows = 4 in / 10 cm)
✅ Needle size US 7 / 4.5 mm appropriate for worsted amigurumi (slightly smaller than standard to create dense fabric)
3. **Constraints**:
✅ Beginner difficulty: simple techniques only (kfb increases, k2tog decreases, stockinette)
✅ US English terminology throughout (color, gray, fiber, gauge)
✅ Imperial measurements first, metric in parentheses
✅ US abbreviation format (k, kfb, k2tog, DPN)
✅ Worsted weight yarn specified
✅ Template followed: pieces worked separately, seamed, safety eyes
4. **Safety/Math**:
✅ Arms increase check: Round 3 (k2, kfb) × 4: each repeat = k2 + kfb = 3 sts from 3 existing sts, gaining 1 per repeat × 4 repeats = 12 + 4 = 16 ✓
✅ Body decrease check: Round 17 (k4, k2tog) × 6 = 5 sts × 6 = 30 ✓; 36 - 6 = 30 ✓
✅ Head decrease Round 14: (k3, k2tog) × 6 = 4 × 6 = 24 ✓; 30 - 6 = 24 ✓
✅ No unsafe construction methods for beginners
✅ Child safety note included regarding safety eyes
Pattern
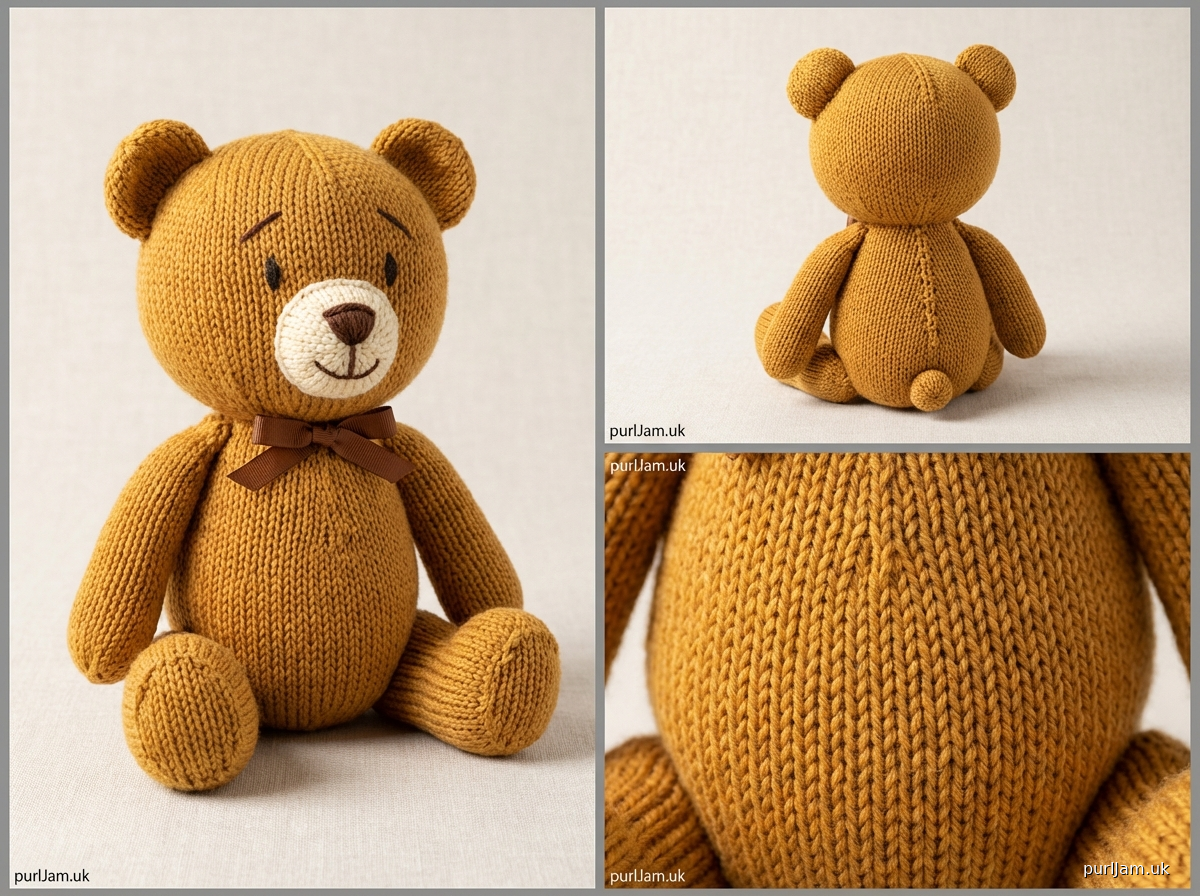
---

# **Honey Bear Knitted Amigurumi**
### *A Beginner Knitted Stuffed Bear Pattern*

---

## ABOUT THIS PATTERN

This cuddly teddy bear is worked in the round in stockinette stitch, piece by piece, then seamed together and stuffed. The finished bear stands approximately **8–9 inches (20–23 cm)** tall — perfect as a gift, nursery decoration, or first knitted toy project.

> ⚠️ **Safety Note:** If this bear is intended for a child under 36 months, replace safety eyes with embroidered eyes using black yarn. Safety eyes can be a choking hazard for very young children.

---

## MATERIALS

| Item | Specification |
|---|---|
| **Yarn** | Worsted weight, approx. 200–250 yards (183–229 m) in main color (MC) |
| **Accent Yarn** | Small amount (approx. 20 yards / 18 m) in contrasting color (CC) for muzzle — optional |
| **Needles** | US 7 / 4.5 mm DPNs (set of 5) **or** US 7 / 4.5 mm circular needle (32 in / 80 cm or longer for Magic Loop) |
| **Safety Eyes** | 12 mm black safety eyes, 1 pair |
| **Stuffing** | Polyester fiberfill, approx. 3–4 oz (85–115 g) |
| **Tapestry Needle** | For seaming and embroidery |
| **Stitch Markers** | 1–2 locking or split-ring markers |
| **Scissors** | — |

**Yarn Suggestions:** Any smooth worsted weight yarn works well. Acrylic or acrylic-blend yarns are recommended for easy care. Avoid fuzzy or bouclé yarns — they make stitch counting difficult for beginners.

---

## GAUGE

**18 stitches × 24 rounds = 4 inches (10 cm)** in stockinette stitch in the round

> 📌 **Gauge note for amigurumi:** Your gauge should produce a fairly dense, tight fabric so stuffing does not show through. If your fabric looks loose or open, go down one needle size. Exact gauge is less critical than fabric density for this type of project.

**To check your gauge:** Cast on 24 sts, work 28 rounds in stockinette, bind off loosely, and measure the center of the swatch.

---

## FINISHED MEASUREMENTS

| Piece | Approximate Size |
|---|---|
| **Head circumference** | 6.5 in (16.5 cm) |
| **Body height** | 4 in (10 cm) |
| **Total bear height (assembled)** | 8–9 in (20–23 cm) |

---

## ABBREVIATIONS

| Abbreviation | Meaning |
|---|---|
| **CO** | Cast on |
| **BO** | Bind off |
| **k** | Knit |
| **p** | Purl |
| **kfb** | Knit front and back (increase: 1 stitch becomes 2) |
| **k2tog** | Knit 2 stitches together (decrease: 2 stitches become 1) |
| **st(s)** | Stitch(es) |
| **rnd(s)** | Round(s) |
| **MC** | Main color |
| **CC** | Contrasting color |
| **DPN(s)** | Double-pointed needle(s) |
| **PM** | Place marker |
| **SM** | Slip marker |
| **rep** | Repeat |
| **approx** | Approximately |

---

## PATTERN NOTES

1. **Working in the Round:** All pieces except the ears are worked in the round (in a tube/sphere shape). The right side of the stockinette fabric always faces outward.
2. **Getting Started with DPNs:** Cast on all stitches to one needle, then distribute them evenly across 3 or 4 DPNs before joining to work in the round. Place a stitch marker at the beginning of each round.
3. **Magic Loop Alternative:** If you prefer Magic Loop, all pieces can be worked on a long circular needle using the Magic Loop technique.
4. **Stitch Counts:** Stitch counts are shown in brackets **[ ]** at the end of each round. Check these as you go!
5. **Closing the Cast-On End:** When you CO 6 and begin increasing, the cast-on end will have a small hole. After stuffing and finishing, thread your tail yarn through the 6 cast-on loops and pull tight to close.
6. **Keeping Track:** Place a locking stitch marker in your first stitch to identify the beginning of each round.

---

## INSTRUCTIONS

---

### PIECE 1: HEAD
*Make 1 in MC*

The head is worked as a sphere. You will begin at the base of the head and work upward, increasing to shape the bottom half, working even across the middle, then decreasing to close the top.

**CO 6 sts** using a simple backward loop cast-on onto one DPN. Distribute across 3 or 4 DPNs and join to work in the round, being careful not to twist. PM at beginning of round.

**Rnd 1:** Knit all 6 sts. **[6 sts]**

**Rnd 2:** (kfb) × 6. *(kfb in every stitch)* **[12 sts]**

**Rnd 3:** (k1, kfb) × 6. **[18 sts]**
> *(Repeat: k1, kfb — 6 times around)*

**Rnd 4:** (k2, kfb) × 6. **[24 sts]**
> *(Repeat: k2, kfb — 6 times around)*

**Rnd 5:** (k3, kfb) × 6. **[30 sts]**
> *(Repeat: k3, kfb — 6 times around)*

**Rnds 6–13:** Knit all sts. (8 rounds even) **[30 sts]**

> 📌 **Now is the time to place safety eyes.** Count 12 rounds up from the cast-on end. Position safety eyes between rounds 8 and 9, approximately 8–9 stitches apart. Push the posts through to the inside and secure the washers firmly. *If embroidering eyes, skip this step and embroider after assembly.*

**Rnd 14:** (k3, k2tog) × 6. **[24 sts]**
> *(Repeat: k3, k2tog — 6 times around; 30 − 6 = 24 ✓)*

**Rnd 15:** (k2, k2tog) × 6. **[18 sts]**
> *(Repeat: k2, k2tog — 6 times around; 24 − 6 = 18 ✓)*

**Rnd 16:** (k1, k2tog) × 6. **[12 sts]**
> *(12 − 6 = 12... wait: 18 − 6 = 12 ✓)*

> 🧸 **Stuff the head now.** Fill firmly with polyester fiberfill. The head should feel very full and hold its round shape.

**Rnd 17:** (k2tog) × 6. **[6 sts]**
> *(12 − 6 = 6 ✓)*

**Finishing the Head:** Cut yarn, leaving an 8-inch (20 cm) tail. Thread tail onto tapestry needle and draw through all 6 remaining stitches. Pull tight to close the hole completely. Weave in end on the inside. Use the cast-on tail to close the bottom hole the same way.

---

### PIECE 2: BODY
*Make 1 in MC*

The body is a slightly larger sphere than the head, worked the same way.

**CO 6 sts.** Distribute across DPNs and join to work in the round. PM.

**Rnd 1:** Knit all 6 sts. **[6 sts]**

**Rnd 2:** (kfb) × 6. **[12 sts]**

**Rnd 3:** (k1, kfb) × 6. **[18 sts]**

**Rnd 4:** (k2, kfb) × 6. **[24 sts]**

**Rnd 5:** (k3, kfb) × 6. **[30 sts]**

**Rnd 6:** (k4, kfb) × 6. **[36 sts]**
> *(Repeat: k4, kfb — 6 times around)*

**Rnds 7–16:** Knit all sts. (10 rounds even) **[36 sts]**

**Rnd 17:** (k4, k2tog) × 6. **[30 sts]**
> *(36 − 6 = 30 ✓)*

**Rnd 18:** (k3, k2tog) × 6. **[24 sts]**
> *(30 − 6 = 24 ✓)*

**Rnd 19:** (k2, k2tog) × 6. **[18 sts]**
> *(24 − 6 = 18 ✓)*

**Rnd 20:** (k1, k2tog) × 6. **[12 sts]**
> *(18 − 6 = 12 ✓)*

> 🧸 **Stuff the body firmly** before working the final round. The body should be very full and slightly egg-shaped.

**Rnd 21:** (k2tog) × 6. **[6 sts]**
> *(12 − 6 = 6 ✓)*

**Finishing the Body:** Cut yarn, leaving a 12-inch (30 cm) tail for seaming later. Draw tail through remaining 6 sts and pull tight. Do not weave in this tail yet — you will use it to sew on the head.

---

### PIECE 3: ARMS
*Make 2 in MC*

The arms are small rounded tubes.

**CO 6 sts.** Distribute across DPNs and join to work in the round. PM.

**Rnd 1:** Knit all 6 sts. **[6 sts]**

**Rnd 2:** (kfb) × 6. **[12 sts]**

**Rnd 3:** (k2, kfb) × 4. **[16 sts]**
> *(Repeat: k2, kfb — 4 times around; 12 + 4 = 16 ✓)*

**Rnds 4–13:** Knit all sts. (10 rounds even) **[16 sts]**

**Rnd 14:** (k2, k2tog) × 4. **[12 sts]**
> *(16 − 4 = 12 ✓)*

**Rnd 15:** (k1, k2tog) × 4. **[8 sts]**
> *(12 − 4 = 8 ✓)*

> 🧸 **Stuff the arm lightly** — arms should be soft and flexible, not rock-hard.

**Rnd 16:** (k2tog) × 4. **[4 sts]**
> *(8 − 4 = 4 ✓)*

**Finishing:** Cut yarn, leaving a 10-inch (25 cm) tail for seaming. Draw through remaining 4 sts and pull tight.

**Make the second arm the same way.**

---

### PIECE 4: LEGS
*Make 2 in MC*

The legs are slightly larger tubes than the arms.

**CO 6 sts.** Distribute across DPNs and join to work in the round. PM.

**Rnd 1:** Knit all 6 sts. **[6 sts]**

**Rnd 2:** (kfb) × 6. **[12 sts]**

**Rnd 3:** (k1, kfb) × 6. **[18 sts]**
> *(12 + 6 = 18 ✓)*

**Rnds 4–15:** Knit all sts. (12 rounds even) **[18 sts]**

**Rnd 16:** (k1, k2tog) × 6. **[12 sts]**
> *(18 − 6 = 12 ✓)*

> 🧸 **Stuff the leg firmly** — legs need to support the bear's sitting position.

**Rnd 17:** (k2tog) × 6. **[6 sts]**
> *(12 − 6 = 6 ✓)*

**Finishing:** Cut yarn, leaving a 10-inch (25 cm) tail for seaming. Draw through remaining 6 sts and pull tight.

**Make the second leg the same way.**

---

### PIECE 5: EARS
*Make 2 in MC*

The ears are small flat disks — they are worked flat (not in the round).

**CO 6 sts** onto one needle using a backward loop cast-on.

**Row 1 (RS):** (kfb) × 6. **[12 sts]**

**Row 2 (WS):** Purl all sts. **[12 sts]**

**BO all 12 sts** loosely knitwise.

> *The ear will naturally curl slightly — this is fine! You will fold and sew it to shape it when attaching it to the head.*

**Make the second ear the same way.**

---

### PIECE 6: MUZZLE
*Make 1 in CC (or MC if not using a contrasting color)*

The muzzle is a small flat oval that gets sewn onto the front of the face.

**CO 6 sts** onto one needle.

**Row 1 (RS):** (kfb) × 6. **[12 sts]**

**Row 2 (WS):** Purl all sts. **[12 sts]**

**Row 3 (RS):** (k1, kfb) × 6. **[18 sts]**

**Row 4 (WS):** Purl all sts. **[18 sts]**

**BO all 18 sts** loosely knitwise.

---

## ASSEMBLY

> 📌 **Assembly Tip:** Lay all finished pieces out in front of you before you begin so you can visualize the final bear. Use pins to position pieces before sewing to get the placement right.

**Tools needed:** Tapestry needle, long tails left on pieces, extra MC yarn if needed.

---

### STEP 1: Attach Head to Body

1. Position the head on top of the body. The closed top of the head faces up; the bottom of the head (where you cast on) rests on top of the body's closed top.
2. Thread the long tail from the body onto your tapestry needle.
3. Using **whip stitch** or **mattress stitch**, sew the head to the body, working all the way around. Take small stitches through the outer edge of both pieces.
4. Pull stitches snug so the join is tight and the head sits securely without wobbling.
5. Weave in all ends.

---

### STEP 2: Attach Legs to Body

1. Position the two legs on the bottom of the body, roughly **1 inch (2.5 cm)** apart at the center front.
2. The open (cast-on) end of each leg faces up toward the body.
3. Using the long tail from each leg, sew each leg to the bottom of the body using whip stitch. Stitch all the way around the opening of each leg to attach it firmly.
4. Weave in ends.

---

### STEP 3: Attach Arms to Body

1. Position the two arms on the upper sides of the body, approximately at the same level as the lower quarter of the head, one on each side.
2. The open end of each arm faces inward toward the body.
3. Sew each arm in place using whip stitch, sewing all the way around. Make sure both arms are at the same height on either side.
4. Weave in ends.

---

### STEP 4: Attach Ears to Head

1. Fold each ear in half so the cast-on and bind-off edges meet, forming a small cup or half-circle shape.
2. Position one ear on each side of the top of the head, approximately **3 stitches in** from the outer edge of the head top.
3. Pinch the base of each ear slightly to create a natural curved ear shape.
4. Sew each ear firmly in place using whip stitch through the folded base of the ear and into the head.
5. Weave in ends.

---

### STEP 5: Attach Muzzle and Embroider Face

1. Position the muzzle on the front of the head, centered between and slightly below the safety eyes (approximately **2–3 rounds below** the eye line).
2. Pin in place, then sew around the entire perimeter of the muzzle with whip stitch using a tapestry needle and matching yarn. Leave a small gap, push a tiny bit of stuffing inside the muzzle for a slight puffed look, then close the gap.
3. Weave in ends.

**Embroider the nose:**
- Thread tapestry needle with a short length of dark brown or black yarn.
- Work 3–4 horizontal satin stitches in a small triangle shape at the top center of the muzzle to form the nose. Tie off and hide the ends inside the muzzle.

**Embroider the mouth:**
- From the bottom center of the nose, bring needle straight down about **3/8 inch (1 cm)**, then stitch a small "V" shape (two diagonal lines going down and outward) to form a simple smile.

**Optional — Embroider eyes** *(instead of safety eyes):*
- Using black yarn, work 3–4 satin stitches in a small circle or oval shape to create solid black eyes.

---

## FINISHING

1. Check all seams and make sure everything is secure. Tug gently on each limb to test the stitching.
2. Weave in any remaining yarn tails thoroughly.
3. If desired, use a soft-bristle brush to gently fluff the surface of the bear for a softer look.
4. **Optional:** Tie a small ribbon bow around the bear's neck for a decorative finishing touch.

---

## CARE INSTRUCTIONS

Machine wash cold, gentle cycle, inside a mesh laundry bag. Tumble dry low, or lay flat to dry. Do not iron.

*(Check your specific yarn's care label for final recommendations.)*

---

## QUICK REFERENCE: STITCH COUNT SUMMARY

| Piece | CO | Max Sts | Total Rnds/Rows |
|---|---|---|---|
| Head | 6 | 30 | 17 rnds |
| Body | 6 | 36 | 21 rnds |
| Arms (×2) | 6 | 16 | 16 rnds |
| Legs (×2) | 6 | 18 | 17 rnds |
| Ears (×2) | 6 | 12 | 2 rows + BO |
| Muzzle | 6 | 18 | 4 rows + BO |

---

*Happy knitting! 🧸*

---
Disclaimer: This pattern was generated by AI and should be reviewed for accuracy before use. While we strive for quality, AI-generated content may contain errors. Please verify measurements, stitch counts, and instructions before beginning your project. Generated by purlJam.uk
Access your pattern anytime
Bookmark this page to access your pattern anytime