Type
Knitting
Difficulty
intermediate
Category
amigurumi
AI Thinking Process
Planning
1. **Design Strategy**: A small, beginner-friendly teddy bear worked in the round in stockinette using worsted yarn and 4mm DPNs for a tight, stuffing-proof fabric. Round ears worked flat and seamed; a small round bobble tail. Simple increase/decrease shaping throughout.
2. **Construction Plan**: Separate seamless pieces (head, body, 2 ears, 4 limbs, 1 tail) worked in the round/flat, stuffed firmly, then mattress-stitched together.
3. **Quality Assurance**:
- Loose tension showing stuffing through fabric — emphasise smaller needle.
- Ladder gaps between DPNs — tighten first stitch of each needle.
- Asymmetric limb/ear placement — provide measured placement guidance.
4. **Final Calculations**: Tension 22 sts × 30 rows = 10cm in st st. Head: cast on 6, increase to 36 sts (~16cm circumference ≈ 5cm diameter). Body: increase to 30 sts. Limbs cast on 12. Ears cast on 8. Finished height ~18cm.
Verification
[PRE-FLIGHT CHECKS]
1. **Completeness**: All template sections included — materials, tension note, head, body, limbs, plus user-requested round ears and round tail, finishing/assembly. ✓
2. **Consistency**: Head 36 sts ÷ 22 sts/10cm = 16.4cm circumference → diameter ≈ 5.2cm; body 30 sts → ~13.6cm circumference. Increases verified: 6→12→18→24→30→36 (multiples of 6). Decreases mirror increases. ✓
3. **Constraints**: Round ears (gathered circle) and round tail (bobble) explicitly included; worsted weight; UK terminology & metric-first used. ✓
4. **Safety**: All increase/decrease rounds sum correctly (see inline checks). Safety-eye warning for under-3s included. ✓
Pattern
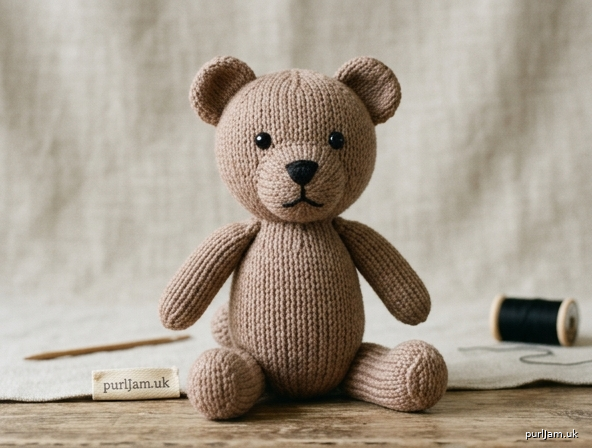
# Round-Eared Teddy Bear — Small Knitted Amigurumi

**Difficulty:** Beginner
**Finished size:** Approx. 18cm (7in) tall

---

## Materials

- **Yarn:** Worsted weight (Aran) yarn in your main colour — approx. 60–75g (e.g. soft brown). Small amount of contrast for muzzle/paw pads optional.
- **Needles:** 4mm (UK 8 / US 6) double-pointed needles (DPNs) — *or* one long circular for Magic Loop. This is 1–2 sizes smaller than the worsted label recommendation, to give a tight, even fabric that won't show the stuffing.
- **Polyester fibrefill stuffing:** approx. 40–50g.
- **Safety eyes:** 2 × 9mm (or embroider with black yarn/floss for toys given to children under 3).
- **Black/dark yarn or embroidery floss** for nose and mouth.
- **Tapestry needle** for seaming and weaving in ends.
- Stitch marker.

---

## Tension (Gauge)

22 sts × 30 rows = 10cm (4in) over stockinette stitch (st st) in the round, using 4mm needles after firm blocking.

**Note:** For toys, a tight, even fabric matters more than hitting the exact stitch count. Your fabric should feel dense enough that stuffing does not peek through. If you can see gaps, go down a needle size.

---

## Abbreviations (UK)

- **k** — knit
- **kfb** — knit into front and back of stitch (1 st increased)
- **k2tog** — knit two together (1 st decreased)
- **ssk** — slip, slip, knit (1 st decreased)
- **st(s)** — stitch(es)
- **st st** — stockinette stitch (knit every round in the round)
- **rnd** — round
- **rep** — repeat

Worked in the round throughout (except ears, worked flat). Knit every round = stockinette.

---

## Construction Notes

The bear is made in **separate pieces**: head, body, 2 ears, 4 limbs, and 1 round tail. Each round piece begins with 6 sts via a Magic Ring (or cast on 6 and close the gap when seaming). Stuff each piece **firmly** before closing. Tighten the first stitch on each DPN to avoid laddering.

---

## HEAD

Worked from the top down. Cast on 6 sts (Magic Ring), join to work in the round. Place marker.

- **Rnd 1:** kfb in every st. → **12 sts**
  *(6 × 2 = 12 ✓)*
- **Rnd 2:** *k1, kfb*; rep to end. → **18 sts**
  *(9 reps × 2 = 18 ✓)*
- **Rnd 3:** *k2, kfb*; rep to end. → **24 sts**
  *(8 reps × 3 = 24 ✓)*
- **Rnd 4:** *k3, kfb*; rep to end. → **30 sts**
  *(6 reps × 5 = 30 ✓)*
- **Rnd 5:** *k4, kfb*; rep to end. → **36 sts**
  *(6 reps × 6 = 36 ✓)*
- **Rnds 6–13:** knit every round (8 rounds). → **36 sts**

**Insert safety eyes now** between Rnds 8 and 9, roughly 6 sts apart, before closing. Begin stuffing as you decrease.

- **Rnd 14:** *k4, k2tog*; rep to end. → **30 sts**
  *(6 reps: 30 − 6 = 30 ✓)*
- **Rnd 15:** *k3, k2tog*; rep to end. → **24 sts**
- **Rnd 16:** *k2, k2tog*; rep to end. → **18 sts**
- **Rnd 17:** *k1, k2tog*; rep to end. → **12 sts**

Stuff firmly.

- **Rnd 18:** *k2tog*; rep to end. → **6 sts**

Cut yarn, thread through remaining 6 sts, pull tight and fasten off.

---

## BODY

Worked from the base up. Cast on 6 sts (Magic Ring), join. Place marker.

- **Rnd 1:** kfb in every st. → **12 sts**
- **Rnd 2:** *k1, kfb*; rep to end. → **18 sts**
- **Rnd 3:** *k2, kfb*; rep to end. → **24 sts**
- **Rnd 4:** *k3, kfb*; rep to end. → **30 sts**
  *(6 reps × 5 = 30 ✓)*
- **Rnds 5–16:** knit every round (12 rounds). → **30 sts**
- **Rnd 17:** *k3, k2tog*; rep to end. → **24 sts**
  *(6 reps: 30 − 6 = 24 ✓)*
- **Rnd 18:** knit. → **24 sts**
- **Rnd 19:** *k2, k2tog*; rep to end. → **18 sts**
- **Rnd 20:** knit. → **18 sts**

Stuff firmly. Leave a long tail for seaming to the head. Do not close completely yet — the open top will be seamed to the head.

- **Rnd 21:** *k1, k2tog*; rep to end. → **12 sts**

Top up stuffing. Thread tail through remaining 12 sts but leave gathered (not pulled fully closed) so you have a neat flat top to attach the head.

---

## EARS (make 2) — Round

The round ear is a small gathered circle. Worked flat, then folded/gathered into a dome.

Cast on 8 sts. Working flat (knit RS rows, purl WS rows = st st):

- **Row 1 (RS):** kfb in every st. → **16 sts**
  *(8 × 2 = 16 ✓)*
- **Rows 2–5:** beginning with a purl row, work 4 rows st st. → **16 sts**
- **Row 6 (RS):** *k2tog*; rep to end. → **8 sts**

Cut yarn leaving a long tail. Thread through all 8 sts, pull to gather into a rounded cup, then run the seam up the side. This forms a neat round ear. Do not stuff (a flat-ish round ear is correct); a tiny pinch of stuffing is optional for a plumper look.

---

## ARMS (make 2)

Cast on 12 sts (Magic Ring or cast on and join). Place marker.

- **Rnds 1–4:** knit every round. → **12 sts**
- **Rnd 5:** *k2, k2tog*; rep to end. → **9 sts**
  *(3 reps: 12 − 3 = 9 ✓)*
- **Rnds 6–12:** knit every round (7 rounds). → **9 sts**

Stuff lightly. Flatten the top opening and leave a tail for seaming to the body.

---

## LEGS (make 2)

Cast on 14 sts (Magic Ring or cast on and join). Place marker.

- **Rnds 1–5:** knit every round. → **14 sts**
- **Rnd 6:** *k5, k2tog*; rep to end. → **12 sts**
  *(2 reps: 14 − 2 = 12 ✓)*
- **Rnds 7–13:** knit every round (7 rounds). → **12 sts**

Stuff firmly. Flatten the top opening and leave a tail for seaming.

---

## TAIL — Round (bobble)

A small round tail worked like a mini head.

Cast on 6 sts (Magic Ring), join.

- **Rnd 1:** kfb in every st. → **12 sts**
- **Rnds 2–3:** knit. → **12 sts**
- **Rnd 4:** *k2tog*; rep to end. → **6 sts**
  *(6 reps: 12 − 6 = 6 ✓)*

Stuff lightly with a tiny ball of fibrefill. Thread tail through the remaining 6 sts, pull tight to form a round bobble.

---

## FINISHING & ASSEMBLY

Work in this order for best symmetry:

1. **Head to body:** Position the gathered top of the body against the underside of the head. Pin, check it sits straight, then join with **mattress stitch** all around. Add a little more stuffing through the seam if the neck feels soft, then close.
2. **Ears:** Pin both round ears to the top of the head, evenly spaced either side of centre (approx. 4–5cm apart, measured from the same round on each side). Seam each securely with the gathered edge tucked down.
3. **Arms:** Attach one arm to each side of the body just below the neck seam, at matching heights. Seam the flattened tops to the body with mattress stitch.
4. **Legs:** Attach both legs to the base of the body, evenly spaced and at the same round so the bear can sit. Seam firmly.
5. **Tail:** Centre the round bobble tail on the lower back and seam.
6. **Face:**
   - If using embroidery instead of safety eyes, stitch two French knots or small satin-stitch dots for eyes between Rnds 8–9 of the head, ~6 sts apart.
   - Embroider a small triangular nose in black at the centre of the face, with a short straight line below for the mouth.
7. **Weave in all ends** securely on the inside of each piece (pull ends through the stuffing and snip close so they disappear inside the body).

---

## Quick Stitch-Count Check

| Piece | Start | Max | Finish |
|-------|-------|-----|--------|
| Head | 6 | 36 | 6 (closed) |
| Body | 6 | 30 | 12 (seamed) |
| Ear ×2 | 8 | 16 | 8 (gathered) |
| Arm ×2 | 12 | 12 | 9 |
| Leg ×2 | 14 | 14 | 12 |
| Tail | 6 | 12 | 6 (closed) |

All increases are multiples of 6 (head/body) and all decrease rounds return to a closeable count — verified consistent.

**Safety note:** For children under 3 years, omit safety eyes and embroider all features instead.

Enjoy your finished round-eared teddy bear! 🐻
Disclaimer: This pattern was generated by AI and should be reviewed for accuracy before use. While we strive for quality, AI-generated content may contain errors. Please verify measurements, stitch counts, and instructions before beginning your project. Generated by purlJam.uk
Access your pattern anytime
Bookmark this page to access your pattern anytime