Type
Crochet
Difficulty
beginner
Category
dishcloth
AI Thinking Process
Planning
Verification
Pattern
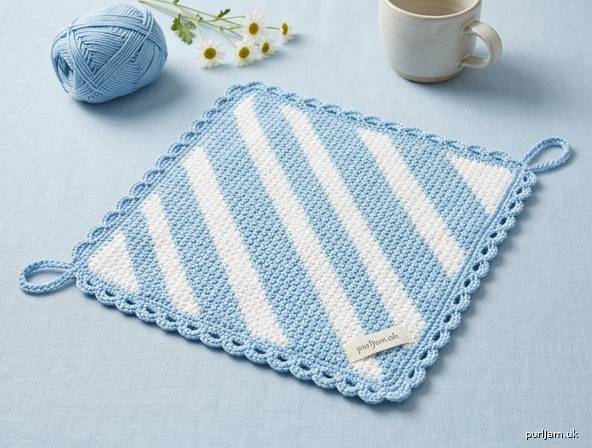
Diagonal Striped Cotton Dishcloth Beginner-friendly · Sport weight · Approx. 8 × 8 inches (20 × 20 cm) excluding border
Materials
- 100% cotton sport-weight yarn:
- Color A (Light Blue): 60 yd (55 m)
- Color B (White): 50 yd (46 m)
- Crochet hook: US E-4 / 3.5 mm (or size needed to obtain gauge)
- Yarn needle
- Scissors
- Stitch marker (optional)
Gauge 5 sc and 5 rows = 1 inch (2.5 cm) in single crochet (Work a small swatch and adjust hook if needed; exact gauge is helpful for size but not critical for a dishcloth.)
Finished Size 8 × 8 inches (20 × 20 cm) before border; approx. 9 × 9 inches (23 × 23 cm) after border.
Abbreviations (US terms) ch – chain sc – single crochet inc – increase (2 sc in same st) dec – decrease (sc2tog) sl st – slip stitch sp – space st(s) – stitch(es) rep – repeat RS – right side
Notes
- Dishcloth is worked diagonally (corner to corner) in rows of single crochet for a lightly textured fabric.
- Color changes create clean diagonal stripes: change color in the last yarn-over of the final stitch of the row.
- Carry unused yarn up the side only if floats stay loose; otherwise cut and weave ends (recommended for neat dishcloth).
- Turning ch-1 does not count as a stitch.
- Hanging loops are placed on two opposite corners during the border.
Pattern Instructions
Body (Diagonal Stripes) With Color A, ch 2.
Row 1 (RS): 1 sc in 2nd ch from hook. (1 sc) Row 2: Ch 1, turn; inc in the st. (2 sc) Row 3: Ch 1, turn; inc in first st, sc in last st. (3 sc) Row 4: Ch 1, turn; inc in first st, sc across to end. (4 sc)
Continue in this manner, working an increase at the beginning of every row, until you have 40 sc. Change to Color B after Row 8 (or every 8 rows) to form even diagonal stripes. Alternate A and B every 8 rows for balanced light-blue and white stripes. (At 40 sts you have reached the midpoint — widest point of the square. This measures approx. 8 inches along the side edges.)
Decrease section Next row: Ch 1, turn; dec over first 2 sts, sc across to end. (39 sc) Continue decreasing 1 st at the beginning of every row until 1 sc remains. Maintain the established 8-row stripe sequence, ending with Color A if possible. Fasten off after final stitch, leaving a 6-inch tail.
Border (Light Blue Looped Scallops) Join Color A with sl st in any corner.
Round 1 (setup): Ch 1, work sc evenly around the entire dishcloth as follows:
- 40 sc along each of the four sides,
- 3 sc in each corner st. Join with sl st to first sc. (172 sc total: 40×4 + 3×4 = 172 ✓)
Round 2 (scalloped loops): Ch 1, sc in same st, *skip 1 st, (sc, ch 3, sc) in next st, skip 1 st, sc in next st; rep from * around, working (sc, ch 3, sc, ch 3, sc) in each corner st to keep corners full and rounded. Adjust final skips if needed so pattern lands evenly; join with sl st to first sc. Fasten off.
Hanging Loops (two opposite corners) Identify two opposite corners (e.g., the original starting corner and the final ending corner). With Color A, join yarn in the center of the corner scallop. Ch 12, sl st back into the same corner st to form a loop. Fasten off. Repeat at the opposite corner. Weave in all ends securely on the wrong side.
Finishing Block gently if desired: dampen, pin to 8 × 8 inch square (border will add a little extra), and allow to dry flat. This evens the diagonal fabric and opens the scallops. Your dishcloth is ready for use or gifting.
Inline Math Validation
- Increase phase: start 1 st → +1 each row → 40 sts at center (39 increases). ✓
- Decrease phase: 40 → 1 st (39 decreases). ✓
- Side length: 40 sts ÷ 5 sc/in = 8 in. ✓
- Border Round 1: 4 sides × 40 sc + 4 corners × 3 sc = 160 + 12 = 172 sc. ✓
- Scallops use a 3-st repeat that divides evenly after corner adjustments. ✓
Enjoy your handmade diagonal-striped dishcloth!
Disclaimer: This pattern was generated by AI and should be reviewed for accuracy before use. While we strive for quality, AI-generated content may contain errors. Please verify measurements, stitch counts, charts, and instructions before beginning your project. Generated by purlJam.uk
Love this pattern?
Save this pattern to your free PurlJam libraryAccess your pattern anytime
Bookmark this page to access your pattern anytime