Type
Crochet
Difficulty
intermediate
Category
tank
AI Thinking Process
Planning
Verification
Pattern
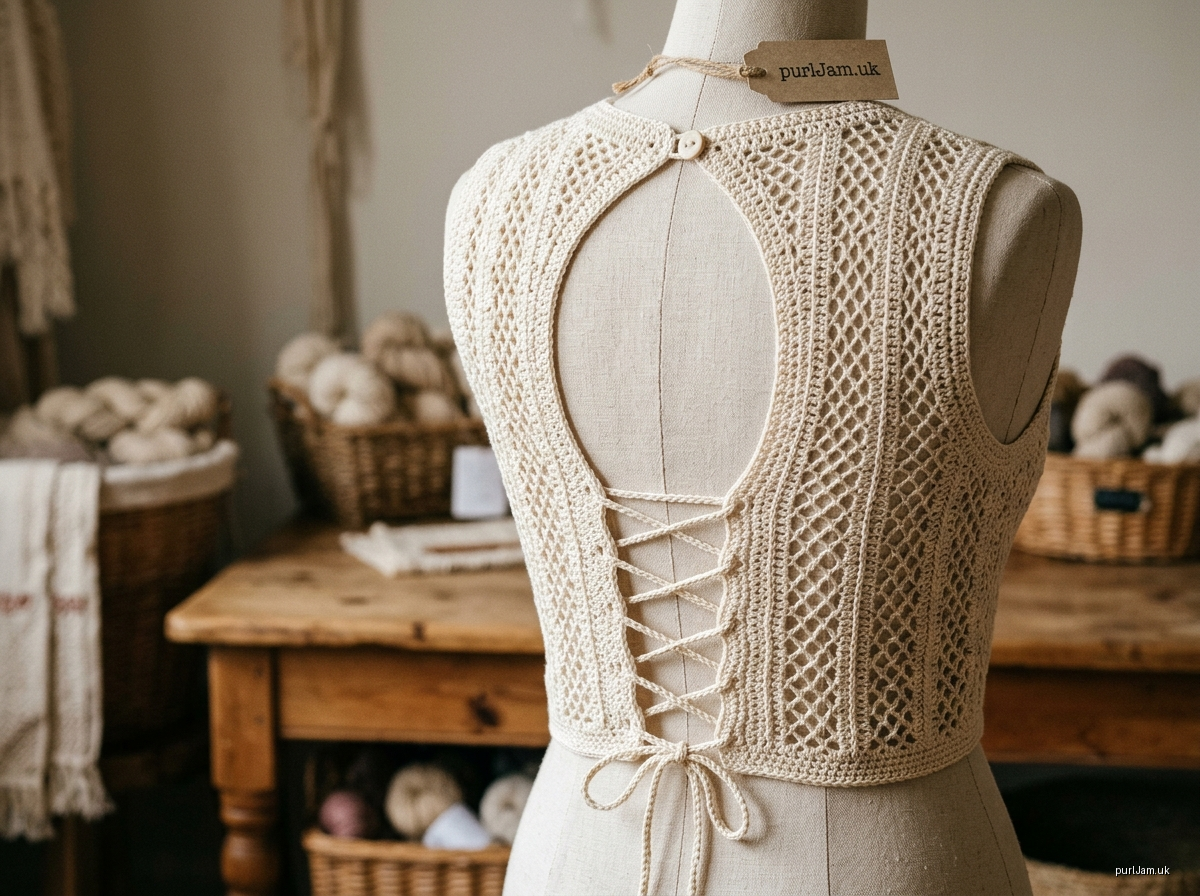
Diamond Column Lace High-Neck Top
Sleeveless, cropped, with open back, lace-up and button loop
Skill level: Confident beginner / intermediate. The stitches are only ch, sc and dc. The challenge is keeping count across lace sections and the shaped edges. Every rule is spelled out below.
Construction (Route A – flat panels, bottom-up, seamed): The Front and two mirrored Back Halves are worked separately from the hem up. The Back Halves stay apart at the center to form the lace-up gap and the oval opening. They meet again at the upper back, where a button loop closes them. Pieces are joined with a slip-stitch seam at the shoulders and mattress stitch at the sides.
Yarn weight note: Bulky yarn was selected, but your design calls for delicate milk/mercerized cotton on a 2.5–3.5 mm hook. Bulky yarn would make this lace heavy, gappy and about twice the intended scale. The pattern is therefore written for sport-weight (2) yarn. Do not substitute bulky yarn.
Fabric note: The diamond lace is semi-sheer. Wear it over a bralette or bandeau, or line the front with a cotton jersey or tulle cut to the blocked front shape.
1. Materials & Tools
Yarn: Sport (2) milk cotton or mercerized cotton, approx. 160 yd per 50 g.
| Size | XS | S | M | L | XL | XXL |
|---|---|---|---|---|---|---|
| Yardage | 450 yd | 520 yd | 600 yd | 680 yd | 780 yd | 880 yd |
| 50 g balls | 3 | 4 | 4 | 5 | 5 | 6 |
Tools and notions:
- Hook: US E/4 (3.5 mm), or the size needed to obtain gauge. Optional: 3.0 mm hook for edgings.
- 1 button, ½ in (12 mm).
- Stitch markers: 10, including removable ones.
- Measuring tape, tapestry needle, scissors.
- Rust-proof pins and a blocking mat.
2. Gauge
In the Diamond Column Lace, after blocking:
- 20 sts × 12 rows = 4 in (10 cm).
- 1 repeat (10 sts) = 2 in. 3 rows = 1 in.
Gauge swatch:
- Ch 35. Work Rows 1–4, then repeat Rows 3–4 until the swatch measures 5 in. That gives 33 sts.
- Block the swatch, then measure the center.
- If you have too many sts per 4 in, go up a hook size. If too few, go down a size.
Gauge controls the fit. Each repeat out of gauge changes the bust by about 1.5 in.
3. Abbreviations (US)
| Abbreviation | Meaning |
|---|---|
| ch | Chain |
| sl st | Slip stitch |
| sc | Single crochet |
| dc | Double crochet |
| ch-sp | Chain space; work into the space, not into the chains |
| sk | Skip |
| dc2tog | (Yo, insert in next st, pull up loop, yo, pull through 2) twice; yo, pull through 3 |
| dc3tog | As dc2tog, but over 3 sts; finish by pulling through 4 loops |
| RS / WS | Right side / wrong side |
| beg | Beginning |
| st(s) | Stitch(es) |
Counting rule:
- A turning ch-3 counts as 1 dc.
- Every chain in a ch-sp counts as 1 st: a ch-3 sp = 3 sts, a ch-1 sp = 1 st.
- Each lace section therefore always counts 7 sts.
- Each column counts 3 dc.
4. Stitch Pattern – Diamond Column Lace
Multiple: 10 sts + 3. Layout: Column, then (Lace, Column) repeated.
- Columns: 3 dc worked into the 3 dc of the previous row, every row. They form unbroken solid ribs.
- Diamonds: sc "points" alternate between the center and the sides. Combined with ch-3 diagonals, this outlines closed diamond openings.
Foundation chain: Ch (number of sts + 2).
Row 1 (RS, base row):
- Dc in 4th ch from hook. The skipped 3 ch count as the first dc.
- Dc in each ch across.
- Total: 10n+3 sts.
Row 2 (Row A – diamond points):
- Ch 3 (counts as dc), turn. Dc in next 2 sts (Column).
- *Ch 3, sk 3 sts, sc in next st, ch 3, sk 3 sts (Lace = 7). Dc in next 3 sts (Column).*
- Repeat from * across. The last dc goes into the top of the turning ch.
- Total: 10n+3 sts.
Row 3 (Row B – diamond sides):
- Ch 3, turn. Dc in next 2 dc.
- *Ch 1, sc in next ch-3 sp, ch 3 (sk the sc), sc in next ch-3 sp, ch 1. This lace section = 1+1+3+1+1 = 7. Dc in next 3 dc.*
- Repeat from * across.
- Total: 10n+3 sts.
Row 4 (Row A worked over Row B):
- Ch 3, turn. Dc in next 2 dc.
- *Ch 3, sk ch-1 sp and sc, sc in center ch-3 sp, ch 3, sk sc and ch-1 sp. Dc in next 3 dc.*
- Repeat from * across.
- Total: 10n+3 sts.
Repeat Rows 3–4 for the pattern.
- From Row 2 on, even-numbered rows are Row A and odd-numbered rows are Row B.
Edge Rule (used for all shaping):
- Never leave a partial lace section. If shaping cuts through a lace section, work the remaining sts of that section as dc: 1 dc in each st, and 1 dc per chain into each ch-sp.
- The solid dc border this creates keeps edges firm and the columns undistorted.
Placket: Extra dc worked over dc at the center edge of each Back Half.
5. Sizes & Measurements
| Size | XS | S | M | L | XL | XXL |
|---|---|---|---|---|---|---|
| To fit bust (in) | 30 | 34 | 38 | 42 | 46 | 50 |
| Finished bust (in), laced | 29.2 | 33.2 | 37.2 | 41.2 | 45.2 | 49.2 |
| Ease | −0.8 in, close fit (lace stretches) | |||||
| Front width (in) | 14.6 | 16.6 | 18.6 | 20.6 | 22.6 | 24.6 |
| Hem to underarm (in) | 9 | 9.7 | 10.3 | 11 | 11.7 | 12.3 |
| Armhole depth (in) | 7 | 7 | 7.7 | 7.7 | 8.3 | 9 |
| Total length (in) | 16 | 16.7 | 18 | 18.7 | 20 | 21.3 |
| Neck width (in) | 5.8 | 5.8 | 5.8 | 5.8 | 5.8 | 5.8 |
| Shoulder width (in) | 2.4 | 3.4 | 4.4 | 5.4 | 6.4 | 7.4 |
Choosing a size: Pick by full bust measurement. Adjust the length to the underarm by adding or removing 2 rows (about ⅔ in), always ending on a Row B.
Waist and bust fit: The column-and-lace fabric stretches sideways, so it hugs both bust and waist without breaking the repeat. Optional waist shaping: work Rows 1–10 with a 3.0 mm hook, then change to 3.5 mm. This draws the waist in by about 1.5 in.
Stitch and row counts per size
| Count | XS | S | M | L | XL | XXL |
|---|---|---|---|---|---|---|
| Front | ||||||
| Repeats (n) | 7 | 8 | 9 | 10 | 11 | 12 |
| Foundation ch | 75 | 85 | 95 | 105 | 115 | 125 |
| Sts (10n+3) | 73 | 83 | 93 | 103 | 113 | 123 |
| After armholes | 53 | 63 | 73 | 83 | 93 | 103 |
| Each side at neck split | 18 | 23 | 28 | 33 | 38 | 43 |
| Center neck sts left unworked | 17 | 17 | 17 | 17 | 17 | 17 |
| Shoulder (F) | 12 | 17 | 22 | 27 | 32 | 37 |
| Back Half (each) | ||||||
| Repeats (m) | 2 | 3 | 3 | 4 | 4 | 5 |
| Placket extra dc (e) | 9 | 4 | 9 | 4 | 9 | 4 |
| Foundation ch | 34 | 39 | 44 | 49 | 54 | 59 |
| Sts | 32 | 37 | 42 | 47 | 52 | 57 |
| After opening shaping | 20 | 25 | 30 | 35 | 40 | 45 |
| After underarm | 10 | 15 | 20 | 25 | 30 | 35 |
| Upper yoke | 26 | 31 | 36 | 41 | 46 | 51 |
| Rows | ||||||
| Underarm rows (U) | 27 | 29 | 31 | 33 | 35 | 37 |
| Armhole rows (H) | 21 | 21 | 23 | 23 | 25 | 27 |
Checks:
- Front at neck: 2 × (F+6) + 17 = sts after armholes. XS: 2 × 18 + 17 = 53 ✓; XXL: 2 × 43 + 17 = 103 ✓.
- Back Half sts = 10m + 3 + e. XS: 20 + 3 + 9 = 32 ✓; S: 30 + 3 + 4 = 37 ✓.
6. Front (bottom-up)
Hem to underarm:
- Ch 75 / 85 / 95 / 105 / 115 / 125.
- Work Rows 1–4 of the Diamond Column Lace.
- Repeat Rows 3–4 until you have worked 27 / 29 / 31 / 33 / 35 / 37 rows, ending with a Row B.
- Count: 73 / 83 / 93 / 103 / 113 / 123 sts. That is 8–13 columns, evenly spaced and symmetrical, with a column at each edge.
Armhole shaping (cut-in armholes):
- Next row (Row A): Turn, sl st in first 11 sts. This takes in one full Column + Lace, and the 11th sl st is the base of the next column.
- Ch 3 (counts as dc), dc in next 2 dc.
- Work in pattern until 10 sts remain. Leave them unworked.
- Count: 53 / 63 / 73 / 83 / 93 / 103 sts (−20 ✓). The piece still starts and ends with a full column.
- Continue straight in pattern for 14 / 14 / 16 / 16 / 18 / 20 more rows. Including the shaping row, that is 15 / 15 / 17 / 17 / 19 / 21 armhole rows.
High round neckline:
First shoulder:
- Neck Row 1: Work in pattern across the first 18 / 23 / 28 / 33 / 38 / 43 sts. Apply the Edge Rule at the neck edge. Turn.
- Leave the center 17 sts and the remaining side unworked.
- Neck Rows 2–4: Work in pattern. At the neck edge, work the last 3 sts as dc3tog. That removes 2 sts per row.
- Counts: F+4 → F+2 → F, giving 12 / 17 / 22 / 27 / 32 / 37 sts.
- Neck Rows 5–6: Work straight in pattern, using the Edge Rule at the neck edge.
- Armhole total: 15 / 15 / 17 / 17 / 19 / 21 + 6 = 21 / 21 / 23 / 23 / 25 / 27 rows ✓.
- Fasten off, leaving a 12 in tail for seaming.
Second shoulder:
- Skip the center 17 sts.
- Join yarn in the next st on the same row as Neck Row 1.
- Ch 3 and work in pattern to the armhole edge.
- Work it as a mirror image of the first shoulder: dc3tog at the neck edge on Neck Rows 2–4, then 2 rows straight.
- Fasten off.
Check: the neck is 17 + 6 + 6 = 29 sts ≈ 5.8 in ✓.
7. Back Halves (make 2, mirrored)
Each half is worked from the hem up.
- The placket sits at the center back edge.
- The side edge begins with a normal column.
Layout from the side edge: Column, (Lace, Column) × m, then e extra dc for the placket. The placket is solid dc: 12 / 7 / 12 / 7 / 12 / 7 dc wide, including the last column.
Mirroring the two halves:
- Left Back Half (as worn): The placket is at the end of RS rows.
- Right Back Half: The placket is at the beginning of RS rows. Work the layout in reverse order: placket dc, Column, (Lace, Column) × m.
Instructions:
Foundation and base row:
- Ch 34 / 39 / 44 / 49 / 54 / 59.
- Row 1: Dc in 4th ch from hook and in each ch across.
- Count: 32 / 37 / 42 / 47 / 52 / 57 sts.
Lace-up zone (Rows 2–13):
- Work in pattern. Work the placket sts as 1 dc in each dc on every row.
- At the end of Row 13 (Row B), the zone measures about 4.3 in. All sts are still in place.
Opening shaping, lower curve (Rows 14–19):
- At the center edge of each row, leave the last 2 sts unworked, then turn. On rows that begin at the center edge, sl st over the first 2 sts, then ch 3.
- This removes 12 sts over 6 rows. The placket is consumed first; after that the Edge Rule applies.
- Count: 20 / 25 / 30 / 35 / 40 / 45 sts.
Side strip:
- Work straight in pattern until 27 / 29 / 31 / 33 / 35 / 37 rows are complete. This matches the front at the underarm.
Underarm:
- Next row: Leave 10 sts unworked at the side edge. Use sl sts if the side edge is at the beginning of the row.
- Count: 10 / 15 / 20 / 25 / 30 / 35 sts. This is armhole row 1.
Upper back yoke, top curve of the opening (armhole rows 2–9):
- On each row, work 2 dc in each of the last 2 sts at the center edge. This increases 2 sts per row.
- Work all new sts as solid dc.
- After 8 rows (+16 sts): 26 / 31 / 36 / 41 / 46 / 51 sts. This equals F + 14 ✓.
Yoke, straight section:
- Work straight for 11 / 11 / 13 / 13 / 15 / 17 rows.
- Keep the lace in pattern on the side portion and solid dc on the yoke portion.
Back neck:
- Next row: Leave the last 8 sts at the center edge unworked.
- Final row: Leave 6 more sts at the center edge unworked.
- Count: 12 / 17 / 22 / 27 / 32 / 37 sts. This equals the front shoulder ✓.
- Armhole rows: 1 + 8 + 11 + 2 = 22 for XS. The underarm row counts as row 1, so the armhole totals 21 rows after it, matching the front. If your back sits one row higher, work 1 fewer straight row so the back matches the front exactly.
- Fasten off, leaving a 12 in tail for seaming.
Back Opening Dimensions (blocked)
| Size | XS | S | M | L | XL | XXL |
|---|---|---|---|---|---|---|
| Opening height (in) | 7.3 | 8 | 8.7 | 9.3 | 10 | 10.7 |
| Max width at underarm (in) | 6.6 | 6.6 | 6.6 | 6.6 | 6.6 | 6.6 |
- Opening height = (U − 13 + 8 rows) ÷ 3 rows per in.
- Max width = 1.8 in gap + 2 × 2.4 in of shaping.
- The lace-up gap stays 1.8 in wide and 4.3 in tall at the base.
- The upper-back halves meet edge to edge at the neck.
8. Assembly
- Block all three pieces first. Wet-block them, then pin each to the schematic measurements. Open each diamond and straighten the columns with pins along each column. Leave to dry fully.
- Shoulders: Place the Front and Back RS together. Join each shoulder with a sl st seam through both layers, matching st for st: 12 / 17 / 22 / 27 / 32 / 37 sts.
- Sides: Mattress-stitch the side edges from the hem to the underarm. Work through the dc posts of the edge columns so the columns line up across the seam.
- Keep the back open. Never seam the center back edges.
9. Edgings & Reinforcement (3.0 mm hook)
Neckline:
- Join at the center back with the RS facing.
- Work sc evenly around the neck: 2 sc per dc row-end and 1 sc per st, keeping it flat.
- Join, then work a round of sl st through the back loops. This firm line stops the high neck from stretching.
Armholes:
- Join at the underarm seam.
- Work 1 round of sc: 2 sc per row-end, 1 sc per st, and sc2tog at the 2 underarm corners.
- Work a sl st round.
- Repeat on the second armhole so both match.
Opening and plackets:
- Work 1 row of sc along each center-back edge: up the placket, around the oval and up to the neck.
- Use 2 sc per row-end and 3 sc at the hem corners.
Hem:
- Work 1 round of sc along the full lower edge, including the plackets.
10. Upper-Back Fastening
- Button loop (Left half, top neck corner): Join yarn at the corner. Ch 8, then sl st into the same corner.
- Work 12 sc over the loop and fasten off.
- Button: Sew the button to the Right half, 3 sts in from the edge, aligned with the loop.
11. Lace-Up Cords & Lacing
Cord (make 1):
- Ch 300 (about 60 in).
- Sl st in the back bump of each ch.
- Knot each end and trim, leaving 1 in tassels.
Eyelets:
- Use the spaces between the 1st and 2nd placket dc from the edge.
- Mark them on every 2nd row from Row 3 to Row 13. That gives 6 eyelets per side.
Lacing:
- Lace criss-cross from the bottom up, like a shoe.
- Even out the ends, then tie a bow at the top, just under the oval.
- Adjust the tightness to fit.
- To secure, sew the cord's center to the inside of the lowest eyelets with 3 stitches so it can't pull free.
12. Finishing
- Weave in all ends along a solid column or placket, never across a ch-sp. Work the tail up and back for 2 in in each direction.
- Steam-block the edgings lightly.
- Care: hand wash cold and dry flat.
Disclaimer: This pattern was generated by AI and should be reviewed for accuracy before use. While we strive for quality, AI-generated content may contain errors. Please verify measurements, stitch counts, charts, and instructions before beginning your project. Generated by purlJam.uk
Love this pattern?
Save this pattern to your free PurlJam libraryAccess your pattern anytime
Bookmark this page to access your pattern anytime