Type
Crochet
Difficulty
intermediate
Category
pullover
AI Thinking Process
Planning
Verification
Pattern
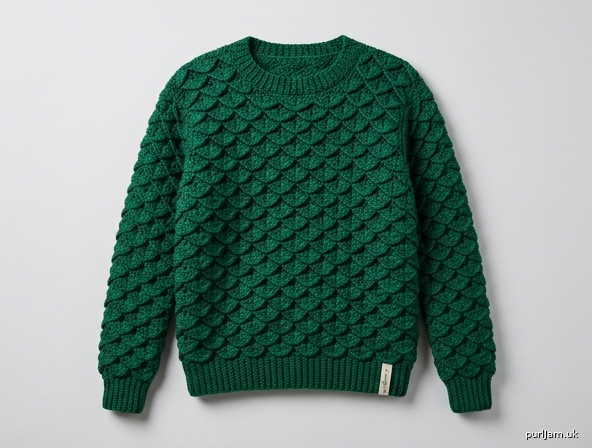
Dragon Scale Crochet Pullover
A classic crew-neck pullover worked flat in pieces and seamed, covered in beginner-friendly overlapping shell “dragon scales.”
Sizes
Small (Medium, Large, XL, 2XL)
To fit bust: 34–36 (38–40, 42–44, 46–48, 50–52)" / 86–91 (97–102, 107–112, 117–122, 127–132) cm
Finished bust: 40½ (44½, 48½, 52½, 56½)" / 103 (113, 123, 133, 144) cm
Finished length: 24 (24½, 25, 25½, 26)" / 61 (62, 63.5, 65, 66) cm
Sleeve length to underarm: 18 (18½, 18½, 19, 19)" / 46 (47, 47, 48, 48) cm
Shown with approximately 4–6" (10–15 cm) positive ease. Instructions are written for Small; Medium, Large, XL, and 2XL are in parentheses. When only one number is given, it applies to all sizes.
Materials
- Yarn: Worsted weight (category 4), approx. 1480 (1650, 1850, 2050, 2280) yd / 1355 (1510, 1690, 1875, 2085) m
Scale texture uses more yarn than plain dc — buy an extra skein if your tension is loose or you lengthen the body.
Suggested fibers: soft acrylic, wool blend, or cotton blend in dragon-inspired shades (forest green, emerald, teal, amethyst, black, or gold). - Hooks:
- US I/9 (5.5 mm) — body and sleeves
- US H/8 (5.0 mm) — ribbing and neckband
(or sizes needed to match gauge)
- Yarn needle
- 4 stitch markers
- Scissors
- Tape measure
Gauge
With larger hook (I/9), in Dragon Scale Stitch:
12 sts and 8 rows = 4" (10 cm)
- 1 full scale repeat (6 sts) ≈ 2" (5 cm) wide
- 2 rows (one RS shell row + one WS shell row) ≈ 1" (2.5 cm) tall
Make a swatch at least 6" × 6" (15 × 15 cm). Block lightly, then measure the center 4".
If you have too few stitches per 4", go down a hook size. If too many, go up a hook size.
Fit depends on gauge — check before you start the sweater.
Abbreviations (US terms)
| Abb | Meaning |
|---|---|
| ch | chain |
| sc | single crochet |
| dc | double crochet |
| sl st | slip stitch |
| blo | back loop only |
| st(s) | stitch(es) |
| rep | repeat |
| RS | right side |
| WS | wrong side |
| pm | place marker |
| beg | beginning |
| sp | space |
| sk | skip |
Special Stitch — Dragon Scale Stitch
Worked over a multiple of 6 sts + 1 (foundation chain = multiple of 6 + 2).
Setup Row (WS): Sc in 2nd ch from hook and in each ch across.
Scale Row A (RS): Ch 1, turn, sc in first sc, *sk 2 sc, 5 dc in next sc, sk 2 sc, sc in next sc; rep from * across.
Scale Row B (WS): Ch 3 (counts as dc), turn, 2 dc in first sc, sk 2 dc, sc in next dc (center dc of 5-dc shell), sk 2 dc, *5 dc in next sc, sk 2 dc, sc in next dc (center of shell), sk 2 dc; rep from * until 1 sc remains, 3 dc in last sc.
Scale Row C (RS): Ch 1, turn, sc in first dc, *sk 2 dc, 5 dc in next sc, sk 2 dc, sc in next dc (center of 5-dc shell); rep from * across, working last sc in top of turning ch-3.
Rep Scale Rows B and C for pattern.
Row A is used only once after ribbing (or after a plain sc setup). Thereafter alternate B (WS) and C (RS).
Tips for beginners:
- The “scale” is the 5-dc shell; the sc between shells anchors the next row’s shells so they nest and look like overlapping armor.
- Always place the sc of the next row in the center (3rd) dc of each 5-dc shell.
- Keep shell stitches loose enough that the fabric doesn’t cup.
- Count shells at the end of every RS row until the rhythm feels automatic.
Notes
- Pullover is worked flat in pieces (back, front, two sleeves), then seamed.
- Ribbing is worked in rows of sc blo for stretch, then body stitches are worked across the long edge of the ribbing.
- Ch 3 at start of a row counts as dc unless stated otherwise. Ch 1 at start of sc rows does not count as a stitch.
- When shaping cuts into a partial scale, work plain dc or sc at the edge to keep the side straight — do not force a half-shell.
- RS is the side where Scale Row C (sc at edges, full 5-dc shells) faces you and scales point downward when worn.
- Weave in ends as you go where possible. Block pieces lightly before seaming for easier matching.
Pattern Instructions
BACK
Bottom Ribbing
With smaller hook (H/8), ch 11.
Row 1: Sc in 2nd ch from hook and in each ch across — 10 sc.
Row 2: Ch 1, turn, sc blo in each st across — 10 sc.
Rep Row 2 until ribbing measures 20½ (22½, 24½, 26½, 28½)" / 52 (57, 62, 67, 72) cm when slightly stretched, ending after a WS row.
Do not fasten off. You should have approximately 61 (67, 73, 79, 85) row-ends along the long edge.
(10 sc blo ribs × length; stretch gently to match half-bust. Exact row-end count is matched in the next step.)
Body
Switch to larger hook (I/9). Turn work to work across the long edge of the ribbing (each ribbing row-end = one st).
Setup Row (WS): Ch 1, work 61 (67, 73, 79, 85) sc evenly across long edge of ribbing.
(Math: 61 = 6×10+1 ✓; 67 = 6×11+1 ✓; 73 = 6×12+1 ✓; 79 = 6×13+1 ✓; 85 = 6×14+1 ✓)
Next row (RS): Work Scale Row A — 10 (11, 12, 13, 14) full scales with sc at each end.
Next row (WS): Work Scale Row B.
Next row (RS): Work Scale Row C.
Continue alternating Scale Rows B and C until piece measures 16 (16, 16, 16½, 16½)" / 40.5 (40.5, 40.5, 42, 42) cm from bottom edge of ribbing, ending after a WS row (Scale Row B).
Place a marker at each end of the last row to mark underarm.
Armhole Shaping
Next row (RS): Sl st loosely across first 6 sts, ch 1, begin Scale Row C pattern as established from this point (treat the st after the sl sts as the new first st), and work in pattern until 6 sts remain; leave last 6 sts unworked — 49 (55, 61, 67, 73) sts.
(61−12=49 ✓; 67−12=55 ✓; 73−12=61 ✓; 79−12=67 ✓; 85−12=73 ✓; all = 6k+1 ✓)
Next row (WS): Work Scale Row B across remaining sts (adjust edge shells to 2 or 3 dc if a full 5-dc does not fit cleanly at the new edge).
Continue in established Dragon Scale Stitch on these 49 (55, 61, 67, 73) sts until armhole measures 8 (8½, 9, 9½, 10)" / 20.5 (21.5, 23, 24, 25.5) cm, ending after a WS row.
Total length from bottom of ribbing should be about 24 (24½, 25, 25½, 26)" / 61 (62, 63.5, 65, 66) cm.
Shoulder & Neck Divide
Mark center 21 (23, 25, 27, 29) sts for back neck. Remaining sts each side:
(49−21=28 → 14 each shoulder ✓; 55−23=32 → 16 each ✓; 61−25=36 → 18 each ✓; 67−27=40 → 20 each ✓; 73−29=44 → 22 each ✓)
Right shoulder (RS): Work in pattern across first 14 (16, 18, 20, 22) sts only. Fasten off.
Left shoulder: Sk center 21 (23, 25, 27, 29) sts, join yarn in next st, work in pattern across remaining 14 (16, 18, 20, 22) sts. Fasten off.
FRONT
Work same as Back through Armhole Shaping, including the 6-st armhole bind-offs each side — 49 (55, 61, 67, 73) sts.
Continue in Dragon Scale Stitch until armhole measures 5½ (6, 6½, 7, 7½)" / 14 (15, 16.5, 18, 19) cm, ending after a WS row.
(Neck shaping begins ~2½" / 6.5 cm before shoulder line.)
Front Neck Shaping
Mark center 13 (15, 17, 19, 21) sts for front neck. Sts each side before neck:
(49−13=36 → 18 each ✓; 55−15=40 → 20 each ✓; 61−17=44 → 22 each ✓; 67−19=48 → 24 each ✓; 73−21=52 → 26 each ✓)
Left front neck (RS): Work in pattern across first 18 (20, 22, 24, 26) sts; leave remaining sts unworked.
Working on left neck sts only:
- Next row (WS): Work in pattern to end.
- Next row (RS): Work in pattern to last 2 sts, sk 1 (or leave unworked), work last st — 1 st dec at neck edge.
- Rep last 2 rows 3 more times — 14 (16, 18, 20, 22) sts remain.
(18−4=14 ✓; 20−4=16 ✓; 22−4=18 ✓; 24−4=20 ✓; 26−4=22 ✓)
Work even in pattern until left armhole matches Back armhole length, ending at shoulder. Fasten off.
Right front neck: With RS facing, sk center 13 (15, 17, 19, 21) sts, join yarn in next st, work in pattern to end — 18 (20, 22, 24, 26) sts.
- Next row (WS): Work in pattern to end.
- Next row (RS): Ch as needed for pattern, sk first st at neck edge (or work dec), work in pattern to end — 1 st dec at neck.
- Rep last 2 rows 3 more times — 14 (16, 18, 20, 22) sts.
Work even until right armhole matches Back. Fasten off.
SLEEVES (make 2)
Cuff Ribbing
With smaller hook (H/8), ch 11.
Row 1: Sc in 2nd ch from hook and in each ch across — 10 sc.
Row 2: Ch 1, turn, sc blo in each st across — 10 sc.
Rep Row 2 until ribbing measures 8 (8, 9, 9, 9)" / 20.5 (20.5, 23, 23, 23) cm slightly stretched, ending after a WS row.
Do not fasten off.
Sleeve Body
Switch to larger hook (I/9). Turn to work across long edge of ribbing.
Setup Row (WS): Ch 1, work 25 (25, 31, 31, 31) sc evenly across long edge.
(25 = 6×4+1 ✓; 31 = 6×5+1 ✓)
Next row (RS): Work Scale Row A — 4 (4, 5, 5, 5) scales.
Next row (WS): Work Scale Row B.
Next row (RS): Work Scale Row C.
Increase row (WS): Ch 3, dc in first st (inc), work Scale Row B pattern across to last st, 2 dc in last st (inc) — 2 sts increased.
(When increases break a clean multiple, work plain dc at edges until you can absorb 6 new sts into another full scale. Keep edges neat.)
Work 1 (1, 1, 1, 1) row even in pattern, then work Increase row again.
Continue increasing 1 st each edge every 2nd row (i.e., every WS row that you designate as an inc row) until you have 49 (55, 55, 61, 67) sts.
(Incs needed: S 24 sts → 12 inc rows; M 30 → 15; L 24 → 12; XL 30 → 15; 2XL 36 → 18. At +2 sts per inc row ✓)
Stitch-count check at sleeve top: 49 (55, 55, 61, 67) = 6k+1 ✓ for all sizes.
After last increase, work even in Dragon Scale Stitch until sleeve measures 18 (18½, 18½, 19, 19)" / 46 (47, 47, 48, 48) cm from bottom of cuff, ending after a WS row. Fasten off.
FINISHING
Block all pieces lightly to measurements. Do not flatten the scales completely — steam or wet-block gently so texture remains raised.
Shoulder Seams
With WS together (RS facing out), mattress-stitch or whip-stitch Front shoulders to Back shoulders — 14 (16, 18, 20, 22) sts each side.
Set in Sleeves
Pin sleeve top into armhole, matching center of sleeve top to shoulder seam and sleeve edges to underarm markers. Seam with mattress stitch or whip stitch, easing to fit.
(Sleeve top width 16½ (18½, 18½, 20½, 22½)" pairs with armhole depth 8 (8½, 9, 9½, 10)" set-in opening ✓)
Side & Underarm Seams
Seam each side from bottom ribbing to underarm, then continue down the sleeve underarm to the cuff, in one continuous seam. Rep for other side.
Neckband
With smaller hook (H/8) and RS facing, join yarn at either shoulder seam.
Rnd 1: Ch 1, work sc evenly around neck opening as follows:
- Across back neck: 21 (23, 25, 27, 29) sc
- Down left front neck edge: approx. 10 (10, 11, 11, 12) sc
- Across front neck center: 13 (15, 17, 19, 21) sc
- Up right front neck edge: approx. 10 (10, 11, 11, 12) sc
Total approx. 54 (58, 64, 68, 74) sc. Join with sl st to first sc.
(Exact count may vary by 1–2 sts; work an even number if you prefer paired decreases later. Do not pull tight.)
Rnd 2: Ch 1, sc blo in each sc around; join.
Rnds 3–4: Rep Rnd 2.
(For a snugger crew, on Rnd 3 work sc2tog at each of the 4 “corners” where shoulder meets neck shaping — 4 decs.)
Fasten off after Rnd 4 (band ≈ ¾–1" / 2–2.5 cm). Weave in end.
Final
Weave in all remaining ends. Lightly steam seams. Optional: add small surface-crochet “spines” or contrasting scale tips along shoulders for extra dragon flair.
Schematic Measurements (approx.)
| Measurement | S | M | L | XL | 2XL |
|---|---|---|---|---|---|
| Finished bust | 40½" | 44½" | 48½" | 52½" | 56½" |
| Length | 24" | 24½" | 25" | 25½" | 26" |
| Armhole depth | 8" | 8½" | 9" | 9½" | 10" |
| Upper arm (sleeve top) | 16½" | 18½" | 18½" | 20½" | 22½" |
| Cuff | 8" | 8" | 9" | 9" | 9" |
| Sleeve length | 18" | 18½" | 18½" | 19" | 19" |
| Shoulder each | ~4¾" | ~5¼" | ~6" | ~6¾" | ~7¼" |
| Back neck | 7" | 7¾" | 8¼" | 9" | 9¾" |
Care
Follow yarn label. Generally: machine wash gentle cold or hand wash; lay flat to dry to preserve scale texture. Do not iron scales flat.
You’re done — pull on your scales and roar.
If a shell ever lands off-center, frog one row and re-count the 6-st repeat; the pattern forgives small edge fudges as long as the center scales stay nested.
Disclaimer: This pattern was generated by AI and should be reviewed for accuracy before use. While we strive for quality, AI-generated content may contain errors. Please verify measurements, stitch counts, charts, and instructions before beginning your project. Generated by purlJam.uk
Love this pattern?
Save this pattern to your free PurlJam libraryAccess your pattern anytime
Bookmark this page to access your pattern anytime