Type
Crochet
Difficulty
intermediate
Category
pullover
AI Thinking Process
Planning
Verification
Pattern
Filet Crochet "21" Pullover
A beginner-friendly worsted-weight pullover with the number 21 worked in classic filet crochet on the front.
Skill Level
Beginner (confident with chain, single crochet, and double crochet; filet crochet is introduced step-by-step)
Sizes
Small (Medium, Large, XL, 2XL) Finished chest circumference: 36 (40, 44, 48, 52)" — approximately 2" positive ease.
| Measurement | S | M | L | XL | 2XL |
|---|---|---|---|---|---|
| Finished chest | 36" | 40" | 44" | 48" | 52" |
| Body length | 22" | 23" | 24" | 25" | 26" |
| Sleeve length (cuff to underarm) | 17" | 17.5" | 18" | 18.5" | 19" |
Materials
- Yarn: Worsted weight (medium / #4), smooth plied yarn recommended for crisp filet definition.
- Main Color (MC): approx. 1000 (1150, 1300, 1450, 1600) yds
- Filet crochet uses a single color — the number is formed by open vs. filled mesh, not by a second color. No contrast color is required.
- Hook: US H/8 (5.0 mm), or size needed to obtain gauge
- Tapestry needle, stitch markers, scissors
Gauge
In double crochet fabric: 14 dc x 8 rows = 4" (10 cm) In filet mesh: 7 mesh squares x 8 rows = 4" (10 cm)
Filet mesh definition (READ THIS FIRST):
- Open square (space): dc, ch 1, skip 1 st, dc
- Filled square (block): dc, dc, dc (a dc worked into the skipped stitch/space)
- Every square shares its edge dc with the neighbor, so each additional square = 2 stitches (1 ch-or-dc + 1 dc) after the first square's starting dc.
- Math check: A row of n mesh squares = (2n + 1) stitches wide. Example: 21 squares = 43 sts.
Always make a gauge swatch (chain 25, work 7 rows of alternating mesh) and block it. Gauge is critical for fit.
Abbreviations (US terms)
- ch = chain
- st(s) = stitch(es)
- sc = single crochet
- dc = double crochet
- sl st = slip stitch
- BLO = back loops only
- sp = space
- rep = repeat
Construction Overview
Worked flat in four pieces from the bottom up: Back, Front (with the filet "21" chart), and two Sleeves. Pieces are seamed at the shoulders and sides; sleeves are set in; a single crochet neckband is worked in rounds at the end.
Stitch Counts Reference
| Piece | S | M | L | XL | 2XL |
|---|---|---|---|---|---|
| Body starting dc (each of Back/Front) | 63 | 70 | 77 | 84 | 91 |
| Front mesh squares across | 31 | 35 | 38 | 41 | 45 |
| Sleeve starting dc | 33 | 35 | 37 | 39 | 41 |
| Sleeve top dc | 55 | 58 | 61 | 64 | 67 |
Math check (Small front): 63 dc → mesh = (63 − 1) ÷ 2 = 31 squares. ✓
BACK
Ribbing
- Ch 11 (this makes a 2.5" tall ribbing worked sideways).
- Row 1: sc in 2nd ch from hook and each ch across — 10 sc.
- Row 2: ch 1, turn, sc in BLO across — 10 sc.
- Rep Row 2 until ribbing measures 18 (20, 22, 24, 26)" unstretched. Do not fasten off; turn ribbing to work along the long edge.
Body
- Ch 1, work 63 (70, 77, 84, 91) sc evenly along the long edge of the ribbing (about 1 sc per row-end, skipping occasionally to reach the count).
- Row 1 (RS): ch 3 (counts as first dc), dc in each st across — 63 (70, 77, 84, 91) dc.
- Rows 2–onward: ch 3, turn, dc in each st across.
- Continue in plain dc until body measures 14 (14.5, 15, 15.5, 16)" from cast-on edge.
Armhole Shaping
- Next row: sl st across first 4 (4, 5, 5, 6) sts, ch 3, dc across until 4 (4, 5, 5, 6) sts remain, turn (leave remaining sts unworked).
- Remaining: 55 (62, 67, 74, 79) dc.
- Continue in plain dc until armhole measures 7 (7.5, 8, 8.5, 9)".
Shoulder & Back Neck
- Fasten off, marking the outer 15 (17, 18, 20, 21) sts on each side as shoulders; the center 25 (28, 31, 34, 37) sts form the back neck.
FRONT
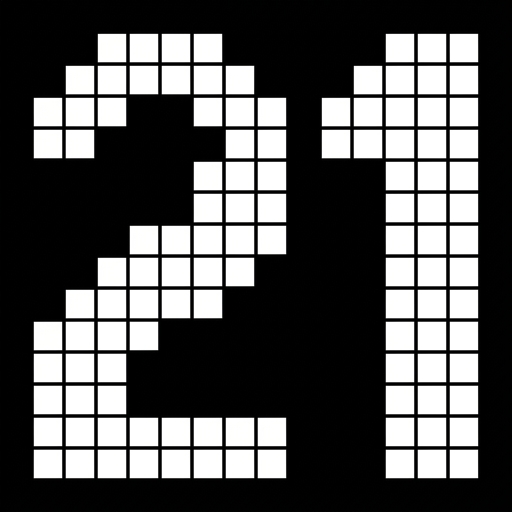
Work exactly as the Back through the Ribbing and the first dc row. The filet "21" is worked in the body using mesh. Follow the Attached Stitch Chart (see section below) for placement.
Setting Up the Filet Body
- After joining the body to the ribbing (as Back Row 1), work 2 (2, 3, 3, 4) rows of plain dc so the number sits above the ribbing.
- Begin mesh rows: Row 1 of mesh: ch 4 (counts as dc + ch 1), skip 1 st, dc in next st, ch 1, skip 1 st; rep to last st, dc in top of turning ch.
- This creates 31 (35, 38, 41, 45) mesh squares.
- Math check (Small): starting dc + [ (63−1)÷2 ] squares = 31 squares. ✓
- Continue in mesh following the chart:
- Open square: (ch 1, skip 1 st or ch-sp, dc in next dc).
- Filled square: (dc in the ch-sp, dc in next dc) — i.e., fill the space with a dc.
- Centering: The "21" motif is charted to sit centered. Work plain mesh (all open squares) on each side of the charted motif so the number is centered horizontally. The chart tells you which squares are filled in each row.
- Work all charted rows, then continue in mesh (or return to plain dc) until the front matches the Back to the underarm — 14 (14.5, 15, 15.5, 16)" total.
Armhole Shaping
- Shape armholes as for Back: sl st across first 4 (4, 5, 5, 6) sts, work across until 4 (4, 5, 5, 6) sts remain — 55 (62, 67, 74, 79) sts remain. Maintain mesh/dc pattern as established.
Front Neck Shaping
- When armhole measures 4.5 (5, 5.5, 6, 6.5)", shape neck:
- Work across first 15 (17, 18, 20, 21) sts (right shoulder), turn; work this side first.
- Dec 1 st at neck edge every row 2 (2, 3, 3, 3) times until 15 (17, 18, 20, 21) shoulder sts remain firm; work even until armhole matches Back.
- Fasten off. Rejoin yarn to opposite shoulder, skip center 25 (28, 31, 34, 37) sts, and mirror the shaping.
SLEEVES (make 2)
Cuff Ribbing
- Ch 9; sc in 2nd ch and across — 8 sc.
- Work in BLO sc until cuff measures 9 (9.5, 10, 10.5, 11)". Turn to work along long edge.
Sleeve Body
- Work 33 (35, 37, 39, 41) sc evenly along the cuff edge.
- Row 1: ch 3, dc across — 33 (35, 37, 39, 41) dc.
- Increase row: ch 3, dc in first st, dc across to last st, 2 dc in last st (+2 sts).
- Rep increase row every 6th row 11 (11, 12, 12, 13) times until you have 55 (57, 61, 63, 67) dc.
- Math check (Small): 33 + (11 × 2) = 55. ✓
- Work even until sleeve measures 17 (17.5, 18, 18.5, 19)" from cuff edge.
Sleeve Cap
- sl st across first 4 (4, 5, 5, 6) sts, dc across leaving 4 (4, 5, 5, 6) sts unworked.
- Dec 1 st each end every row until 15 (17, 19, 21, 23) sts remain. Fasten off.
ATTACHED STITCH CHART
Use the separate attached chart panel for the visual grid of the number "21." The chart is not reproduced inline in this pattern — refer to the attached asset.
Placement in this pattern: The chart is applied to the FRONT piece only, beginning after the "Begin mesh rows" step (Front, step 2), centered horizontally across the mesh squares and vertically within the body between the ribbing and the neck shaping.
How to read the chart (crochet / filet):
- The chart is a grid where each cell = one filet mesh square.
- A filled/shaded cell = a filled (block) square → work (dc, dc, dc)-style block.
- A blank/open cell = an open (space) square → work (dc, ch 1, skip 1, dc).
- Row direction: Read right-to-left on right-side (RS) rows and left-to-right on wrong-side (WS) rows, because the work is turned each row. Start reading the chart from the bottom row upward.
- Work plain open-mesh squares on either side of the charted section to keep the "21" centered.
Color / yarn management notes:
- Filet crochet uses a single yarn color — there are no color changes. The number appears purely through solid blocks vs. open spaces. Ignore any color-change instructions; none apply.
- No yarn is carried or dropped.
Stitch-count integration math:
- Total front mesh = 31 (35, 38, 41, 45) squares.
- If the attached chart is C squares wide, the plain border on each side = (total − C) ÷ 2 squares. If odd, add the extra square to the left border.
- Example (Small, chart 15 wide): (31 − 15) ÷ 2 = 8 open squares each side. ✓
- Each mesh square always = 2 stitches wide (block or space use the same footprint), so the stitch count never changes whether a square is filled or open — the fabric stays the same width throughout. ✓
FINISHING
- Block all pieces to measurements; blocking sharpens filet definition dramatically.
- Seam shoulders: with tapestry needle, whip stitch or sl st the front and back shoulder sts together.
- Set in sleeves: center the sleeve cap at the shoulder seam and seam the cap into the armhole.
- Side & underarm seams: seam sides and sleeve undersides in one continuous line using whip stitch or sl st.
Neckband
- With RS facing, join MC at a shoulder seam.
- Round 1: sc evenly around the neck opening (about 3 sc per 4 row-ends, 1 sc per st across back neck), keeping the count even; join with sl st.
- Rounds 2–4: ch 1, sc in BLO around; join.
- Fasten off after 3 rounds (about 1"). Weave in all ends.
Tips for Beginners
- Count your mesh squares at the end of every chart row — catching an error early saves frogging.
- Place a stitch marker at the first and last charted square to keep the borders even.
- Keep your ch-1 spaces snug and consistent; loose spaces distort the number.
- The "21" reads best after blocking, so don't panic if it looks uneven off the hook.
Enjoy your finished filet "21" pullover!
Disclaimer: This pattern was generated by AI and should be reviewed for accuracy before use. While we strive for quality, AI-generated content may contain errors. Please verify measurements, stitch counts, and instructions before beginning your project. Generated by purlJam.uk
Access your pattern anytime
Bookmark this page to access your pattern anytime