Type
Knitting
Difficulty
beginner
Category
cardigan
Pattern
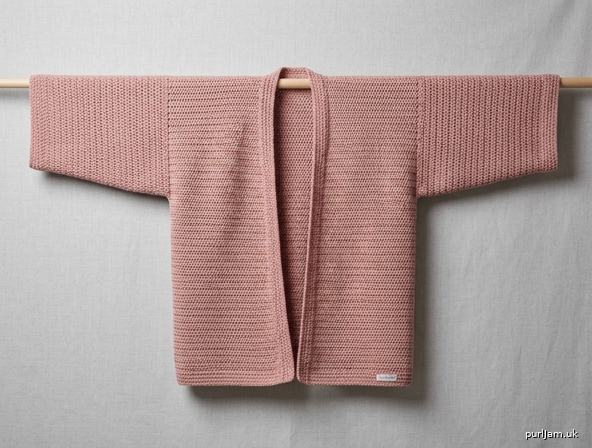
# Dusty Rose Kimono Cardigan
### A Beginner-Friendly Crochet Pattern (UK Terms)

A relaxed, T-shaped kimono-style cardigan worked flat in five simple rectangles. There is no complicated shaping — if you can chain and work trebles, you can make this cardigan! The oversized, boxy fit drapes beautifully and suits every body.

---

## Materials

- **Yarn:** Worsted weight (Aran/medium / weight 4) cotton or cotton blend
  - Approx. **1000–1500 m** total depending on size (see chart below)
  - Sample shown in a soft **dusty rose** shade
- **Hook:** 5 mm (UK metric) for the main body; 4.5 mm for the border (optional, for a neater edge)
- **Notions:** Tapestry/yarn needle, stitch markers, scissors
- **Optional:** 1 button or fabric tie for closure

### Yarn Quantity by Size

| Size | Approx. metres |
|------|----------------|
| XS   | 1000 m |
| S    | 1100 m |
| M    | 1200 m |
| L    | 1350 m |
| XL   | 1450 m |
| 2XL  | 1550 m |

---

## Tension (Gauge)

**14 tr × 7 rows = 10 cm (4")** using 5 mm hook in treble crochet.

> ⚠️ Always work a tension swatch. The fit is forgiving, but matching tension keeps your measurements accurate.

---

## Abbreviations (UK Terms)

| Abbreviation | Meaning |
|--------------|---------|
| ch | chain |
| dc | double crochet (US sc) |
| tr | treble crochet (US dc) |
| st(s) | stitch(es) |
| sl st | slip stitch |
| RS / WS | right side / wrong side |
| rep | repeat |
| beg | beginning |

> **Note on UK terms:** UK *tr* = US *dc*. UK *dc* = US *sc*. This pattern uses **UK terminology** throughout.

---

## Sizes & Finished Measurements

Choose your size based on the **finished bust** (this cardigan has a generous, oversized fit — choose a size with 15–25 cm positive ease for the intended boxy look).

<span style="color:#D8A0A6">

### Finished Measurements (Dusty Pink)

| Size | Finished Bust | Body Length | Sleeve Length | Sleeve Width |
|------|--------------|-------------|---------------|--------------|
| XS   | 100 cm (39") | 56 cm (22") | 42 cm (16½") | 36 cm (14") |
| S    | 106 cm (42") | 58 cm (23") | 43 cm (17")  | 38 cm (15") |
| M    | 112 cm (44") | 60 cm (24") | 45 cm (17¾") | 40 cm (16") |
| L    | 120 cm (47") | 62 cm (24½")| 45 cm (17¾") | 42 cm (16½")|
| XL   | 128 cm (50") | 64 cm (25") | 46 cm (18")  | 44 cm (17") |
| 2XL  | 136 cm (54") | 66 cm (26") | 46 cm (18")  | 46 cm (18") |

</span>

---

## Construction Overview

This kimono is made from **5 rectangles**:
- **1 Back** (one large rectangle)
- **2 Fronts** (each half the width of the back)
- **2 Sleeves** (wide rectangles, NOT tapered)

The shoulders are sewn straight across, sleeves attach at right angles (T-shape, dropped shoulder), then the sides and underarms are seamed. A simple dc border finishes the front edges and neck.

---

## Stitch Counts by Size

| Piece | XS | S | M | L | XL | 2XL |
|-------|----|----|----|----|----|-----|
| **Back** (starting ch) | 70 | 74 | 78 | 84 | 90 | 96 |
| **Back** tr per row | 68 | 72 | 76 | 82 | 88 | 94 |
| **Each Front** (starting ch) | 35 | 37 | 39 | 42 | 45 | 48 |
| **Each Front** tr per row | 33 | 35 | 37 | 40 | 43 | 46 |
| **Body rows** | 39 | 41 | 42 | 43 | 45 | 46 |
| **Sleeve** (starting ch) | 52 | 54 | 58 | 60 | 62 | 66 |
| **Sleeve** tr per row | 50 | 52 | 56 | 58 | 60 | 64 |
| **Sleeve rows** | 29 | 30 | 31 | 31 | 32 | 32 |

> ✓ **Math check (size M):** Back 76 tr ÷ 1.4 sts/cm = 54 cm; two Fronts (37 + 37 = 74 tr) ≈ 53 cm. Combined with seams and border this gives the ~112 cm finished bust. Sleeve 56 tr ÷ 1.4 = 40 cm wide ✓.

The standard turning chain at the start of each tr row = **ch 3** (counts as first tr).

---

## PATTERN

### Back Panel

1. **Foundation:** Ch [size number — Back starting ch]. *(e.g. M = ch 78)*
2. **Row 1 (RS):** Work 1 tr into the 4th ch from hook, then 1 tr in each ch to end. Turn. *(76 tr for M — the skipped 3 ch count as first tr)*
3. **Row 2:** Ch 3 (counts as first tr), 1 tr in each st across, working last tr into top of turning ch. Turn.
4. **Rep Row 2** until the Back measures the **Body Length** for your size (e.g. 60 cm for M = 42 rows total).
5. Fasten off.

---

### Front Panels (make 2 — mirror identical)

1. **Foundation:** Ch [Front starting ch]. *(e.g. M = ch 39)*
2. **Row 1 (RS):** 1 tr in 4th ch from hook, 1 tr in each ch to end. Turn. *(37 tr for M)*
3. **Row 2:** Ch 3, 1 tr in each st across. Turn.
4. **Rep Row 2** until the Front measures the **same number of rows as the Back** (e.g. 42 rows). This keeps the side seams even.
5. Fasten off.

> 💡 **Optional gentle neckline:** For a slightly curved front neck, on the last 4 rows of each Front, sl st across the first 4 sts at the neck edge before working the row (decreasing 4 sts total). Beginners may skip this — a straight front edge works perfectly for a kimono.

---

### Sleeves (make 2 — wide rectangles, NO tapering)

The sleeves are simple rectangles the same width top to bottom. This gives the classic dropped-shoulder kimono shape.

1. **Foundation:** Ch [Sleeve starting ch]. *(e.g. M = ch 58)*
2. **Row 1 (RS):** 1 tr in 4th ch from hook, 1 tr in each ch to end. Turn. *(56 tr for M)*
3. **Row 2:** Ch 3, 1 tr in each st across. Turn.
4. **Rep Row 2** until the sleeve measures the **Sleeve Length** for your size (e.g. 45 cm for M = 31 rows total). Do **not** increase or decrease — keep it straight.
5. Fasten off, leaving a long tail for seaming.

---

## ASSEMBLY

Block all pieces lightly to even out the stitches before seaming.

1. **Shoulder seams:** Lay the Back flat (RS up). Place each Front on top (RS down) aligning the outer edges. Seam the shoulders with a **straight horizontal seam** (mattress stitch or sl st), leaving the centre open for the neck. For M, seam approx. 14 cm in from each outer edge, leaving the centre ~26 cm open for the neckline.

2. **Attach sleeves:** Find the centre point of each sleeve's top edge and match it to the shoulder seam. Pin the sleeve along the body so it sits at a **right angle** (dropped-shoulder T-shape). Sew the sleeve top edge to the body.

3. **Side & underarm seams:** Fold the cardigan at the shoulders so RS face. Seam each side from the hem up to the underarm, then continue along the sleeve underside to the cuff in one continuous line. Repeat on the other side.

4. Weave in all loose ends.

---

## BORDER PATTERN

A simple double crochet (dc) border neatens all front and neck edges. Use a 4.5 mm hook for a tidy finish.

1. **Round 1:** Join yarn at the bottom right front corner. Ch 1, work dc evenly up the right front, around the back neck, and down the left front. Work approx. **2 dc per row-end** along the vertical edges and **1 dc per st** along the neck. At the two bottom corners, work 3 dc into the corner to turn neatly.
2. **Round 2:** Work 1 dc in each dc around, again working 3 dc at corners. Turn.
3. **Round 3 (optional decorative crab stitch):** Work **reverse dc** (work dc from left to right) for a neat corded edge. Fasten off.

**Cuff & hem edging (optional):** Join yarn at a seam and work 1 round of dc around each cuff and around the bottom hem, sl st to join. Fasten off.

---

## CLOSURE OPTIONS

- **Worn open:** No closure needed — classic kimono style.
- **Single button:** Sew a button to one front edge and use a chain loop on the other (ch 8–10, sl st to form a loop in the border).
- **Fabric tie:** Make two cords (ch 60, then 1 dc in each ch back along) and attach at the front edges to tie at the waist.

---

## FINISHING

Give the finished cardigan a final gentle block to open up the drape and even out the stitches. Lay flat to dry. Your relaxed, beginner-friendly kimono cardigan is ready to wear!

---

### Quick Reference — Build Order
1. Crochet Back rectangle
2. Crochet 2 Front rectangles
3. Crochet 2 Sleeve rectangles
4. Seam shoulders (straight)
5. Attach sleeves at right angles
6. Seam sides + underarms
7. Work dc border + cuff/hem edging
8. Add closure + block

Enjoy your handmade **Dusty Rose Kimono Cardigan**! 🌸
Disclaimer: This pattern was generated by AI and should be reviewed for accuracy before use. While we strive for quality, AI-generated content may contain errors. Please verify measurements, stitch counts, and instructions before beginning your project. Generated by purlJam.uk
Access your pattern anytime
Bookmark this page to access your pattern anytime