Type
Crochet
Difficulty
intermediate
Category
custom
AI Thinking Process
Planning
Verification
Pattern
Easy Ribbed Scarf
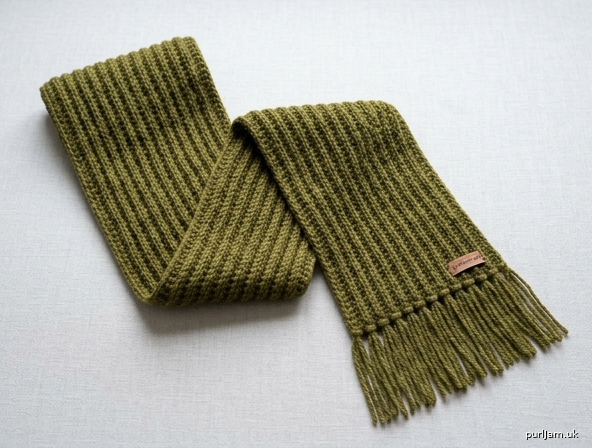
A cozy, stretchy scarf for first-time crocheters. It uses only chains and half double crochet, worked in the back loop to create a knit-like rib. The fabric is reversible, warm, and easy to customize in width or length.
Skill level: Beginner
Materials
Yarn: Worsted weight (category 4), approximately 420 yards / 384 meters (about 8 oz / 225 g).
If adding fringe, allow an extra 50 yards / 46 meters.
Solid, heather, or lightly variegated yarn shows the ribs clearly. Highly speckled or long-color-change yarns will hide the texture.
Hook: US H/8 (5 mm), or size needed to obtain gauge.
Optional: US I/9 (5.5 mm) for the foundation chain only, if your chains tend to be tight.
Notions:
- Yarn needle
- Scissors
- Measuring tape
- Stitch marker (optional, to mark the first stitch of the row)
Gauge
14 hdc BLO and 10 rows = 4 inches (10 cm), unstretched, using US H/8 (5 mm).
Swatch: Chain 18. Hdc in 2nd ch from hook and in each ch across (17 hdc). Work 12 rows of hdc BLO. Block lightly if you plan to block the scarf, then measure the center 14 stitches and 10 rows.
If you have fewer than 14 sts in 4 inches, go down a hook size.
If you have more than 14 sts in 4 inches, go up a hook size.
Gauge affects width and yardage. Length is worked to measurement, so row gauge is less critical.
Size
One size (adult): approximately 7 × 64 inches (18 × 162.5 cm), unstretched.
The ribbing stretches in width. On the body it will sit closer to 7.5–8 inches (19–20.5 cm) wide.
To customize:
- Wider or narrower: Add or subtract chains before Row 1 (any number). Finished width in inches ≈ (stitch count ÷ 14) × 4.
- Longer or shorter: Work more or fewer rows until the piece measures the length you want. Extra length uses more yarn.
Abbreviations (US terms)
| Abbreviation | Meaning |
|---|---|
| BLO | back loop only |
| ch | chain |
| hdc | half double crochet |
| st(s) | stitch(es) |
| RS | right side |
Pattern Notes
- Worked flat, in rows.
- Turning ch-1 does not count as a stitch. After turning, work the first hdc into the first stitch of the row (the last hdc of the previous row).
- Row 1 is worked into the foundation chain (both loops / top bumps of the chain).
- Row 2 and all following rows are worked BLO, except as noted in the optional neater-edge tip.
- Stitch count is 25 hdc at the end of every row (25 sts remain constant ✓). Count at the end of each row until the motion feels automatic.
- Do not join. Do not work in the round.
- The turning chain is always ch 1, even though the stitch is hdc. A ch-2 turning chain will leave gaps along the long edges.
- Keep the first and last stitches of each row a little snug so the long edges stay straight.
Optional neater-edge tip: Work the first and last hdc of every row through both loops, and work BLO on the center 23 stitches (2 both-loop + 23 BLO = 25 ✓). This firms up the long sides without changing the count.
Special Stitch
Hdc BLO (half double crochet in the back loop only): Yarn over, insert hook under the back loop only of the next stitch (the loop farther from you), yarn over, pull up a loop, yarn over, pull through all 3 loops on the hook.
The unused front loops form the horizontal ribs.
Scarf
Foundation chain: Ch 26.
Tip: If your starting chain is tight, make this chain with a US I/9 (5.5 mm) hook, then switch to US H/8 (5 mm) for Row 1.
Row 1 (RS): Hdc in 2nd ch from hook and in each ch across. (25 hdc; 26 − 1 = 25 ✓)
Place a stitch marker in the first hdc if you tend to skip it on later rows.
Row 2: Ch 1, turn. Hdc BLO in each st across. (25 hdc ✓)
Row 3: Ch 1, turn. Hdc BLO in each st across. (25 hdc ✓)
Rows 4–160: Repeat Row 2 until the piece measures 64 inches (162.5 cm) from the foundation chain, or until desired length.
At gauge, that is 160 rows total including Row 1 (160 rows ÷ 10 rows per 4 in × 4 in = 64 in ✓).
Stitch count remains 25 hdc on every row.
If your row gauge differs, trust the tape measure, not the row number. Stop when the unstretched length is 64 inches (162.5 cm).
Fasten off, leaving a 6-inch (15 cm) tail.
Finishing
- Weave in both yarn tails with the yarn needle, following the rib columns so the tails disappear into the fabric. Weave at least 2 inches (5 cm) in one direction, then a short stretch in the opposite direction to lock.
- Blocking (optional): For acrylic, hover a steam iron above the fabric (do not press the iron onto the ribs) and pat flat to 7 × 64 inches (18 × 162.5 cm). For wool or wool-blend, wet-block: soak, roll in a towel, pin to size, and dry flat. Blocking evens the long edges; it will not remove the stretch of the rib.
- Optional fringe (each short end):
- Cut 50 strands, each 12 inches (30.5 cm) long.
- Use 2 strands per fringe. Fold in half, insert the hook from the RS into a stitch on the short edge, pull the fold through, then pull the cut ends through the loop and tighten (lark’s head knot).
- Place one fringe in every other stitch across each short end (12 or 13 fringes per end; 25 sts, every other st ≈ 13 positions ✓).
- Trim the fringe even at about 5 inches (12.5 cm).
Helpful Tips
- Lost a stitch? Count. If you have 24, you skipped the first or last stitch — the usual beginner miss. Work 2 hdc in that edge stitch on the next row to return to 25, then continue.
- Extra stitch? You likely worked into the turning chain. Skip it; it does not count. On the next row, skip one stitch at the same edge to return to 25.
- Curling along the length: Normal before the piece grows. It relaxes after about 8–10 inches (20–25 cm) and after blocking.
- Second skein: Join at the start of a row with a new slip knot, or overlap tails and weave both in. Avoid joining in the middle of a row if you can.
Wear wrapped once, doubled, or knotted. The rib stretches comfortably at the neck without extra shaping.
Disclaimer: This pattern was generated by AI and should be reviewed for accuracy before use. While we strive for quality, AI-generated content may contain errors. Please verify measurements, stitch counts, charts, and instructions before beginning your project. Generated by purlJam.uk
Love this pattern?
Save this pattern to your free PurlJam libraryAccess your pattern anytime
Bookmark this page to access your pattern anytime