Type
Crochet
Difficulty
beginner
Category
amigurumi
AI Thinking Process
Planning
Verification
Pattern
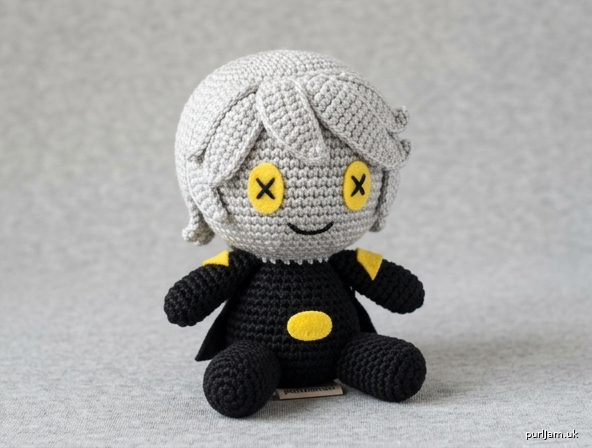
N (Murder Drones) Chibi Plushie – Easy Crochet Pattern
Skill Level: Easy / Beginner
Finished Size: Approx. 4 inches (10 cm) tall
Yarn Weight: Worsted (4)
A simple chibi-style amigurumi of Serial Designation N using basic spheres, cylinders, and embroidery. Perfect first character plush.
Materials
- Worsted weight yarn (US 4):
- Color A (Head/Hair): White or light silver/gray – approx. 30 yd (27 m)
- Color B (Body/Limbs): Black – approx. 40 yd (37 m)
- Color C (Accents): Yellow or gold – approx. 10 yd (9 m)
- Small amount of black embroidery floss or yarn for mouth/details
- Crochet hook: US E-4 (3.5 mm) or US F-5 (3.75 mm) – go down a size from yarn label for tight fabric
- Fiberfill stuffing
- Yarn needle
- Stitch marker
- Optional: 6–8 mm yellow safety eyes (or embroider), yellow felt scraps for accents, black felt for small coat details
- Scissors
Abbreviations (US Terms)
- ch: chain
- sc: single crochet
- inc: increase (2 sc in same st)
- dec: invisible decrease (sc2tog)
- st(s): stitch(es)
- rnd(s): round(s)
- mr: magic ring
- FO: fasten off
- [ ]: stitch count at end of rnd
- ( ) × n: repeat instructions in parentheses n times
Gauge
5 sc × 5 rnds = 1 inch (2.5 cm) in continuous sc rounds.
Exact gauge is not critical but work tightly so stuffing does not show.
Notes
- Work in continuous spiral rounds unless stated. Do not join or turn. Mark first st of each rnd with stitch marker.
- Use invisible decrease for smooth surface.
- Stuff firmly as you go, especially head and body.
- Color changes: finish last yarn-over of previous st with new color.
- Chibi proportions: large head, short body/limbs.
Pattern Pieces
Head (Color A – White/Silver)
Make 1.
- Rnd 1: 6 sc in mr [6]
- Rnd 2: inc in each st around [12]
- Rnd 3: (sc, inc) around [18]
- Rnd 4: (2 sc, inc) around [24]
- Rnds 5–9: sc around [24] (5 rnds)
- Rnd 10: (2 sc, dec) around [18]
- Insert safety eyes (if using) between Rnds 6–7, about 4–5 sts apart, centered. Stuff head firmly now.
- Rnd 11: (sc, dec) around [12]
- Rnd 12: dec around [6] FO, leaving 8-inch tail. Thread tail through front loops of remaining 6 sts and pull tight to close. Weave in end. (6 dec → 12 – 6 = 6 ✓; final close neat.)
Body (Color B – Black)
Make 1.
- Rnd 1: 6 sc in mr [6]
- Rnd 2: inc in each st around [12]
- Rnd 3: (sc, inc) around [18]
- Rnds 4–8: sc around [18] (5 rnds)
- Optional yellow accent stripe: On Rnd 6 only, change to Color C for 6–8 sts at front center, then back to B (or surface slip-stitch a yellow band later).
- Stuff firmly.
- Rnd 9: (sc, dec) around [12]
- Rnd 10: dec around [6] FO, leave long tail for sewing. Close hole same as head or leave slightly open to sew to head. (Counts: 18 even; (sc, dec)×6 = 12 ✓.)
Arms (Color B – Black)
Make 2.
- Rnd 1: 6 sc in mr [6]
- Rnd 2: (sc, inc) around [9]
- Rnds 3–6: sc around [9] (4 rnds)
- Lightly stuff.
- Rnd 7: (sc, dec) around [6] FO, leave long tail for sewing. Flatten slightly and sew closed if desired. (9 sts even; final 6 neat for attachment.)
Legs (Color B – Black)
Make 2.
- Rnd 1: 6 sc in mr [6]
- Rnd 2: (2 sc, inc) around [8]
- Rnds 3–5: sc around [8] (3 rnds)
- Lightly stuff. FO, leave long tail. (Simple tube; 8 sts stable.)
Hair Tufts / Bangs (Color A – White/Silver)
Make 3–4 small pieces for chibi messy hair. Option A – Small flaps (recommended for beginners):
- Ch 5.
- Row 1: sc in 2nd ch from hook and each ch across [4]
- Rows 2–3: ch 1, turn, sc across [4] FO, leave tail for sewing. Make 3–4. Curve slightly when attaching. Option B – Strand fringe: Cut 8–10 lengths of Color A (4 inches each). Attach with lark’s head knot along top/back of head and trim to messy style.
Optional Yellow Accent Pieces (Color C)
- Small oval badge or chest stripe: Ch 4, sc in 2nd ch, sc, 3 sc in last, turn and work other side (sc, inc) to form tiny oval [approx. 8–10 sts]. FO and sew to chest.
- Or simply embroider yellow lines with yarn needle after assembly.
Assembly
- Head to Body: Pin head centered on open/top of body. Sew securely with body tail or matching yarn, adding a tiny bit more stuffing at neck join if needed for stability.
- Legs: Pin legs to bottom of body, slightly apart and angled forward for sitting/standing chibi pose. Sew firmly.
- Arms: Pin arms to sides of body at approx. Rnd 3–4 (just below neck). Angle slightly forward or one raised for friendly pose. Sew.
- Hair: Arrange hair flaps/tufts on top and front of head (covering upper forehead for bangs). Pin, then sew. Add extra strands at back/sides for volume. Keep front open enough to show eyes.
- Face Details (important for N look):
- Eyes: If not using safety eyes, embroider two large yellow ovals or circles with Color C between Rnds 6–7. Add small black X or cross pupils with embroidery floss (N’s signature glowing X-eyes simplified).
- Mouth: Small curved smile or straight line in black floss, 2 rnds below eyes.
- Optional: Tiny gray eyebrows or cheek blush with light yarn.
- Final Accents: Sew or glue any yellow felt triangles/stripes on chest or shoulders. Weave in all ends securely.
Finishing
- Check all seams; reinforce high-stress joins (neck, limbs).
- Gently shape head round and body cylindrical with fingers.
- If desired, add a small black “coat” flap: crochet a tiny rectangle (ch 8, 4 rows sc) and sew at back of body.
- Spot-clean only; do not machine wash.
Tips for Success
- Work tightly – amigurumi fabric should hide stuffing.
- Count stitches every rnd; marker prevents lost rounds.
- Stuff head very firmly so it stays spherical; body medium-firm.
- For cleaner color changes on stripe, carry unused yarn inside or cut and weave.
- Customize: Make larger by adding 1–2 increase rnds (to 30 sts) and extra body length.
Your chibi N plush is ready for adventures! Display him with other Murder Drones friends or gift to a fellow fan.
© Pattern for personal use. Happy crocheting!
Disclaimer: This pattern was generated by AI and should be reviewed for accuracy before use. While we strive for quality, AI-generated content may contain errors. Please verify measurements, stitch counts, and instructions before beginning your project. Generated by purlJam.uk
Love this pattern?
Save this pattern to your free PurlJam libraryAccess your pattern anytime
Bookmark this page to access your pattern anytime