Type
Knitting
Difficulty
intermediate
Category
shawl
AI Thinking Process
Planning
Verification
Pattern
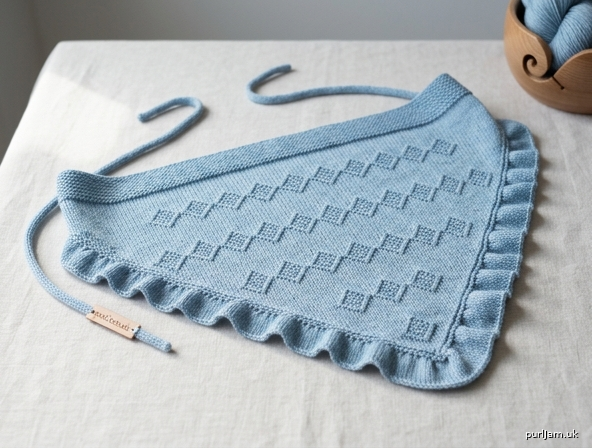
Elodie Head Bandana
A delicate, shallow triangular bandana worked flat from the forehead edge to the back point. A 2 cm garter band keeps the front edge stable; the body is stocking stitch with a small repeating knit-and-purl diamond texture and 3-stitch garter borders. Soft ruffled frills (worked with increases, not eyelets) are picked up along the two diagonal edges only. Narrow i-cord ties finish the front corners.
Skill level: Intermediate
Finished measurements
After blocking, excluding i-cord ties and frill:
- Forehead (cast-on) edge: 50 cm (19¾ in)
- Depth at centre: 28 cm (11 in)
- Each diagonal (body only): approx. 37.5 cm (14¾ in)
- I-cord ties: 11 cm (4¼ in) each
- Frill width: 1.5–2 cm (⅝–¾ in)
The frill is additional to these measurements and meets at the back point.
Yarn
Laceweight to light 4-ply (fingering) cotton or cotton-linen that knits to tension on 3.5 mm needles (a slightly larger needle than usual for laceweight gives a soft, drapey fabric).
- 180 m / 197 yds (one 50 g skein is typically sufficient)
Smooth, softly spun cotton or cotton-linen in a solid or gently heathered shade shows the diamonds clearly. Avoid highly textured or slubby yarns.
Needles and notions
- 3.5 mm needles (straight, or a circular used flat)
- 3.5 mm double-pointed needles (for i-cord)
- 4 mm needle (for casting off the frill loosely)
- Stitch markers
- Tapestry needle
- Blocking pins and wires (or a tape measure and pins)
Tension (gauge)
22 stitches and 30 rows to 10 cm (4 in) over stocking stitch on 3.5 mm needles, after blocking.
The diamond texture has the same stitch tension; row tension is effectively the same. Garter stitch is shorter in row height: 8 rows of garter ≈ 2 cm, which is the forehead band.
Work a blocked tension square. If you have too many stitches to 10 cm, change to a larger needle; too few, a smaller needle.
Abbreviations (UK)
| Abbrev. | Meaning |
|---|---|
| alt | alternate |
| approx. | approximately |
| beg | beginning |
| CO | cast on |
| cont | continue |
| dec | decrease(ing) |
| k | knit |
| k2tog | knit 2 together (right-leaning dec) |
| kfb | knit into front and back of stitch (1 st increased) |
| p | purl |
| p2tog | purl 2 together |
| p2tog tbl | purl 2 together through back loops (left-leaning on RS) |
| rem | remain(ing) |
| rep | repeat |
| RS | right side |
| ssk | slip 1 kwise, slip 1 kwise, knit those 2 sts tog tbl (left-leaning dec) |
| st(s) | stitch(es) |
| st st | stocking stitch (k on RS, p on WS) |
| WS | wrong side |
3-st i-cord: Using two double-pointed needles, *k3, do not turn, slide sts to other end of needle; rep from *. Yarn comes across the back of the three stitches each time.
Pattern notes
- The bandana is a wide, shallow triangle, worked from the long forehead edge down to a single point — not from the centre neck out.
- Garter forehead band (all knit, both sides) is worked first, without shaping, so the 50 cm edge stays straight and does not roll.
- Body: stocking stitch with Chart A diamonds, plus a 3-st garter border at each side. Shaping sits just inside those borders.
- Diamonds are knit/purl texture only — no yarn overs, eyelets, bobbles or colourwork.
- Each diamond is 3 sts wide (approx. 1.4 cm) and 5 rows tall. Motifs are arranged in staggered bands, not vertical columns, with stocking stitch between them.
- As the triangle narrows, centre the 8-st repeat on the remaining stitches. Work leftover stitches in stocking stitch. Do not work a diamond unless all 3 of its stitches are present; knit those stitches in stocking stitch instead.
- Two independent counts run together: the 16-row diamond repeat and the 3-row shaping repeat. Use two row counters, or tick a paper chart.
- The frill is picked up after the body is finished, along both diagonals only. The forehead edge stays plain.
- UK terms throughout: stocking stitch, tension, cast off, centre, fibre.
Chart A: Textured diamonds
8-st repeat × 16 rows
The chart shows the right-side appearance.
- RS (odd) rows: read right to left
- WS (even) rows: read left to right
- Work the 8-st repeat across the centre stitches only (inside the 3-st garter borders)
Key
□= k on RS, p on WS (stocking stitch)■= p on RS, k on WS (purl bump on RS)
The first diamond sits on stitches 3–5 of the repeat. The second, staggered diamond sits on stitches 7, 8 and 1 of the next repeat (it crosses the repeat line). When two or more repeats are worked side by side, both diamonds read as complete 3-st lozenges.
    st  1 2 3 4 5 6 7 8
    16  □ □ □ □ □ □ □ □     WS
    15  □ □ □ □ □ □ □ □     RS
    14  □ □ □ □ □ □ □ □     WS
    13  □ □ □ □ □ □ □ ■     RS
    12  ■ □ □ □ □ □ ■ □     WS
    11  ■ □ □ □ □ □ ■ ■     RS
    10  ■ □ □ □ □ □ ■ □     WS
     9  □ □ □ □ □ □ □ ■     RS
     8  □ □ □ □ □ □ □ □     WS
     7  □ □ □ □ □ □ □ □     RS
     6  □ □ □ □ □ □ □ □     WS
     5  □ □ □ ■ □ □ □ □     RS
     4  □ □ ■ □ ■ □ □ □     WS
     3  □ □ ■ ■ ■ □ □ □     RS
     2  □ □ ■ □ ■ □ □ □     WS
     1  □ □ □ ■ □ □ □ □     RS
Written Chart A (8-st repeat, as worked)
Row 1 (RS): *k4, p1, k3; rep from * Row 2 (WS): *p2, k1, p1, k1, p3; rep from * Row 3 (RS): *k3, p3, k2; rep from * Row 4 (WS): *p2, k1, p1, k1, p3; rep from * Row 5 (RS): *k4, p1, k3; rep from * Row 6 (WS): purl Row 7 (RS): knit Row 8 (WS): purl Row 9 (RS): *p1, k7; rep from * Row 10 (WS): *k1, p5, k1, p1; rep from * Row 11 (RS): *p2, k5, p1; rep from * Row 12 (WS): *k1, p5, k1, p1; rep from * Row 13 (RS): *p1, k7; rep from * Row 14 (WS): purl Row 15 (RS): knit Row 16 (WS): purl
These 16 rows form one vertical repeat. Repeat them for the length of the body.
Instructions
First i-cord tie
With 3.5 mm double-pointed needles, CO 3 sts.
Work 3-st i-cord until the tie measures 11 cm (approx. 40–44 rows). Do not break yarn.
Turn the work. Using a 3.5 mm needle and the cable (or knitted) cast-on, cast on 107 sts onto the needle that holds the 3 i-cord stitches.
110 sts. (3 i-cord sts + 107 CO = 110 ✓)
The 3 i-cord stitches sit at the right-hand front corner (beginning of RS rows).
Garter forehead band
Working flat on all 110 sts:
Rows 1–8: Knit.
8 rows garter = 4 ridges ≈ 2 cm ✓. No shaping. The cast-on edge is the 50 cm forehead (110 sts ÷ 22 sts × 10 cm = 50 cm ✓).
Place a marker after the first 3 sts and before the last 3 sts to mark the garter borders. The centre 104 sts = 13 × 8-st repeats (3 + 104 + 3 = 110 ✓).
Body — diamonds and shaping
Join Chart A immediately after the band. Row 1 of Chart A is a RS row.
Border (every row): Knit the first 3 sts and the last 3 sts.
Centre: Work Chart A (or the written repeat) across as many complete 8-st repeats as will fit, centred. Any leftover stitches at each side of those repeats are worked in stocking stitch (k on RS, p on WS). If a 3-st diamond cannot be completed, work those stitches in stocking stitch.
Shaping decreases (worked just inside the borders):
- RS decrease row: k3, ssk, work as set to last 5 sts, k2tog, k3. (2 sts decreased)
- WS decrease row: k3, p2tog, work as set to last 5 sts, p2tog tbl, k3. (2 sts decreased)
- WS even row: k3, work as set to last 3 sts, k3.
Shape the triangle as follows, at the same time as Chart A:
Rows 1–72 of the body: *Work 2 decrease rows, then 1 even row; rep from * 24 times.
(24 × 3 = 72 rows ✓. 24 × 2 decrease rows = 48 decrease rows × 2 sts = 96 sts decreased. 110 − 96 = 14 sts ✓.)
Maintain Chart A through these 72 rows (72 = 4 × 16 + 8, so you will complete four full 16-row repeats plus Chart rows 1–8 of a fifth — a full first diamond band and its stocking-stitch spacer).
When the centre no longer holds a complete 8-st repeat, work remaining centre stitches in stocking stitch with the 3-st garter borders.
Rows 73–78 of the body: Discontinue Chart A. Work in garter stitch (knit every row) and decrease 1 st at each end of every row 6 times, as: k1, ssk, k to last 3 sts, k2tog, k1.
(6 × 2 = 12 sts decreased. 14 − 12 = 2 sts ✓. 72 + 6 = 78 body rows ✓.)
Next row: k2tog. Fasten off.
8 garter rows + 78 body rows give a blocked depth of 28 cm (2 cm band + 26 cm body ✓).
Second i-cord tie
With 3.5 mm double-pointed needles and RS facing, pick up and knit 3 sts from the left-hand front corner (the last three stitches of the original cast-on edge, at the opposite end from the first tie).
Work 3-st i-cord until this tie measures 11 cm. Cast off. Break yarn and draw the tail through the 3 sts, pulling firmly so the tip closes.
Frilled edging
The frill is added after the triangle is complete. It runs along both diagonal edges only, meeting at the back point. Do not pick up along the straight forehead edge.
With 3.5 mm needles and RS facing, beginning at the right front corner (where the first i-cord meets the body, just after the forehead edge):
Pick up and knit 1 stitch for every row-end down the right diagonal, 1 extra stitch at the point, then 1 stitch for every row-end up the left diagonal to the left front corner.
Row-ends per diagonal: 8 (band) + 78 (body) = 86. 86 + 86 + 1 = 173 sts ✓.
Row 1 (WS): Purl.
Row 2 (RS) — increase row: Kfb in every stitch. 346 sts. (173 × 2 = 346 ✓)
Rows 3–9: Beg with a WS purl row, work 7 rows stocking stitch (so 8 rows in total from the increase, including Row 2).
8 rows at 30 rows / 10 cm ≈ 2.7 cm; the stocking-stitch fabric rolls softly to a 1.5–2 cm ruffle ✓.
Cast off: Change to 4 mm needle and cast off loosely knitwise. A tight cast-off will flatten the ruffle and cup the diagonals.
The two sides of the frill meet at the back point as a small, continuous ruffle. The forehead edge remains a plain garter line.
Finishing
Weave in all ends on the WS, along garter borders or into the i-cord rather than across the diamond field.
Blocking (essential for cotton/linen and for the shallow triangle)
- Soak the bandana in lukewarm water with a drop of wool wash (or a mild soap suitable for cotton) for 15–20 minutes. Do not agitate.
- Roll in a towel and press out water. Do not wring.
- Lay flat. Pin the forehead edge to a straight 50 cm line. Pin the back point so the centre depth is 28 cm. Pin the two body diagonals as straight lines between the front corners and the point. The outline is a wide, shallow isosceles triangle.
- Do not pin the frill flat. Ease it into soft waves along each diagonal and pin only enough to stop it folding under. The ruffle should remain the main decorative edge.
- Do not stretch the i-cord ties; let them dry relaxed.
- Leave until fully dry.
Trim ends. The bandana is worn with the garter edge across the forehead, the point at the nape, and the i-cords tied at the back or over the hair.
Stitch-count summary (for checking as you knit)
| Stage | Stitches | Notes |
|---|---|---|
| After i-cord + CO | 110 | 3 + 107 = 110 ✓ |
| After 8-row garter band | 110 | no shaping ✓ |
| After 24 shaping units (72 rows) | 14 | 110 − 96 = 14 ✓ |
| After 6 every-row decreases | 2 | 14 − 12 = 2 ✓ |
| Fasten off | 1 | k2tog |
| Frill, picked up | 173 | 86 + 86 + 1 ✓ |
| Frill, after kfb | 346 | 173 × 2 ✓ |
Diamond repeat: 8 sts × 16 rows. Starting centre: 104 sts = 13 repeats. Motifs are omitted when a full 3-st diamond no longer fits.
Disclaimer: This pattern was generated by AI and should be reviewed for accuracy before use. While we strive for quality, AI-generated content may contain errors. Please verify measurements, stitch counts, charts, and instructions before beginning your project. Generated by purlJam.uk
Love this pattern?
Save this pattern to your free PurlJam libraryAccess your pattern anytime
Bookmark this page to access your pattern anytime