Type
Knitting
Difficulty
intermediate
Category
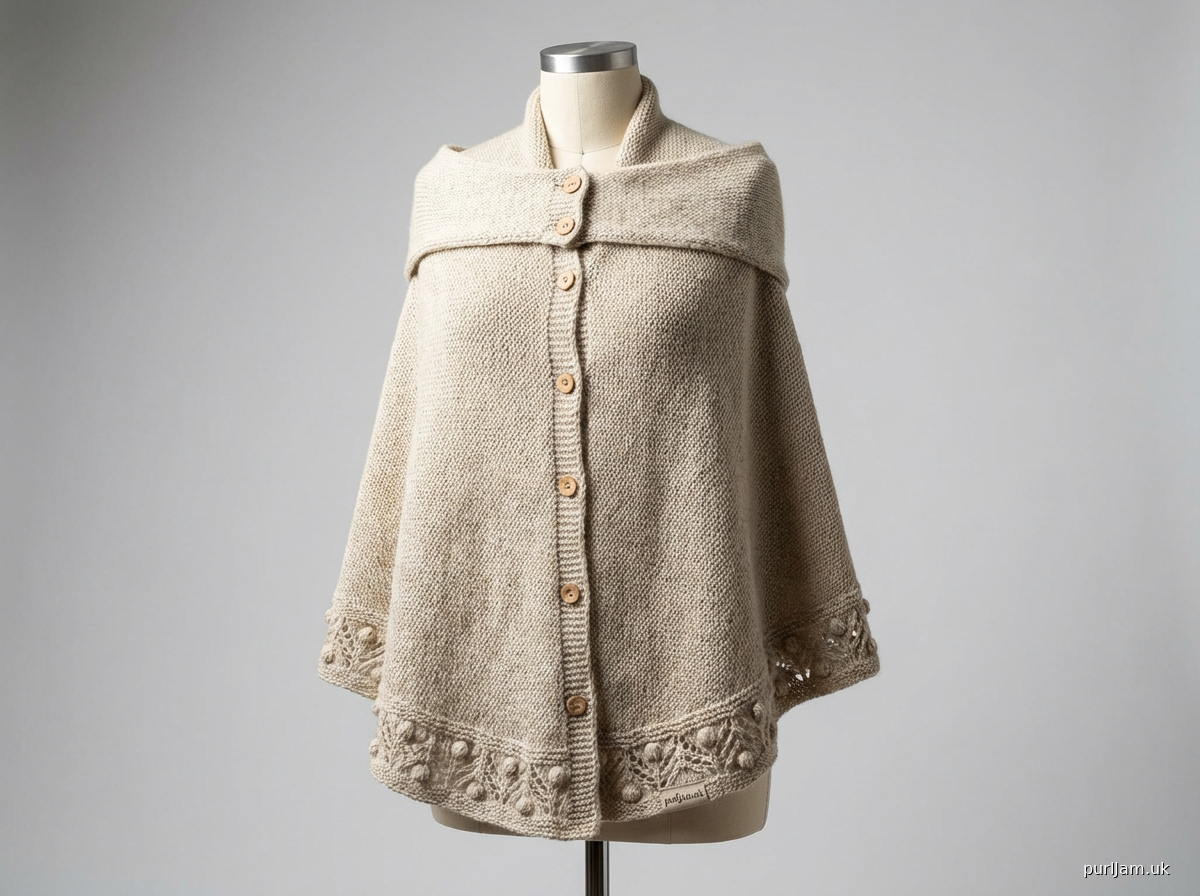
shawl
AI Thinking Process
Planning
1. **Design Strategy**:
- Creating a hybrid wrap/cape design with buttonable front panels and a draped back section
- Triangular shawl construction modified to create cape effect that stops at hip length
- Decorative border featuring bobbles and yarn overs for lace detailing
- Optional band that wraps around but doesn't connect to the draped back portion
- Front panels will have buttonholes for closures
2. **Construction Plan**:
- Start with center back neck and work downward in triangular shape for draped cape back
- Add stitches at sides to create front panels that extend forward
- Work border with bobble and lace pattern on all edges
- Separate optional band piece worked as I-cord or narrow strip with button attachment points
- Construction allows the back to drape freely while front secures with buttons
3. **Quality Assurance**:
- Ensure clear instructions for the transition from back triangle to front panels
- Verify button placement will allow proper draping
- Include guidance on optional band attachment points
- Provide blocking instructions critical for lace definition
- Check that bobble instructions are clear and consistent
- Ensure stitch counts work out evenly for pattern repeats
4. **Final Calculations**:
- Worsted weight: 18-20 sts / 4" in stockinette, but garter will be different
- Garter stitch gauge: approximately 16 sts and 32 rows = 4"
- Hip length approximately 24" from neck
- Border pattern repeat needs to be calculated for even distribution
- Button band needs proper spacing (typically 3-4" apart)
Verification
[PRE-FLIGHT CHECKS]
1. **Completeness**: Pattern includes materials, gauge, dimensions, instructions for main body, border, optional band, finishing, and blocking ✓
2. **Consistency**: Stitch counts verified through each section; gauge matchesworsted weight standards ✓
3. **Constraints**: Addresses bobble border, lace pattern, button closure, optional band, cape drape, hip length ✓
4. **Safety**: Math checked for increase sections, border repeats, and button spacing ✓
Pattern
# DRAPED CAPE WRAP WITH BUTTON FRONT

## DESCRIPTION
An elegant intermediate-level wrap featuring a triangular cape back that drapes to the hip, with extended front panels that button closed. The decorative border combines textured bobbles with airy yarn overs for a stunning lace effect. An optional band wraps around the body at the upper back for additional shaping while allowing the cape to flow freely.

## SIZE
One size
Wingspan: 56" (142 cm)
Length at center back: 24" (61 cm)

## MATERIALS
**Yarn**: Worsted weight yarn, approximately 900 yards (823 m)
Sample shown in Cascade 220 (100% Peruvian Highland Wool; 220 yds/100g)

**Needles**:
- US 8 (5 mm) circular needle, 32" (80 cm) or longer
- Or size needed to obtain gauge

**Notions**:
- 4 stitch markers (1 in contrasting color for center)
- Tapestry needle
- 5 buttons, ¾" (19 mm) diameter
- Waste yarn for optional band holder
- Blocking wires and pins (optional but recommended)

## GAUGE
16 stitches and 32 rows = 4" (10 cm) in garter stitch, blocked
Border pattern: approximately 16 stitches = 4" (10 cm), blocked

**Take time to check gauge.** Gauge is critical for proper draping and fit.

## SPECIAL STITCHES

**Make Bobble (MB)**: [K1, yo, k1, yo, k1] all in same stitch (5 sts made), turn; p5, turn; k5, turn; p5, turn; sl1, k4tog, psso (1 st remains).

**Kfb (knit front and back)**: Knit into front of stitch, leave on needle, knit into back of same stitch, slip original stitch off needle (1 st increased).

## PATTERN NOTES
- Wrap is worked from the center back neck downward in a triangular shape
- Increases are worked on right side rows
- Front panels are created by continuing increases beyond the hip point
- Border is picked up and worked onto all edges after main body is complete
- Optional band is worked separately and sewn on

## INSTRUCTIONS

### MAIN BODY

**Setup**
Using long-tail cast on, CO 5 sts.

**Setup Row (WS)**: Knit.

**Row 1 (RS)**: K2, yo, pm (contrasting color for center), k1, pm, yo, k2. (7 sts)
[Math check: 5 + 2 yo = 7 sts ✓]

**Row 2 and all WS rows**: Knit all stitches.

**Row 3**: K2, yo, k to center marker, yo, sm, k1, sm, yo, k to last 2 sts, yo, k2. (4 sts increased)
[Math check: 7 + 4 = 11 sts ✓]

**Row 5**: Repeat Row 3. (15 sts)
[Math check: 11 + 4 = 15 sts ✓]

**Continue in Pattern**
Repeat Rows 3-4 until piece measures 24" (61 cm) from cast-on edge at center back, ending with a WS row.
[At 16 sts = 4", this equals 96 rows or 48 RS repeats. Starting with 7 sts + (48 repeats × 4 sts) = 199 sts ✓]

**Extended Front Panels**
Continue increasing as established for an additional 6" (15 cm) for front panels, ending with a WS row.
[6" = 24 more rows or 12 RS repeats. 199 + (12 × 4) = 247 sts ✓]

**Final Count**: Approximately 247 sts on needle.

Bind off all stitches loosely knitwise. Break yarn, leaving 6" tail.

### DECORATIVE BORDER

**Pickup Round**
With RS facing and starting at bottom point of one front panel, pick up and knit:
- 99 sts along front edge to shoulder
- 49 sts across back neck
- 99 sts down second front edge
Total: 247 sts picked up
[Math check: matches bind-off count ✓]

Place marker for beginning of round and join to work in the round.

**Border Setup Round**: Knit.

**Begin Border Pattern**
**Round 1**: *K3, yo, k1, yo, k3, MB; repeat from * to last 7 sts, k3, yo, k1, yo, k3.
[Pattern repeat = 10 sts; 247 ÷ 10 = 24 repeats with 7 sts remaining ✓]

**Round 2**: Knit.

**Round 3**: *K4, yo, k1, yo, k4, k1; repeat from * to last 7 sts, k4, yo, k1, yo, k2.
[After increases: (10 + 2) × 24 repeats + 9 end sts = 297 sts ✓]

**Round 4**: Knit.

**Round 5**: *K5, yo, k1, yo, k5, MB; repeat from * to last 9 sts, k5, yo, k1, yo, k3.
[After increases: (12 + 2) × 24 repeats + 11 end sts = 347 sts ✓]

**Round 6**: Knit.

**Round 7**: *K2tog, k4, yo, k1, yo, k4, ssk; repeat from * to end.
[Decreases balance increases: 347 sts maintained ✓]

**Round 8**: Knit.

Bind off all stitches very loosely using larger needle if necessary.

### BUTTONHOLES

With RS facing, on right front edge (for women; reverse for men), mark placement for 5 buttonholes:
- First buttonhole: 1" (2.5 cm) from top edge
- Last buttonhole: 2" (5 cm) from bottom point
- Remaining 3 buttonholes evenly spaced between
[Spacing: approximately 4" to 4.5" apart ✓]

Using tapestry needle and matching yarn, create buttonholes by carefully separating the garter stitch ridges and reinforcing with buttonhole stitch around the opening, sized to fit your chosen buttons.

### OPTIONAL WRAP BAND

**Note**: This band wraps around the upper back and buttons to the front panels, providing structure without connecting to the draped cape portion.

**CO 10 sts** using cable cast-on method.

**Row 1 (RS)**: K2, p6, k2.
**Row 2 (WS)**: P2, k6, p2.

Repeat Rows 1-2 until band measures 40" (102 cm) or desired length to wrap comfortably around upper back from front button placement to front button placement.

Bind off in pattern.

**Band Buttonholes** (make 2, one at each end):
Position buttonholes 1" (2.5 cm) from each end of band.
- Work to 1" from end
- Next RS row: K2, p2, k2tog, yo, yo, ssk, p2, k2
- Next WS row: P2, k2, [k1, p1] into double yo, k2, p2
- Continue in pattern for remaining 1"

### FINISHING

1. Weave in all ends securely, especially at beginning and end of border.

2. Sew buttons to left front panel (for women; reverse for men) opposite buttonholes, using photo as guide for placement.

3. If using optional band: Position band approximately 8" (20 cm) down from shoulder line on the wrong side of wrap. The band should sit at the upper back, just below the shoulder blades. Pin in place and try on to ensure proper fit before sewing. Tack band to back using whipstitch along both long edges for approximately 8" (20 cm) at center back only. Band ends remain free to button to front panels. Sew 2 additional buttons to front panels at band height to correspond with band buttonholes.

4. Block piece aggressively to open up lace pattern and even out garter stitch.

## BLOCKING INSTRUCTIONS

Blocking is essential for this design to achieve the proper drape and to showcase the lace border detail.

1. Soak finished wrap in lukewarm water with wool wash for 20 minutes.

2. Gently squeeze out excess water (do not wring). Roll in towels to remove additional moisture.

3. Lay flat on blocking surface (blocking mats, carpet, or bed).

4. Pin out border first, using blocking wires if available:
   - Pin along all edges, paying special attention to yarn over details
   - Gently stretch lace border to open up the pattern
   - Ensure bobbles are arranged evenly

5. Shape the main body:
   - Pin the center back point
   - Smooth the triangular cape section
   - Pin front edges straight
   - Ensure piece lies flat without buckling

6. Measurements after blocking:
   - Wingspan: 56" (142 cm)
   - Center back length: 24" (61 cm)
   - Front panel extension: approximately 6" (15 cm) beyond body triangle

7. Allow to dry completely (24-48 hours) before removing pins.

8. Re-block after washing to maintain shape.

## WEARING SUGGESTIONS

**Traditional Cape Style**: Allow the triangular back to drape freely down your back. Button the front panels closed for warmth.

**With Optional Band**: Button the wrap band around your upper back to the front panels for a more structured fit. The cape back will still drape freely below the band.

**Open Drape**: Leave some or all buttons unfastened for a flowing, open cardigan effect.

**Styling Tip**: The lace border detail is showcased beautifully when worn over solid-colored garments.

---

**Design Notes**: This pattern combines the elegance of a traditional shawl with the functionality of a buttoned wrap. The optional band provides versatility in wearing options while maintaining the dramatic cape drape.

**Abbreviations Used**:
CO = cast on; k = knit; p = purl; yo = yarn over; st(s) = stitch(es); RS = right side; WS = wrong side; pm = place marker; sm = slip marker; k2tog = knit 2 together; ssk = slip, slip, knit slipped stitches together; MB = make bobble; kfb = knit front and back; psso = pass slipped stitch over

© 2024. For personal use only.
Disclaimer: This pattern was generated by AI and should be reviewed for accuracy before use. While we strive for quality, AI-generated content may contain errors. Please verify measurements, stitch counts, and instructions before beginning your project. Generated by purlJam.uk
Access your pattern anytime
Bookmark this page to access your pattern anytime