Type
Crochet
Difficulty
intermediate
Category
dress
AI Thinking Process
Planning
Verification
Pattern
Elongated Irish Crochet Peacock Shift Dress
Intermediate · Lace weight · US terms · Sizes XS–5XL
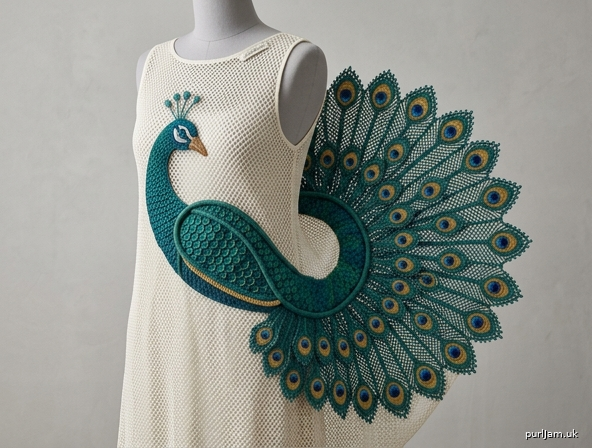
A sleeveless summer shift in open mesh, with a sculptural Irish-crochet peacock appliquéd in a wrapping line: head at the bust or shoulder, looking back along its own body, elongated body curving around the torso, and a fanned train across the back.
The dress fabric is intentionally sheer. Wear over a slip or lining.
Skill Level
Intermediate. You should be comfortable working in the round and in rows, keeping stitch counts, simple decreases, wet blocking, and sewing motifs. Irish padding-cord work is fully explained.
Sizes
XS (S, M, L, XL, 2XL, 3XL, 4XL, 5XL)
To fit bust 28–30 (32–34, 36–38, 40–42, 44–46, 48–50, 52–54, 56–58, 60–62)" / 71–76 (81–86, 91.5–96.5, 101.5–106.5, 112–117, 122–127, 132–137, 142–147.5, 152.5–157.5) cm.
Shown as a relaxed shift with about 4–6" (10–15 cm) positive ease at the bust. Choose the size whose finished bust is 4–6" larger than your actual bust.
Finished Measurements
Bust: 34 (38, 42, 46, 50, 54, 58, 62, 66)" / 86.5 (96.5, 106.5, 117, 127, 137, 147.5, 157.5, 167.5) cm
Hem (slight A-line): 38 (42, 46, 50, 54, 58, 62, 66, 70)" / 96.5 (106.5, 117, 127, 137, 147.5, 157.5, 167.5, 178) cm
Length, shoulder to hem (knee/midi, adjustable): 36 (37, 38, 38.5, 39, 39.5, 40, 40.5, 41)" / 91.5 (94, 96.5, 98, 99, 100.5, 101.5, 103, 104) cm
Armhole depth: 7 (7.25, 7.5, 8, 8.5, 9, 9.5, 10, 10.5)" / 18 (18.5, 19, 20.5, 21.5, 23, 24, 25.5, 26.5) cm
Front neck drop: about 3½ (3½, 3½, 4, 4, 4, 4¼, 4¼, 4¾)" / 9 (9, 9, 10, 10, 10, 11, 11, 12) cm
Back neck drop: about 2¼ (2¼, 2¼, 2¾, 2¾, 2¾, 3, 3, 3¼)" / 5.5 (5.5, 5.5, 7, 7, 7, 7.5, 7.5, 8.5) cm
Shoulder width (bra-friendly): about 3¼ (3¾, 4½, 5, 5½, 6, 6¼, 7, 7¼)" / 8.5 (9.5, 11.5, 12.5, 14, 15, 16, 18, 18.5) cm
Yarn
Lace weight (Size 10 crochet cotton, or a lace-weight cotton/cotton-blend with similar wrap). Firm cotton is strongly preferred for the Irish motifs: it holds padding-cord shaping and blocks crisply.
Main color (MC) — dress and peacock: ivory, ecru, or white for traditional Irish crochet; or deep teal/emerald for a jewel-tone bird.
- 1600 (1800, 2000, 2300, 2600, 2900, 3300, 3700, 4100) yd / 1465 (1645, 1830, 2105, 2380, 2650, 3020, 3380, 3750) m
Contrast C1 (peacock-eye center, optional): gold, bronze, or amber — 80 yd / 75 m
Contrast C2 (peacock-eye ring, optional): teal, sapphire, or emerald — 80 yd / 75 m
If working the entire peacock in MC only, add those 160 yd to MC and skip the color changes in the eyes.
Yarn note for length changes: allow about 50 yd / 46 m extra (or less) per 1" / 2.5 cm of dress length.
Hooks
- US B-1 / 2.25 mm — dress body and all edgings
- US 4 steel / 1.75 mm — Irish motifs (firm fabric)
- US 7 steel / 1.5 mm (optional) — beak, crest, and eye details
Use the 2.25 mm hook that obtains gauge. Motif hook should be smaller than the dress hook so the peacock is dense and sculptural.
Notions
- Yarn needle
- Stitch markers (at least 4)
- Pins and a blocking surface; blocking wires helpful for the hem
- Padding cord: 3 strands of MC held together, or a smooth 1 mm cotton cord
- Optional: light fabric starch for the tail fan only
- Matching sewing thread (or a single strand of MC) for appliqué
- Dress form or willing helper for placement
Gauge
24 sts and 12 rows = 4" (10 cm) in Mesh Pattern with 2.25 mm hook, blocked.
That is 6 sts = 1" and 3 rows = 1".
Swatch at least 6" (15 cm) square. Wash and pin-block the swatch the same way you will treat the dress before measuring. Change dress hook if needed; keep the motif hook smaller than the dress hook.
Abbreviations (US)
- beg — beginning
- BLO — back loop only
- ch — chain
- ch-sp — chain space
- dc — double crochet
- dc2tog — double crochet 2 together
- dtr — double treble (yo 3 times)
- hdc — half double crochet
- PC — padding cord
- pm — place marker
- rep — repeat
- rnd(s) — round(s)
- RS — right side
- sc — single crochet
- sc2tog — single crochet 2 together
- sk — skip
- sl st — slip stitch
- sp(s) — space(s)
- st(s) — stitch(es)
- tr — treble crochet
- WS — wrong side
- yo — yarn over
Special Stitches
Mesh Pattern (in the round): Ch 4 (counts as dc + ch 1), sk 1 st, *dc in next st, ch 1, sk 1 st; rep from * around, join with sl st to 3rd ch of beg ch-4.
Mesh Pattern (flat, RS): Ch 3 (counts as dc), *ch 1, sk 1 st, dc in next st; rep from * across.
Mesh Pattern (flat, WS): Ch 4 (counts as dc + ch 1), sk first ch-1, *dc in next dc, ch 1, sk next ch-1; rep from * to last dc, dc in last dc (or in top of turning ch).
Keep an odd or even edge stitch as written; if a decrease leaves the mesh “off,” work a dc (no ch) at the edge to square the fabric. Edge stitches are not decorative — they disappear into seams and edgings.
Picot: Ch 3, sl st in first ch of the ch-3.
Picot edging: *Sc in next st, picot, sk 1 st; rep from *.
Dc2tog (mesh decrease): Yo, insert hook in next dc, yo and pull up a loop, yo and draw through 2 loops (2 loops remain); sk the ch-1 between; yo, insert hook in following dc, yo and pull up a loop, yo and draw through 2 loops, yo and draw through all 3 loops on hook. Ch 1 to resume mesh. This replaces (dc, ch 1, dc, ch 1) with (dc2tog, ch 1) and removes 2 sts.
Working over padding cord (PC): Lay the cord along the top of the previous rnd/row. Insert the hook as usual, yarn over, complete the stitch so the cord is enclosed inside the stitches. Feed the cord as you go; do not let it twist. To make a tighter curve, tug the cord tail gently after a section is worked. Never cut the cord until the shape is set and the tail is woven/secured.
Magic ring: Adjustable loop; work the stated stitches into the ring, then pull the tail to close.
Pattern Notes
- Stitch multiple for the dress: 2 sts (each mesh unit is dc + ch 1).
- Work the dress in joined rounds without turning until the underarm split, then work flat in rows, turning at the end of every row.
- Ch 4 at the start of a mesh round counts as dc + ch 1. Ch 3 at the start of a flat mesh row counts as dc.
- Markers: place two side markers at the split points of the round (beg-of-rnd is the left side as worn; second marker is opposite). Move them up each round.
- When only one number is given, it applies to all sizes.
- The peacock is not sized per garment size. One motif fits XS–5XL; add extra tail feathers on larger backs if you want more spread (see Tail).
- Block the dress and the peacock separately before sewing them together.
DRESS
Foundation (Hem)
With MC and 2.25 mm hook, Fsc 228 (252, 276, 300, 324, 348, 372, 396, 420). Join with sl st to first Fsc, being careful not to twist. Pm for beg of rnd.
Alternative start: Ch 228 (252, 276, 300, 324, 348, 372, 396, 420), join with sl st to first ch. Rnd 0: Ch 1, sc in each ch around, join. 228 (252, 276, 300, 324, 348, 372, 396, 420) sc.
Check: 228 sts ÷ 6 sts per inch = 38" hem on XS ✓. 420 ÷ 6 = 70" hem on 5XL ✓.
Body (Hem to Underarms)
Rnd 1 (Mesh): Ch 4 (counts as dc + ch 1), sk next st, *dc in next st, ch 1, sk next st; rep from * around, join with sl st to 3rd ch of beg ch-4.
You now have 114 (126, 138, 150, 162, 174, 186, 198, 210) dc and the same number of ch-1 sps; 228 (252, 276, 300, 324, 348, 372, 396, 420) sts counted as dc + ch-1.
Pm at the opposite side (114 (126, 138, 150, 162, 174, 186, 198, 210) sts from beg). These two markers are the “side seams.”
Work even in Mesh Pattern until the piece measures 4 (4, 4¼, 4¼, 4¼, 4¼, 4¼, 4¼, 4¼)" / 10 (10, 11, 11, 11, 11, 11, 11, 11) cm from the foundation, about 12 (12, 13, 13, 13, 13, 13, 13, 13) rnds total from Rnd 1.
Decrease rnd: Work Mesh Pattern to 3 sts before first side marker (ending on a dc), dc2tog over the next dc and the dc after the marker (skipping the ch-1 between), ch 1, continue mesh to 3 sts before second marker, dc2tog as before, ch 1, mesh to end, join. −2 sts at each side = −4 sts this rnd ✓.
Work 11 (12, 12, 12, 12, 12, 12, 12, 12) rnds even in Mesh Pattern.
Rep the last 12 (13, 13, 13, 13, 13, 13, 13, 13) rnds (1 decrease rnd + the even rnds) 5 more times — 6 decrease rnds total.
Stitch count after all decreases: 228 − (6 × 4) = 204 (252 − 24 = 228; 276 − 24 = 252; 300 − 24 = 276; 324 − 24 = 300; 348 − 24 = 324; 372 − 24 = 348; 396 − 24 = 372; 420 − 24 = 396) sts ✓.
Work even in Mesh Pattern on 204 (228, 252, 276, 300, 324, 348, 372, 396) sts until the piece measures 29 (29¾, 30½, 30½, 30½, 30½, 30½, 30½, 30½)" / 73.5 (75.5, 77.5, 77.5, 77.5, 77.5, 77.5, 77.5, 77.5) cm from the foundation, or until (desired finished length) minus (armhole depth) is reached.
Length customization (do this here, before the split):
- Mini: stop about 8–10" / 20.5–25.5 cm sooner (about 24–30 fewer rnds).
- Midi/knee: as written.
- Maxi: add 10–14" / 25.5–35.5 cm (about 30–42 extra rnds). Add extra even rnds after the last decrease rnd so the A-line is not stretched out.
Check: 204 sts ÷ 6 = 34" bust on XS ✓. 396 ÷ 6 = 66" bust on 5XL ✓.
Armhole Split
At the underarms, the round is divided as follows:
Front: 90 (100, 110, 120, 130, 140, 150, 160, 170) sts
Underarm (leave unworked, each side): 12 (14, 16, 18, 20, 22, 24, 26, 28) sts
Back: 90 (100, 110, 120, 130, 140, 150, 160, 170) sts
Check XS: 90 + 12 + 90 + 12 = 204 ✓. Check 5XL: 170 + 28 + 170 + 28 = 396 ✓.
Next row (RS), Front only: Starting at the first st after the left underarm group, work Mesh Pattern flat across the 90 (100, 110, 120, 130, 140, 150, 160, 170) Front sts. Turn, leaving underarm sts and Back sts unworked.
The Back will be worked later from the same split.
Front — Armhole Shaping
Working in Mesh Pattern flat, decrease 1 st at each edge every RS row 4 (5, 5, 6, 6, 7, 8, 8, 9) times as follows:
RS decrease row: Ch 3, dc2tog over next dc and the following dc (skipping ch-1), resume mesh to last 3 mesh sts, dc2tog, dc in top of turning ch. Turn.
WS row: Work even in Mesh Pattern.
After all armhole decreases: 90 − (2 × 4) = 82 (100 − 10 = 90; 110 − 10 = 100; 120 − 12 = 108; 130 − 12 = 118; 140 − 14 = 126; 150 − 16 = 134; 160 − 16 = 144; 170 − 18 = 152) sts ✓.
Work even in Mesh Pattern until the Front measures 3½ (4, 4, 4, 4½, 5, 5¼, 5¾, 5¾)" / 9 (10, 10, 10, 11.5, 12.5, 13.5, 14.5, 14.5) cm from the split, ending with a WS row. (This leaves the front-neck depth still to work inside the remaining armhole depth.)
Front — Scoop Neck and Shoulders
Neck set-up row (RS): Work Mesh Pattern across 31 (34, 38, 42, 45, 48, 51, 55, 58) sts, sl st across the center 20 (22, 24, 24, 28, 30, 32, 34, 36) sts (or fasten off and rejoin on the far side of the center — either is fine), work remaining 31 (34, 38, 42, 45, 48, 51, 55, 58) sts. Turn.
Work each side of the neck separately.
Left Front (as worn — this is the second side you just worked, if you began at the left armhole): At the neck edge only, decrease 1 st every row 11 (11, 11, 12, 12, 12, 13, 13, 14) times, then work even if needed until the armhole measures 7 (7¼, 7½, 8, 8½, 9, 9½, 10, 10½)" / 18 (18.5, 19, 20.5, 21.5, 23, 24, 25.5, 26.5) cm from the split. Fasten off.
Shoulder remaining: 31 − 11 = 20 (34 − 11 = 23; 38 − 11 = 27; 42 − 12 = 30; 45 − 12 = 33; 48 − 12 = 36; 51 − 13 = 38; 55 − 13 = 42; 58 − 14 = 44) sts ✓.
Right Front: Rejoin yarn at the neck edge if you fastened off. Shape the neck as a mirror: decrease 1 st at the neck edge every row 11 (11, 11, 12, 12, 12, 13, 13, 14) times, then even until the armhole matches the left. Fasten off. 20 (23, 27, 30, 33, 36, 38, 42, 44) sts remain.
If a shoulder is narrower than you like for a bra strap, stop neck decreases 2–4 sts sooner and accept a slightly narrower neck.
Back — Armhole Shaping
With RS facing, join MC at the first Back st after the right underarm group. Work Mesh Pattern flat across 90 (100, 110, 120, 130, 140, 150, 160, 170) Back sts. Turn.
Shape armholes exactly as for the Front: decrease 1 st at each edge every RS row 4 (5, 5, 6, 6, 7, 8, 8, 9) times. 82 (90, 100, 108, 118, 126, 134, 144, 152) sts.
Work even until the Back measures 4¾ (5¼, 5¼, 5¼, 5¾, 6¼, 6½, 7, 7¼)" / 12 (13.5, 13.5, 13.5, 14.5, 16, 16.5, 18, 18.5) cm from the split, ending with a WS row.
Back — Neck and Shoulders
Neck set-up row (RS): Work 27 (30, 34, 38, 41, 44, 47, 51, 54) sts, sl st across the center 28 (30, 32, 32, 36, 38, 40, 42, 44) sts, work remaining 27 (30, 34, 38, 41, 44, 47, 51, 54) sts.
Shape each side separately: decrease 1 st at the neck edge every row 7 (7, 7, 8, 8, 8, 9, 9, 10) times. Then work even until the armhole matches the Front.
Shoulder remaining: 27 − 7 = 20 (30 − 7 = 23; 34 − 7 = 27; 38 − 8 = 30; 41 − 8 = 33; 44 − 8 = 36; 47 − 9 = 38; 51 − 9 = 42; 54 − 10 = 44) sts ✓ — matches Front.
Fasten off.
Shoulders
With RS together (or WS together for a decorative ridge), join each Front shoulder to the matching Back shoulder with sl st or sc through both layers, stitch for stitch. 20 (23, 27, 30, 33, 36, 38, 42, 44) sts each seam.
Turn RS out.
Strap note: These shoulders are bra-friendly. If you want them stronger, work 1 row of sc along each shoulder seam on the WS, or sew a length of clear elastic or twill tape to the WS of the shoulder.
IRISH CROCHET PEACOCK
Work all motifs with MC and 1.75 mm hook unless a contrast is named. Work firmly. The right side is the side facing you as you crochet the outlines.
Finished motif (blocked, medium spread): about 28–32" / 71–81 cm along the wrap path; tail fan about 16–20" / 40.5–51 cm wide. Head sits at the bust/shoulder; the body is a long, slightly curved oval; the tail is a radial fan.
Peacock Head
With 1.75 mm hook and MC, ch 8.
Rnd 1: Sc in 2nd ch from hook, sc in next 5 ch, 3 sc in last ch; rotate to work along the other side of the foundation, sc in next 5 ch, 2 sc in the same ch as the first sc, join with sl st to first sc. 16 sc (6 + 3 + 5 + 2 = 16 ✓).
Rnd 2: Ch 1, 2 sc in first sc, sc in next 5 sc, 2 sc in each of next 3 sc, sc in next 5 sc, 2 sc in each of last 2 sc, join. 22 sc (16 + 6 = 22 ✓).
Rnd 3: Ch 1, sc in first sc, 2 sc in next sc, sc in next 6 sc, (sc in next sc, 2 sc in next sc) 3 times, sc in next 6 sc, (sc in next sc, 2 sc in next sc) twice, join. 28 sc (22 + 6 = 28 ✓).
Rnd 4 (optional PC outline): Lay PC along the rnd and sc in each sc around, working 2 sc in 1 st at each pointed end so the oval stays flat. Join. Fasten off, leaving a 12" / 30.5 cm tail for sewing. Weave the PC tail into the outline; do not cut it until the head is sewn on.
Mark one pointed end as the beak end and the opposite pointed end as the neck join.
Beak: With 1.5 mm hook (or 1.75 mm) and MC, join at the beak end. Ch 6, sl st in 2nd ch from hook, sc in next ch, hdc in next ch, dc in next ch, sl st in the last ch and into the head. Fasten off.
Eye: With C1 (or MC), make a French knot on the RS of the head, slightly toward the beak and above center. Optional ring: with C2, ch 2, 6 sc in 2nd ch from hook, join, and sew around the knot.
Crest (aigrettes): With RS facing, join MC at the top edge of the head, between beak and neck (not at a point). (Ch 10, sl st in 4th ch from hook (picot), ch 4, sl st in the same head st) 3 times along 3 adjacent top sts, moving slightly toward the neck so the crest sits on the crown when the head is turned back. Fasten off.
Regardant Neck (head looking back)
The neck is a padded cord covered in sc, then pulled into an S-curve so the head faces back toward the body and tail.
Cut a PC about 24" / 61 cm long (3 strands of MC, or cotton cord). Leave a 4" / 10 cm tail at the start.
With 1.75 mm hook and MC, work 75 sc over the PC. Do not join and do not cut the PC. The strip will measure about 8–9" / 20.5–23 cm before shaping.
Gently pull the PC until the neck shortens to about 5½–6" / 14–15 cm and forms a shallow S: one curve up from the body, a second curve reversing so the free end (head end) turns back over the line of the body. Pin this S on the blocking board and, with a tapestry needle, tack the PC tail through the last few sc to lock the curve. Only then trim the PC.
Sew the head’s neck-join end to this free end of the neck, RS facing, crest on the outside of the upper curve, beak pointing toward where the tail will be. The bird is looking back along its own spine.
Leave the other end of the neck open for the body join.
Elongated Body
The body is a long oval with a padded outline and a lightly scaled surface. It is the wrapping section of the design.
With 1.75 mm hook and MC, ch 91.
Rnd 1: Sc in 2nd ch from hook, sc in next 88 ch, 3 sc in last ch; rotate, sc in next 88 ch along the other side, 2 sc in the same ch as the first sc, join. 182 sc (1 + 88 + 3 + 88 + 2 = 182 ✓).
Rnd 2: Ch 1, 2 sc in first sc, sc in next 88 sc, 2 sc in each of next 3 sc, sc in next 88 sc, 2 sc in each of last 2 sc, join. 188 sc (182 + 6 = 188 ✓).
Rnd 3 (curve the wrap): Ch 1, sc around, working 2 sc in each of 4 sts evenly along ONE long edge only (this will be the outer, longer edge of the wrap) and 2 sc in 1 st at each pointed end. 196 sc (188 + 4 long-edge + 4 at the two ends = 196 ✓). The extra long-edge increases make a gentle banana curve so the body can hug the dress.
Rnd 4: Ch 1, sc in each sc around, 2 sc in 1 st at each pointed end. 198 sc (196 + 2 = 198 ✓).
Rnd 5 (PC outline): Lay PC along the rnd. Sc in each sc around, enclosing the PC, with 2 sc at each pointed end if the oval starts to cup. Join. Lock and weave in the PC. Fasten off, leaving a long sewing tail.
Mark one pointed end chest/neck (slightly fuller if you placed more end-increases there) and the opposite pointed end tail base.
Scale texture (RS): With MC, surface-sl-st or surface-sc short nested arcs from chest toward tail, like overlapping scales, in 4–6 staggered columns down the center of the body. Do not cover the outer ¼" / 6 mm; that edge stays smooth for sewing. Fasten off.
Chest fullness (optional): At the neck end, join MC and work 3 short rows of sc (about 12–16 sc wide) back and forth on RS, joining each row-end to the outline with a sl st, to pad the breast. Fasten off.
Sew the open end of the neck to the chest point, matching RS. The S-curve should already aim the head back along the body. Tack the inner side of the neck to the chest with 2–3 hidden stitches so the turn-back stays put, but leave the outer curve free so it reads as a neck, not a flat appliqué.
Wing
Ch 28.
Row 1: Sc in 2nd ch from hook, hdc in next ch, dc in next 3 ch, tr in next 12 ch, dc in next 4 ch, hdc in next 3 ch, sc in last 3 ch. Turn. 27 sts.
Row 2: Ch 1, sc in first 3 sc, hdc in next 3 hdc, dc in next 4 dc, tr in next 12 tr, dc in next 3 dc, hdc in next hdc, sc in last sc. Turn.
Row 3 (outer picot edge): Ch 1, sc in first st, *picot, sc in next 2 sts; rep from * to the wide (tr) section; along the 12 tr work (sc, picot, sc) in every other st so the outer edge ruffles like flight feathers. Fasten off.
PC on the leading edge: Join MC at the narrow (shoulder) end. Working over PC, sc along the foundation-chain edge (the inner, body-facing edge). Lock PC. Fasten off, leaving a sewing tail.
Sew the wing onto the body, padded edge toward the neck/chest, picot edge trailing toward the tail and slightly toward the outer curve, covering about one-third of the body. Tack only the padded edge and the center; leave picots free.
Tail Feathers (fan)
Each feather is an “eye” with a padded shaft and picot barbs. Make 9 feathers in five lengths, plus 5 coverts.
Eye (all full feathers): With C1 and 1.75 mm hook, magic ring. Rnd 1: 8 sc in ring, join. 8 sc. Pull ring closed. Rnd 2: Ch 1, 2 sc in each sc, join. 16 sc. Fasten off C1. Rnd 3: Join C2, ch 1, *sc in next sc, 2 sc in next sc; rep from * around, join. 24 sc (16 + 8 = 24 ✓). Rnd 4: Ch 1, *sc in next 2 sc, 2 sc in next sc; rep from * around, join. 32 sc (24 + 8 = 32 ✓). Fasten off C2, leaving a short tail to the WS. All-MC version: work Rnds 1–4 in MC; optionally work Rnd 2 BLO to ridge the eye.
Mark one st of Rnd 4 as the shaft join (this is the inner end of the eye; the opposite side is the feather tip).
Shaft and barbs: Join MC at the shaft-join st, working over PC.
| Feather | Make | Ch for shaft | Sc on shaft (ch − 1) |
|---|---|---|---|
| A (center) | 1 | 56 | 55 |
| B | 2 | 50 | 49 |
| C | 2 | 44 | 43 |
| D | 2 | 38 | 37 |
| E (outer) | 2 | 32 | 31 |
Row 1 (shaft): Ch the number in the table, sc in 2nd ch from hook and in each ch to the eye, enclosing PC; sl st into the eye at the shaft join. Do not turn. Lock a gentle very slight outward curve into the PC if you want the fan to cup; otherwise leave the shaft straight.
Row 2 (barbs, first side): Working back along the sc of the shaft, *ch 4, sl st in next sc; rep from * to the last 4 sc before the eye; then *ch 3, sl st in next sc; rep from * into the eye for 3 sts so the barbs blend into the eye. Fasten off.
Row 3 (barbs, second side): Join MC at the eye on the other side of the shaft. Working along the unused loops of the foundation ch, *ch 5, sl st in next ch; rep from * for two-thirds of the shaft (longer outer barbs), then *ch 4, sl st in next ch; rep from * to the base. Fasten off. Weave PC tails into the shaft.
Coverts (make 5): With MC, magic ring, 8 sc, join. Fasten off. Join MC, ch 18 working over PC, sc in 2nd ch and each ch to the ring, sl st to ring. Work ch-3 picots along both sides of this short shaft as for Row 2. Fasten off. No contrast eye.
Assemble the Peacock
Block every piece before assembly: pin the head, S-neck, curved body, wing, and each feather flat, RS up. Wet or spray. Do not stretch the eyes into circles if they want to be slightly oval — a hint of oval reads as a peacock eye. Dry completely.
On a large blocking board or sheet, lay out:
- Body on a gentle wrap curve, chest to the upper left (or upper right if reversing), tail base lower and toward center.
- Neck and head already attached, head looking back along the body toward the tail base, crest up.
- Wing on the body as sewn.
- Coverts first: sew the 5 small feathers in a small fan over the tail-base point, covering the join.
- Full feathers, overlapping like a hand of cards, RS up, shortest (E) on the outside, then D, C, B, with A in the center. Bases stacked and staggered by ¼–½" / 6–12 mm so the fan is thick at the rump and thin at the tips. Spread to 16–20" / 40.5–51 cm at the tips (wider on XL–5XL).
- Tack bases together on the WS with MC. Do not tack the outer two-thirds of any feather — the fan must stay free.
For a wider train (XL–5XL): make 2 extra Feather D and insert them between D and E.
FINISHING THE DRESS
Hems, Armholes, and Neckline
With 2.25 mm hook, MC, and RS facing:
Armholes: Join at a shoulder seam. Work 1 rnd sc evenly around the armhole, including the unworked underarm sts. Across the underarm group, sc2tog as needed so the underarm sits flat (on larger sizes, sc2tog every 2nd or 3rd st across those 12–28 sts). Join.
Next rnd: Picot edging around. Join. Fasten off.
Rep for the second armhole.
Neckline: Join at a shoulder seam. Work 1 rnd sc evenly around the scoop, placing sc2tog at each inner corner if the front neck wants to flare. Join. Next rnd: picot edging. Join. Fasten off.
Hem: Join at a side marker. Work 1 rnd sc in each foundation st (or in each Fsc). Join. Next rnd: picot edging. Join. Fasten off.
Weave in Ends
Weave every dress end along a mesh dc for at least 1" / 2.5 cm, then reverse direction for ½" / 1.3 cm. On motifs, hide ends under PC outlines or inside eyes. Do not leave knots on the RS.
Blocking the Dress
Soak the dress in lukewarm water with a drop of wool wash or mild soap. Roll in a towel. Pin to finished measurements, stretching the mesh evenly until the A-line and armholes are smooth. Use wires in the hem if you have them. Dry fully. Do not starch the dress body — it must drape.
Lightly starch the tail fan only, if you want the feathers to hold a harder spread in wear. Keep starch off the dress mesh.
Place and Sew the Peacock
Put the blocked dress on a form (or the wearer over a slip). Pin the blocked peacock as follows — left-side placement (reverse all directions for the right side):
- Head at the left bust or the front of the left shoulder, about 1–2" / 2.5–5 cm in from the armhole and 1–2" / 2.5–5 cm below the shoulder seam. Beak points back toward the side and the tail, not toward center front.
- Neck S-curve sits on the upper bust, the reverse curve reading as the bird looking over its own shoulder.
- Body wraps from that bust point, around the left side, toward the center back — a long diagonal comma. On smaller sizes the body may sit higher; on larger sizes let it travel farther around the ribcage.
- Tail fan opens across the back, center feather roughly on the spine or just to the right of it, tips spreading toward the right back and slightly downward. Do not let the longest tips hang below the point you want on the skirt; shift the whole bird up if needed.
- Step back. The line should read as one gesture: head (front) → wrapping body (side) → fanned train (back). Adjust until the S-neck still looks back at the body when the dress is worn.
Sew: With matching thread or a single strand of MC, and with small hidden stitches through the PC outlines only:
- Anchor the head firmly (it takes strain at the shoulder).
- Anchor the neck along its inner curve; leave the outer S free.
- Anchor the body along its spine and inner edge; take a stitch every ½–¾" / 1.3–2 cm. Leave the outer scaled edge and the wing picots free so the bird stays dimensional.
- Anchor the stacked tail bases and covert bases very firmly to the dress. Do not sew the feather shafts or tips down except for 1–2 invisible tacks on the center shaft if the fan flops in wear.
The mesh should still stretch around the body; the peacock is an appliqué, not a second layer of fabric.
SCHEMATIC (read as measurements)
        [shoulder  3¼–7¼"]
     ______/  scoop  \______
    |                       |
    |  armhole 7–10½"       |
    |                       |
    |     bust 34–66"       |     Peacock: head at bust/shoulder
    |                       |     looking BACK along body
    |     (straight/A-line) |     body wraps around side
    |                       |     tail fans across the back
    |                       |
    |_____ hem 38–70" ______|
         length 36–41"
         (adjust at body)
CUSTOMIZATION
Length: Add or remove even mesh rounds in the Body after the last decrease round and before the underarm split. 3 rounds = 1" / 2.5 cm. Recalculate yarn at about 50 yd per extra inch.
Fit / ease: This is a shift. If you want less ease, go down one size (check hip — hem is only 4" larger than bust). If you want more swing, add 8 extra foundation sts (about 1⅓") and take them out with two additional decrease rnds, or leave them in for a wider hem.
Neckline: For a higher neck, begin front neck shaping 1" later (3 fewer neck decrease rows) and leave those sts on the shoulders. For a deeper scoop, begin 1" sooner and decrease more at the neck, watching that shoulder width does not drop below 2" / 5 cm if you wear a bra.
Peacock scale: Hook and blocking control size more than stitch count. A 1.5 mm motif hook shrinks the bird; a 2.25 mm motif hook enlarges it (softer, less Irish). Extra Feather D pairs widen the train without lengthening the wrap.
Color: Traditional Irish: all MC (ecru). Jewel peacock: MC teal or emerald body/neck/head, C1 gold eyes, C2 sapphire rings, optional bronze beak. Change color at the last pull-through of the previous stitch.
SCALING FOR NON-STANDARD AND PET SIZES
Measure the chest/bust circumference you need to fit, add 2–4" / 5–10 cm ease for a pet (more for a human if you want the same relaxed shift). Divide that finished circumference by 4, then multiply by the 24-st gauge: that is the bust stitch count (round to an even number).
Hem = bust + 24 sts (the same 4" A-line). Length, armhole depth, and strap/shoulder width all scale by the same percentage as (new bust ÷ listed bust for the nearest size).
For a rabbit or similar small animal: omit bust/waist shaping and human armholes. Work a straight or A-line tube to chest stitch count, leave openings for the forelegs (split as for armholes but much shallower — typically 1–1½" / 2.5–4 cm), and work a simple bound neck opening that slips over the head, or add a back button loop. Scale the peacock down by using the 1.5 mm hook and making 5 tail feathers (A, two C, two E) with shafts chained at half the listed counts (A: ch 28, etc.). Ensure the neck opening and leg openings are comfortable before sewing the motif on.
CHECKLIST BEFORE YOU WEAR IT
- Gauge was measured after blocking.
- Bust count is 204 (228, 252, 276, 300, 324, 348, 372, 396) before the split.
- Front and Back shoulders match: 20 (23, 27, 30, 33, 36, 38, 42, 44) sts.
- Neck S-curve is locked; head faces the tail.
- Tail bases are sewn; feather tips are free.
- Dress body is unstarched and draped over a slip.
Disclaimer: This pattern was generated by AI and should be reviewed for accuracy before use. While we strive for quality, AI-generated content may contain errors. Please verify measurements, stitch counts, charts, and instructions before beginning your project. Generated by purlJam.uk
Love this pattern?
Save this pattern to your free PurlJam libraryAccess your pattern anytime
Bookmark this page to access your pattern anytime