Type
Knitting
Difficulty
intermediate
Category
custom
AI Thinking Process
Planning
Verification
Pattern
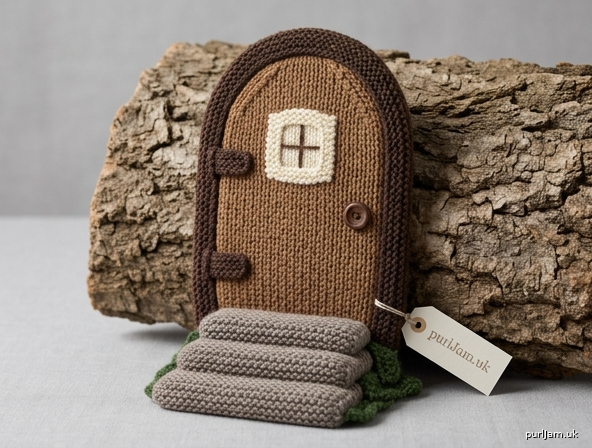
Enchanted Tree Fairy Door
A small knitted fairy door with a stacked stone stair, designed to lean against a tree trunk, garden pot, or bookshelf. Worked entirely in garter stitch from worsted yarn, it is a first project in simple shaping and seaming. Finished door is about 5¼" (13.5 cm) wide and 7" (18 cm) tall; three steps sit in front.
Materials
Yarn (worsted weight / medium 4; about 18–20 sts = 4" on typical needles)
- MC (door): brown or warm wood tone — 40 yd (37 m)
- CC1 (frame, hinges): dark brown — 20 yd (18 m)
- CC2 (steps): gray, taupe, or stone — 30 yd (27 m)
- CC3 (window): cream, pale gold, or light green — 5 yd (5 m)
- CC4 (optional moss): forest green — 10 yd (9 m)
A single 50 g / 100 yd (91 m) skein of MC is more than enough if you prefer a one-color door.
Needles
- US 8 / 5 mm straight or circular needles, or size needed to obtain gauge
Notions
- Tapestry needle
- Scissors
- 1 small button, ⅜–½" (1–1.3 cm), for the doorknob
- Optional: polyester stuffing (a pinch for each step)
- Optional: thin cardboard or plastic canvas, cut to the door outline, to help it stand
- Optional: sewing thread to match the button
Gauge
18 stitches and 32 rows = 4" (10 cm) in garter stitch (knit every row), after light blocking.
Gauge is not critical for fit, but it determines the finished size. A denser fabric (US 7 / 4.5 mm) will make a firmer, slightly smaller door that stands more easily.
Finished Size
- Door: 5¼" (13.5 cm) wide × 7" (18 cm) tall
- Bottom step: about 4⅞" (12.5 cm) wide × 1" (2.5 cm) tall
- Middle step: about 3½" (9 cm) wide × 1" (2.5 cm) tall
- Top step: about 2⅝" (6.5 cm) wide × 1" (2.5 cm) tall
- Assembled depth (door + steps): about 2–2½" (5–6.5 cm)
One size. To make a larger door, use bulky yarn and US 10 / 6 mm needles and follow the same stitch counts.
Abbreviations (US)
- BO — bind off
- CC — contrast color
- CO — cast on
- k — knit
- k2tog — knit 2 stitches together (right-leaning decrease)
- MC — main color
- rep — repeat
- RS — right side
- ssk — slip, slip, knit (left-leaning decrease): slip 1 stitch knitwise, slip 1 stitch knitwise, insert left needle into the front of both slipped stitches and knit them together
- st(s) — stitch(es)
- WS — wrong side
Pattern Notes
- The entire project is knitted flat in garter stitch (knit every row). Garter fabric lies flat, looks like wooden planks or stone, and is ideal for beginners.
- Two identical door panels are seamed together so the door has two neat faces and enough body to lean against a tree. Cardboard slipped between the layers is optional but recommended outdoors.
- The arch is shaped with a paired decrease every other row. The stepped edge is part of the rustic look; seaming the two panels together softens it.
- If ssk is new, you may work k2tog at both ends instead. The arch will lean slightly to one side; for a garden ornament this is not noticeable.
- Cast on using the long-tail method, or any method you know. Bind off knitwise, not too tightly.
- Weave in ends as you go when possible.
Door Panels (make 2)
With MC, CO 24 sts. Width check: 24 sts ÷ 18 sts × 4" = 5.33" (5¼" / 13.5 cm) ✓
Lower door Knit 40 rows (20 garter ridges). Height check: 40 rows ÷ 32 rows × 4" = 5" (12.7 cm) ✓ Piece measures about 5¼" (13.5 cm) wide × 5" (12.7 cm) tall.
Arch The next 16 rows shape the top. Row 1 (decrease row): K1, k2tog, knit to last 3 sts, ssk, k1. (2 sts decreased) Row 2: Knit. Rep Rows 1–2 seven more times (8 decrease pairs total).
Stitch counts after each decrease row: 22, 20, 18, 16, 14, 12, 10, 8. 8 decrease rows × 2 sts = 16 sts decreased; 24 − 16 = 8 sts remaining ✓ 16 shaping rows ÷ 32 rows × 4" = 2" (5 cm) ✓
BO remaining 8 sts knitwise. Fasten off, leaving a 12" (30 cm) tail on one panel only (for seaming).
Each panel measures about 5¼" (13.5 cm) wide × 7" (18 cm) tall. ✓
Make a second identical panel.
Window
With CC3, CO 8 sts. Width: 8 sts ÷ 18 sts × 4" = 1.78" (about 1¾" / 4.5 cm) ✓
Knit 12 rows (6 garter ridges). Height: 12 rows ÷ 32 rows × 4" = 1.5" (3.8 cm) ✓
BO knitwise. Leave a 12" (30 cm) tail for sewing.
Hinges (make 2)
With CC1, CO 5 sts. Knit 10 rows. BO knitwise. Leave a tail for sewing. Each hinge is about 1⅛" (2.8 cm) wide × 1¼" (3.2 cm) tall.
Frame Strip
With CC1, CO 4 sts. Knit every row until the strip measures 26" (66 cm). BO knitwise. Leave a long tail for sewing.
Perimeter check: two sides (7" + 7") + bottom (5¼") + arch (about 5½") ≈ 24¾"; 26" gives ease to ease the strip around the curve ✓
Steps
Bottom step With CC2, CO 22 sts. Width: 22 sts ÷ 18 sts × 4" = 4.89" (about 4⅞" / 12.5 cm) ✓ Knit 16 rows. Height: 16 rows ÷ 32 rows × 4" = 2" (5 cm) ✓ BO knitwise. Leave a tail for seaming.
Middle step With CC2, CO 16 sts. Width: 16 sts ÷ 18 sts × 4" = 3.56" (about 3½" / 9 cm) ✓ Knit 16 rows (2"). BO knitwise.
Top step With CC2, CO 12 sts. Width: 12 sts ÷ 18 sts × 4" = 2.67" (about 2⅝" / 6.5 cm) ✓ Knit 16 rows (2"). BO knitwise.
Optional Moss Strip
With CC4, CO 28 sts. Knit 6 rows. BO knitwise, leaving a long tail. This strip is gathered along one long edge and tucked under the bottom step.
Finishing
Block (optional) Garter stitch rarely needs blocking. If the panels curl at the cast-on edge, pin them to 5¼" × 7" (13.5 × 18 cm) and mist lightly. Let dry.
Assemble the door
- Place the two door panels together, WS facing, matching the arch and side edges.
- If using cardboard, cut it slightly smaller than one panel (trim the top to follow the arch) and slip it between the layers before you close the last side.
- With MC, mattress-stitch or whipstitch around the entire outer edge, leaving a 2" (5 cm) gap at the bottom if you still need to insert cardboard, then close. Do not stuff the door firmly — a flat, slightly padded panel leans better than a puffy one.
Window and knob 4. Center the window on the upper half of the front panel, about 1" (2.5 cm) below the start of the arch and slightly toward the hinge side. Whipstitch in place with the CC3 tail. 5. With CC1, embroider a small plus-sign or hash of straight stitches on the window for panes, if desired. 6. Sew the button doorknob on the front, about halfway down, ¾" (2 cm) in from the opening edge (the edge without hinges).
Hinges and frame 7. Sew the two hinges to the left edge of the front, spaced evenly — one about 1½" (4 cm) from the bottom, one about 1½" (4 cm) below the arch. 8. Pin the frame strip around the outer edge of the door, starting at one bottom corner. Ease extra length around the arch so it lies flat; the strip should sit just inside the seamed edge, like a wooden casing. Whipstitch along both long edges of the strip. Join the short ends at the starting corner and weave in.
Assemble the steps 9. Fold each step piece in half so the cast-on and bind-off edges meet (WS together). The fold becomes the front of the step. Whipstitch the two short sides. Lightly stuff if you want plump stones; leave empty for a flatter stair. Close the back seam. 10. Stack the steps: bottom (widest) on the table, middle centered on top of it, top (narrowest) centered on the middle. Sew the layers together along the back and a few stitches at each side so they cannot slide. 11. Sew the back of the top step to the bottom edge of the door so the staircase sits in front of the threshold. The bottom step will project forward and help the door lean at a slight angle.
Moss (optional) 12. Run a gathering stitch along one long edge of the moss strip, pull in slightly, and stitch the gathered edge under and around the bottom step so a little “grass” peeks out.
Weave in all remaining ends.
To display Lean the door against a tree trunk, fence post, or flowerpot. Outdoors, a cardboard insert will soften in rain — swap it for plastic canvas or a scrap of thin plastic if the door will live in the garden. The piece is a decoration, not a toy for unsupervised small children (button knob).
Quick Reference — Stitch Counts
| Piece | Cast on | Rows | Bind off | Finished (approx.) |
|---|---|---|---|---|
| Door panel ×2 | 24 | 40 even + 16 shaping | 8 | 5¼" × 7" |
| Window | 8 | 12 | 8 | 1¾" × 1½" |
| Hinge ×2 | 5 | 10 | 5 | 1⅛" × 1¼" |
| Frame | 4 | to 26" | 4 | ⅞" × 26" |
| Bottom step | 22 | 16 | 22 | 4⅞" × 1" folded |
| Middle step | 16 | 16 | 16 | 3½" × 1" folded |
| Top step | 12 | 16 | 12 | 2⅝" × 1" folded |
Arch validation: 24 sts − (8 decrease rows × 2 sts) = 8 sts ✓ Door height validation: 5" + 2" = 7" ✓
Disclaimer: This pattern was generated by AI and should be reviewed for accuracy before use. While we strive for quality, AI-generated content may contain errors. Please verify measurements, stitch counts, charts, and instructions before beginning your project. Generated by purlJam.uk
Love this pattern?
Save this pattern to your free PurlJam libraryAccess your pattern anytime
Bookmark this page to access your pattern anytime