Type
Knitting
Difficulty
intermediate
Category
amigurumi
AI Thinking Process
Planning
Verification
Pattern
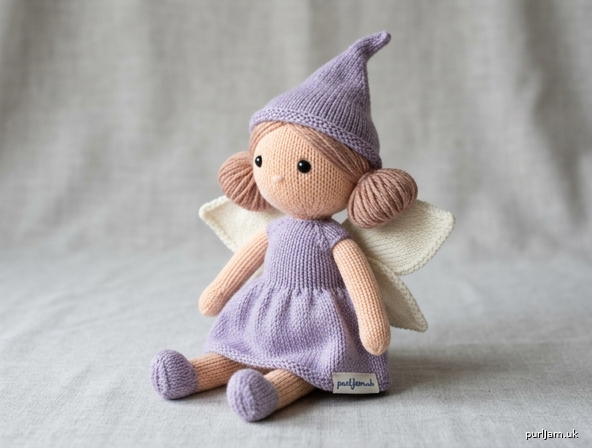
Twinkle the Knitted Fairy Doll
A Beginner Amigurumi Knitting Pattern
Meet Twinkle — a sweet little knitted fairy with a pointed hat, a flared dress, and a pair of delicate wings. Every piece is worked in simple stockinette in the round, making this a perfect confidence-building project for adventurous beginners.
Finished Size: Approximately 9 in (23 cm) tall, including hat.
Materials
- Worsted weight yarn (US #4 / Aran) in the following colors:
- Skin tone — approx. 55 yd (50 m) — head, arms, legs
- Dress color (e.g., lavender) — approx. 45 yd (41 m) — body/dress, hat
- Wing color (white or pale pink) — approx. 25 yd (23 m) — wings
- Hair color — approx. 20 yd (18 m) — hair
- Needles: US 4 / 3.5 mm — set of DPNs OR one long circular for Magic Loop (This is 1–2 sizes smaller than the worsted label recommendation, to create a tight fabric.)
- Polyester fiberfill stuffing — approx. 1.5–2 oz (40–55 g) total
- Safety eyes — 2, 6 mm (or embroider with black floss for children under 3)
- Tapestry needle for seaming and weaving in ends
- Stitch marker to mark beginning of round
- Small amount of pink floss or yarn for cheeks (optional)
Gauge
6 sts and 8 rows = 1 in (2.5 cm) in stockinette in the round (24 sts × 32 rows = 4 in).
Gauge Note: Exact stitch count is less critical than fabric density for toys. Knit a small tube and check that stuffing does not peek through the stitches. If it does, drop down a needle size. A tight, even fabric is your goal.
Abbreviations (US)
- k – knit
- kfb – knit into front and back of stitch (1 st increased)
- k2tog – knit 2 together (1 st decreased)
- ssk – slip, slip, knit (1 st decreased)
- st(s) – stitch(es)
- rnd – round
- St st – stockinette stitch
- rep – repeat
Construction note: All pieces except the wings are worked in the round from the top down or bottom up as noted. Begin each piece using the Magic Ring method or by casting on the given number of stitches and joining to work in the round. Knit every round for stockinette.
HEAD
(Skin tone yarn — worked bottom-up from a magic ring)
Cast on 8 sts using a magic ring; join to work in the round.
- Rnd 1: kfb around → 16 sts
- Rnd 2: *k1, kfb; rep from * around → 24 sts
- Rnd 3: *k3, kfb; rep from * around → 30 sts
- Rnd 4: *k4, kfb; rep from * around → 36 sts (Check: 30 + 6 increases = 36 ✓)
- Rnds 5–14: knit (10 rnds even) → 36 sts
Insert safety eyes between Rnds 8 and 9, spaced about 6 sts (1 in) apart. Anchor firmly.
Begin decreasing:
- Rnd 15: *k4, k2tog; rep from * around → 30 sts
- Rnd 16: *k3, k2tog; rep from * around → 24 sts
- Rnd 17: *k2, k2tog; rep from * around → 18 sts
Stuff the head firmly now.
- Rnd 18: *k1, k2tog; rep from * around → 12 sts
- Rnd 19: k2tog around → 6 sts
Cut yarn, thread through remaining 6 sts, pull tight, and fasten off. (Verify: 36→30→24→18→12→6, decreasing by 6 each round ✓)
BODY / DRESS
(Dress color — worked bottom-up; the flare forms the skirt)
Cast on 8 sts using a magic ring; join.
- Rnd 1: kfb around → 16 sts
- Rnd 2: *k1, kfb; rep from * around → 24 sts
- Rnd 3: *k3, kfb; rep from * around → 30 sts
- Rnds 4–7: knit (4 rnds even — skirt flare) → 30 sts
- Rnd 8: *k3, k2tog; rep from * around → 24 sts (waist shaping)
- Rnds 9–10: knit → 24 sts
- Rnd 11: *k2, k2tog; rep from * around → 18 sts
- Rnds 12–14: knit → 18 sts (bodice)
Stuff the body firmly, keeping the base flat so the doll can sit/stand.
- Rnd 15: *k1, k2tog; rep from * around → 12 sts
- Rnd 16: knit → 12 sts (this is the neck — leave open for seaming to head)
Cut yarn leaving a long tail (~12 in) for attaching the head. Do not close.
ARMS (make 2)
(Skin tone yarn)
Cast on 12 sts; join to work in the round.
- Rnds 1–12: knit → 12 sts
- Rnd 13: *k2, k2tog; rep from * around → 9 sts
Stuff lightly (arms should stay soft and bendable). Cut yarn, thread through remaining 9 sts, pull to close. Leave a long tail for attaching.
LEGS (make 2)
(Skin tone yarn)
Cast on 14 sts; join to work in the round.
- Rnds 1–14: knit → 14 sts
Stuff the legs firmly for the lower half, lightly toward the top. Flatten the top opening and set aside with a long tail for attaching. Do not close the top — it will be seamed to the body base.
HAT
(Dress color — a pointed fairy hat, worked bottom-up)
Cast on 30 sts; join to work in the round.
- Rnds 1–2: knit → 30 sts
- Rnd 3: *k3, k2tog; rep from * around → 24 sts
- Rnds 4–5: knit → 24 sts
- Rnd 6: *k2, k2tog; rep from * around → 18 sts
- Rnds 7–8: knit → 18 sts
- Rnd 9: *k1, k2tog; rep from * around → 12 sts
- Rnd 10: knit → 12 sts
- Rnd 11: k2tog around → 6 sts
- Rnd 12: knit → 6 sts
Cut yarn, thread through remaining 6 sts, pull tight. (Verify: 30→24→18→12→6 ✓) Do not stuff. Weave in ends.
WINGS (make 2 — worked flat)
(Wing color — simple garter-edge leaf shape)
Cast on 3 sts.
- Row 1 (RS): k1, kfb, k1 → 4 sts
- Row 2: knit → 4 sts
- Row 3: k1, kfb, k1, kfb (worked as: kfb, k to last st, kfb) → 6 sts (Simple version: kfb, knit to last st, kfb)
- Rows 4–5: knit → 6 sts
- Row 6: kfb, knit to last st, kfb → 8 sts
- Rows 7–8: knit → 8 sts
- Row 9: kfb, knit to last st, kfb → 10 sts
- Rows 10–11: knit → 10 sts
- Row 12: kfb, knit to last st, kfb → 12 sts
- Rows 13–14: knit → 12 sts
Now decrease to shape the wing tip:
- Row 15: ssk, knit to last 2 sts, k2tog → 10 sts
- Row 16: ssk, knit to last 2 sts, k2tog → 8 sts
- Row 17: ssk, knit to last 2 sts, k2tog → 6 sts
- Row 18: ssk, k2, k2tog → 4 sts
Bind off. The wing is a rounded leaf shape, widest in the middle. Make a second wing identically. (Verify: increases 3→12, decreases 12→4 then bind off ✓)
HAIR
Cut lengths of hair-color yarn about 8 in (20 cm) long. Using a tapestry needle, attach strands to the top and back of the head using a lark's head knot (fold strand in half, pull loop through a stitch, pass ends through loop, tighten). Cover the top and back of the head, leaving the face clear. Trim to desired length — around 3 in (7.5 cm) for a bob, longer for braids. Optionally gather and tie into two low pigtails.
ASSEMBLY & FINISHING
Work in this order for the best proportions and stability:
-
Head to Body: Using the body's long neck tail, attach the open neck (Rnd 16 of body) to the underside of the head using mattress stitch. Add a little extra stuffing at the neck junction before closing to keep the head upright. Seam all the way around securely.
-
Legs to Body: Position both legs at the front base of the body, about 1 in (2.5 cm) apart and symmetric. Flatten the open tops and seam to the body base with the tapestry needle. Make sure they mirror each other so the doll stands evenly.
-
Arms to Body: Attach one arm to each side of the body at Rnd 12–13 (the bodice), just below the neck. Keep them symmetric — measure the same number of rounds down from the neck on both sides.
-
Wings to Back: Center the two wings on the upper back, points angled outward and upward like a butterfly. Whipstitch the inner straight edge of each wing to the back of the body. Anchor the center firmly.
-
Hat: Place the hat on the head at a slight jaunty angle. Pin, then whipstitch the brim to the head all the way around. You may tack the pointed tip down or leave it to flop.
-
Face: If not using safety eyes, embroider two eyes with black floss between Rnds 8–9 of the head. Add optional pink cheeks with a few horizontal straight stitches or a light dab of blush.
-
Weave in all ends securely to the inside of the pieces, burying tails deep into the stuffing so they cannot work loose. Trim closely.
Stuffing Guide
- Head: firm and rounded — the largest amount of stuffing
- Body: firm, with a flat base for standing
- Arms: light and soft (bendable)
- Legs: firm at the bottom, softer at the top
- Hat & Wings: unstuffed
Total stuffing estimate: 1.5–2 oz (40–55 g).
Designer's Tips
- Beginner-friendly: If Magic Loop or DPNs feel tricky at the small stitch counts, cast the head and body onto DPNs and use a stitch marker to track the round start.
- Tight fabric first: Re-check that no stuffing shows through before seaming. It's easier to fix on a single piece than a finished doll.
- Safety: For a child under 3, always embroider the eyes rather than using safety eyes, and stitch the wings and hat down extra securely.
Enjoy your finished fairy — she's ready to sprinkle a little magic! ✨
Disclaimer: This pattern was generated by AI and should be reviewed for accuracy before use. While we strive for quality, AI-generated content may contain errors. Please verify measurements, stitch counts, and instructions before beginning your project. Generated by purlJam.uk
Access your pattern anytime
Bookmark this page to access your pattern anytime