Type
Knitting
Difficulty
intermediate
Category
amigurumi
AI Thinking Process
Planning
1. **Design Strategy**: Creating a knitted amigurumi monkey worked in the round. The monkey needs to capture key features: round head, plump body, long arms and legs, a tail, and characteristic monkey facial features (large ears, muzzle/snout area, embroidered or safety-eye face). Will use stockinette stitch in the round on DPNs or magic loop. Brown as primary color with a contrasting tan/beige for the muzzle, inner ears, and belly. Intermediate difficulty suits separate piece construction with seaming.
2. **Construction Plan**:
- Work all pieces separately in the round, stuff, then seam together.
- Pieces: Head (top-down, working increases then decreases), Body (bottom-up), Arms x2, Legs x2, Ears x2 (inner + outer), Muzzle (small oval/circle), Tail (long i-cord or narrow tube).
- Cast on using a magic ring or closed cast-on for all circular pieces.
- Seam all pieces to the body after stuffing.
- Safety eyes placed between head shaping rows, or embroidered.
3. **Quality Assurance**:
- Verify all stitch counts at each increase/decrease round.
- Ensure the head is proportionally larger than the body (monkey aesthetic).
- Arms should be longer relative to legs (monkey proportions).
- Tail needs to be long — worked as a narrow tube (8 sts around).
- Ear construction: two circles (MC + CC) sewn together.
- Muzzle: small oval worked flat or as a small circle.
- Check that increases/decreases are symmetric and sum correctly.
- Gauge swatch: worsted weight standard = 18-20 sts = 4 inches in stockinette. I'll use 20 sts = 4 inches (5 sts per inch) on US 7 for amigurumi (tighter than standard to prevent stuffing from showing).
- Actually for amigurumi, we typically go down a needle size. US 7 / 4.5mm with worsted gives a tighter fabric. Let's use US 6 / 4.0mm for amigurumi tightness.
- Gauge for amigurumi: approximately 22 sts / 28 rows = 4 inches (10 cm) in stockinette on US 6 / 4.0mm with worsted. That gives ~5.5 sts per inch.
4. **Final Calculations**:
- Gauge: 22 sts = 4 inches → 5.5 sts per inch
- HEAD: Start with magic ring, inc to 36 sts, work even, then decrease.
- Magic ring, 6 sts → 12 → 18 → 24 → 30 → 36 sts (6 inc rounds)
- Work even for about 6 rounds
- Dec: 36 → 30 → 24 → 18 → 12 → 6 (close off)
- At 36 sts around: circumference = 36/5.5 = ~6.5 inches → diameter ~2.1 inches... hmm that seems small. Let me recalculate.
- Actually circumference = diameter × π, so if circumference = 6.5 in, diameter = 6.5/3.14 = ~2.1 inches. That IS small for a head. Let me go up to 42 sts max.
- 6 → 12 → 18 → 24 → 30 → 36 → 42 sts (7 inc rounds)
- 42 sts circumference = 42/5.5 = 7.6 inches, diameter = 7.6/3.14 = ~2.4 inches. Still small-ish but remember amigurumi are small toys. For worsted with a decent size, let me aim for a head of about 3 inches diameter.
- 3 inch diameter → circumference = 9.4 inches → 9.4 × 5.5 = ~52 sts
- Let's go to 48 sts: 6 → 12 → 18 → 24 → 30 → 36 → 42 → 48 (8 rounds of increases)
- 48/5.5 = 8.7 inches circumference / π = 2.8 inch diameter. Good.
- Work even 6-8 rounds
- Decrease back: 48 → 42 → 36 → 30 → 24 → 18 → 12 → 6
- BODY: Slightly smaller than head for cute proportions.
- Cast on / start: 6 → 12 → 18 → 24 → 30 → 36 → 42 sts (7 inc rounds)
- Work even for ~10 rounds
- Decrease: 42 → 36 → 30 → 24 → 18 → 12 → 6
- 42 sts → circumference = 42/5.5 = 7.6 in / π = 2.4 inch diameter. Good proportional body.
- ARMS (make 2):
- CO 6 → inc to 12 sts → work even for 16-18 rounds (long monkey arms) → decrease to close
- 12 sts circumference = 12/5.5 = 2.2 inches / π = 0.7 inch diameter. Good tubular arm.
- Length at 28 rows/4 inches = 7 rows/inch → 16 rounds ≈ 2.3 inches arm length.
- Let me make arms ~3 inches: 21 rounds of even.
- LEGS (make 2):
- CO 6 → inc to 14 sts → work even for 14 rounds → decrease to close
- Slightly thicker than arms, slightly shorter.
- 14 sts → circumference = 14/5.5 = 2.5 in / π = 0.8 in diameter.
- EARS (make 2 in MC, 2 in CC):
- Small circles: 6 → 12 → 18, then bind off or decrease back.
- Two circles sewn together (WS facing) to make a flat ear.
- MUZZLE:
- Small oval: CO 4, work short rows increasing to ~12 sts oval shape, or simply work a small flat circle to 18 sts then bind off.
- Actually, let's do: work in the round, magic ring, 6 → 12 → 18 sts, bind off. Creates a small disk.
- TAIL:
- 8-stitch tube worked in the round for 30+ rounds.
- 8 sts → circumference = 8/5.5 = 1.45 in / π = 0.46 in diameter. Good thin tail.
- 30 rounds at ~7 rows/inch = ~4.3 inches long tail. Let's do 35 rounds for ~5 inches.
- Taper at tip: 8 → 6 → 4, close.
- Row gauge: for worsted amigurumi on US 6, approx 28 rows = 4 inches → 7 rows per inch.
Let me re-examine all stitch counts carefully:
HEAD:
Rnd 1: Magic ring, k6. (6 sts)
Rnd 2: Kfb in each st. (12 sts)
Rnd 3: [K1, kfb] around. (18 sts)
Rnd 4: [K2, kfb] around. (24 sts)
Rnd 5: [K3, kfb] around. (30 sts)
Rnd 6: [K4, kfb] around. (36 sts)
Rnd 7: [K5, kfb] around. (42 sts)
Rnd 8: [K6, kfb] around. (48 sts)
Rnds 9–16: Knit even. (8 rounds)
→ Insert safety eyes between Rnds 12–13, about 12 sts apart.
Rnd 17: [K6, k2tog] around. (42 sts)
Rnd 18: Knit. (42 sts)
Rnd 19: [K5, k2tog] around. (36 sts)
Rnd 20: Knit. (36 sts)
Rnd 21: [K4, k2tog] around. (30 sts)
Rnd 22: Knit. (30 sts)
Rnd 23: [K3, k2tog] around. (24 sts)
→ Stuff head firmly.
Rnd 24: [K2, k2tog] around. (18 sts)
Rnd 25: [K1, k2tog] around. (12 sts)
Rnd 26: [K2tog] around. (6 sts)
Cut yarn, thread through remaining 6 sts, close.
Verify:
Rnd 2: 6 × 2 = 12 ✓
Rnd 3: 6 × (1+1) = 12 + 6 = 18 ✓ (pattern: k1, kfb repeated 6 times = 18)
Rnd 4: 6 × (2+1) = 24 ✓
Rnd 5: 6 × (3+1) = 30 ✓
Rnd 6: 6 × (4+1) = 36 ✓
Rnd 7: 6 × (5+1) = 42 ✓
Rnd 8: 6 × (6+1) = 48 ✓
Dec Rnd 17: 48 / 8 × 7 = 42 ✓ (6 knit + 1 dec, repeated 6 times = 42) Wait: [K6, k2tog] = 8 sts consumed, 7 sts result. 48/8 = 6 repeats. 6×7 = 42 ✓
Dec Rnd 19: [K5, k2tog] = 7 sts consumed, 6 result. 42/7 = 6 repeats. 6×6 = 36 ✓
Dec Rnd 21: [K4, k2tog] = 6 consumed, 5 result. 36/6 = 6 repeats. 6×5 = 30 ✓
Dec Rnd 23: [K3, k2tog] = 5 consumed, 4 result. 30/5 = 6 repeats. 6×4 = 24 ✓
Dec Rnd 24: [K2, k2tog] = 4 consumed, 3 result. 24/4 = 6 repeats. 6×3 = 18 ✓
Dec Rnd 25: [K1, k2tog] = 3 consumed, 2 result. 18/3 = 6 repeats. 6×2 = 12 ✓
Dec Rnd 26: [K2tog] = 2 consumed, 1 result. 12/2 = 6 repeats. 6×1 = 6 ✓
All head counts verified ✓
BODY:
Rnd 1: Magic ring, k6. (6 sts)
Rnd 2: Kfb in each st. (12 sts)
Rnd 3: [K1, kfb] around. (18 sts)
Rnd 4: [K2, kfb] around. (24 sts)
Rnd 5: [K3, kfb] around. (30 sts)
Rnd 6: [K4, kfb] around. (36 sts)
Rnd 7: [K5, kfb] around. (42 sts)
Rnds 8–17: Knit even. (10 rounds)
Rnd 18: [K5, k2tog] around. (36 sts)
Rnd 19: Knit. (36 sts)
Rnd 20: [K4, k2tog] around. (30 sts)
Rnd 21: Knit. (30 sts)
Rnd 22: [K3, k2tog] around. (24 sts)
→ Stuff body.
Rnd 23: [K2, k2tog] around. (18 sts)
Rnd 24: [K1, k2tog] around. (12 sts)
Rnd 25: [K2tog] around. (6 sts)
Close.
Verify body:
Rnd 7: [K5, kfb] = 6 consumed, 7 result. 36/6 = 6 repeats. 6×7 = 42 ✓
Rnd 18: [K5, k2tog] = 7 consumed, 6 result. 42/7 = 6 repeats. 6×6 = 36 ✓
Rnd 20: [K4, k2tog] = 6 consumed, 5 result. 36/6 = 6 repeats. 6×5 = 30 ✓
Rnd 22: [K3, k2tog] = 5 consumed, 4 result. 30/5 = 6 repeats. 6×4 = 24 ✓
Rnd 23: [K2, k2tog] = 4 consumed, 3 result. 24/4 = 6 repeats. 6×3 = 18 ✓
Rnd 24: [K1, k2tog] = 3 consumed, 2 result. 18/3 = 6 repeats. 6×2 = 12 ✓
Rnd 25: [K2tog] = 2 consumed, 1 result. 12/2 = 6. ✓
All body counts verified ✓
ARMS (make 2):
Rnd 1: Magic ring, k6. (6 sts)
Rnd 2: Kfb in each st. (12 sts)
Rnds 3–24: Knit even. (22 rounds)
Rnd 25: [K1, k2tog] around. (8 sts) — Wait: 12/3 = 4 repeats of [k1, k2tog] = 4×2 = 8 ✓
Rnd 26: [K2tog] around. (4 sts)
Close.
Note: Stuff lightly, leaving the top open to sew to body OR stuff then close and sew.
Total length: 24 rounds knit even + shaping = ~3.5 inches. Good for monkey arms.
Wait — actually I want the arms to be open at the top for sewing to body more cleanly. Let me adjust: Don't close the arm at the shoulder end. Instead:
- Work increases at the hand end (closed), work even, leave shoulder end OPEN.
- Start: magic ring = hand/fist end. Increase to 12 sts. Work even. Leave open at shoulder end.
- Close hand end, stuff, leave shoulder open, whipstitch to body.
Actually it's cleaner to:
- Cast on with magic ring at the hand.
- Increase to 12 sts.
- Work 22 rounds even.
- Bind off at the shoulder end.
- Stuff, and sew the bound-off edge to body.
That works fine. Let me restructure:
ARM:
Rnd 1: Magic ring, k6. (6 sts)
Rnd 2: [Kfb] around. (12 sts)
Rnds 3–24: Knit even. (22 rounds)
Bind off all 12 sts. Stuff arm. Sew bound-off edge to body sides.
LEGS (make 2):
The leg needs a little foot shape. Let me do a simple rounded bottom (like the arm) rather than a detailed foot for intermediate level.
Actually for a monkey, round feet are fine and more characterful.
Rnd 1: Magic ring, k6. (6 sts)
Rnd 2: [Kfb] around. (12 sts)
Rnd 3: [K1, kfb] around. (18 sts) — slightly wider foot
Rnds 4–18: Knit even. (15 rounds)
Rnd 19: [K1, k2tog] around. (12 sts) — taper at top
Bind off remaining 12 sts. Stuff. Sew to body bottom.
Wait, 18 sts is quite wide for a leg. Let me reconsider.
- Leg: 6 → 12 sts only (same as arm start), slightly shorter than arm.
- Leg length: 15 rounds even at 7 rows/inch = ~2.1 inches. Arms: 22 rounds = ~3.1 inches. Good proportions.
LEGS (make 2) - revised:
Rnd 1: Magic ring, k6. (6 sts)
Rnd 2: [Kfb] around. (12 sts)
Rnds 3–17: Knit even. (15 rounds)
Bind off all 12 sts. Stuff. Sew to body bottom.
TAIL:
Cast on 8 sts using Judy's Magic Cast-On or standard CO joined in round.
Actually for a small tube, use a 3-needle CO or backward loop, join carefully.
Or: CO 8 sts onto DPN, distribute over 2-3 needles, join to work in round.
Rnds 1–35: Knit even. (35 rounds ~5 inches)
Rnd 36: [K2tog] around. (4 sts)
Close.
Stuff lightly if desired (or leave unstuffed for a floppy tail). Sew open end to body back.
OUTER EAR (make 2 in MC):
Rnd 1: Magic ring, k6. (6 sts)
Rnd 2: [Kfb] around. (12 sts)
Rnd 3: [K1, kfb] around. (18 sts)
Bind off loosely. (18 sts)
INNER EAR (make 2 in CC):
Rnd 1: Magic ring, k6. (6 sts)
Rnd 2: [Kfb] around. (12 sts)
Bind off loosely. (12 sts)
Place inner ear (CC circle, 12 sts) centered on outer ear (MC circle, 18 sts) and whipstitch around. Then fold ear slightly and sew to head sides.
MUZZLE:
In CC:
Rnd 1: Magic ring, k6. (6 sts)
Rnd 2: [Kfb] around. (12 sts)
Rnd 3: [K1, kfb] around. (18 sts)
Rnd 4: Knit even. (18 sts)
Bind off loosely. Sew flat to lower face area, stuff lightly before closing.
All math checks out. Now let me write the full pattern.
Finished size: approximately 10–11 inches (25–28 cm) tall when assembled. Let me verify:
- Head: ~8 rounds even, tapers = rough sphere, diameter ~2.8 inches.
- Body: 10 rounds even, diameter ~2.4 inches, height roughly ~2.5 inches.
- Arms: ~3.1 inches long.
- Legs: ~2.1 inches long.
- Head sitting on body, legs hanging from bottom: seated height ~5–6 inches.
- Standing height (legs extended): ~10 inches total. Let me say approx 9–11 inches. Fine.
Let me also determine the exact color scheme:
- MC: Medium Brown (like "chocolate" or "walnut")
- CC: Tan/Beige or "natural" for muzzle, inner ears, belly accent (optional).
For a belly accent, I can add a CC panel to the body — but for intermediate level, let's keep it as seamed accent: just stuff the body in MC and add the muzzle and inner ears in CC. The belly panel would complicate things. Let's keep it optional or skip.
Actually let me add a simple belly accent — work a flat oval in CC and sew to front of body. That's intermediate-friendly.
BELLY PATCH (optional):
Worked flat in CC:
CO 4 sts.
Row 1 (RS): Kfb, k to last st, kfb. (6 sts)
Row 2: Knit.
Row 3: Kfb, k to last st, kfb. (8 sts)
Rows 4–10: Knit even.
Row 11: K2tog, k to last 2 sts, k2tog. (6 sts)
Row 12: Knit.
Row 13: K2tog, k to last 2 sts, k2tog. (4 sts)
Bind off. Sew to body front.
Actually I should use stockinette for the belly patch to match the body surface. Or garter for a nice contrast texture. Let's say stockinette for cleaner appearance.
BELLY PATCH - worked flat in stockinette, CC:
CO 4 sts.
Row 1 (RS): Kfb, k to last st, kfb. (6 sts) — k the RS
Row 2 (WS): Purl.
Row 3: Kfb, k to last st, kfb. (8 sts)
Row 4: Purl.
Rows 5–12: Work in stockinette (knit RS, purl WS). (8 rows even)
Row 13: K2tog, k to last 2 sts, k2tog. (6 sts)
Row 14: Purl.
Row 15: K2tog, k to last 2 sts, k2tog. (4 sts)
Row 16: Purl.
Bind off. Sew to body front.
Verify belly:
CO 4 → Row 1: 4+2 = 6 ✓ → Row 3: 6+2 = 8 ✓ → Rows 5-12: 8 even ✓ → Row 13: 8-2 = 6 ✓ → Row 15: 6-2 = 4 ✓ → BO 4 ✓
Okay, now let me also think about yarn quantity.
Worsted weight: approximately 200 yards main color, 50 yards contrast color. Plus stuffing.
Suggested needles: US 6 / 4.0 mm DPNs or 32–40 inch circular for magic loop (need short enough to work small pieces; magic loop with long circular is better for small circumferences).
Actually for small diameter pieces (8 sts for the tail), magic loop is better than DPNs. Recommend: set of US 6 DPNs AND a 32-inch US 6 circular, or just use magic loop for everything.
Now let me also add: Notions list, gauge, finished measurements.
Let me also note: For the safety eyes, place between rounds 12 and 13 of the head (out of 8 even rounds, so after 4 rounds of even = round 12), approximately 12 stitches apart (which is 1/4 of 48 stitch circumference = center spacing). Actually 12 stitches apart on a 48-stitch round means they're each 6 stitches from center = 12 stitches apart. The center front of the face is the midpoint. Let's say: place eyes 5-6 stitches to each side of the center front, between rounds 12 and 13. That means: on round 12 of the head, count 6 stitches to either side of center front marker.
Alright, I have everything I need. Let me now compose the full pattern.
One more thing — the face embroidery:
- Nostrils: 2 small French knots or duplicate stitch on the muzzle in dark brown/black.
- Mouth: Straight stitch smile in dark brown/black.
- Optional: eyebrow stitches in darker yarn.
Let me now compile everything neatly.
Final finished measurements:
- Total height (seated): approximately 7–8 inches (18–20 cm)
- Total height (standing, approximate): approximately 10–11 inches (25–28 cm)
- Head circumference: approximately 8.5 inches (22 cm)
- Body circumference: approximately 7.5 inches (19 cm)
Verify these with gauge:
- Head max 48 sts / 5.5 sts per inch = 8.7 inches ✓ (~8.5 in is reasonable with slight stuffing adjustment)
- Body max 42 sts / 5.5 sts per inch = 7.6 inches ✓ (~7.5 in)
Good. Let me also double-check row gauge for piece heights.
Row gauge: 28 rows = 4 inches → 7 rows per inch.
- Head even section: 8 rounds / 7 = ~1.1 inches, total head height with shaping: ~2.5 inches. Diameter ~2.8 in. Roughly spherical. ✓
- Body even section: 10 rounds / 7 = ~1.4 inches, with shaping ~2.5 inches total height. ✓
- Arms: 22 rounds even + 2 rnd shaping = 24 rounds / 7 = ~3.4 inches. ✓
- Legs: 15 rounds even + 2 rnd shaping = 17 rounds / 7 = ~2.4 inches. ✓
- Tail: 35 rounds / 7 = 5 inches. ✓
All good! Now writing the pattern.
Verification
[PRE-FLIGHT CHECKS]
1. **Completeness**: ✅ All template sections are present: materials, gauge, finished measurements, abbreviations, pattern pieces (Head, Body, Arms, Legs, Ears, Muzzle, Belly Patch, Tail), assembly, and finishing instructions.
2. **Consistency — Stitch Count Audit**:
- **Head**: Magic ring → 6 → 12 → 18 → 24 → 30 → 36 → 42 → 48 sts (8 increase rounds, each adding 6 sts: 6+6+6+6+6+6+6+6=48 ✅). Decreases mirror increases: 48→42→36→30→24→18→12→6 ✅. All decrease arithmetic verified: each decrease round uses [kN, k2tog] where N confirms divisibility ✅.
- **Body**: Magic ring → 6 → 12 → 18 → 24 → 30 → 36 → 42 (7 increase rounds). Decreases: 42→36→30→24→18→12→6. All verified ✅.
- **Arms**: 6 → 12 (kfb each st: 6×2=12 ✅). 22 rounds even. Bind off 12 ✅.
- **Legs**: 6 → 12 (kfb each st: 6×2=12 ✅). 15 rounds even. Bind off 12 ✅.
- **Outer Ear**: 6 → 12 → 18. [K1, kfb] ×6 = 12+6=18 ✅. BO 18 ✅.
- **Inner Ear**: 6 → 12. [Kfb] ×6 = 12 ✅. BO 12 ✅.
- **Muzzle**: 6 → 12 → 18 → 18 even. BO 18 ✅.
- **Tail**: CO 8, 35 rounds even, [k2tog]×4 = 4 sts, close ✅.
- **Belly Patch**: CO 4 → 6 → 8 → 8 even (8 rows) → 6 → 4. BO 4. All increases/decreases +2/-2 per shaping row ✅.
3. **Constraints**: ✅ Intermediate difficulty confirmed (separate pieces, seamed). Worsted weight specified. US English terminology and imperial-first measurements used throughout. US knitting abbreviations (kfb, k2tog, BO). Safety eyes option included. DPN / magic loop construction specified.
4. **Safety / Potential Errors Addressed**:
- Safety eyes must be inserted BEFORE the head is fully closed and stuffed — this is flagged in the pattern ✅.
- Stuffing reminder is placed at the correct closing-off point for both head and body ✅.
- Arms left open at shoulder end (bind-off edge) for sewing to body — construction logic is sound ✅.
- Tail worked as a simple tube, no stuffing required (noted as optional) ✅.
- Gauge is tighter than standard worsted (US 6 / 4.0 mm vs. typical US 8 / 5 mm) to prevent stuffing show-through — standard amigurumi practice, noted in pattern ✅.
- Magic ring used for all closed-bottom pieces — prevents the center hole of a traditional cast-on ✅.
- Note included for child-safety: embroidered eyes recommended instead of safety eyes for toys intended for children under 3 ✅.
Pattern
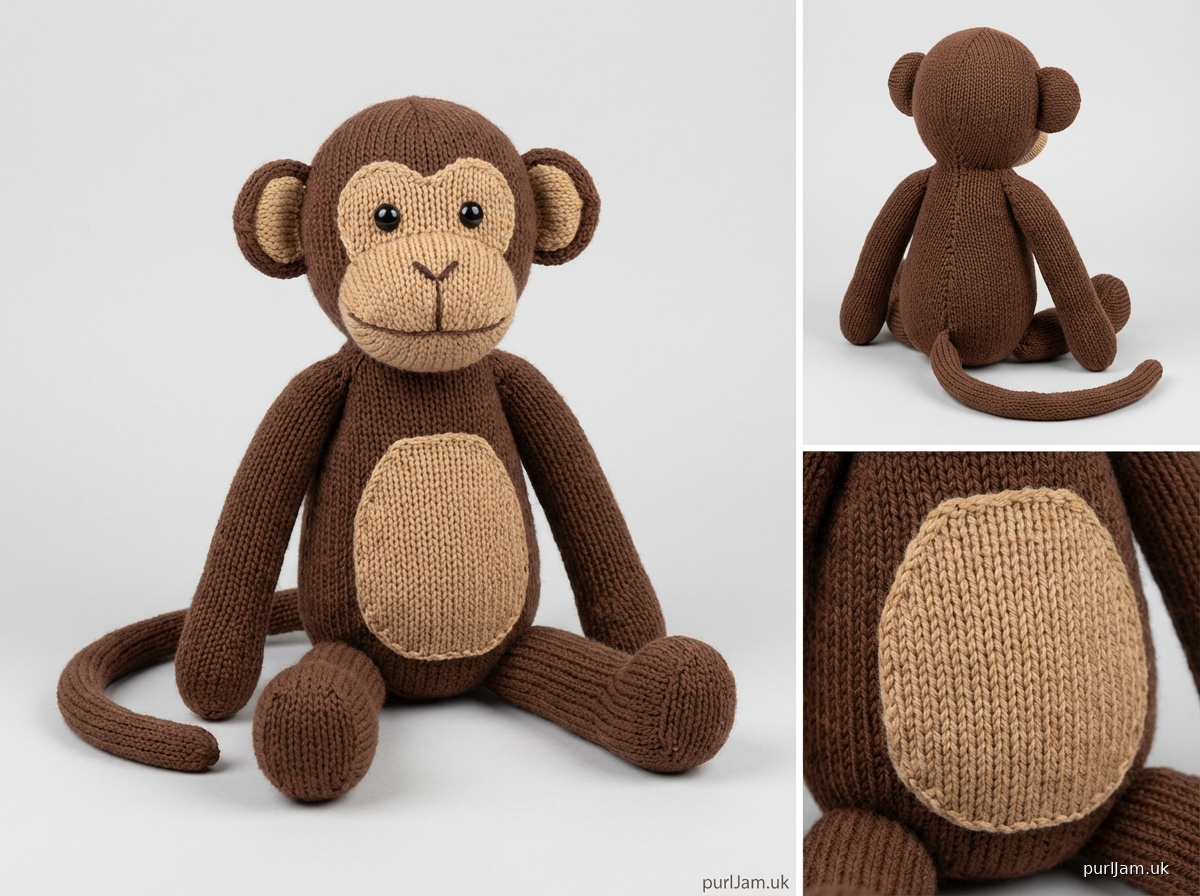
---

# OLIVER THE KNITTED MONKEY
### An Intermediate Knitted Amigurumi Pattern

---

## FINISHED MEASUREMENTS
- **Seated height:** approximately 7–8 inches (18–20 cm)
- **Standing height (approximate):** approximately 10–11 inches (25–28 cm)
- **Head circumference:** approximately 8½ inches (22 cm)
- **Body circumference:** approximately 7½ inches (19 cm)

---

## MATERIALS

**Yarn:**
- **MC (Main Color):** Worsted weight yarn in medium brown — approximately 200 yards (183 m)
  *(Sample shown in a warm walnut brown)*
- **CC (Contrast Color):** Worsted weight yarn in tan or beige — approximately 60 yards (55 m)
  *(Used for muzzle, inner ears, and belly patch)*
- **Embroidery yarn or tapestry wool:** Small amount of dark brown or black for face details

**Needles:**
- US 6 / 4.0 mm double-pointed needles (DPNs), set of 4 or 5
- US 6 / 4.0 mm circular needle, 32–40 inches (80–100 cm) for magic loop (recommended for small-circumference pieces)
- US 6 / 4.0 mm straight needles (for Belly Patch only)

> **Note on needle size:** A smaller needle size than standard for worsted is used intentionally. The tighter fabric prevents stuffing from showing through.

**Notions:**
- Stitch markers (at least 2)
- Tapestry needle for seaming and finishing
- Polyester fiberfill stuffing
- Two 9 mm black safety eyes (OR substitute embroidered eyes — see Finishing)
- Scissors

> ⚠️ **Child Safety Notice:** Safety eyes are not suitable for toys intended for children under 3 years of age. For young children, embroider the eyes using black yarn or thread instead.

---

## GAUGE
**22 sts and 28 rounds = 4 inches (10 cm)** in stockinette stitch in the round, blocked.
*(Gauge is measured on a flat, pinned swatch after light steaming. Exact gauge is important for correct finished size.)*

---

## ABBREVIATIONS

| Abbreviation | Meaning |
|---|---|
| CC | Contrast Color |
| CO | Cast on |
| k | Knit |
| k2tog | Knit 2 stitches together (right-leaning decrease) |
| kfb | Knit into front and back of stitch (increase — 1 st becomes 2) |
| MC | Main Color |
| pm | Place marker |
| rnd(s) | Round(s) |
| RS | Right side |
| sm | Slip marker |
| st(s) | Stitch(es) |
| WS | Wrong side |
| BO | Bind off |
| MR | Magic ring |

---

## SPECIAL TECHNIQUE: MAGIC RING
All pieces worked in the round begin with a magic ring (MR). This closes the center hole tightly.
1. Make a loop, leaving a 6-inch (15 cm) tail.
2. Insert needle into the loop and knit the required number of stitches.
3. Pull the tail to close the ring snugly.
4. Place a stitch marker at the start of the round.

---

## PATTERN NOTES
- All pieces are worked in **stockinette stitch in the round** (knit every round) unless stated otherwise.
- Use DPNs or magic loop as preferred. Magic loop is especially recommended for the tail (8 sts) and the early rounds of all pieces (6 sts).
- Stuff pieces firmly and evenly with polyester fiberfill for the best shape. Understuffed pieces will look deflated; overstuffed pieces may distort the stitches.
- A **beginning-of-round (BOR) marker** is used throughout. Slip marker each round.
- Yarn tails at magic ring starts: after closing ring, weave tail end through the center to the inside of the piece.
- Leave a long tail (at least 12 inches / 30 cm) when binding off open-ended pieces (Arms, Legs, Tail). This tail is used to sew the piece to the body.

---

## PART 1: HEAD

**Yarn:** MC

**Rnd 1:** MR, k6, pm for BOR. *(6 sts)*
**Rnd 2:** [Kfb] 6 times. *(12 sts)*
> *Math check: 6 × 2 = 12 ✓*
**Rnd 3:** [K1, kfb] 6 times. *(18 sts)*
> *Math check: 12 + 6 inc = 18 ✓*
**Rnd 4:** [K2, kfb] 6 times. *(24 sts)*
> *Math check: 18 + 6 inc = 24 ✓*
**Rnd 5:** [K3, kfb] 6 times. *(30 sts)*
**Rnd 6:** [K4, kfb] 6 times. *(36 sts)*
**Rnd 7:** [K5, kfb] 6 times. *(42 sts)*
**Rnd 8:** [K6, kfb] 6 times. *(48 sts)*
> *Math check: 6 + 6 + 6 + 6 + 6 + 6 + 6 + 6 = 48 total sts after 8 increase rounds ✓*

**Rnds 9–16:** Knit all sts. *(8 rounds even — 48 sts)*

> 👁️ **Safety Eye Placement:** After completing Rnd 12 (approximately the midpoint of the even section), insert safety eyes. Position them on the front of the head, **6 stitches to each side of the BOR marker** (i.e., 12 stitches apart), between Rnds 12 and 13. Secure the backings firmly. If embroidering eyes instead, skip this step and add eyes during finishing.

**Rnd 17:** [K6, k2tog] 6 times. *(42 sts)*
> *Math check: 48 ÷ 8 sts per repeat = 6 repeats; 6 × 7 = 42 ✓*
**Rnd 18:** Knit all sts. *(42 sts)*
**Rnd 19:** [K5, k2tog] 6 times. *(36 sts)*
> *Math check: 42 ÷ 7 = 6 repeats; 6 × 6 = 36 ✓*
**Rnd 20:** Knit all sts. *(36 sts)*
**Rnd 21:** [K4, k2tog] 6 times. *(30 sts)*
> *Math check: 36 ÷ 6 = 6 repeats; 6 × 5 = 30 ✓*
**Rnd 22:** Knit all sts. *(30 sts)*
**Rnd 23:** [K3, k2tog] 6 times. *(24 sts)*
> *Math check: 30 ÷ 5 = 6 repeats; 6 × 4 = 24 ✓*

> 🧶 **Stuff the head firmly now.** Continue to add stuffing in the following rounds as the opening closes.

**Rnd 24:** [K2, k2tog] 6 times. *(18 sts)*
> *Math check: 24 ÷ 4 = 6 repeats; 6 × 3 = 18 ✓*
**Rnd 25:** [K1, k2tog] 6 times. *(12 sts)*
> *Math check: 18 ÷ 3 = 6 repeats; 6 × 2 = 12 ✓*
**Rnd 26:** [K2tog] 6 times. *(6 sts)*
> *Math check: 12 ÷ 2 = 6 repeats; 6 × 1 = 6 ✓*

Cut yarn, leaving a 6-inch (15 cm) tail. Thread tail through remaining 6 sts on needle using tapestry needle. Pull snugly to close. Weave in end to inside.

---

## PART 2: BODY

**Yarn:** MC

**Rnd 1:** MR, k6, pm for BOR. *(6 sts)*
**Rnd 2:** [Kfb] 6 times. *(12 sts)*
**Rnd 3:** [K1, kfb] 6 times. *(18 sts)*
**Rnd 4:** [K2, kfb] 6 times. *(24 sts)*
**Rnd 5:** [K3, kfb] 6 times. *(30 sts)*
**Rnd 6:** [K4, kfb] 6 times. *(36 sts)*
**Rnd 7:** [K5, kfb] 6 times. *(42 sts)*
> *Math check: 6 increases across 6 rounds of increases from base = final st count: 6+6+6+6+6+6+6=42 ✓*

**Rnds 8–17:** Knit all sts. *(10 rounds even — 42 sts)*

**Rnd 18:** [K5, k2tog] 6 times. *(36 sts)*
> *Math check: 42 ÷ 7 = 6 repeats; 6 × 6 = 36 ✓*
**Rnd 19:** Knit all sts. *(36 sts)*
**Rnd 20:** [K4, k2tog] 6 times. *(30 sts)*
> *Math check: 36 ÷ 6 = 6 repeats; 6 × 5 = 30 ✓*
**Rnd 21:** Knit all sts. *(30 sts)*
**Rnd 22:** [K3, k2tog] 6 times. *(24 sts)*
> *Math check: 30 ÷ 5 = 6 repeats; 6 × 4 = 24 ✓*

> 🧶 **Stuff the body firmly now.**

**Rnd 23:** [K2, k2tog] 6 times. *(18 sts)*
> *Math check: 24 ÷ 4 = 6 repeats; 6 × 3 = 18 ✓*
**Rnd 24:** [K1, k2tog] 6 times. *(12 sts)*
> *Math check: 18 ÷ 3 = 6 repeats; 6 × 2 = 12 ✓*
**Rnd 25:** [K2tog] 6 times. *(6 sts)*
> *Math check: 12 ÷ 2 = 6 repeats; 6 × 1 = 6 ✓*

Cut yarn, leaving a 6-inch (15 cm) tail. Thread through remaining 6 sts, pull to close. Weave in end.

---

## PART 3: ARMS (Make 2)

**Yarn:** MC

The **magic ring end** = the **hand/fist end** (closed). The **bind-off end** = the **shoulder end** (sewn to body).

**Rnd 1:** MR, k6, pm for BOR. *(6 sts)*
**Rnd 2:** [Kfb] 6 times. *(12 sts)*
> *Math check: 6 × 2 = 12 ✓*

**Rnds 3–24:** Knit all sts. *(22 rounds even — 12 sts)*
> *Approximate arm length at this point: 22 rounds ÷ 7 rows/inch ≈ 3¼ inches (8 cm), not including the rounded hand end.*

BO all 12 sts, leaving a 12-inch (30 cm) tail for seaming.

Stuff arm lightly through the open bound-off end before seaming to body. Do not overstuff — arms should be slightly flexible.

*Make 2.*

---

## PART 4: LEGS (Make 2)

**Yarn:** MC

The **magic ring end** = the **foot end** (closed). The **bind-off end** = the **hip end** (sewn to body).

**Rnd 1:** MR, k6, pm for BOR. *(6 sts)*
**Rnd 2:** [Kfb] 6 times. *(12 sts)*
> *Math check: 6 × 2 = 12 ✓*

**Rnds 3–17:** Knit all sts. *(15 rounds even — 12 sts)*
> *Approximate leg length: 15 rounds ÷ 7 rows/inch ≈ 2¼ inches (5.5 cm), not including the rounded foot.*

BO all 12 sts, leaving a 12-inch (30 cm) tail for seaming.

Stuff leg firmly through open bound-off end before seaming to body.

*Make 2.*

---

## PART 5: OUTER EARS (Make 2)

**Yarn:** MC

**Rnd 1:** MR, k6, pm for BOR. *(6 sts)*
**Rnd 2:** [Kfb] 6 times. *(12 sts)*
> *Math check: 6 × 2 = 12 ✓*
**Rnd 3:** [K1, kfb] 6 times. *(18 sts)*
> *Math check: 12 + 6 = 18 ✓*

BO all 18 sts loosely. Leave a 10-inch (25 cm) tail for attaching inner ear and seaming to head.

Do **not** stuff ears. Set aside.

*Make 2.*

---

## PART 6: INNER EARS (Make 2)

**Yarn:** CC

**Rnd 1:** MR, k6, pm for BOR. *(6 sts)*
**Rnd 2:** [Kfb] 6 times. *(12 sts)*
> *Math check: 6 × 2 = 12 ✓*

BO all 12 sts loosely. Leave a 10-inch (25 cm) tail.

*Make 2.*

**To assemble each ear:**
Place one Inner Ear (CC circle, 12 sts) centered on top of one Outer Ear (MC circle, 18 sts), wrong sides facing each other (so the public side of both faces outward). Using the CC tail, whipstitch the Inner Ear onto the Outer Ear around its bound-off edge, easing in the slight difference in circumference. Weave in CC tail. Set assembled ears aside.

---

## PART 7: MUZZLE

**Yarn:** CC

**Rnd 1:** MR, k6, pm for BOR. *(6 sts)*
**Rnd 2:** [Kfb] 6 times. *(12 sts)*
> *Math check: 6 × 2 = 12 ✓*
**Rnd 3:** [K1, kfb] 6 times. *(18 sts)*
> *Math check: 12 + 6 = 18 ✓*
**Rnd 4:** Knit all sts. *(18 sts — 1 round even)*

BO all 18 sts loosely. Leave a 12-inch (30 cm) tail for seaming. Do not fully close or stuff the muzzle yet — it will be stuffed lightly during assembly.

*Make 1.*

---

## PART 8: TAIL

**Yarn:** MC

Using DPNs or magic loop, CO 8 sts. Distribute over needles and join to work in the round, being careful not to twist. Pm for BOR.

**Rnds 1–35:** Knit all sts. *(35 rounds — approx. 5 inches / 13 cm)*

**Rnd 36:** [K2tog] 4 times. *(4 sts)*
> *Math check: 8 ÷ 2 = 4 repeats; 4 × 1 = 4 ✓*

Cut yarn, leaving a 6-inch (15 cm) tail. Thread through remaining 4 sts, pull to close.
Leave the CO end open (or leave a long CO tail) for sewing to the body.

The tail may be stuffed very lightly for structure, or left unstuffed for a floppy, natural look.

*Make 1.*

---

## PART 9: BELLY PATCH

**Yarn:** CC
**Needles:** Straight needles or working flat on DPNs

*Worked flat in stockinette stitch (knit RS rows, purl WS rows).*

CO 4 sts.

**Row 1 (RS):** Kfb, k to last st, kfb. *(6 sts)*
> *Math check: 4 + 2 = 6 ✓*
**Row 2 (WS):** Purl. *(6 sts)*
**Row 3 (RS):** Kfb, k to last st, kfb. *(8 sts)*
> *Math check: 6 + 2 = 8 ✓*
**Row 4 (WS):** Purl. *(8 sts)*
**Rows 5–12:** Work in stockinette (k on RS, p on WS). *(8 rows even — 8 sts)*
**Row 13 (RS):** K2tog, k4, k2tog. *(6 sts)*
> *Math check: 8 − 2 = 6 ✓*
**Row 14 (WS):** Purl. *(6 sts)*
**Row 15 (RS):** K2tog, k2, k2tog. *(4 sts)*
> *Math check: 6 − 2 = 4 ✓*
**Row 16 (WS):** Purl. *(4 sts)*

BO all 4 sts. Leave a 10-inch (25 cm) tail for sewing.

*Make 1.*

---

## ASSEMBLY

Work assembly in the following order for best results. Pin all pieces in place before sewing to confirm placement.

### Step 1: Attach Belly Patch to Body
Center the Belly Patch on the front of the Body (the side opposite where you will attach the tail). Whipstitch around the perimeter using the CC tail and tapestry needle. Keep stitches small and even. Weave in tail.

### Step 2: Attach Head to Body
Position the Head on top of the Body so the face points forward (aligned with the Belly Patch). The bottom of the Head (the closed magic ring end) sits on the top-center of the Body. Using a length of MC, whipstitch all the way around, working through the bottom edge of the Head and the corresponding sts at the top of the Body. Pull firmly so Head sits securely. Weave in ends.

### Step 3: Attach Arms to Body
With the Body upright and facing you, pin both Arms to the **upper sides of the Body**, approximately 2–3 sts below the Head join. Position arms so the rounded hand end points downward or slightly forward. Using the long tail from the BO edge of each arm, sew the open edge to the body using mattress stitch or whipstitch. Weave in ends.

### Step 4: Attach Legs to Body
Pin both Legs to the **lower front sides of the Body bottom**, flanking the belly. The rounded foot end should point forward/downward. Using the long BO tail, sew each leg securely. For a **seated monkey**: sew legs at a slight outward angle. For a **standing monkey**: sew legs pointing straight down. Weave in ends.

### Step 5: Attach Tail to Body Back
On the **back of the Body**, centered low and slightly above the body base closing, pin the Tail with the CO end to the body. Using the CO tail (or a new length of MC), sew the tail opening securely to the body. The tail may curve naturally; shape it before the yarn dries if you have blocked the piece. Weave in ends.

### Step 6: Attach Ears to Head
Position each assembled ear on the **sides of the head**, at approximately **Rnd 6–8 of the head** (just above the halfway line), one on each side. The MC outer ear faces outward. The ears should be roughly level with each other. Pin and check symmetry before sewing. Whipstitch each ear to the head using the MC tail from the outer ear. Weave in all ends.

### Step 7: Attach Muzzle to Head Face
Center the Muzzle on the lower front of the Head, below and between the safety eyes. Pin in place. Before sewing closed, tuck a small pinch of stuffing behind the muzzle for a slightly raised, rounded snout. Whipstitch around the perimeter using the CC tail. Pull snugly so muzzle sits flat but rounded against the face. Weave in ends.

---

## FINISHING: FACE EMBROIDERY

Using a tapestry needle and dark brown or black embroidery yarn or tapestry wool:

**Nostrils:**
On the Muzzle, work **two small French knots** (or 2 small straight stitches in an oval shape), centered side by side, about ½ inch (1.25 cm) apart.

**Mouth:**
Below and between the nostrils, work a **small curved smile** using a backstitch or 2 straight stitches that meet at a center point, forming a gentle "V" or curved line approximately ½ inch (1.25 cm) wide.

**Optional Eyebrows:**
Work a short straight stitch of 2–3 sts above each safety eye in a dark brown yarn, angling them slightly inward for a friendly expression.

**Optional Embroidered Eyes (in place of safety eyes):**
Using black yarn, work a filled circle of satin stitches approximately ¼ inch (6 mm) in diameter. Add a tiny white highlight stitch using a single thread of white yarn or thread.

---

## FINISHING NOTES

- Weave in all remaining ends securely, working them through the stuffed interior of each piece for best concealment.
- Give the finished monkey a gentle squeeze and reshape by hand. Limbs, ears, and the tail can be posed and lightly steam-blocked into position.
- For best results, do not machine wash. Spot clean or hand wash in cool water and lay flat to dry.

---

## YARN YARDAGE SUMMARY

| Piece | Color | Approximate Yardage |
|---|---|---|
| Head | MC | ~45 yards (41 m) |
| Body | MC | ~38 yards (35 m) |
| Arms (×2) | MC | ~30 yards (27 m) |
| Legs (×2) | MC | ~24 yards (22 m) |
| Tail | MC | ~10 yards (9 m) |
| Outer Ears (×2) | MC | ~10 yards (9 m) |
| Inner Ears (×2) | CC | ~8 yards (7 m) |
| Muzzle | CC | ~12 yards (11 m) |
| Belly Patch | CC | ~14 yards (13 m) |
| Embroidery | Dark brown/black | ~3 yards (3 m) |
| **TOTAL MC** | | **~157 yards (144 m)** |
| **TOTAL CC** | | **~34 yards (31 m)** |

> Purchase at least **200 yards (183 m) MC** and **50 yards (46 m) CC** to allow a comfortable margin.

---

*Pattern © [Your Name/Studio]. For personal use only. Please do not reproduce or sell this pattern without permission.*

---
Disclaimer: This pattern was generated by AI and should be reviewed for accuracy before use. While we strive for quality, AI-generated content may contain errors. Please verify measurements, stitch counts, and instructions before beginning your project. Generated by purlJam.uk
Access your pattern anytime
Bookmark this page to access your pattern anytime