Type
Knitting
Difficulty
intermediate
Category
custom
AI Thinking Process
Planning
Verification
Pattern
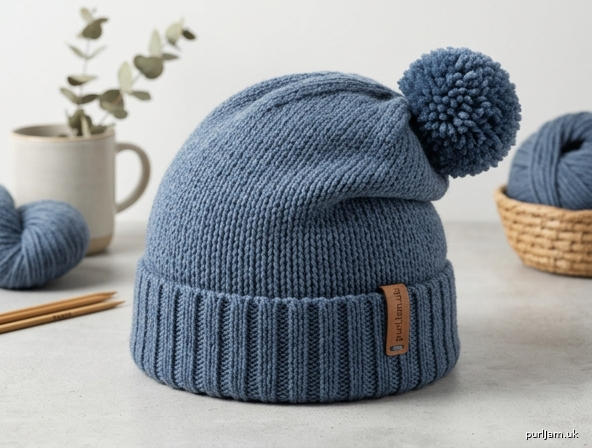
Everyday Beginner Beanie
A knitted take on the classic beginner crochet hat
If you learned to make hats with a hook, this is the knitting equivalent: a stretchy ribbed brim, a smooth stockinette body, and a simple decrease crown. It is worked from the bottom up in the round in worsted-weight yarn. Four sizes are written out in full. Choose the size whose finished circumference is about 1½–2" (4–5 cm) smaller than the wearer’s head.
Sizes
Child (Adult Small, Adult Medium, Adult Large)
To fit head circumference: 19–21 (21–22½, 22½–24, 24–25½)" / 48–53 (53–57, 57–61, 61–65) cm
Finished hat circumference (unstretched): 17¾ (19½, 21¼, 23)" / 45 (49.5, 54, 58.5) cm
Finished height (brim to crown): 7½ (8½, 9, 9½)" / 19 (21.5, 23, 24) cm
The pattern is written Child (Adult Small, Adult Medium, Adult Large). When only one number appears, it applies to all sizes.
Materials
Yarn: Worsted weight (CYC 4), smooth wool, wool-blend, or acrylic.
- 110 (130, 150, 170) yards / 100 (120, 135, 155) m
- One 100 g / 220 yd (200 m) skein is enough for any size, including a small pom-pom.
Needles:
- US 8 / 5 mm, 16" (40 cm) circular needle
- US 8 / 5 mm double-pointed needles (DPNs), or a long circular for magic loop, for the crown
Notions:
- 1 stitch marker (beginning of round)
- Tapestry needle
- Scissors
- Optional: pom-pom maker or extra yarn for a pom-pom
Gauge
18 stitches and 24 rounds = 4" (10 cm) in stockinette stitch (knit every round) on US 8 / 5 mm, after light blocking.
Check gauge. A 4" (10 cm) swatch in the round is ideal; a flat stockinette swatch (knit RS, purl WS) is acceptable for this hat.
- If you have more than 18 sts in 4", the hat will be too small — go up a needle size.
- If you have fewer than 18 sts in 4", the hat will be too large — go down a needle size.
At this gauge: 18 sts ÷ 4" = 4.5 sts per inch.
Abbreviations (US knitting)
| Abbreviation | Meaning |
|---|---|
| BOR | beginning of round |
| CO | cast on |
| k | knit |
| k2tog | knit 2 stitches together (right-leaning decrease; 2 sts become 1) |
| p | purl |
| pm | place marker |
| rep | repeat |
| rnd(s) | round(s) |
| RS | right side |
| st(s) | stitch(es) |
| St st | stockinette stitch (in the round: knit every round) |
Pattern Notes
For crocheters new to knitting. Knitting builds fabric with two needles and a live row of stitches. You do not turn the work while knitting in the round — the right side faces you the whole time. Knit every round = stockinette (smooth “V” fabric). Knit 2, purl 2 = the ribbed brim. k2tog is the decrease (similar in purpose to skipping a stitch or sc2tog).
Construction. Cast on at the brim, join in the round, work 2×2 rib, then stockinette to length, then decrease for the crown. Switch from the 16" circular to DPNs (or magic loop) when the stitches no longer stretch comfortably around the circular — usually around the k3, k2tog or k2, k2tog round.
Join without twisting. After casting on, lay the work flat with the cast-on edge at the bottom and all stitches facing the same way before you join. A twisted join cannot be fixed later.
Stretch. Ribbing and knitted fabric both stretch. The finished circumferences already include negative ease; do not size up “for stretch” unless the recipient likes a very loose hat.
Stitch counts. All sizes begin as a multiple of 8 (and of 4, for 2×2 rib). Each decrease round removes 10 (11, 12, 13) stitches.
Instructions
Brim
Using the circular needle and the long-tail cast-on (stretchy and suitable for hat brims), CO 80 (88, 96, 104) sts.
Check: 80 ÷ 4.5 = 17.8" ≈ 17¾"; 88 ÷ 4.5 = 19.6" ≈ 19½"; 96 ÷ 4.5 = 21.3" ≈ 21¼"; 104 ÷ 4.5 = 23.1" ≈ 23" ✓. All counts are multiples of 4 (for 2×2 rib) and of 8 (for the crown) ✓.
Place a marker for BOR and join to work in the round, being careful not to twist.
Rib rnd: *K2, p2; rep from * to end of rnd.
Repeat the Rib rnd until the brim measures 1½ (2, 2, 2)" / 4 (5, 5, 5) cm from the cast-on edge.
Tip: If your join looks loose, pull the working yarn firmly on the first stitch of the next few rounds. You can also knit the first and last cast-on stitches together on the first round only (optional; if you do this, restore the count by knitting into the front and back of one stitch on the following round so you still have 80 (88, 96, 104) sts).
Body
Change to stockinette:
Next rnd: Knit all stitches.
Continue knitting every round until the piece measures 5¼ (6¼, 6¾, 7¼)" / 13.5 (16, 17, 18.5) cm from the cast-on edge, including the brim.
This leaves approximately 2¼" / 5.5 cm for the crown, so finished height will be 7½ (8½, 9, 9½)" / 19 (21.5, 23, 24) cm ✓.
Crown
You will decrease 10 (11, 12, 13) stitches on every decrease round. When the circular needle feels too long, switch to DPNs (divide stitches over 3 or 4 needles) or magic loop and keep the BOR marker.
Decrease rnd 1: *K6, k2tog; rep from * to end of rnd. 10 (11, 12, 13) repeats of k2tog → 80 − 10 = 70 (88 − 11 = 77, 96 − 12 = 84, 104 − 13 = 91) sts ✓.
Next rnd: Knit.
Decrease rnd 2: *K5, k2tog; rep from * to end of rnd. 70 − 10 = 60 (77 − 11 = 66, 84 − 12 = 72, 91 − 13 = 78) sts ✓.
Next rnd: Knit.
Decrease rnd 3: *K4, k2tog; rep from * to end of rnd. 60 − 10 = 50 (66 − 11 = 55, 72 − 12 = 60, 78 − 13 = 65) sts ✓.
Next rnd: Knit.
Decrease rnd 4: *K3, k2tog; rep from * to end of rnd. 50 − 10 = 40 (55 − 11 = 44, 60 − 12 = 48, 65 − 13 = 52) sts ✓.
Next rnd: Knit.
Decrease rnd 5: *K2, k2tog; rep from * to end of rnd. 40 − 10 = 30 (44 − 11 = 33, 48 − 12 = 36, 52 − 13 = 39) sts ✓.
Next rnd: Knit.
Decrease rnd 6: *K1, k2tog; rep from * to end of rnd. 30 − 10 = 20 (33 − 11 = 22, 36 − 12 = 24, 39 − 13 = 26) sts ✓.
Next rnd: Knit.
Decrease rnd 7: *K2tog; rep from * to end of rnd. 20 − 10 = 10 (22 − 11 = 11, 24 − 12 = 12, 26 − 13 = 13) sts ✓.
Decrease rnd 8: *K2tog; rep from * to last 0 (1, 0, 1) st, k 0 (1, 0, 1). 10 ÷ 2 = 5; 11 sts → 5 k2tog + k1 = 6; 12 ÷ 2 = 6; 13 sts → 6 k2tog + k1 = 7. Remaining: 5 (6, 6, 7) sts ✓.
Finishing
Cut the yarn, leaving a tail about 8" (20 cm) long. Thread the tail onto a tapestry needle, draw it through the remaining 5 (6, 6, 7) stitches, and pull tight to close the crown. Pass the needle through the stitches a second time for security, then weave the tail to the wrong side and fasten off.
Weave in the cast-on tail on the wrong side of the brim.
Blocking (optional but recommended): Lightly mist the hat or steam it from a distance, then shape it over a bowl or balloon roughly the finished circumference. Let dry. Do not stretch the ribbing aggressively if you want it to stay snug.
Pom-pom (optional): Make a 2½–3" (6.5–7.5 cm) pom-pom, tie it firmly, and sew it to the crown with the yarn tails. Take the tails all the way through the crown and tie them on the inside so the pom-pom cannot pull out.
Weave in any remaining ends.
Quick size recap
| Size | CO sts | Finished circ. | Height | Yarn |
|---|---|---|---|---|
| Child | 80 | 17¾" (45 cm) | 7½" (19 cm) | 110 yd (100 m) |
| Adult Small | 88 | 19½" (49.5 cm) | 8½" (21.5 cm) | 130 yd (120 m) |
| Adult Medium | 96 | 21¼" (54 cm) | 9" (23 cm) | 150 yd (135 m) |
| Adult Large | 104 | 23" (58.5 cm) | 9½" (24 cm) | 170 yd (155 m) |
Customizing (optional)
- Slouchier hat: Work the body 1–1½" (2.5–4 cm) longer before starting the crown. Budget about 15–25 extra yards.
- Folded brim: Work ribbing for 4" (10 cm), then continue as written, adding 2" (5 cm) to the “work until” length so the fold is extra, not stolen from the body. Budget about 20 extra yards.
- Length only, same circumference: Keep the cast-on; change only the body length.
Do not change the cast-on unless you stay on a multiple of 8 and recast the crown math.
Enjoy your first (or next) knitted hat — same cozy result as a beginner crochet beanie, built with needles instead of a hook.
Disclaimer: This pattern was generated by AI and should be reviewed for accuracy before use. While we strive for quality, AI-generated content may contain errors. Please verify measurements, stitch counts, charts, and instructions before beginning your project. Generated by purlJam.uk
Love this pattern?
Save this pattern to your free PurlJam libraryAccess your pattern anytime
Bookmark this page to access your pattern anytime