Type
Knitting
Difficulty
beginner
Category
hat
AI Thinking Process
Planning
Verification
Pattern
Fisherman’s Beanie
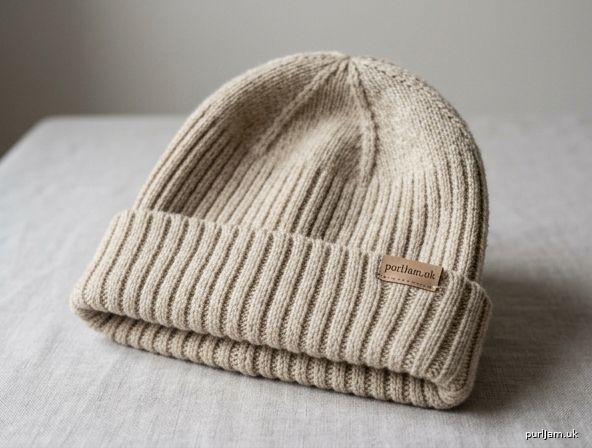
A classic fisherman’s watch cap in firm k2, p2 rib. It is worked in the round from the brim up, with a deep fold-over brim and a simple decreased crown. Wear the brim folded for a neat beanie, or turn it down when you want your ears covered. There are no cables and nothing to sew unless you choose the optional pompom.
Difficulty: Beginner
Skills used: long-tail cast-on, knit, purl, k2tog, working in the round, simple decreases.
Instructions are given for four sizes: Child (Adult S, Adult M, Adult L). Where only one figure is given, it applies to all sizes. Before you begin, circle or highlight the figures for your size.
Sizes
| Child | Adult S | Adult M | Adult L | |
|---|---|---|---|---|
| To fit head circumference | 46–50 cm (18–19¾ in) | 50–55 cm (19¾–21¾ in) | 54–58 cm (21¼–22¾ in) | 58–63 cm (22¾–24¾ in) |
Sizes overlap slightly. Choose the smaller size for a snug fit under a hood, or the larger size if you prefer a little more ease. The rib stretches and recovers, so the unstretched hat is smaller than the head.
Finished measurements
Measured unstretched, after a light block if you choose to block.
| Child | Adult S | Adult M | Adult L | |
|---|---|---|---|---|
| Circumference | 40 cm (15¾ in) | 44 cm (17¼ in) | 48 cm (19 in) | 56 cm (22 in) |
| Length, cast-on to crown (brim unfolded) | 22 cm (8¾ in) | 25 cm (9¾ in) | 26.5 cm (10½ in) | 28 cm (11 in) |
| Length worn, brim folded | 17 cm (6¾ in) | 19 cm (7½ in) | 19.5 cm (7¾ in) | 21 cm (8¼ in) |
| Brim fold | 5 cm (2 in) | 6 cm (2⅜ in) | 7 cm (2¾ in) | 7 cm (2¾ in) |
Lengths are approximate. They assume you meet the tension below. Fit is governed by stitch tension and the centimetre length you knit before the crown, not by counting every round of the body.
Yarn
Worsted weight yarn (CYC 4 / about 10-ply). A light Aran-weight yarn is acceptable if you can match the tension.
Quantity: 160 (185, 210, 240) m [175 (202, 230, 262) yd].
These amounts do not include a pompom. Add 15 m (16 yd) if you make one.
A typical 100 g ball of worsted has about 180–220 m. Check the ball band and buy enough balls to cover the metreage, plus the pompom if you want one. Smooth wool or a wool blend gives the best elasticity and warmth. A hairy or novelty yarn is harder to see for a first hat.
Suggested colours: oatmeal, navy, charcoal grey, or undyed cream — a traditional fisherman palette. Any colour works.
Needles
- 4.5 mm (UK 7 / US 7) circular needle, 80–100 cm long, for magic loop
or a 4.5 mm circular needle, 40 cm long, for Adult S, Adult M and Adult L brim and body only - 4.5 mm (UK 7 / US 7) double-pointed needles, set of 4 or 5, for the crown (and for the whole Child hat if you are not using magic loop)
The needle cable must be shorter than the stitches on it, unless you are using magic loop. A 40 cm circular needle is uncomfortable for the Child size (40 cm of stitches) and will not work for the crown in any size.
If you need to change needle size to match tension, use the same size for the whole hat. A firm fabric is what you want: it sheds weather and holds its shape.
Notions
- 8 stitch markers, 1 in a different colour for the beginning of the round
- Tapestry needle
- Scissors
- Optional: a small piece of card, about 7 cm wide, for the pompom (or a pompom maker about 6–7 cm)
Tension
20 stitches and 28 rounds = 10 cm (4 in) over k2, p2 rib, measured unstretched, using 4.5 mm needles.
This is the pattern tension (gauge). It is a little firmer than a loose stocking-stitch tension, on purpose.
Swatch: Cast on 28 sts. Join in the round, being careful not to twist, and work k2, p2 for at least 10 cm. Lay the tube flat and do not stretch it. The centre 20 stitches should measure 10 cm across; the full 28 stitches should measure 14 cm (28 ÷ 20 × 10 = 14 ✓). Count 28 rounds over 10 cm in height.
If you have more than 20 stitches in 10 cm, your knitting is tight — try a 5.0 mm needle. If you have fewer than 20 stitches in 10 cm, your knitting is loose — try a 4.0 mm needle. Remake the swatch until the stitch tension matches. Round tension may vary a little; follow the centimetre lengths in the pattern if it does.
Abbreviations
| Abbreviation | Meaning |
|---|---|
| k | knit |
| p | purl |
| k2tog | knit 2 stitches together (1 stitch decreased) |
| st(s) | stitch(es) |
| rnd(s) | round(s) |
| rep | repeat |
| pm | place marker |
| sm | slip marker |
| cm | centimetres |
| mm | millimetres |
Stocking stitch in the round: knit every stitch of every round.
Pattern notes
- The hat is one piece, worked from the brim up. There is no separate brim to pick up and no seam.
- Every rib round is *k2, p2; rep from * to end. The beginning-of-round marker should always sit just before a k2.
- Do not stretch the fabric when you measure. Measure from the cast-on edge to the needle, with the hat smoothed flat.
- The lower 5 (6, 7, 7) cm is the fold. You do not sew it up. Fold it when you wear the hat, or leave it down to cover the ears.
- For a slightly slouchier hat, work an extra 2–3 cm before the crown. Allow about 10–15 m more yarn for each extra 2 cm.
- The crown is worked in stocking stitch so the decreases are easy to see. The change sits on the top of the head and barely shows when the hat is worn.
- Read the crown checklist for your size and tick each figure as you reach it.
Instructions
Cast on and join
With 4.5 mm needles and the long-tail method, cast on 80 (88, 96, 112) stitches.
Check the count before you join:
- 80 ÷ 4 = 20 repeats of k2, p2 ✓
- 88 ÷ 4 = 22 repeats ✓
- 96 ÷ 4 = 24 repeats ✓
- 112 ÷ 4 = 28 repeats ✓
Being careful not to twist the cast-on, join to work in the round and place the contrasting marker to show the beginning of the round. The cast-on edge should run straight around like a bracelet, not cross over itself like a figure of eight. Leave the yarn tail hanging at the marker so you can spot the start easily.
Unstretched circumference of this cast-on, at the pattern tension: 80 (88, 96, 112) ÷ 20 × 10 = 40 (44, 48, 56) cm ✓.
Brim and body
Every round: *K2, p2; rep from * to end.
Work straight in rib until the piece measures 16 (18, 19, 19) cm from the cast-on edge.
That is the whole body. There is no separate brim instruction: the fold is simply the lower part of this rib.
Early check (worth doing): after about 5 cm, the unstretched circumference should be close to 40 (44, 48, 56) cm. If it is more than 2 cm too large, start again on a 4.0 mm needle. If it is more than 2 cm too small, start again on a 5.0 mm needle.
Keep the rib lined up. If a round starts with purl stitches, you have shifted the start — move the marker back so the round begins with k2.
Crown shaping
Change to double-pointed needles or magic loop when the stitches no longer sit comfortably on the circular needle. Keep the beginning-of-round marker.
Set-up: From the beginning-of-round marker, place a marker every 10 (11, 12, 14) stitches, including the beginning-of-round marker as one of the eight. You should finish exactly back at the start.
8 sections × 10 (11, 12, 14) sts = 80 (88, 96, 112) sts ✓.
The crown decreases are plain knits. You no longer work k2, p2.
Rnd 1 (decrease): *K2tog, knit to the next marker, sm; rep from * to end. 8 stitches decreased.
After this first decrease round you have 72 (80, 88, 104) stitches.
Each section has lost 1 stitch: 9 (10, 11, 13) sts × 8 = 72 (80, 88, 104) ✓.
Rnd 2 (plain): Knit, slipping markers as you come to them.
Repeat Rnd 1 and Rnd 2 until 8 stitches remain, ending with Rnd 1. Do not work a plain round after the decrease round that leaves 8 stitches.
On the last decrease round, each section has 2 stitches: k2tog uses both of them, the marker is slipped (or removed), and 1 stitch remains in that section. 8 × k2tog on 16 stitches = 8 stitches ✓.
Stitch count after each decrease round — tick your size only:
- Child: 72, 64, 56, 48, 40, 32, 24, 16, 8
- Adult S: 80, 72, 64, 56, 48, 40, 32, 24, 16, 8
- Adult M: 88, 80, 72, 64, 56, 48, 40, 32, 24, 16, 8
- Adult L: 104, 96, 88, 80, 72, 64, 56, 48, 40, 32, 24, 16, 8
Each figure is 8 less than the one before it. If your count does not match the next figure, you have missed a k2tog or worked one twice — check the eight markers before you continue.
The decrease lines form eight gentle spokes. That is the right look.
Close the crown
Cut the yarn, leaving a tail of about 30 cm. Thread the tail onto a tapestry needle, pass it through the remaining 8 stitches, and slip the stitches off the needle. Pull firmly until the hole closes. Take the tail to the inside and sew two or three small stitches across the gather so it cannot pop open. Do not cut the tail yet if you still need to weave it in; weave it in on the wrong side.
Finishing
Weave in the cast-on tail on the wrong side, catching it along a purl column so it does not show on the right side. Weave in the crown tail the same way.
Fold the lower 5 (6, 7, 7) cm to the outside. The brim should stay folded because of the rib; there is nothing to stitch down. If a wool brim will not stay put, catch it with two or three tiny stitches at the sides, hidden in a purl column — optional, and not needed for most yarns.
Blocking (optional): Soak in cool water with a little wool wash, squeeze gently, and dry flat, or over a balloon or hat form that matches your head size. Do not stretch the rib out hard, and do not press it flat. A light steam is enough for acrylic. Do not hang the hat to dry.
Optional pompom
Skip this section if you want a plain watch cap. Many fisherman’s caps have no pompom.
- Cut a piece of card about 7 cm wide. Wind yarn around it about 80–100 times, keeping the wraps even. (A 6–7 cm pompom maker works the same way.)
- Slide a separate 30 cm length of yarn under the wraps at one edge and tie a very tight knot. Turn the card and tie a second tight knot on the other side, using the same tie.
- Cut the wraps open along the opposite edge of the card. Remove the card.
- Shake the pompom and trim it into a neat ball about 6 cm across. Do not cut the tying tails.
- Use those tails to sew the pompom to the gathered centre of the crown. Go through the tied centre of the pompom and the 8 closed stitches several times. Finish with a knot on the inside and weave in the ends.
A pompom uses about 15 m (16 yd) extra.
How to wear it
- Folded: turn up 5 (6, 7, 7) cm for a close beanie. This is the worn length in the measurements table.
- Down: leave the brim unfolded in cold weather. The full length, about 22 (25, 26.5, 28) cm, covers the ears. This is the traditional watch-cap way to wear it.
The rib should grip gently and spring back when you take the hat off. If it is loose enough to slip over your eyes, you needed a smaller size or a tighter tension. If it leaves a deep mark, you needed a larger size or a slightly looser tension.
Care
Hand wash in cool water. Squeeze — do not wring — and dry flat, reshaping the brim. Do not hang the hat, and do not iron the rib flat. Wool may be freshened by a damp steam; follow the ball band for acrylic and blends.
Quick reference
| Child | Adult S | Adult M | Adult L | |
|---|---|---|---|---|
| Cast on | 80 | 88 | 96 | 112 |
| Rib repeats (k2, p2) | 20 | 22 | 24 | 28 |
| Work even to | 16 cm | 18 cm | 19 cm | 19 cm |
| Crown sections | 8 × 10 sts | 8 × 11 sts | 8 × 12 sts | 8 × 14 sts |
| Close crown on | 8 sts | 8 sts | 8 sts | 8 sts |
| Fold | 5 cm | 6 cm | 7 cm | 7 cm |
Cast-on check: 4 × 20 (22, 24, 28) = 80 (88, 96, 112) ✓.
Section check: 8 × 10 (11, 12, 14) = 80 (88, 96, 112) ✓.
Final close: 16 ÷ 2 = 8 ✓.
Disclaimer: This pattern was generated by AI and should be reviewed for accuracy before use. While we strive for quality, AI-generated content may contain errors. Please verify measurements, stitch counts, charts, and instructions before beginning your project. Generated by purlJam.uk
Love this pattern?
Save this pattern to your free PurlJam libraryAccess your pattern anytime
Bookmark this page to access your pattern anytime