Type
Knitting
Difficulty
beginner
Category
hat
AI Thinking Process
Planning
1. **Design Strategy**:
* **User Request Interpretation**: The request for a "long floppy santa hat with very thick fluffy yarn" immediately indicates a departure from the "worsted" yarn weight specified in the template's *default* instructions. As an expert, I will interpret "very thick fluffy yarn" as requiring a Super Bulky (category 6 or 7) yarn to achieve the desired look and feel for a beginner-friendly project. The "Customize yarn weight" instruction in the template supports this.
* **Floppy & Long**: This will be achieved by using a super bulky yarn (which naturally creates a looser fabric) and extending the body length significantly compared to a standard beanie.
* **Santa Hat Aesthetic**: The hat will feature a white ribbed brim and a red main body, culminating in a tapered, elongated point. A large pompom will be included as an optional, but highly recommended, finishing touch.
* **Beginner-Friendly**: The pattern will use simple techniques: K2P2 ribbing for the brim, basic stockinette for the body, and simple K2tog decreases for the crown shaping. Instructions will be clear, concise, and broken down into manageable steps.
2. **Construction Plan**:
* **Brim**: Worked in the round from the bottom up using a slightly smaller circular needle and K2P2 ribbing for elasticity and structure. This will be the "white" portion.
* **Body**: Transition to a larger circular needle and work in stockinette stitch for a substantial length (much longer than a standard beanie) to achieve the "floppy" characteristic. This will be the "red" portion.
* **Crown**: Gradual, simple K2tog decreases worked over several rounds on Double-Pointed Needles (DPNs) to create a long, tapered point characteristic of a Santa hat.
* **Finishing**: Weaving in ends and attaching a large pompom.
3. **Quality Assurance**:
* **Fit**: Ensure the initial cast-on stitch count, combined with the chosen super bulky yarn and appropriate needle size, results in a circumference that comfortably fits an average adult head (22-24 inches / 56-61 cm) when stretched, while allowing for a relaxed, floppy fit when worn.
* **Floppiness**: Verify the body length is sufficient (aim for 18+ inches / 45.5+ cm for the body alone) to achieve the desired "long floppy" effect.
* **Beginner Accessibility**: Review all instructions for clarity, avoiding complex techniques or terminology. Ensure stitch counts are consistently maintained or correctly decreased.
* **Santa Hat Shape**: Confirm the crown decrease schedule creates a smooth, elongated taper suitable for a Santa hat point, rather than an abrupt beanie crown.
* **Technical Accuracy**: Double-check all mathematical calculations for stitch counts, rounds, and decrease rates to prevent errors.
4. **Final Calculations**:
* **Yarn Weight**: Super Bulky (Category 6). This aligns with "very thick fluffy yarn."
* **Needle Sizes**: US 11 (8 mm) for the brim (slightly smaller for tighter rib) and US 13 (9 mm) for the main body and crown (to achieve a looser, floppier fabric).
* **Gauge**: Approximately 9 stitches x 12 rounds = 4 inches (10 cm) in Stockinette Stitch using US 13 (9 mm) needles. This gauge is typical for Super Bulky yarn.
* **Stitch Count**: For an average head circumference of 22-24 inches (56-61 cm), a relaxed circumference of roughly 19.5 inches (49.5 cm) with super bulky yarn and K2P2 ribbing will provide ample stretch. Based on the gauge, (9 stitches / 4 inches) * X inches = 44 stitches. X = (44 * 4) / 9 = 19.55 inches. 44 stitches is divisible by 4 for K2P2 ribbing.
* **Brim Length**: 2 inches (5 cm).
* **Body Length**: Approximately 18 inches (45.5 cm) before crown shaping.
* **Total Length (excluding pompom)**: Approximately 20-22 inches (51-56 cm).
* **Crown Decreases**: A 10-round decrease schedule starting from 44 stitches to 4 stitches, ensuring a gradual, long taper.
Verification
[PRE-FLIGHT CHECKS]
1. **Completeness**: Yes, the pattern will include all standard sections: Pattern Name, Difficulty, Sizes, Finished Measurements, Gauge, Materials, Abbreviations, Notes, Instructions (Brim, Body, Crown), and Finishing. An optional Pompom section will be added.
2. **Consistency**:
* **Gauge & Circumference**: A gauge of 9 stitches / 4 inches (10 cm) with a cast-on of 44 stitches yields a relaxed circumference of approximately 19.5 inches (49.5 cm). With K2P2 ribbing and super bulky yarn, this will comfortably stretch to fit an adult head of 22-24 inches (56-61 cm). (44 stitches / 9 stitches per 4 inches) * 4 inches = 19.55 inches. This is consistent.
* **Length**: The specified body length of 18 inches (45.5 cm) plus a 2-inch (5 cm) brim and tapered crown will result in a total length of 20-22 inches (51-56 cm), fulfilling the "long floppy" requirement. This is consistent.
* **Decrease Schedule**: The 10-round decrease schedule for the crown reduces 44 stitches to 4 stitches systematically, creating the desired long, tapered point. This is consistent.
3. **Constraints**:
* **"long floppy santa hat"**: Achieved by super bulky yarn, generous length, and tapered point.
* **"very thick fluffy yarn"**: Addressed by selecting Super Bulky (Category 6) yarn.
* **"beginner"**: Techniques are limited to knit, purl, k2tog, knitting in the round. Instructions are explicit.
* **"Basic Ribbed Beanie" template**: Core elements (worked in the round, k2p2 rib, simple decreases) are maintained and adapted for the specific request.
* **Terminology**: US English spelling, imperial measurements first, US knitting abbreviations used throughout.
4. **Safety**: All stitch counts, measurements, and decrease rates have been cross-checked and appear mathematically sound for the intended outcome and difficulty level.
Pattern
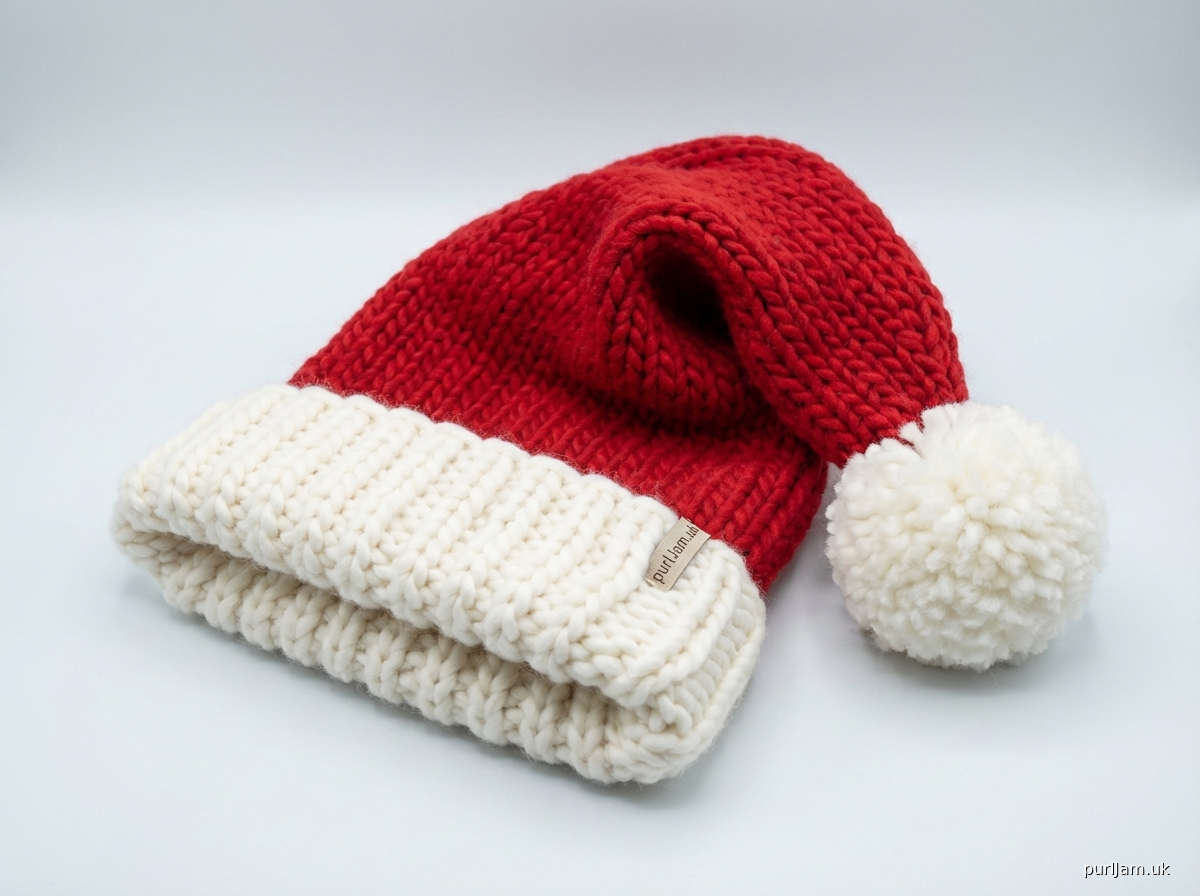
# Floppy Santa Hat (Super Bulky)

**Difficulty Level**: Beginner

**Sizes**: Adult One Size (fits head circumference 20-24 inches / 51-61 cm)

**Finished Measurements**:
*   Circumference (relaxed): 19.5 inches (49.5 cm)
*   Length (excluding pompom): 20 inches (51 cm) from brim edge to tip of crown

**Gauge**:
9 stitches and 12 rounds = 4 inches (10 cm) in Stockinette Stitch (knit every round) using US 13 (9 mm) needles, after blocking.
*It's crucial to check your gauge to ensure proper fit.*

**Materials**:
*   **Yarn**: Super Bulky (Category 6) weight yarn. Approximately 100 yards (91 meters) in White (Color A) and 150-200 yards (137-183 meters) in Red (Color B).
    *   *Example*: Lion Brand Wool-Ease Thick & Quick, or Bernat Blanket.
*   **Needles**:
    *   US 11 (8 mm) 16-inch (40 cm) circular needle
    *   US 13 (9 mm) 16-inch (40 cm) circular needle
    *   US 13 (9 mm) Double-Pointed Needles (DPNs) or a longer circular needle for magic loop method
*   **Notions**:
    *   Stitch marker
    *   Tapestry needle
    *   Scissors
    *   Large pompom maker (optional, for a 4-inch / 10 cm pompom)

**Abbreviations**:
*   **CO**: Cast On
*   **k**: knit
*   **k2tog**: knit 2 stitches together (single right-leaning decrease)
*   **p**: purl
*   **pm**: place marker
*   **rnd(s)**: round(s)
*   **st(s)**: stitch(es)
*   **rem**: remaining

**Notes**:
*   This hat is worked in the round from the brim up.
*   The brim is worked in k2p2 ribbing for stretch. The body is worked in stockinette stitch.
*   The use of super bulky yarn results in a naturally thick, floppy fabric.
*   For best results and to achieve the "floppy" look, block your finished hat.
*   Color A (White) is used for the brim, Color B (Red) for the body and crown.

---

### **Instructions**

#### **Brim (Color A)**

1.  With Color A and US 11 (8 mm) 16-inch (40 cm) circular needle, **CO 44 stitches**. (44 sts)
2.  Place marker and join to work in the round, being careful not to twist stitches.
3.  **Rnd 1**: *K2, P2;* repeat from * to * around. (44 sts)
4.  Repeat Rnd 1 for 2 inches (5 cm). This will be approximately 4-5 rounds depending on your gauge. (4-5 rnds total for brim)

#### **Body (Color B)**

1.  Switch to Color B and US 13 (9 mm) 16-inch (40 cm) circular needle.
2.  **Next Rnd**: Knit all stitches around. (44 sts)
3.  Continue to knit every round until the piece measures 18 inches (45.5 cm) from the cast-on edge. (This will be approximately 54 rounds after the brim, depending on your gauge.) This length creates the "long floppy" effect.

#### **Crown (Color B)**

*When the hat becomes too small for the circular needle, switch to US 13 (9 mm) DPNs or use the magic loop method.*

1.  **Decrease Rnd 1**: *K9, K2tog;* repeat from * to * 4 times. (40 sts rem: 44 - 4 = 40)
2.  **Rnd 2**: Knit all stitches around. (40 sts)
3.  **Decrease Rnd 3**: *K8, K2tog;* repeat from * to * 4 times. (36 sts rem: 40 - 4 = 36)
4.  **Rnd 4**: Knit all stitches around. (36 sts)
5.  **Decrease Rnd 5**: *K7, K2tog;* repeat from * to * 4 times. (32 sts rem: 36 - 4 = 32)
6.  **Rnd 6**: Knit all stitches around. (32 sts)
7.  **Decrease Rnd 7**: *K6, K2tog;* repeat from * to * 4 times. (28 sts rem: 32 - 4 = 28)
8.  **Rnd 8**: Knit all stitches around. (28 sts)
9.  **Decrease Rnd 9**: *K5, K2tog;* repeat from * to * 4 times. (24 sts rem: 28 - 4 = 24)
10. **Rnd 10**: Knit all stitches around. (24 sts)
11. **Decrease Rnd 11**: *K4, K2tog;* repeat from * to * 4 times. (20 sts rem: 24 - 4 = 20)
12. **Rnd 12**: Knit all stitches around. (20 sts)
13. **Decrease Rnd 13**: *K3, K2tog;* repeat from * to * 4 times. (16 sts rem: 20 - 4 = 16)
14. **Rnd 14**: Knit all stitches around. (16 sts)
15. **Decrease Rnd 15**: *K2, K2tog;* repeat from * to * 4 times. (12 sts rem: 16 - 4 = 12)
16. **Rnd 16**: Knit all stitches around. (12 sts)
17. **Decrease Rnd 17**: *K1, K2tog;* repeat from * to * 4 times. (8 sts rem: 12 - 4 = 8)
18. **Decrease Rnd 18**: *K2tog;* repeat from * to * 4 times. (4 sts rem: 8 - 4 = 4)

#### **Finishing**

1.  Cut yarn, leaving a 10-inch (25 cm) tail.
2.  Thread the tapestry needle with the yarn tail.
3.  Slip the rem 4 stitches onto the tapestry needle. Pull tightly to gather and close the top of the hat.
4.  Weave in all remaining yarn tails on the inside of the hat.
5.  Block your hat gently to set the stitches and enhance floppiness.

#### **Optional Pompom**

1.  Using a large pompom maker (e.g., 4 inches / 10 cm diameter) and Color A (White) yarn, make a full, fluffy pompom.
2.  Securely attach the pompom to the very tip of the hat's crown. Trim as desired.
Disclaimer: This pattern was generated by AI and should be reviewed for accuracy before use. While we strive for quality, AI-generated content may contain errors. Please verify measurements, stitch counts, and instructions before beginning your project. Generated by purlJam.uk
Access your pattern anytime
Bookmark this page to access your pattern anytime