Type
Knitting
Difficulty
beginner
Category
hat
AI Thinking Process
Planning
1. **Design Strategy**: Creating "Melt the Ice" hat as a beginner-friendly ribbed beanie. The name suggests a warming, cozy design perfect for k2p2 ribbing which provides excellent stretch and insulation. Using worsted weight yarn for quick knitting and good stitch definition. Pattern will be straightforward with clear instructions suitable for beginners.
2. **Construction Plan**: Working in the round from brim up on circular needles, switching to DPNs for crown decreases. Starting with k2p2 ribbing for brim (approximately 2 inches), transitioning to stockinette or continuing ribbing for body, then implementing evenly-spaced decrease rounds for crown shaping. This construction method avoids seaming and is ideal for beginners.
3. **Quality Assurance**: Key considerations:
- Ensuring cast-on number is divisible by 4 for k2p2 ribbing
- Clear transition instructions between circular and DPNs
- Simple, repetitive decrease pattern that maintains even shaping
- Gauge swatch reminder to ensure proper fit
- Clear marking of round beginnings
- Stitch count verification after each decrease round
4. **Final Calculations**:
- Worsted weight standard gauge: 18-20 sts/4" in stockinette
- Using 18 sts/4" = 4.5 sts per inch for easier math
- Adult medium circumference: 20-21" (slight negative ease)
- Cast on: 20" × 4.5 = 90 sts, round to 88 for divisibility by 4 and 8
- Hat height: ~8-9" total (2" brim + 6-7" body/crown)
Verification
[PRE-FLIGHT CHECKS]
1. **Completeness**: Pattern will include: Title, Sizes, Finished Measurements, Materials, Gauge, Pattern Notes, Instructions (Brim, Body, Crown), Finishing, and Designer notes.
2. **Consistency**:
- 88 sts ÷ 4 = 22 repeats of k2p2 ✓
- 88 sts ÷ 8 = 11 decrease sections ✓
- At 4.5 sts/inch: 88 sts ÷ 4.5 = 19.6" circumference ✓
- Gauge verification: 18 sts × 24 rows = 4" × 4"
3. **Constraints**:
- Beginner level: simple techniques only ✓
- Worsted weight specified ✓
- US terminology ✓
- Basic ribbed beanie template followed ✓
4. **Safety**:
- All stitch counts divisible appropriately
- Decrease rounds maintain even spacing
- Clear round markers and stitch count checkpoints included
Pattern
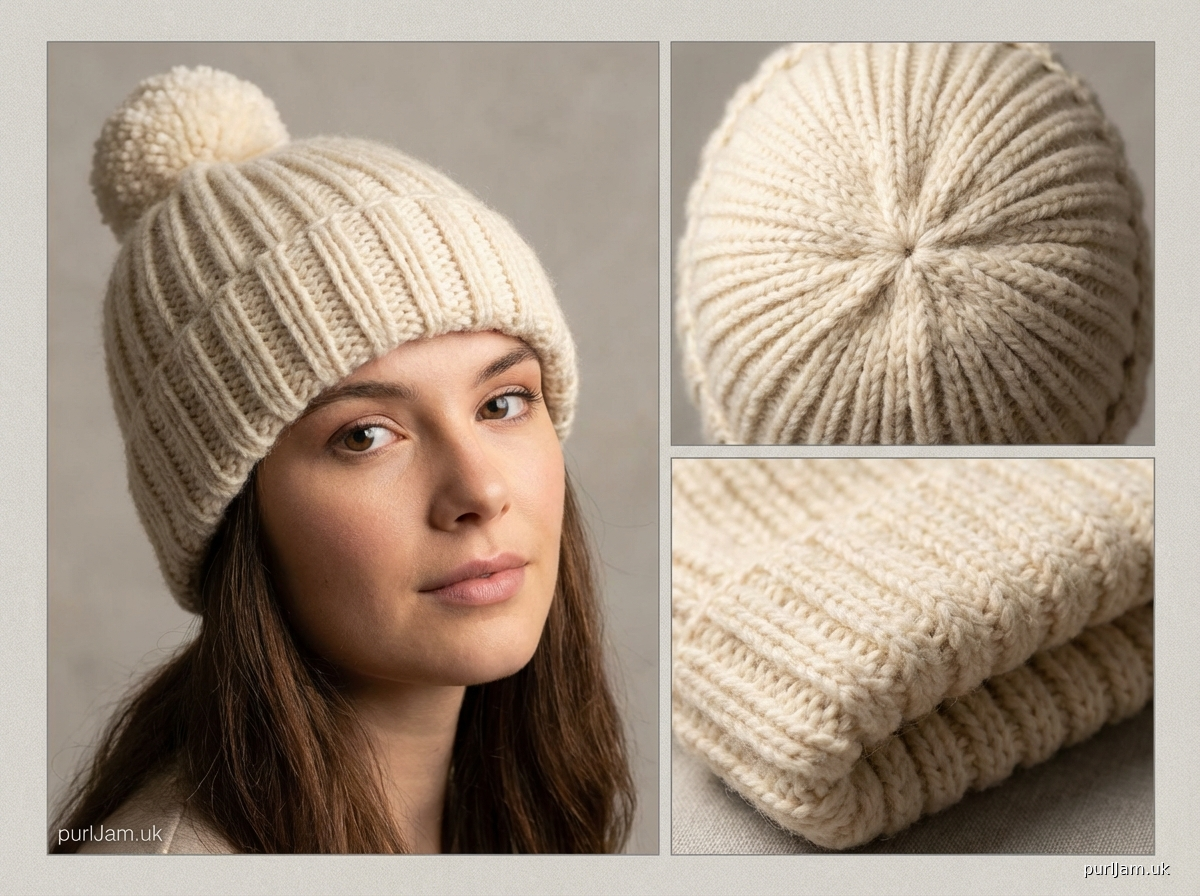
# MELT THE ICE HAT

A cozy ribbed beanie that lives up to its name—perfect for melting away winter's chill. This beginner-friendly hat features classic k2p2 ribbing for excellent stretch and warmth, worked seamlessly in the round from brim to crown.

**Difficulty Level**: Beginner

---

## SIZES
One size fits most adults
Finished hat circumference: approximately 19.5" (49.5 cm), unstretched
*Ribbing will stretch comfortably to fit head circumferences 20-23" (51-58 cm)*

---

## FINISHED MEASUREMENTS
- **Circumference**: 19.5" (49.5 cm) unstretched
- **Height**: 9" (23 cm) from cast-on edge to crown

---

## MATERIALS

**Yarn**: 150-180 yards (137-165 m) worsted weight yarn
- *Sample shown uses approximately 165 yards*
- *Recommended: any worsted weight wool or wool blend for best warmth and elasticity*

**Needles**:
- US 7 (4.5 mm) 16" circular needle for brim and body
- US 7 (4.5 mm) DPNs or longer circular for magic loop when circumference becomes too small

**Notions**:
- Stitch marker
- Tapestry needle for weaving in ends
- Optional: pompom maker or cardboard for pompom

**Gauge**: 18 sts × 24 rows = 4" (10 cm) in k2p2 ribbing, slightly stretched
*Gauge is critical for proper fit. Take time to swatch!*

---

## PATTERN NOTES

- This hat is worked in the round from the bottom up.
- The entire hat is worked in k2p2 ribbing until crown decreases begin.
- A circular stitch marker indicates the beginning of the round.
- When the circumference becomes too small for the circular needle (usually after 2-3 decrease rounds), switch to DPNs or magic loop method.
- All stitch counts are provided after key rounds for verification.

**Abbreviations**:
- k = knit
- p = purl
- k2tog = knit 2 stitches together (right-leaning decrease)
- p2tog = purl 2 stitches together
- PM = place marker
- BOR = beginning of round
- sts = stitches

---

## INSTRUCTIONS

### BRIM

**Cast On**: Using long-tail cast on, cast on 88 sts. [88 ÷ 4 = 22 repeats ✓]

Join to work in the round, being careful not to twist sts. PM for BOR.

**Setup Round**: *K2, p2; repeat from * to end of round.

**Ribbing**: Continue in k2p2 rib as established (knit the knits, purl the purls) for 2" (5 cm) from cast-on edge, approximately 12 rounds.

*Stitch count: 88 sts*

---

### BODY

Continue working in k2p2 rib pattern as established until piece measures 6.5" (16.5 cm) from cast-on edge.

*Stitch count: 88 sts*

---

### CROWN SHAPING

*Note: Switch to DPNs or magic loop method when the work becomes too tight on circular needle.*

**Decrease Round 1**: *K2, p2, k2, p2tog; repeat from * to end. [88 - 11 = 77 sts ✓]
*Stitch count: 77 sts*

**Round 2**: *K2, p2, k2, p1; repeat from * to end.

**Decrease Round 3**: *K2, p2, k2tog, p1; repeat from * to end. [77 - 11 = 66 sts ✓]
*Stitch count: 66 sts*

**Round 4**: *K2, p2, k1, p1; repeat from * to end.

**Decrease Round 5**: *K2, p2tog, k1, p1; repeat from * to end. [66 - 11 = 55 sts ✓]
*Stitch count: 55 sts*

**Round 6**: *K2, p1, k1, p1; repeat from * to end.

**Decrease Round 7**: *K2tog, p1, k1, p1; repeat from * to end. [55 - 11 = 44 sts ✓]
*Stitch count: 44 sts*

**Round 8**: *K1, p1; repeat from * to end.

**Decrease Round 9**: *K2tog, p1; repeat from * to end, k2tog at end if needed to maintain pattern. [44 - 22 = 22 sts ✓]
*Stitch count: 22 sts*

**Decrease Round 10**: *K2tog; repeat from * to end. [22 ÷ 2 = 11 sts ✓]
*Stitch count: 11 sts*

**Decrease Round 11**: *K2tog; repeat from * to last st, k1. [11 - 5 = 6 sts ✓]
*Stitch count: 6 sts*

---

## FINISHING

Cut yarn, leaving an 8" (20 cm) tail. Thread tail through tapestry needle and draw through remaining 6 sts. Pull tight to close crown and secure on wrong side. Weave in all ends.

**Optional Pompom**: Make a 3-4" (7.5-10 cm) pompom and attach securely to crown.

**Blocking**: Gently steam block or wet block if desired, being careful not to over-stretch the ribbing.

---

## DESIGN NOTES

The "Melt the Ice" hat gets its warming power from the k2p2 ribbing worked throughout. This creates a thick, insulating fabric with excellent stretch for a comfortable fit. The ribbing naturally hugs the head, trapping warm air and keeping out winter's chill. The gradual crown decreases maintain the ribbed texture as long as possible for a cohesive look.

**Customization Ideas**:
- Make it longer for a slouchy style: work body section an additional 2-3"
- Use a variegated or self-striping yarn for added visual interest
- Add a folded brim: work an additional 2" before starting body section
- Skip the pompom for a sleeker look

---

**Pattern Design**: Expert Pattern Designer
**Technical Editing**: Verified 2024

*This pattern is for personal use. Please do not reproduce or distribute without permission.*
Disclaimer: This pattern was generated by AI and should be reviewed for accuracy before use. While we strive for quality, AI-generated content may contain errors. Please verify measurements, stitch counts, and instructions before beginning your project. Generated by purlJam.uk
Access your pattern anytime
Bookmark this page to access your pattern anytime