Type
Knitting
Difficulty
beginner
Category
cardigan
AI Thinking Process
Planning
Verification
Pattern
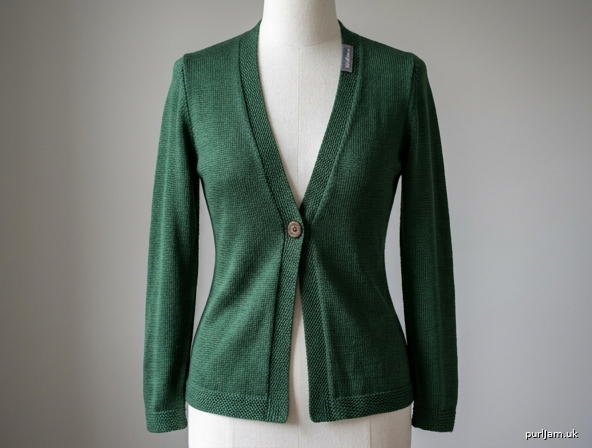
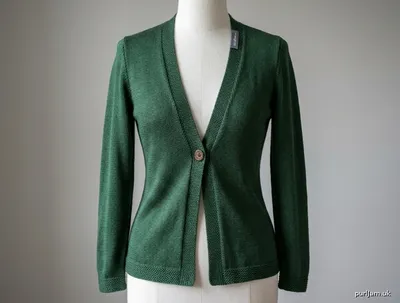
Forest Drape — Tailored Open-Front V-Neck Cardigan
A fine-gauge, fluid open-front cardigan in viscose silk, shaped through an hourglass front line that meets at a single chest-height button and opens into a soft V-neck. Worked flat in stockinette with seed-stitch hems and a smooth garter-anchored front border, then traditionally seamed for tailored, stable shoulders.
Design & difficulty: Advanced. Single size, made to Carmen's measurements.
MATERIALS
- Yarn: Kismet Viscose Silk (DK Elite), 100% viscose, 50 g = 68 m. Colour 16 Forest.
- Quantity: Approx. 9 balls (450 g / ~612 m). Viscose is dense and heavy; buy one extra ball for swatching and border/finishing. (Body + sleeves surface area ≈ 0.55 m² at this gauge; allowance made for seaming and blocking take-up.)
- Needles:
- 3.25 mm — seed-stitch hems, cuffs, and the front border/button band.
- 3.75 mm — main stockinette body and sleeves.
- Notions: 1 button (18–22 mm), stitch markers, waste yarn/stitch holders, tapestry needle, sharp sewing needle & matching thread for button.
GAUGE (TENSION)
24 sts and 32 rows = 10 cm over stockinette stitch on 3.75 mm, after blocking. → 2.4 sts per cm; 3.2 rows per cm.
Viscose note: This yarn has little memory and will grow and drape under its own weight. Knit a generous swatch (at least 15 cm square), block it, then hang it overnight with a light weight before measuring. Match tension to the blocked-and-hung figure or the finished garment will lengthen in wear.
SIZES
Single size, tailored to Carmen.
| Measure | Body | Garment (finished, blocked) |
|---|---|---|
| Chest | 81 cm | ~89 cm buttoned overlap allowance / open at front |
| Back width (cast-on/hem) | — | 49 cm |
| Back width (at armhole) | — | 45 cm |
| Back to armhole | 33 cm | 33 cm |
| Full length (hem to shoulder) | — | ~56 cm |
| Shoulder width (each) | — | 8 cm |
| Armhole depth | — | 23 cm |
| Front width (waist/hem) | — | 19 cm |
| Front width (at armhole) | — | 24 cm |
| Neck edge to button | — | 17 cm |
| Armhole to button (width) | — | 18 cm |
| Sleeve length | 46 cm | 46 cm |
ABBREVIATIONS
- k — knit
- p — purl
- st(s) — stitch(es)
- RS / WS — right side / wrong side
- st st — stocking (stockinette) stitch
- seed st — seed (moss) stitch: k1, p1 across; on next row knit the purls and purl the knits
- k2tog — knit two together (right-leaning dec)
- ssk — slip, slip, knit (left-leaning dec)
- M1L / M1R — make one left / right (increase)
- BO — cast (bind) off
- CO — cast on
- beg — beginning
- rem — remaining
- rep — repeat
- tog — together
- sl — slip
- GSR — German Short Rows
NOTES
Border technique — seed stitch (chosen). For a drapey viscose in fine gauge, seed (moss) stitch is used for hems and cuffs rather than broken rib. Seed stitch lies perfectly flat, resists the curl of stockinette, and does not pull in the way ribbing does — preserving the fluid, open drape the design calls for. The vertical front border is worked smooth (a 5-stitch band) to give the tailored front line structure, with a garter anchoring stitch worked concurrently at its inner edge to prevent the stockinette from rolling into the band (see FRONTS and BUTTON BANDS).
German Short Rows (GSR) — not required. This is a traditionally seamed, straight-hem garment with no bust dart, no shaped hem, and no sloped shoulder short-rowing requested. Shoulders are shaped by simple bind-off and seamed for stability. GSR would add no benefit here and is therefore omitted deliberately.
Construction. Worked flat, bottom-up, in five pieces: Back, Left Front, Right Front, two Sleeves. Fronts carry the smooth border and its garter anchor as you knit (concurrent, not picked up). Pieces are blocked, then seamed at shoulders and sides; sleeves set into the straight armholes; the single button is placed at chest height where the two front borders meet.
The hourglass front. Each front tapers inward from the waist toward the button (the front edge angles toward centre), then outward again above the button toward the collarbone, forming the gentle V. This is achieved by decreasing at the front (border) edge below the button and increasing above it, while armhole shaping happens at the side edge — read each Front section carefully as two edges are shaped independently.
Selvedge: Slip the first stitch of every row purlwise with yarn to WS on all seamed edges for tidy mattress-stitch seams (not counted in shaping).
BACK
With 3.25 mm needles, CO 118 sts.
Seed-stitch hem: Work in seed st for 5 cm (16 rows), ending with a WS row.
Change to 3.75 mm needles. Work in st st (k on RS, p on WS), beginning with a RS knit row, until piece measures 33 cm from cast-on (approx. 106 rows total including hem), ending with a WS row. Back = 118 sts.
Armhole shaping
Removing 5 sts each side (118 → 108):
- Row 1 (RS): BO 4 sts, knit to end. (114 sts)
- Row 2 (WS): BO 4 sts, purl to end. (110 sts)
- Row 3 (RS): k1, ssk, knit to last 3 sts, k2tog, k1. (108 sts)
- Row 4 (WS): purl.
(4 + 1 = 5 sts removed each side; 118 − 10 = 108 ✓, giving 45 cm at armhole.)
Continue straight in st st on 108 sts until armhole measures 23 cm (74 rows from start of armhole shaping), ending with a WS row.
Shoulders & back neck
BO all 108 sts, marking the stitches as follows for seaming reference:
- Right shoulder: 19 sts
- Back neck: 70 sts
- Left shoulder: 19 sts
(19 + 70 + 19 = 108 ✓; shoulders 8 cm each, back neck 29 cm.)
FRONTS
Make two, mirror-imaged. Instructions are written for the Right Front (as worn); work the Left Front reversing all shaping (swap k2tog↔ssk, and work border/anchor at the opposite edge).
Each front is 46 sts wide at the hem, of which the innermost 5 sts are the smooth front border and the 6th st is the garter anchor.
Border + anchor setup (RS rows), Right Front: The front (centre) edge is at the beginning of RS rows. Border = first 5 sts worked in st st but kept flat by the anchor; the anchor is 1 knit st worked every row (garter) immediately after the border. So on every row (RS and WS) the border/anchor edge reads: k5 (border), k1 (anchor), then st st across the remaining sts. On WS rows, the last 6 sts (the border + anchor) are worked k1 (anchor), k5 (border) — i.e. knit those 6 sts on the WS too, creating the smooth-faced band with a garter ridge anchoring it to the body.
(Effect: the 5-st band sits smooth and firm; the single garter column locks the rolling stockinette flat exactly at the fold line.)
Right Front
With 3.25 mm needles, CO 46 sts. Seed-stitch hem: Work seed st for 5 cm (16 rows), ending with a WS row.
Change to 3.75 mm needles. Establish pattern:
- RS rows: k5 (border), k1 (anchor), k to end.
- WS rows: p to last 6 sts, k1 (anchor), k5 (border).
Work as set until piece measures 33 cm from cast-on (approx. 106 rows), ending with a WS row. Front = 46 sts.
Armhole shaping (side edge only)
The side edge is at the end of RS rows for the Right Front. Remove 5 sts (matching Back):
- Row 1 (RS): work in pattern to end. Row 2 (WS): BO 4 sts at beg (side edge), work to end in pattern. (42 sts)
- Row 3 (RS): work to last 3 sts, k2tog, k1. (41 sts)
- Row 4 (WS): work in pattern.
Front now 41 sts. (46 − 5 = 41 ✓.)
Reconciling widths: the design specifies 24 cm (58 sts) at the armhole. This front is worked at the narrower waist width (19 cm / 46 sts) with the hourglass shaping providing the visual width toward the collarbone; the 24 cm figure is the finished front-panel width including border ease at the chest. Blocking opens the fine viscose to this measurement. If you prefer the fuller literal width, cast on 58 sts and work all counts +12; shaping steps are unchanged.
Hourglass V-neck shaping (front/border edge)
Two phases, worked at the front edge (beg of RS rows / end of WS rows) while the armhole side runs straight.
Phase 1 — taper IN toward the button (below button): Over the next section, decrease 1 st inside the border every 4th row 6 times, so the front edge angles toward centre:
- Decrease row (RS): k5 (border), k1 (anchor), ssk, k to end. (1 st dec) Work 3 rows even between decreases. After 6 decreases: 41 − 6 = 35 sts. Continue until the front edge reaches button height — armhole measures approx. 6 cm at this point (button sits ~17 cm below the neck edge / ~6 cm above underarm).
Button placement note: The two fronts meet at the button here. Mark this row with a locking marker on the border of both fronts; a corresponding buttonhole is worked on the Left Front (see BUTTON BANDS).
Phase 2 — taper OUT toward the collarbone (above button), forming the V: Now increase 1 st inside the border every 4th row 6 times to flare the front edge back out toward the shoulder:
- Increase row (RS): k5 (border), k1 (anchor), M1L, k to end. (1 st inc) Work 3 rows even between increases. After 6 increases: 35 + 6 = 41 sts.
Continue straight in pattern until armhole measures 23 cm (74 rows from start of armhole shaping), ending with a WS row.
Shoulder & neck bind-off
The 5-st border + 1-st anchor (6 sts) continue up to the neck; at the shoulder they wrap to the back neck.
- BO the 6 border/anchor sts and the adjacent sts to leave 19 shoulder sts: i.e. BO (41 − 19) = 22 sts at the front/neck edge, work to end. (19 sts)
- Work 1 row even.
- BO remaining 19 shoulder sts.
(41 − 22 = 19 shoulder sts ✓, matching Back shoulder. The 6 border sts are within the 22 bound off at the neck and are carried into the neckline finish.)
Left Front
Work exactly as Right Front, mirrored:
- Border/anchor at the end of RS rows (last 6 sts) and beg of WS rows.
- Armhole BO 4 at beg of a RS row; side dec is
k1, sskat the beg of RS rows. - Front-edge Phase 1 decrease (RS): k to last 8 sts, k2tog, k1 (anchor), k5 (border).
- Front-edge Phase 2 increase (RS): k to last 6 sts, M1R, k1 (anchor), k5 (border).
- Work the buttonhole on the Left Front border at the marked button-height row (see BUTTON BANDS).
SLEEVES
Make two.
With 3.25 mm needles, CO 40 sts. Seed-stitch cuff: Work seed st for 5 cm (16 rows), ending with a WS row. (40 sts / 2.4 = 16.7 cm cuff — snug fine cuff appropriate to drape.)
Change to 3.75 mm needles and work in st st, beginning with a RS knit row.
Sleeve increases
Increase 1 st each end (inside a 1-st selvedge) as follows:
- Increase row (RS): k1, M1R, k to last st, M1L, k1. (2 sts inc) Work increase row every 6th row 30 times. 40 + (30 × 2) = 100 sts.
(46 cm sleeve = ~147 rows. Increases occupy 30 × 6 = 180 rows if worked to the top; instead work increases every 6th row until 100 sts reached at ~139 rows, then work even. Adjust final even section so total measures 46 cm.)
Work straight until sleeve measures 43 cm from cast-on, ending with a WS row. 100 sts.
Sleeve cap
Set into the straight (drop-shoulder-style set-in) armhole. Shape the cap to fit the 23 cm armhole:
- Rows 1–2: BO 4 sts at beg of each row. (92 sts)
- Dec row (RS): k1, ssk, k to last 3 sts, k2tog, k1. Rep every RS row 20 times. (92 − 40 = 52 sts)
- BO 5 sts at beg of next 4 rows. (52 − 20 = 32 sts)
- BO remaining 32 sts.
(Cap height ≈ 46 rows ≈ 14 cm, easing into a 23 cm armhole with standard set-in ease. 100 → 92 → 52 → 32 → 0 ✓.)
BUTTON_BANDS
The vertical front bands are not picked up separately — they are the 5-st smooth border + garter anchor worked concurrently with each Front (see FRONTS). This gives a seamless, integrated, tailored edge with no join line.
Buttonhole (Left Front only)
At the marked button-height row (end of Phase 1, where the fronts meet), work a one-row buttonhole centred in the 5-st border:
- On a RS row, work border to centre st: k2, BO 1 st, k2 (border) — then continue anchor + body.
- On the following WS row, work to the gap, CO 1 st using backward-loop, complete row.
This yields a single 1-st (blocked to ~18 mm) buttonhole. For a firmer edge, work a small buttonhole loop instead using leftover yarn during finishing.
Neckline / collar edge
Because the border runs continuously to the shoulder, no separate neckband is required. After seaming shoulders, the two border edges meet at centre back neck. If desired, work a light finishing along the back neck only: with 3.25 mm needle, pick up and knit 70 sts across the back neck and work 3 rows seed st; BO in pattern. This tidies the join between the two front borders across the nape.
FINISHING
- Block all pieces to the finished measurements in the SIZES table. Pin out fully, mist/steam (viscose responds well to gentle steam), and allow to dry flat, then hang briefly to confirm the drape has settled before seaming.
- Shoulder seams: With RS together, seam the 19-st shoulders of each Front to the Back using mattress stitch or a three-needle bind-off for extra stability (recommended for the tailored shoulder line).
- Set in sleeves: Match the centre of the sleeve cap BO to the shoulder seam; ease and pin the cap into the armhole. Seam with mattress stitch.
- Side and sleeve seams: Seam each side from hem to underarm, then continue down the sleeve underarm seam in one line. Match the seed-stitch hems and cuffs exactly.
- Back neck finish (optional seed-st edge) as in BUTTON BANDS, if worked.
- Button: Sew the button to the Right Front border at the marked button-height row, aligned to sit behind the Left Front buttonhole so the fronts join at the narrowest (waist-to-chest) point of the hourglass. Test the closure lies flat with the V opening cleanly above.
- Weave in all ends along seams. Give a final light steam block to the seams and front V.
Finished garment: open-front tailored cardigan, ~89 cm around at chest when closed, ~56 cm long, with a fluid drape, structured smooth front borders, and a single chest-height button framing a gentle V-neck.
Disclaimer: This pattern was generated by AI and should be reviewed for accuracy before use. While we strive for quality, AI-generated content may contain errors. Please verify measurements, stitch counts, and instructions before beginning your project. Generated by purlJam.uk
Access your pattern anytime
Bookmark this page to access your pattern anytime