Type
Knitting
Difficulty
beginner
Category
blanket
AI Thinking Process
Planning
Verification
Pattern
Four-Panel Keepsake Picture Blanket
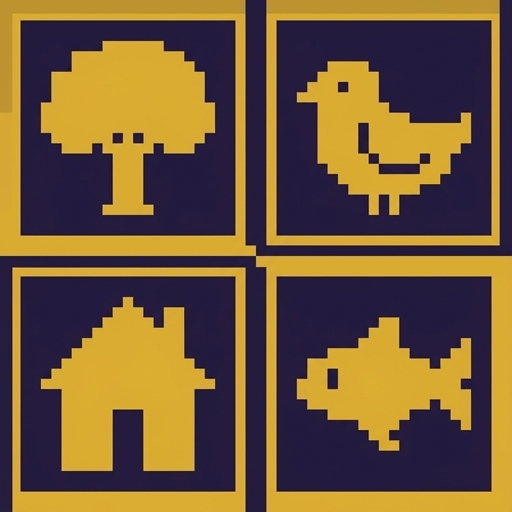
A beginner garter-stitch baby blanket made from four identical rectangles. When the pieces are joined, the fronts form one picture (follow the attached stitch chart). Flip any single piece over and a name or small motif on the reverse makes that square a keepsake of its own.
Skill level: Beginner. The fabric is knit every row. The picture and names are added afterward with duplicate stitch (yarn embroidery on the knitted surface).
Finished measurements
Each panel (blocked): 15 × 18 in (38 × 45.5 cm)
Assembled picture field: 30 × 36 in (76 × 91.5 cm)
With optional border: approximately 32 × 38 in (81.5 × 96.5 cm)
Materials
Yarn: Worsted weight (CYC 4), soft and machine-washable (superwash wool, acrylic, or cotton blend). Do not use novelty yarns, beads, buttons, or other detachable trims on a baby blanket.
- MC (main color, all four panels): 1100 yd / 1005 m
- Chart contrast colors: as shown on the attached chart color key; allow 50–100 yd / 45–90 m of each contrast color used
- Personalization color (names/small reverse motifs): 50 yd / 45 m (may be one of the chart colors)
A 30 × 36 in worsted garter field uses about 1100 yd of MC. Four equal panels share that yardage (about 275 yd / 250 m each).
Needles: US 8 / 5 mm, straight or 24 in (60 cm) circular, or size needed to obtain gauge.
Notions:
- Tapestry needle
- Scissors
- Four locking stitch markers or safety pins (to label Panels 1–4)
- Blocking mats and pins
- Optional: embroidery hoop to steady the fabric while duplicate-stitching
Gauge
18 stitches and 36 rows = 4 in (10 cm) in garter stitch (knit every row), blocked.
Work a swatch at least 6 × 6 in (15 × 15 cm), bind off, wet-block, and measure the center 4 in. Change needle size if needed until gauge matches. Garter row gauge is easy to count as ridges: 18 ridges = 36 rows = 4 in.
Abbreviations (US)
BO — bind off CC — contrast color CO — cast on in — inches k — knit MC — main color RS — right side (picture side) st(s) — stitch(es) WS — wrong side (personalized reverse) yd — yards
Pattern notes
- Knit every row. Both sides of garter stitch look similar; decide now which side is RS (picture) and mark it with a removable marker on Row 1 of each panel.
- The four panels are the same size and the same stitch count so the picture lines up. Do not change needle size, row count, or bind-off tightness between panels.
- Label each panel as soon as it is bound off: Panel 1 = top left, Panel 2 = top right, Panel 3 = bottom left, Panel 4 = bottom right, with the picture side facing you and the 15 in edges running left–right.
- Names and small reverse pictures are worked on the WS of each panel after blocking and before seaming, in a quiet corner so they do not share stitches with the front picture.
- Weave in ends as you go. For baby items, tie no bulky knots on the surface.
Attached Stitch Chart
Use the separate attached chart panel that accompanies this pattern for the visual grid. There is no stitch chart printed in these written instructions.
Where to find it: The chart is the attached visual panel supplied with this pattern (the chart asset, not this text). Keep it beside you while you assign quadrants, while you duplicate-stitch the picture, and again when you seam the four pieces so the image matches.
How to read the chart for this project:
- This blanket is knitted in garter stitch first. The attached chart is applied after knitting, in duplicate stitch, onto the RS of the four panels.
- Each chart square equals one knitted stitch.
- Read the chart from bottom to top. Within each row, read from right to left for the picture side (the same direction as a RS knit row).
- If the chart is divided into four quadrants, those quadrants map directly onto Panels 1–4 as labeled above.
- If the chart uses more than one color, follow the attached color key. Complete one color area at a time. Do not strand long floats across the reverse of a panel; start a new length of yarn for each separate color area and weave the tails into the same color on the WS.
- Color changes happen only in the duplicate-stitch layer. The knitted panels themselves stay in MC (knit every row, no color changes while knitting).
Stitch-count integration:
- Each panel is 68 sts wide and 162 rows tall.
- Two panels side by side = 68 + 68 = 136 sts wide (✓).
- Two panels stacked = 162 + 162 = 324 rows tall (✓).
- If the attached chart is the full combined picture, it corresponds to that 136-st × 324-row field. Work the matching quadrant on each panel (Panel 1: sts 1–68 of chart rows 163–324; Panel 2: sts 69–136 of chart rows 163–324; Panel 3: sts 1–68 of chart rows 1–162; Panel 4: sts 69–136 of chart rows 1–162 — with chart row 1 at the bottom edge of the finished picture).
- If the attached chart is a smaller motif rather than a full-field image, center it on the combined 136 × 324 field, or center one motif on each panel: leftover stitches on a panel = 68 minus the chart width; place half the leftover stitches on each side (if the leftover count is odd, put the extra stitch toward the outer edge of the blanket). Leftover rows = 162 minus the chart height; place them evenly above and below, extra row toward the outer edge if needed.
Instructions
Panels 1–4 (make four, identical)
With MC, CO 68 sts.
Row 1 (RS): Knit. Row 2 (WS): Knit.
Repeat Rows 1–2 until 162 rows have been worked (81 garter ridges), ending after a WS row.
Check as you go:
- Width: 68 sts × 4 in ÷ 18 sts = 15.1 in (✓) after blocking.
- Length: 162 rows × 4 in ÷ 36 rows = 18 in (✓) after blocking.
BO knitwise, keeping the bind-off as elastic as the fabric. Cut yarn, leaving a 24 in (60 cm) tail for seaming if you like, or a 6 in (15 cm) tail to weave in if you will seam with a separate length.
Label the panel (1, 2, 3, or 4), mark the RS, and set aside. Work the remaining three panels the same way.
Block
Wet-block each panel to 15 × 18 in (38 × 45.5 cm). Pin the corners square. Let dry completely. Matching measurements now is what makes the four pieces form one picture later.
Front picture (duplicate stitch)
With RS facing, duplicate-stitch the attached chart onto the four blocked panels, one quadrant (or centered motif) per panel as described in Attached Stitch Chart.
Duplicate stitch (beginner): Thread a tapestry needle with a length of contrast yarn no longer than about 18 in (45 cm) to prevent twisting. Bring the needle up at the base of a knit stitch, follow the two legs of that stitch up and over the top, and return down through the same base hole, covering the MC stitch. Work to chart. Weave ends on the WS into the backs of the same-color stitches.
Do not pull tight; the covered stitch should lie at the same height as the garter ridges around it.
Reverse of each piece (name or small picture)
Turn each panel to the WS. In a quiet corner (lower outer corner of that panel is ideal — away from busy chart stitches), add one of the following in personalization color:
- A name, initial, or short word (baby, parent, grandparent, pet, or a quality you want that piece to carry)
- A birth date or year
- A very small motif (heart, star, or simple flower), no larger than about 2 × 2 in (5 × 5 cm)
Use duplicate stitch or backstitch embroidery. Keep the work on the WS only. If a reverse stitch would land on the back of a front-picture stitch, shift the name a few stitches toward the edge.
Each piece is now meaningful on its own: the four fronts will become one picture, and each back holds its own name or small image.
Join the four pieces
Lay the panels RS up in a 2 × 2 grid:
Panel 1 (top left)     Panel 2 (top right)
Panel 3 (bottom left)  Panel 4 (bottom right)
Confirm the attached chart forms one continuous picture across the seams. Adjust if a panel was rotated.
With MC and a tapestry needle, join Panel 1 to Panel 2 along the 18 in edges using garter mattress stitch (pick up the bump at the end of each ridge on both edges, one ridge at a time). Join Panel 3 to Panel 4 the same way. Then join the two strips along the 30 in center seam (Panel 1/2 to Panel 3/4), matching ridges.
Seam check: 81 ridges + 81 ridges = 162 ridges along each 36 in outer side (✓). Cast-on/bind-off edges of two panels = 68 + 68 = 136 sts along each 30 in outer side (✓).
Optional garter border
With RS facing, MC, and US 8 / 5 mm circular needle, pick up and knit around the assembled blanket:
- Top edge: 136 sts (68 + 68 = 136 ✓)
- Right side: 162 sts (1 st per ridge; 81 + 81 = 162 ✓)
- Bottom edge: 136 sts
- Left side: 162 sts
- Plus 4 corner sts (1 in each corner)
Place a marker in each of the 4 corner stitches.
Border round/row note: Work back and forth or in the round. For a flat picked-up border worked in the round on a circular needle: knit every round. At each corner, kfb in the marked corner stitch every other round (the increase rounds) so the border lies flat. For a simpler beginner finish, knit every round with no corner increases for only 6 rounds — the border will cup slightly and can be blocked flat.
Work 8 rows/rounds of garter (4 ridges). 8 rows × 4 in ÷ 36 rows = 0.9 in of border each side (✓).
BO knitwise, loosely. Finished size with border ≈ 32 × 38 in (81.5 × 96.5 cm).
Finishing
Weave in remaining ends on the WS. Steam- or wet-block the completed blanket to finished measurements, squaring the outer edges and the center seams so the picture sits flat.
Care: Follow the yarn label. For most worsted baby yarns: machine wash gentle, cold; lay flat to dry.
Using the pieces: The blanket is meant to be used joined. Until it is seamed (or if you ever take a seam out), each 15 × 18 in panel is a complete, named square — a small picture on the reverse, and one-quarter of the larger picture on the front.
Disclaimer: This pattern was generated by AI and should be reviewed for accuracy before use. While we strive for quality, AI-generated content may contain errors. Please verify measurements, stitch counts, charts, and instructions before beginning your project. Generated by purlJam.uk
Love this pattern?
Save this pattern to your free PurlJam libraryAccess your pattern anytime
Bookmark this page to access your pattern anytime